Alibaba Cloud Mobile Push + uni-app best practices
Introduction
uni-app is a framework based on Vue.js. It allows developers to write one set of code and publish it to iOS, Android, web, various mini programs such as WeChat and Alipay, and quick apps.
Mobile Push is a basic feature that most mobile applications require. However, directly integrating native Mobile Push SDKs can be complex for uni-app developers. To simplify this process, we provide plugins for Alibaba Cloud Mobile Push that are designed for uni-app.
Alibaba Cloud Mobile Push: The Alibaba Cloud Mobile Push plugin supports Android and iOS. It allows developers to easily integrate mobile push features.
Alibaba Cloud Mobile Push - Vendor Channel: An extension package for Android vendor channels. It must be used with the Alibaba Cloud Mobile Push plugin to enhance push capabilities.
Using these plugins, uni-app developers can implement mobile push features more quickly and easily without needing to handle complex native integration issues.
Prerequisites
Ensure that you have created a project and an application in the EMAS console. For more information, see Quick Start.
1. Get vendor channel push parameters
Xiaomi
Log on to the Xiaomi Open Platform and navigate to the Push Operation Platform. Then, create an application and enable its push service.
Log on to the Xiaomi Developer Platform to obtain the AppID, AppKey, and AppSecret for your registered application.
Log on to the EMAS Mobile Push console and set your Xiaomi push key (AppSecret). For more information, see Configure vendor channel keys.
Huawei
Log on to the HUAWEI Developers platform and register your application. Obtain the AppID and AppSecret from the application information.
Configure the SHA256 certificate fingerprint for your application on the HUAWEI Developers platform. For more information, see the Configuring App Information in AppGallery Connect document.
Configure message receipts for push notifications. For more information, see the Receipt document. Set the message receipt address to
https://amspush-ack.aliyuncs.com/hw/.Log on to the EMAS Mobile Push console and set your Huawei push keys (AppID, AppSecret, and default receipt ID). For more information, see Configure vendor channel keys.
Honor
Log on to HONOR Developers and register your application. Navigate to Application Services > Push Service > View Application to obtain the AppID, ClientID, and ClientSecret.
Configure the signing certificate fingerprint on the HONOR Developers platform. For more information, see the Certificate Fingerprint Generation Guide document.
Configure message receipts for push notifications. For more information, see the Message Receipt document. Set the message receipt address to
https://amspush-ack.aliyuncs.com/ho/.Log on to the EMAS Mobile Push console and set your Honor push key (AppID). For more information, see Configure vendor channel keys.
vivo
Log on to the vivo Open Platform and register your application. Obtain the AppID, AppKey, and AppSecret from the application information.
On the vivo Open Platform, in the application information, enable the APP receipt address. Set the message receipt address to
https://amspush-ack.aliyuncs.com/vivo/.Log on to the EMAS Mobile Push console and set your vivo push keys (AppID, AppSecret, and default receipt ID). For more information, see Configure vendor channel keys.
OPPO
Log on to the OPPO Open Platform and register your application in the push service. In Configuration Management > Application Configuration, obtain the AppKey, AppSecret, and MasterSecret.
Log on to the EMAS Mobile Push console and set your OPPO push keys (AppKey and MasterSecret). For more information, see Configure vendor channel keys.
Meizu
Log on to the Meizu Open Platform and register your application in the Meizu push service. Obtain the AppID and AppSecret from the application information.
On the Meizu push platform, in the application list, click your application. Navigate to the Configuration Management > Receipt Management page and configure the receipt link. Set the message receipt addresses to
http://amspush-ack.aliyuncs.com/mz/andhttps://amspush-ack.aliyuncs.com/mz/.Log on to the Mobile Push console and set your Meizu push keys (AppID and AppSecret). For more information, see Configure vendor channel keys.
Log on to Firebase to create a project. After the project is created, open the project, add an application, and download the google-services.json file for the application. Record the values for the "project_number", "mobilesdk_app_id", "project_id", and "current_key" keys in the google-services.json file. These correspond to sendId, applicationId, projectId, and apiKey, respectively.
In the Firebase console, navigate to Project settings > Service accounts to generate and download the private key file.
Log on to the EMAS Mobile Push console and upload the FCM service account key JSON file that you generated and downloaded from the Firebase console. For more information, see Configure vendor channel keys.
For more information about vendor channel configuration, see the following documents:
Xiaomi vendor channel integration
Huawei vendor channel integration
Honor vendor channel integration
vivo vendor channel integration
OPPO vendor channel integration
2. Get the demo (optional)
In the DCloud plugin marketplace, click Download Sample Code ZIP to obtain the demo for integrating Alibaba Cloud Mobile Push with uni-app.
3. Configure plugin dependencies and push parameters
Plugin dependencies
uni-app supports two methods for adding plugin dependencies: cloud plugins and local plugins. The following sections describe how to add dependencies for the Alibaba Cloud Mobile Push plugin and the Alibaba Cloud Mobile Push - Vendor Channel extension.
Cloud plugin dependencies
In the DCloud plugin marketplace, click
Purchase (CNY 0) for Cloud Packagingto purchase the Alibaba Cloud Mobile Push plugin and the Alibaba Cloud Mobile Push - Vendor Channel plugin.
Select the project for which you are purchasing the plugin.
Enter the application package name.
In the project's manifest.json file, click
Select Cloud Plugin.
From the cloud plugin list, select the
Alibaba Cloud Mobile Pushplugin and theAlibaba Cloud Mobile Push - Vendor Channelplugin.
Add a dependency on a local plugin
In the DCloud plugin marketplace, click
Download for Offline Packagingto download the Alibaba Cloud Mobile Push plugin package and the Alibaba Cloud Mobile Push - Vendor Channel plugin package.
Decompress the downloaded plugin packages and place them in the nativeplugins folder of your project.
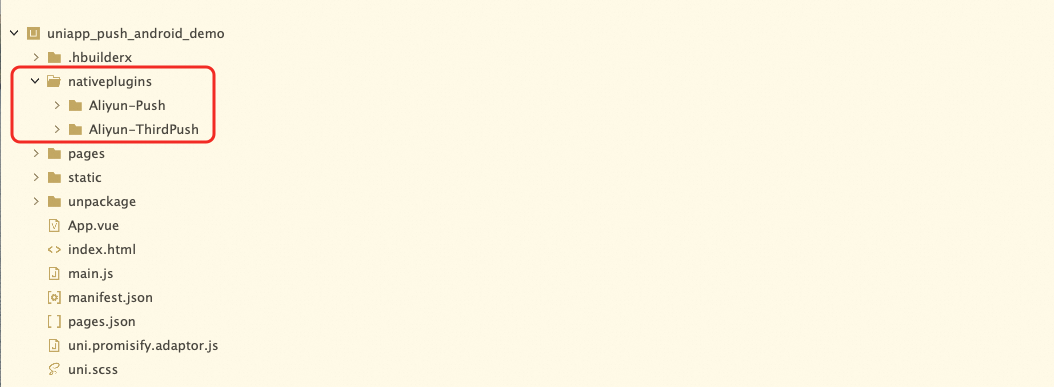
In the manifest.json file, click
Select Local Plugin.
From the local plugin list, select the
Alibaba Cloud Mobile Pushplugin and theAlibaba Cloud Mobile Push - Vendor Channelplugin.
Push parameter configuration
In the manifest.json file, configure the AppKey and AppSecret required by the
Alibaba Cloud Mobile Pushplugin.
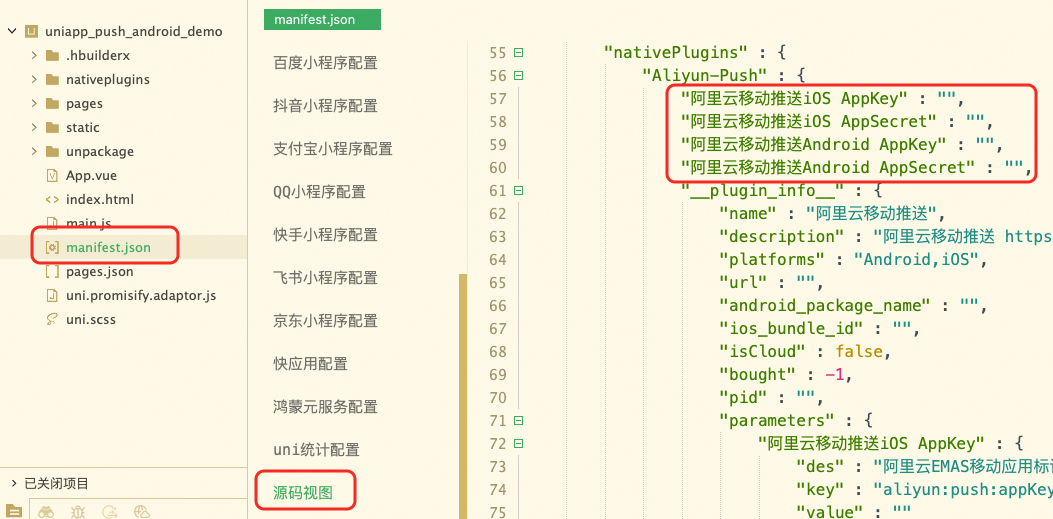
In the manifest.json file, configure the vendor channel push parameters required by the
Alibaba Cloud Mobile Push - Vendor Channelplugin.
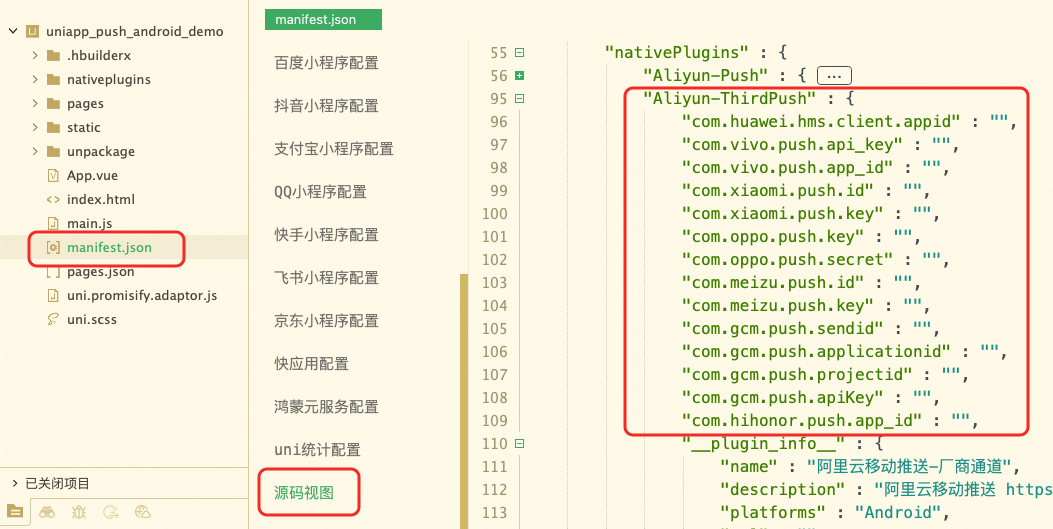
In the manifest.json file, select the push module.
4. Push registration and message receiving
Android
Push registration and proprietary channel message receiving on Android
Register a notification channel
Starting from Android 8.0, you must create a notification channel to display notifications. You can create the notification channel in the onLaunch callback method of the project's App.vue file. The following sample code shows an example:
<script>
	const channel = uni.requireNativePlugin('Aliyun-Push-NotificationChannel');
	export default {
		onLaunch: function() {
			if (uni.getSystemInfoSync().platform === 'android') {
				// Create a notification channel
				channel.createChannel({
                                  id: '${notificationChannelId}',
                                  name: '${notificationChannelName}',
                                  desc: '${notificationChannelDescription}',
                                  importance: 3,
                                });
			}
		}
	}
</script>
The following table describes the parameters of createChannel.
parameter |
Required |
desc |
id |
Yes |
The notification channel ID. |
name |
Yes |
The notification channel name. |
desc |
Yes |
The notification channel description. |
importance |
Yes |
The notification priority. |
allowBubbles |
No |
Specifies whether to allow bubble notifications. |
light |
No |
Enables the LED indicator. |
lightColor |
No |
Sets the color of the LED indicator. |
showBadge |
No |
Specifies whether to display an unread message badge on the upper-right corner of the app icon. |
soundPath |
No |
The path of the ringtone file. |
soundUsage |
No |
The use case for the ringtone. You can set one of the following values: 1: Media playback 2: Voice communication 3: In-call signaling, such as a busy tone or dual-tone multi-frequency signaling (DTMF) 4: Alarm 5: Notification ringtone |
soundContentType |
No |
Sets the audio content type. You can set one of the following values: 1: Speech 2: Music 3: Movie 4: Sonification or system sounds |
soundFlag |
No |
Defines the audio behavior. |
vibration |
No |
Specifies whether to enable vibration. |
vibrationPattern |
No |
The vibration pattern for the notification channel. |
Register for push notifications
The Alibaba Cloud Mobile Push plugin handles the registration of the proprietary channel and its message callbacks on the Android client. These callbacks manage both notification and pass-through messages. You can complete the registration in the onLaunch callback method of your project's App.vue file. The following sample code shows an example:
<script>
	const aliyunPush = uni.requireNativePlugin('Aliyun-Push');
	export default {
		onLaunch: function() {
			if (uni.getSystemInfoSync().platform === 'android') {
				// Create a notification channel
				...
				//Register for push notifications
				aliyunPush.registerPush({}, result => {
                                  const event = result.event;
                                  if (event === 'registerPush') {
                                    if (result.code === 'success') {
                                      console.log("Push registration successful");
                                    } else {
                                      console.log("Push registration " + result.code + " " + result.msg);
                                    }
                                  } else {
                                    const data = JSON.stringify(result.data);
                                    console.log("receive push event : " + event);
                                    console.log("receive push data : " + data);
                                  }
                                });
			}
		}
	}
</script>
The following table describes the fields in the result callback.
Field |
Description |
result.event |
The event type. Valid values: registerPush: Registration event. onNotification: Callback for receiving notification messages. onMessage: Callback for receiving pass-through messages. onNotificationOpened: A notification message was clicked. onNotificationRemoved: A notification message was removed. onNotificationReceivedInApp: Callback for when a notification arrives while the app is in the foreground. This method is valid only for custom-styled notifications. onNotificationClickedWithNoAction: Callback for when a notification with no action is clicked. |
result.code |
The registration result. success: The registration was successful. Other values: An error code is returned if the registration failed. |
result.msg |
The error message returned if the registration failed. |
result.data.deviceId |
The deviceId returned if the registration was successful. |
result.data |
The message data. |
result.data.title |
The message title. |
result.data.content |
The message content. |
result.data.extra |
The extended parameters of the notification message. This field has a value only when event = onNotification. |
result.data.extraStr |
The extended parameters of the notification message. This field has a value only when event = onNotificationOpened or onNotificationClickedWithNoAction. |
result.data.openType |
The action to take after the notification is clicked. Valid values: 1: Open the application (default). 2. You can open the AndroidActivity application. 3: Open a URL. 4: No redirect This field has a value only when event = onNotificationReceivedInApp. |
result.data.openActivity |
The target Activity to navigate to after the notification is clicked. This field has a value only when event = onNotificationReceivedInApp. |
result.data.openUrl |
The URL to navigate to after the notification is clicked. This field has a value only when event = onNotificationReceivedInApp. |
result.data.msgId |
The message ID. This field has a value only when event = onNotificationRemoved. |
Vendor channel registration and notification message receiving on Android
Vendor channel registration
The Alibaba Cloud Mobile Push - Vendor Channel plugin is responsible for registering vendor channels. After the plugin is integrated, vendor channels are automatically registered when the application starts.
Register a callback for vendor channel notification messages
After a user clicks a vendor channel message, you can retrieve the content of the notification message within the application. You can register the callback for vendor channel notification clicks in the onLaunch callback method of the project's App.vue file. The following sample code shows an example:
<script>
	const aliyunThirdPush = uni.requireNativePlugin('Aliyun-ThirdPush');
	export default {
		onLaunch: function() {
			if (uni.getSystemInfoSync().platform === 'android') {
				// Create a notification channel
				...
				//Register for push notifications
				...
				//Register the callback for vendor channel notification clicks
				aliyunThirdPush.registerThirdPush({}, result => {
                                  const data = JSON.stringify(result);
                                  console.log("receive third push : " + data);
                                });
			}
		}
	}
</script>To use a vendor channel, you must configure an auxiliary pop-up window. This plugin hardcodes the auxiliary pop-up window as com.alibaba.uniplugin.android.third.push.ThirdPushPopupActivity. When a user clicks a notification, the application is launched.
Because vendor channels are controlled by each vendor, the message click callback is triggered only when the user clicks the notification. If the user does not click the notification or dismisses it, the application will not be aware of the message.
iOS
Push registration and message receiving on iOS
Register for push notifications
On iOS, initialization is performed by default when the application starts. You do not need to call an initialization method. However, you must register callback interfaces to receive push data.
Register a callback for receiving notification messages
You can register a callback to receive notification messages on the iOS client. This lets you retrieve the content of a notification message when the application is in the foreground and notifications are not displayed. You can register the callback for receiving notification messages in the onLaunch callback method of the project's App.vue file. The following sample code shows an example:
<script>
	const aliyunPush = uni.requireNativePlugin('Aliyun-Push');
	export default {
		onLaunch: function() {
			if (uni.getSystemInfoSync().platform === 'ios') {
				// Register the callback for receiving notification messages
				aliyunPush.setNotificationCallback({}, result => {
                                  const data = JSON.stringify(result);
                                  console.log("setNotificationCallback : " + data);
                                });
			}
		}
	}
</script>
Register a callback for notification message clicks
You can register a callback that is triggered when a user clicks a notification message on the iOS client. You can register this callback for notification message clicks in the onLaunch callback method of the project's App.vue file. The following sample code shows an example:
<script>
	const aliyunPush = uni.requireNativePlugin('Aliyun-Push');
	export default {
		onLaunch: function() {
			if (uni.getSystemInfoSync().platform === 'ios') {
				// Register the callback for receiving notification messages
				...
				// Register the callback for notification message clicks
				aliyunPush.setNotificationResponseCallback({}, result => {
                                  const data = JSON.stringify(result);
                                  console.log("setNotificationResponseCallback : " + data);
                                });
			}
		}
	}
</script>
Register a callback for receiving pass-through messages
You can register a callback to receive pass-through messages on the iOS client. You can register this callback in the onLaunch callback method of the project's App.vue file. The following sample code shows an example:
<script>
	const aliyunPush = uni.requireNativePlugin('Aliyun-Push');
	export default {
		onLaunch: function() {
			if (uni.getSystemInfoSync().platform === 'ios') {
				// Register the callback for receiving notification messages
				...
				// Register the callback for notification message clicks
				...
				// Register the callback for receiving pass-through messages
				aliyunPush.setMessageCallback({}, result => {
                                  const data = JSON.stringify(result);
                                  console.log("setMessageCallback : " + data);
                                });
			}
		}
	}
</script>
5. Logs
Log output control
Android
Set the log output level on Android
const aliyunPush = uni.requireNativePlugin('Aliyun-Push');
aliyunPush.setLogLevel({
  logLevel: 'debug'
});The logLevel parameter can be set to debug, info, error, or off. The off value disables logging.
iOS
Enable SDK logs on iOS
Enable logs for the Alibaba Cloud Mobile Push SDK on the iOS client to troubleshoot issues during development and testing.
const aliyunPush = uni.requireNativePlugin('Aliyun-Push');
aliyunPush.turnOnDebug({});
Add a log output callback for the Alibaba Cloud Mobile Push plugin
const aliyunPush = uni.requireNativePlugin('Aliyun-Push');
aliyunPush.registerLog({}, result => {
    console.warn("push plugin log : " + result);
});
Add a log output callback for the Alibaba Cloud Mobile Push - Vendor Channel plugin
const aliyunThirdPush = uni.requireNativePlugin('Aliyun-ThirdPush');
aliyunThirdPush.registerLog({}, result => {
    console.warn("third push plugin log : " + result);
})
6. API
Common API
Get deviceId
Retrieves the unique identifier of the device. This is required for targeted pushes to a specific device. The following sample code shows an example:
const aliyunPush = uni.requireNativePlugin('Aliyun-Push');
const result = aliyunPush.getDeviceId();
console.log("getDeviceId : " + result.data.deviceId);
Bind an account
You can associate an in-app account with the push channel to send targeted messages to accounts. The following code provides an example:
const aliyunPush = uni.requireNativePlugin('Aliyun-Push');
aliyunPush.bindAccount({
    account: "${account}"
}, result => {
    console.log("bindAccount : " + result);
});For more information about account management on Android, see the Account management API.
For more information about account management on iOS, see the Account management API.
Unbind an account
Dissociates an in-app account from the push channel. The following sample code shows an example:
const aliyunPush = uni.requireNativePlugin('Aliyun-Push');
aliyunPush.unBindAccount({}, result => {
    console.log("unBindAccount : " + result);
});
Add an alias
Adds an alias to a device. This lets you send targeted messages to aliases. The following sample code shows an example:
const aliyunPush = uni.requireNativePlugin('Aliyun-Push');
aliyunPush.addAlias({
    alias: "${alias}"
}, result => {
    console.log("addAlias : " + result);
});For more information about alias management on Android, see Alias management API.
For more information about alias management on iOS, see Alias management API.
Remove an alias
Deletes a device alias. The following sample code shows an example:
const aliyunPush = uni.requireNativePlugin('Aliyun-Push');
aliyunPush.removeAlias({
    alias: "${alias}"
}, result => {
    console.log("removeAlias : " + result);
});
Query aliases
Queries device aliases. The following sample code shows an example:
const aliyunPush = uni.requireNativePlugin('Aliyun-Push');
aliyunPush.listAliases({}, result => {
    console.log('listAliases : '+result.aliases);
});
Attach a tag
Adds tags to a specified target (device, account, or alias). This lets you send targeted messages based on tags. The following sample code shows an example:
const aliyunPush = uni.requireNativePlugin('Aliyun-Push');
aliyunPush.bindTag({
    tags: ["${tag}"],
    target: 3,
    alias: ${alias} // When target is 3, you must pass the alias parameter.
}, result => {
    console.log('bindTag : '+result);
});The target parameter can be set to 1 (device tag), 2 (account tag), or 3 (alias tag).
For more information about tag management on Android, see Tag management API.
For more information about tag management on iOS, see Tag management API.
Detach a tag
Detaches tags from a specified target. The following sample code shows an example:
const aliyunPush = uni.requireNativePlugin('Aliyun-Push');
aliyunPush.unBindTag({
    tags: ["${tag}"],
    target: 1,
}, result => {
    console.log('bindTag : '+result);
});
Set the numeric badge
Sets the application badge on the device. The following sample code shows an example:
const aliyunPush = uni.requireNativePlugin('Aliyun-Push');
aliyunPush.setBadgeNum({
    badge: ${badgeNumber},
    badgeNum: ${badgeNumber}
});On Android, this API currently supports only Huawei, Honor, and vivo devices.
For more information about implementing badges on Android, see Use numeric badges.
On Android, the parameter is badge.
On iOS, the parameter is badgeNum.
Platform-specific API
Android
Bind a phone number
To improve the delivery rate and timeliness of information and to expand the use cases for push notifications, we provide a hybrid notification model that combines push notifications and text messages. You can configure the system to send a user a text message if a push notification is not received or clicked within a certain period.
To implement the hybrid push and text message solution, you must bind a phone number. The following sample code shows an example:
const aliyunPush = uni.requireNativePlugin('Aliyun-Push');
aliyunPush.bindPhoneNumber({
    phone: "${phoneNumber}"
}, result => {
    console.log('bindPhoneNumber : '+result);
});For more information about binding and unbinding phone numbers, see Text message notification API.
Unbind a phone number
Unbinds a phone number. The following sample code shows an example:
const aliyunPush = uni.requireNativePlugin('Aliyun-Push');
aliyunPush.unBindPhoneNumber({}, result => {
    console.log('unBindPhoneNumber : '+result);
});
Check if notification permissions are enabled
Checks notification permissions. The following sample code shows an example:
const channel = uni.requireNativePlugin('Aliyun-Push-NotificationChannel');
const result = channel.isNotificationEnabled({
    id : '${channelId}',
});If you pass the id parameter (notification channel ID), isNotificationEnabled returns whether the notification channel is available. If you do not pass the id parameter, it returns whether notification permissions are enabled for the current application.
Go to the notification permission settings page
Navigates to the notification permission management page for the current application. The following sample code shows an example:
const channel = uni.requireNativePlugin('Aliyun-Push-NotificationChannel');
channel.goNotificationSettings({
  id : '${channelId}',
});If you pass the id parameter (notification channel ID), goNotificationSettings navigates to the settings page for the current notification channel. If you do not pass the id parameter, it navigates to the notification permission management page for the current application.
iOS
Set whether to show notifications when the app is in the foreground (showNoticeWhenForeground)
Sets whether to display a push notification on iOS when the application is in the foreground. The default value is false, which means the notification is not displayed. Instead, the push notification data is received by the callback registered with setNotificationCallback.
If you set this to true, when the application is in the foreground, the push notification is displayed directly, and the callback registered with setNotificationCallback is not triggered. When the user clicks the notification, the callback registered with setNotificationResponseCallback is triggered. The following sample code shows an example:
const aliyunPush = uni.requireNativePlugin('Aliyun-Push');
aliyunPush.showNoticeWhenForeground({
   enable: true
});
Sync the numeric badge
Syncs the badge number with the Alibaba Cloud service. The following sample code shows an example:
const aliyunPush = uni.requireNativePlugin('Aliyun-Push');
aliyunPush.syncBadgeNum({
    badgeNum: ${badgeNumber}
}, result => {
    const data = JSON.stringify(result);
    console.log("syncBadgeNum : " + data);
});