Client integration overview
Learn how to integrate HTTPDNS into your client application to replace traditional DNS resolution.
Introduction
HTTPDNS is a client-side DNS solution that replaces traditional local DNS to prevent domain hijacking, resolution latency, high failure rates, and inaccurate scheduling. Integration involves these steps:
-
Activate the service
-
Add domain names to the resolution list
-
Obtain development configurations
-
Obtain the resolved IP address
-
Apply the resolution result to the network library
-
Verify successful integration
If you use custom parsing for service scheduling, configure a custom parsing policy. Custom parsing.
Complete the first three console steps before proceeding. Product workflow. This topic covers the client integration process (the last three steps), starting with how DNS resolvers work.
DNS resolvers
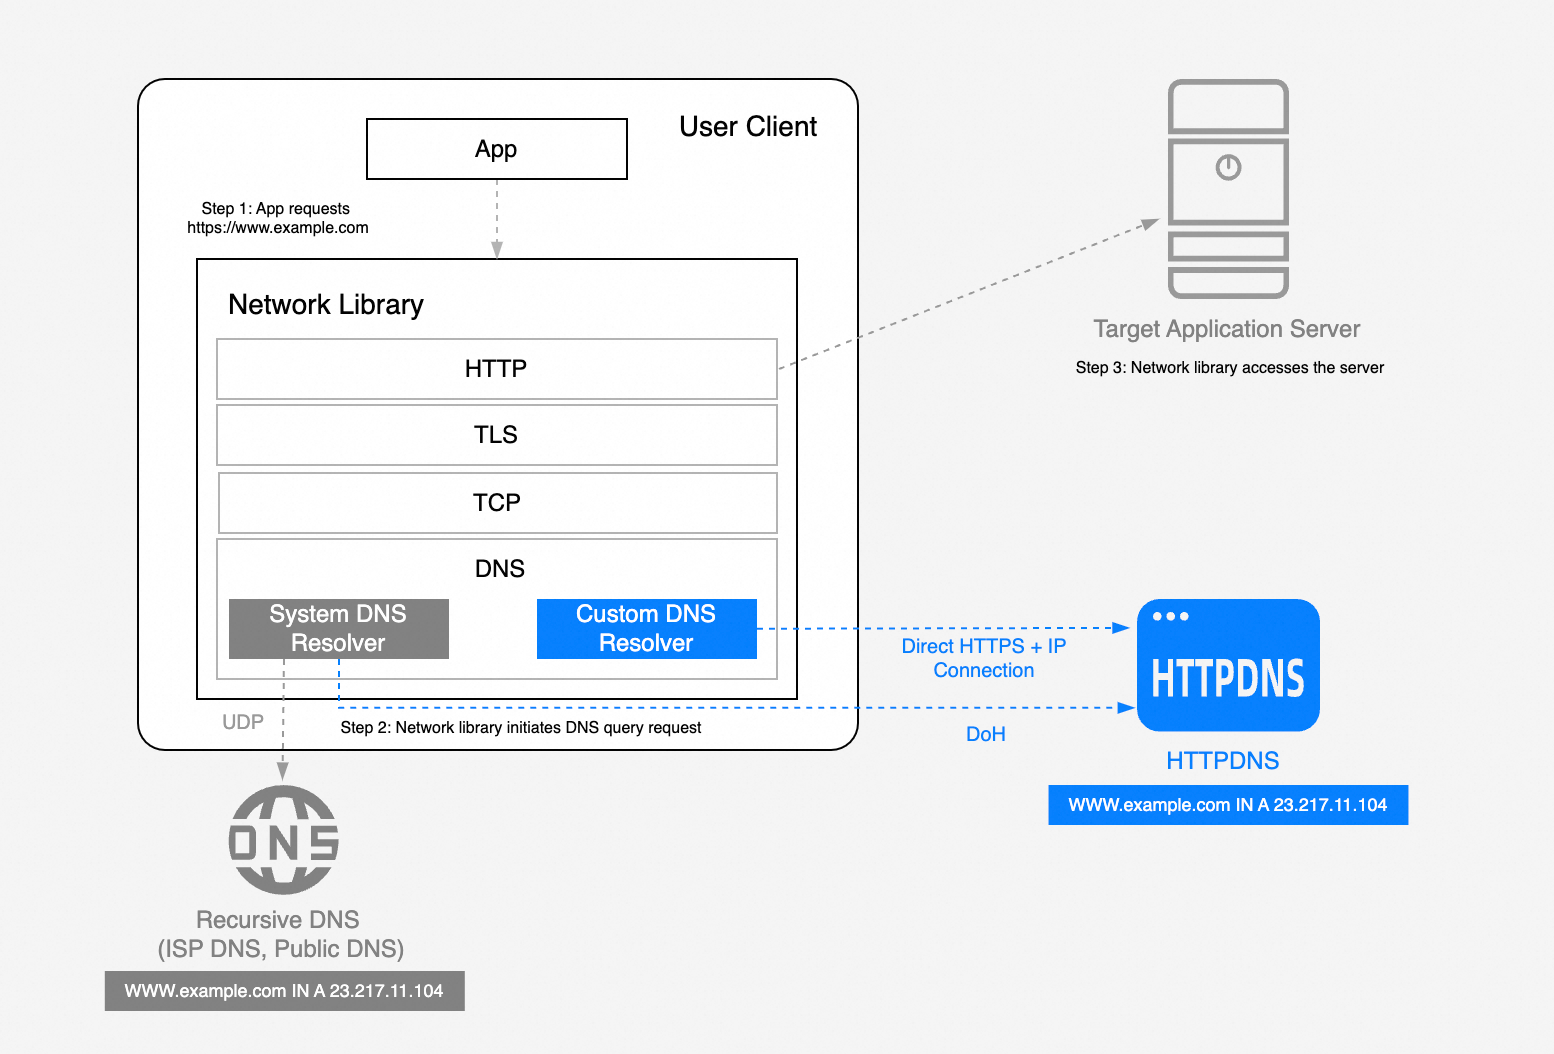
A DNS resolver receives domain queries and returns IP addresses. When an app client sends a network request, its network library (NSURLSession, OkHttp, or libcurl) uses a DNS resolver to resolve the domain to an IP address before connecting. Two types exist:
-
System DNS resolver: An OS-provided component invoked through standard APIs such as POSIX
getaddrinfo(), WindowsDnsQuery(), or AppleNetwork.framework. It queries based on local configuration (hosts file, DNS cache, network settings) and forwards requests to recursive DNS servers — typically ISP-assigned via DHCP or user-configured servers like 8.8.8.8. -
Custom DNS resolver: Application or third-party logic that bypasses the system resolver to access a service like HTTPDNS directly for authoritative IP addresses. Common methods include overriding the network library's DNS interface (OkHttp's
Dnsinterface or libcurl'sresolvemechanism) or intercepting traffic through a proxy for DNS hooking.
Integrating with HTTPDNS means implementing a custom DNS resolver backed by the HTTPDNS service. The following diagram shows how a client uses a custom DNS resolver or DNS-over-HTTPS (DoH) to apply HTTPDNS resolution results, ensuring requests use the optimal IP address.
Integration process
After activating the service and adding domain names in the console, implement a custom DNS resolver with HTTPDNS in three steps:
-
Obtain the resolved IP address: Access the HTTPDNS server to obtain the IP address for a domain name.
-
Apply the resolution result: Inject the obtained IP address into the network request.
-
Verify successful integration: Use logs or packet captures to confirm that the previous two steps were successful.
Get the resolved IP address
Obtain resolution results from HTTPDNS through an SDK, the HTTP API, or DoH.
For fast integration with built-in high availability and performance optimization, use an SDK:
-
If you cannot use an SDK or need fine-grained control, use the HTTP API integration guide. The HTTP API supports encryption, signature verification, SDNS, and additional error codes.
An SDK is recommended for most scenarios.
Apply the resolution result
Apply the resolved IP address during your network requests. If your library supports DNS hooks or domain mapping, inject the result directly. Otherwise, use direct IP connection, protocol replacement, or a local proxy. Adaptation solutions for common libraries and frameworks:
-
Android: OkHttp, Webview, Webview local proxy, ExoPlayer, HttpURLConnection, gRPC, Alibaba Cloud OSS SDK, and more
-
iOS: Native network library, WebView, AFNetworking, Alamofire, Alibaba Cloud OSS SDK, and more
-
HarmonyOS: Alibaba Cloud OSS SDK, Network Kit and RCP, and more
For other libraries or frameworks (Socket.io, HttpClient, Glide, SwiftNIO, Libcurl), contact Technical support.
Verify successful integration
Verify integration success using one of these methods:
-
Log verification (Recommended)
-
Method: Log the resolved IP addresses from HTTPDNS and verify that business requests use them correctly.
-
Simple, lightweight, and suitable for most scenarios.
-
-
Hijacking simulation:
-
Method: Set the device's Wi-Fi DNS server to an invalid address and verify that business requests still succeed through HTTPDNS.
-
Blocks system DNS interference for more accurate verification.
-
Summary
HTTPDNS integration builds a custom DNS resolver in three steps: obtain a resolved IP, apply it to the network library, and verify the result. Choose the guide for your integration method:
SDK integration
-
HTTP API integration