End-to-end protection for database applications with SASE
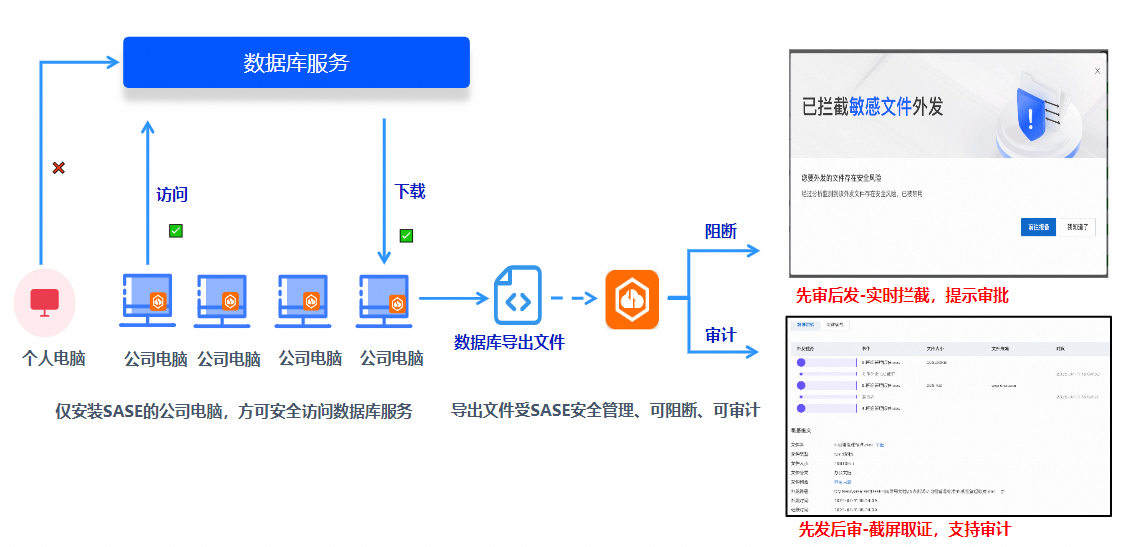
This topic describes how to use Alibaba Cloud SASE to provide end-to-end protection for your database applications.
Use cases
-
You want to restrict database access only to corporate devices.
-
You want to audit and block file exfiltration from databases to local devices.
Alibaba Cloud SASE
SASE, Alibaba Cloud's one-stop office security platform, allows enterprises to quickly build a security system with features like Zero Trust Network Access (ZTNA), data leak prevention, and internet access management, without costly hardware investments. By integrating database applications into this zero-trust framework, you can control access to database applications, audit file exfiltration, and block it when necessary. This provides end-to-end protection for your database-related data.
Procedure
Step 1: Activate an SASE instance
SASE offers a 7-day free trial. For more information, see Activate SASE. For more information about billing, see Billing overview for Alibaba Cloud SASE.
Step 2: Configure an identity source
An identity provider (IdP) authenticates your employees. SASE supports both third-party and self-managed identity providers (IdPs), including LDAP, DingTalk, WeCom, Lark, IDaaS, and custom IdPs. If your business uses multiple IdPs, you can configure all of them and enable them to use the SASE service with different identity providers.
This topic uses a custom identity source as an example to help you quickly validate the feature.
-
Log on to the Alibaba Cloud SASE console.
-
In the left-side navigation pane, choose .
-
On the Identity synchronization tab, find Custom IdP and click Edit in the Actions column. Follow the wizard to configure the custom identity source. For more information, see Connect to a custom identity source.
Step 3: Configure a user group
When you configure a policy, you must specify the user group to which the policy applies.
-
In the left-side navigation pane, choose .
-
On the User Group Management tab, click Create User Group.
-
In the Create User Group panel, configure information for the user group, such as Organizational Structure, Account Name, Email Address, and Mobile Phone Number. Then, click OK. For more information, see Manage user groups.
Step 4: Enable network connectivity
-
In the left-side navigation pane, choose .
-
On the Network Settings page, on the tab, view the network resources synchronized by SASE.
-
Find the target CEN instance or an associated VPC instance, and turn on the Network Connection switch.
-
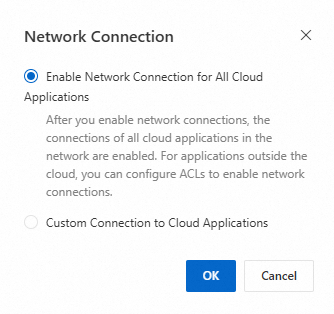
In the Network Connection dialog box, select Enable Network Connection for All Cloud Applications or Custom Connection to Cloud Applications.
-
Enable Network Connection for All Cloud Applications: If you select this option, SASE automatically establishes connections for all cloud-native applications. For non-cloud-native applications, you can configure ACL rules to establish connections. New cloud-native applications in this VPC are also connected by default.
NoteCurrently, only some cloud-native applications are supported. You can find the supported application types on the tab under Application Type.
-
Custom Connection to Cloud Applications:
-
Select Custom Connection to Cloud Applications and click OK.
-
In the Custom Connection to Cloud Applications panel, select the cloud-native applications that you want to connect and click OK.
-
-
Step 5: Create a zero-trust policy
-
In the left-side navigation pane, choose .
-
On the Zero Trust Policies tab, click Create Policy.
-
In the Create Policy panel, configure the policy to allow the specified user group to access the RDS application, and then click OK.
Set Policy name to a descriptive name, such as
cloud-native-app-zero-trust-policy. Set Priority to1. The valid range is 1 to 43. In the Selected applications section, add the target application.
Step 6: Verify the configuration
-
Open the SASE app that you installed.
Enter the enterprise verification ID and click OK.
You can log on to the Secure Access Service Edge console. In the navigation pane on the left, on the Settings page, obtain the Enterprise Authentication Identifier.
-
Log on by using the initial username and password that you received by email or text message.
-
Click Connect to Private Network.
-
Try to access the RDS application. If you can access it, the configuration is successful.
Step 7: Configure a data leak prevention policy in SASE
In SASE, you can configure file control policies to audit and block file exfiltration. This includes sharing files exported from a database through cloud storage, instant messaging, or USB devices. If a risk is detected, SASE can issue a warning or block the action. For more information, see Protect data security by detecting file exfiltration.