Domain Management
Bind a custom domain name to your Wanxiaozhi application space so that visitors can access your website over the Internet. This topic describes how to bind a domain name, configure DNS resolution, view and manage domain name status, configure HTTPS certificates, display filing numbers, and configure 301 redirects.
The Wanxiaozhi Trial Edition does not support binding an independent domain name. To use the Bind Domain feature, purchase the Lite Edition or a higher edition.
Bind a domain name
Associate a domain name with your application space. The following steps cover the I Have a Domain path.
Log on to the Wanxiaozhi console and open the target application.
In the left-side navigation pane of the application editor, click Deploy >Domains to open the Domain Management page.
Click Bind Domain, and select the current domain status: I Have a Domain (a registered domain name that you can bind directly) or I Need a Domain (search for and register a new domain name).
After you select I Have a Domain, enter the complete domain name in Domain, or select one from the list of domain names under the current Alibaba Cloud account. Click Bind Domain to complete the binding. The system automatically completes DNS resolution or guides you to configure it based on the domain ownership.
In the domain name list, confirm that the Binding status column shows the binding is successful. After the Resolution status column shows that resolution is complete, you can access the website through the domain name.
A website can have multiple bound domain names. To make multiple domain names access the same website, bind all of them.
The system automatically adds the
wwwprefix to the domain name, such aswww.aliyun.com, so that the website can be accessed in a browser.If you add a Chinese domain name, CDN and HTTPS cannot be enabled.
If the added domain name belongs to the current account and has completed ICP filing, the system automatically prepares the DNS resolution information.
Configure DNS resolution
Create DNS records that point the domain name to the website server so that the domain name can be used to access the website.
Two resolution methods are available. Select one based on where the domain name is registered and which account owns it:
Plan 1: One-click resolution (recommended) — The domain name is registered with or transferred to Alibaba Cloud, belongs to the current Alibaba Cloud account, and uses Alibaba Cloud DNS. DNS resolution is completed automatically after binding.
Plan 2: Manual resolution — The domain name is registered with another provider, or does not belong to the current Alibaba Cloud account. You add the DNS records yourself.
Plan 1: Use one-click resolution (recommended)
For a domain name that is registered with or transferred to Alibaba Cloud, belongs to the current Alibaba Cloud account, and uses Alibaba Cloud DNS, DNS resolution is completed automatically after binding. Wait approximately 2 to 3 minutes for the system to generate the DNS record value. If the status is not updated, refresh the page manually or click Retry.
ICP filing: Under applicable national regulations, domains that use nodes in the Chinese mainland must completedomain name filing.
Account authorization: If this is your first operation, complete authorization as prompted.
If one-click resolution is unavailable, confirm that the domain name was purchased from Alibaba Cloud. If the domain name was purchased from another registrar, confirm that it has been transferred to Alibaba Cloud. If the domain name does not meet the conditions for one-click resolution, use Plan 2: Configure DNS records manually.
Plan 2: Configure DNS records manually
ICP filing: Under applicable national regulations, domains that use nodes in the Chinese mainland must completedomain name filing.
DNS Verification: If the domain name is not registered with Alibaba Cloud or is not under the current account, complete steps 1 to 3 to configure a TXT record for DNS resolution verification before you add the DNS records.
In the binding status list, click Verify, and copy the Host record and Record value from the dialog box.
Add a TXT record: Go to the DNS resolution console and add the TXT record.
For a domain name not registered with Alibaba Cloud, add the domain name TXT record through the provider from which you purchased the domain name.
For a domain name that is not under the current account, switch accounts before you proceed. For an Alibaba Cloud domain name, switch to the Alibaba Cloud account that owns the domain name, and then log on to the Alibaba Cloud DNS console. Open the Public authoritative DNS page, and click DNS settings to the right of the corresponding domain name.
Return to the Domain Management page and click Verify. If verification fails, reconfigure the TXT record and verify it again.
Get the DNS record value: After a new domain name is added successfully, wait approximately 2 to 3 minutes for the DNS record value to be generated. In the domain name list, find the CNAME record value column and click the copy icon to copy the record value for manual DNS configuration.
Configure DNS records: For an Alibaba Cloud domain name, log on to the Alibaba Cloud DNS console, find the domain name, open its DNS settings page, and click Add record. Add the following two DNS records.
Record
Record type
Host record
Record value
TTL
Record 1: CNAME record for the
wwwsubdomainCNAMEwwwPaste the record value copied in the previous step.
10 minutesRecord 2: CNAME record for the root domain
CNAME@(The @ symbol represents the root domain itself. Some DNS providers may require that you leave this field blank.)Paste the record value copied in the previous step.
10 minutes
View domain name status
After you bind a domain name, the domain name list on the Domain Management page shows the binding, DNS resolution, and certificate status of each domain name, together with the actions that you can perform on each domain name. ClickRefresh to update the list.
Column | Description |
Domain | The name of the bound domain name. |
Binding status | The binding result between the domain name and the website, such as binding successful. |
Resolution status | The DNS resolution progress, such as resolving. After resolution is complete, you can access the website through the domain name. |
HTTPS | The HTTPS certificate enabling status. |
Filing status | The ICP filing status of the domain name, such as no filing required. A domain name that uses nodes in the Chinese mainland must complete filing. ClickComplete Filing in the page instructions to complete filing. |
Redirect | Whether a 301 redirect is configured. |
CNAME record value | The CNAME record value that points to the Wanxiaozhi website building service. |
Actions | ClickRetry to refresh binding and DNS resolution progress. ClickDelete to unbind the domain name. |
Configure HTTPS
Wanxiaozhi provides two ways to obtain and configure an HTTPS certificate for a bound domain name. If you added a Chinese domain name, CDN and HTTPS cannot be enabled for it.
Select one of the following plans based on your requirements:
Plan 1: One-click configuration — The system automatically applies for a certificate. The certificate is valid for 90 days and is automatically renewed one week before it expires.
Plan 2: Manual deployment — You use an existing certificate or apply for one manually. This plan requires more steps to apply for, verify, and download a certificate. It applies when you have a certificate from a third-party platform or need to manage certificate files manually.
Plan 1: One-click configuration
The system then automatically completes the security configuration.
Plan 2: Manual deployment
If you already have certificate files, follow to configure the certificate. Steps 1 to 3 are completed in the Certificate Management Service console. Step 4 is completed on the Domain Management page.
Step 1: Obtain a certificate
Alibaba Cloud certificate: The following uses a Personal Test Certificate (Free Edition) as an example. A single free certificate is valid for 90 days and must be reapplied for and installed after it expires. You can purchasea paid certificate based on your requirements. For more information, seeSSL certificate selection.
Third-party platform: Follow the instructions provided by the relevant platform.
Log on toCertificate Management Service console, and in the left-side navigation pane, choose Certificate Management >SSL Certificate Management V2.0. On theIndividual Test Certificate (Formerly Free Certificate) tab, click Purchase Certificate.
On the Purchase Certificate page, enter Purchase Quantity, keep the other settings at their default values, select Certificate Management Service Terms of Service and Technical Support Agreement for Certificate Management Service, and click Buy Now to complete payment.
NoteIf you do not meetPurchase rules for personal test certificates (Free Edition), seePurchase a personal test certificate (Pro).
A Personal Test Certificate (Free Edition) order cannot be canceled after the certificate is claimed. If it is not used within three months after it is claimed, the quota claimed for that year is returned automatically.
Step 2: Apply for a certificate and complete domain validation
The following uses an Alibaba Cloud Personal Test Certificate (Free Edition) as an example:
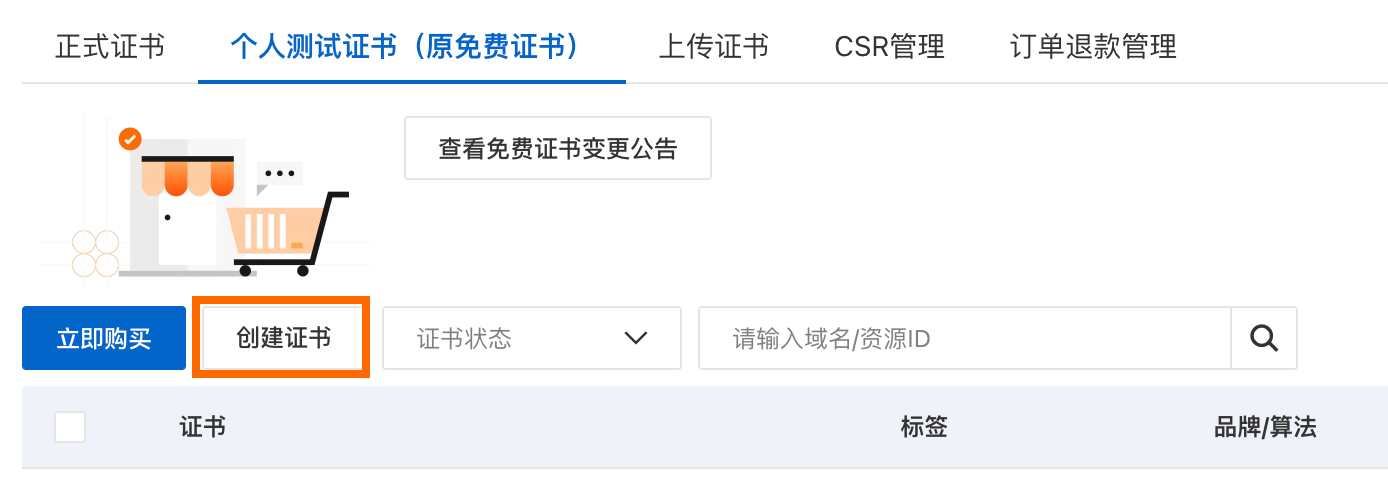
Log on toCertificate Management Service console, and on the Personal Test Certificate (Formerly Free Certificate) tab, click Create certificate.
Enter the required information below, keep the other settings at their default values, confirm that the information is correct, and click Submit for review.
Parameter
Description
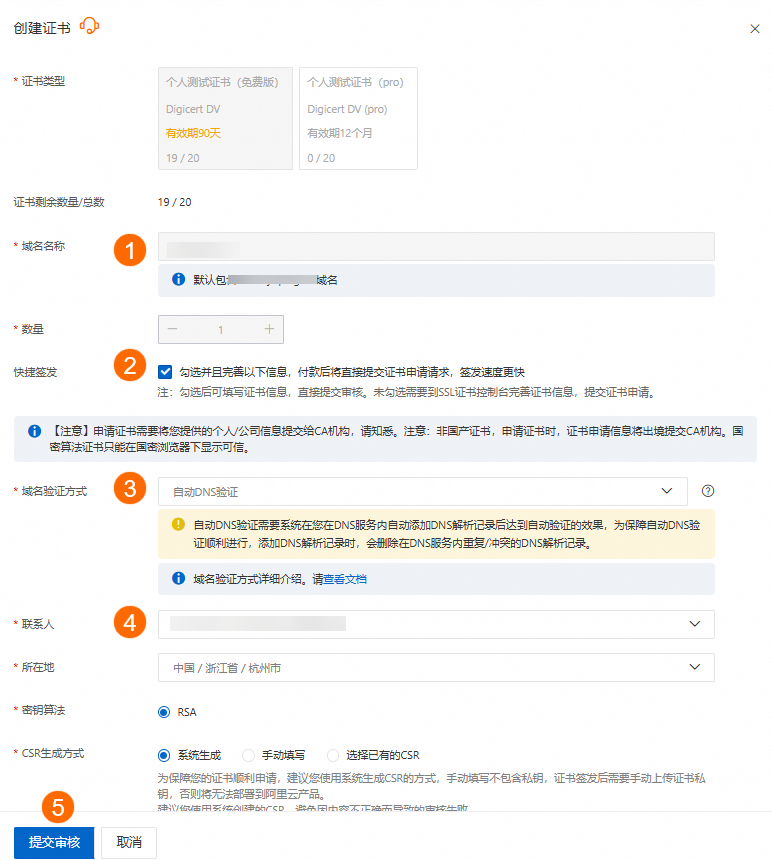
Domain name
Enter the domain name for which you want to apply for a certificate, such as example.com.
Quick issuance
Select Quick issuance and enter the following information.
Domain verification method
Select Automatic DNS verification. Because the DNS service for example.com in this example is under the current account, the system automatically identifies it as Automatic DNS verification. After purchase, the system automatically performs DNS verification. Wait for the certificate to be issued. If the current Alibaba Cloud account differs from the account that owns the domain's Alibaba Cloud DNS service, select Manual DNS verification or File verification.
Manual DNS verification
Go to the DNS service provider for the domain name and add the domain verification information to the DNS record list (add a CNAME or TXT DNS record).
File verification
Verify domain ownership by creating the specified file on the web application server for the domain name. For more information about verification methods, seeDomain ownership verification.
Contact
Select the contact for this certificate application.
-
Complete domain validation. On the Individual Test Certificate (Formerly Free Certificate) tab, find the target certificate instance, and click Verify in the Actions column. Follow the instructions to complete domain ownership validation.
After domain ownership validation succeeds, the certificate is typically issued within 1 to 15 minutes. After issuance, the Status changes to Issued. If the certificate is not issued after a long wait, check whether the DNS validation configuration is correct.
Note-
The certificate takes effect from the date of issuance and is valid for 90 days.
-
If validation fails to pass for an extended period, for example, due to incorrect file content, mismatched DNS record values, or DNS validation timeout, see FAQ for domain ownership validation for solutions.
-
Step 3: Download certificate files
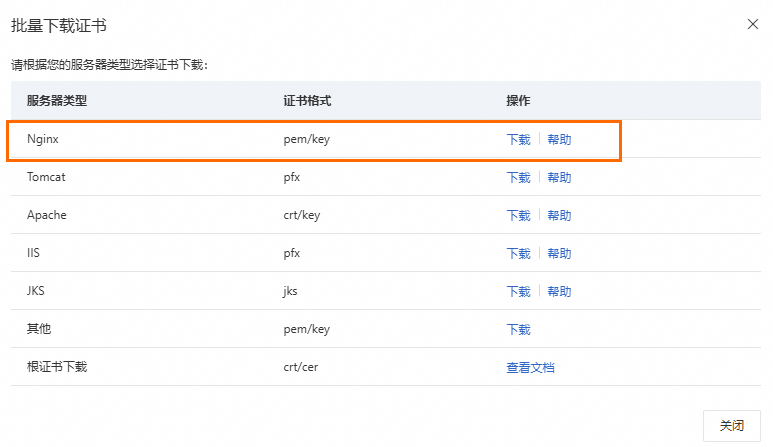
Find and select the issued certificate. At the lower-left corner of the certificate list, click Download.

Select Nginx type, and click Download to download the certificate file package.
Step 4: Configure the certificate
If you applied for an SSL certificate on another platform, select the Nginx type when you download it.
On the Domain Management page, click Configure Custom HTTPS Certificate in the Actions column.
If this option is not available, first complete ICP filing or DNS verification as prompted.
Fill in certificate information: In the dialog box, enter the following information to enable HTTPS for the website.
Parameter
Description
Certificate name
Enter an easily recognizable name.
Certificate (CRT or PEM)
Open the certificate file in PEM or CRT format with a text editor, copy all its content, and paste it into this text box.
Private Key (PEM)
Open the certificate private key file in KEY format with a text editor, copy all its content, and paste it into this text box.
Display filing numbers
For compliance, if your application space uses nodes in the Chinese mainland, the bound domain name must display the ICP filing number and public security filing number in the website footer.
On the Domain Management page, confirm that the domain name is bound successfully and DNS resolution is active.
Find the target domain name and click Add Filing Number.
In the dialog box, enter the Public security filing number accurately, and click OK.
The filing information is automatically displayed in the footer of the website.
Configure redirects
After you change a domain name, you can configure a 301 permanent redirect for a bound custom domain name. Visitors who access the old domain name are automatically redirected to the new domain name, which helps transfer SEO authority.
In the domain name list, find the domain name to use as the source domain name, such as the old domain name before the change, and click Redirect in the Actions column.
In the Configure redirect dialog box, confirm the source domain name and redirect type. The redirect type is fixed as a 301 permanent redirect and cannot be changed.
Enter the target domain name (required). The protocol prefix is removed automatically. Click Configure.
After configuration is complete, verify that the Redirect column in the domain name list displays 301 and the target domain name. Visitors who access the source domain name are automatically redirected to the target domain name.