Document and image-text Q&A
This tutorial shows you how to configure the Q&A capability for an application on the CleverSee AI search PaaS platform. You can visually configure settings like persona, knowledge base connections, search enhancement, and response strategies to quickly build and publish an intelligent Q&A assistant with domain expertise.
Use cases and target audience
Operations and product managers: Who want to quickly build a public-facing Q&A chatbot using private documents and image assets.
Developers: Who need to add a Q&A entry point to existing applications (such as image-text, document, or audio/video apps).
Typical scenarios: Enterprise knowledge base Q&A, product support assistants, paper/document retrieval Q&A, and image-text shopping guides.
Configuration overview
Configuring a Q&A application involves six steps.
Step 1: Select a target application
Log in to the CleverSee console and choose Application Workbench → Application Management from the left navigation pane. This will display all applications created under your account.
Click + Create Application in the upper-right corner to create a new application, or click an existing application card to open its configuration page. To build an application with document Q&A or image-text Q&A capabilities, select "Image-Text" when creating the application.
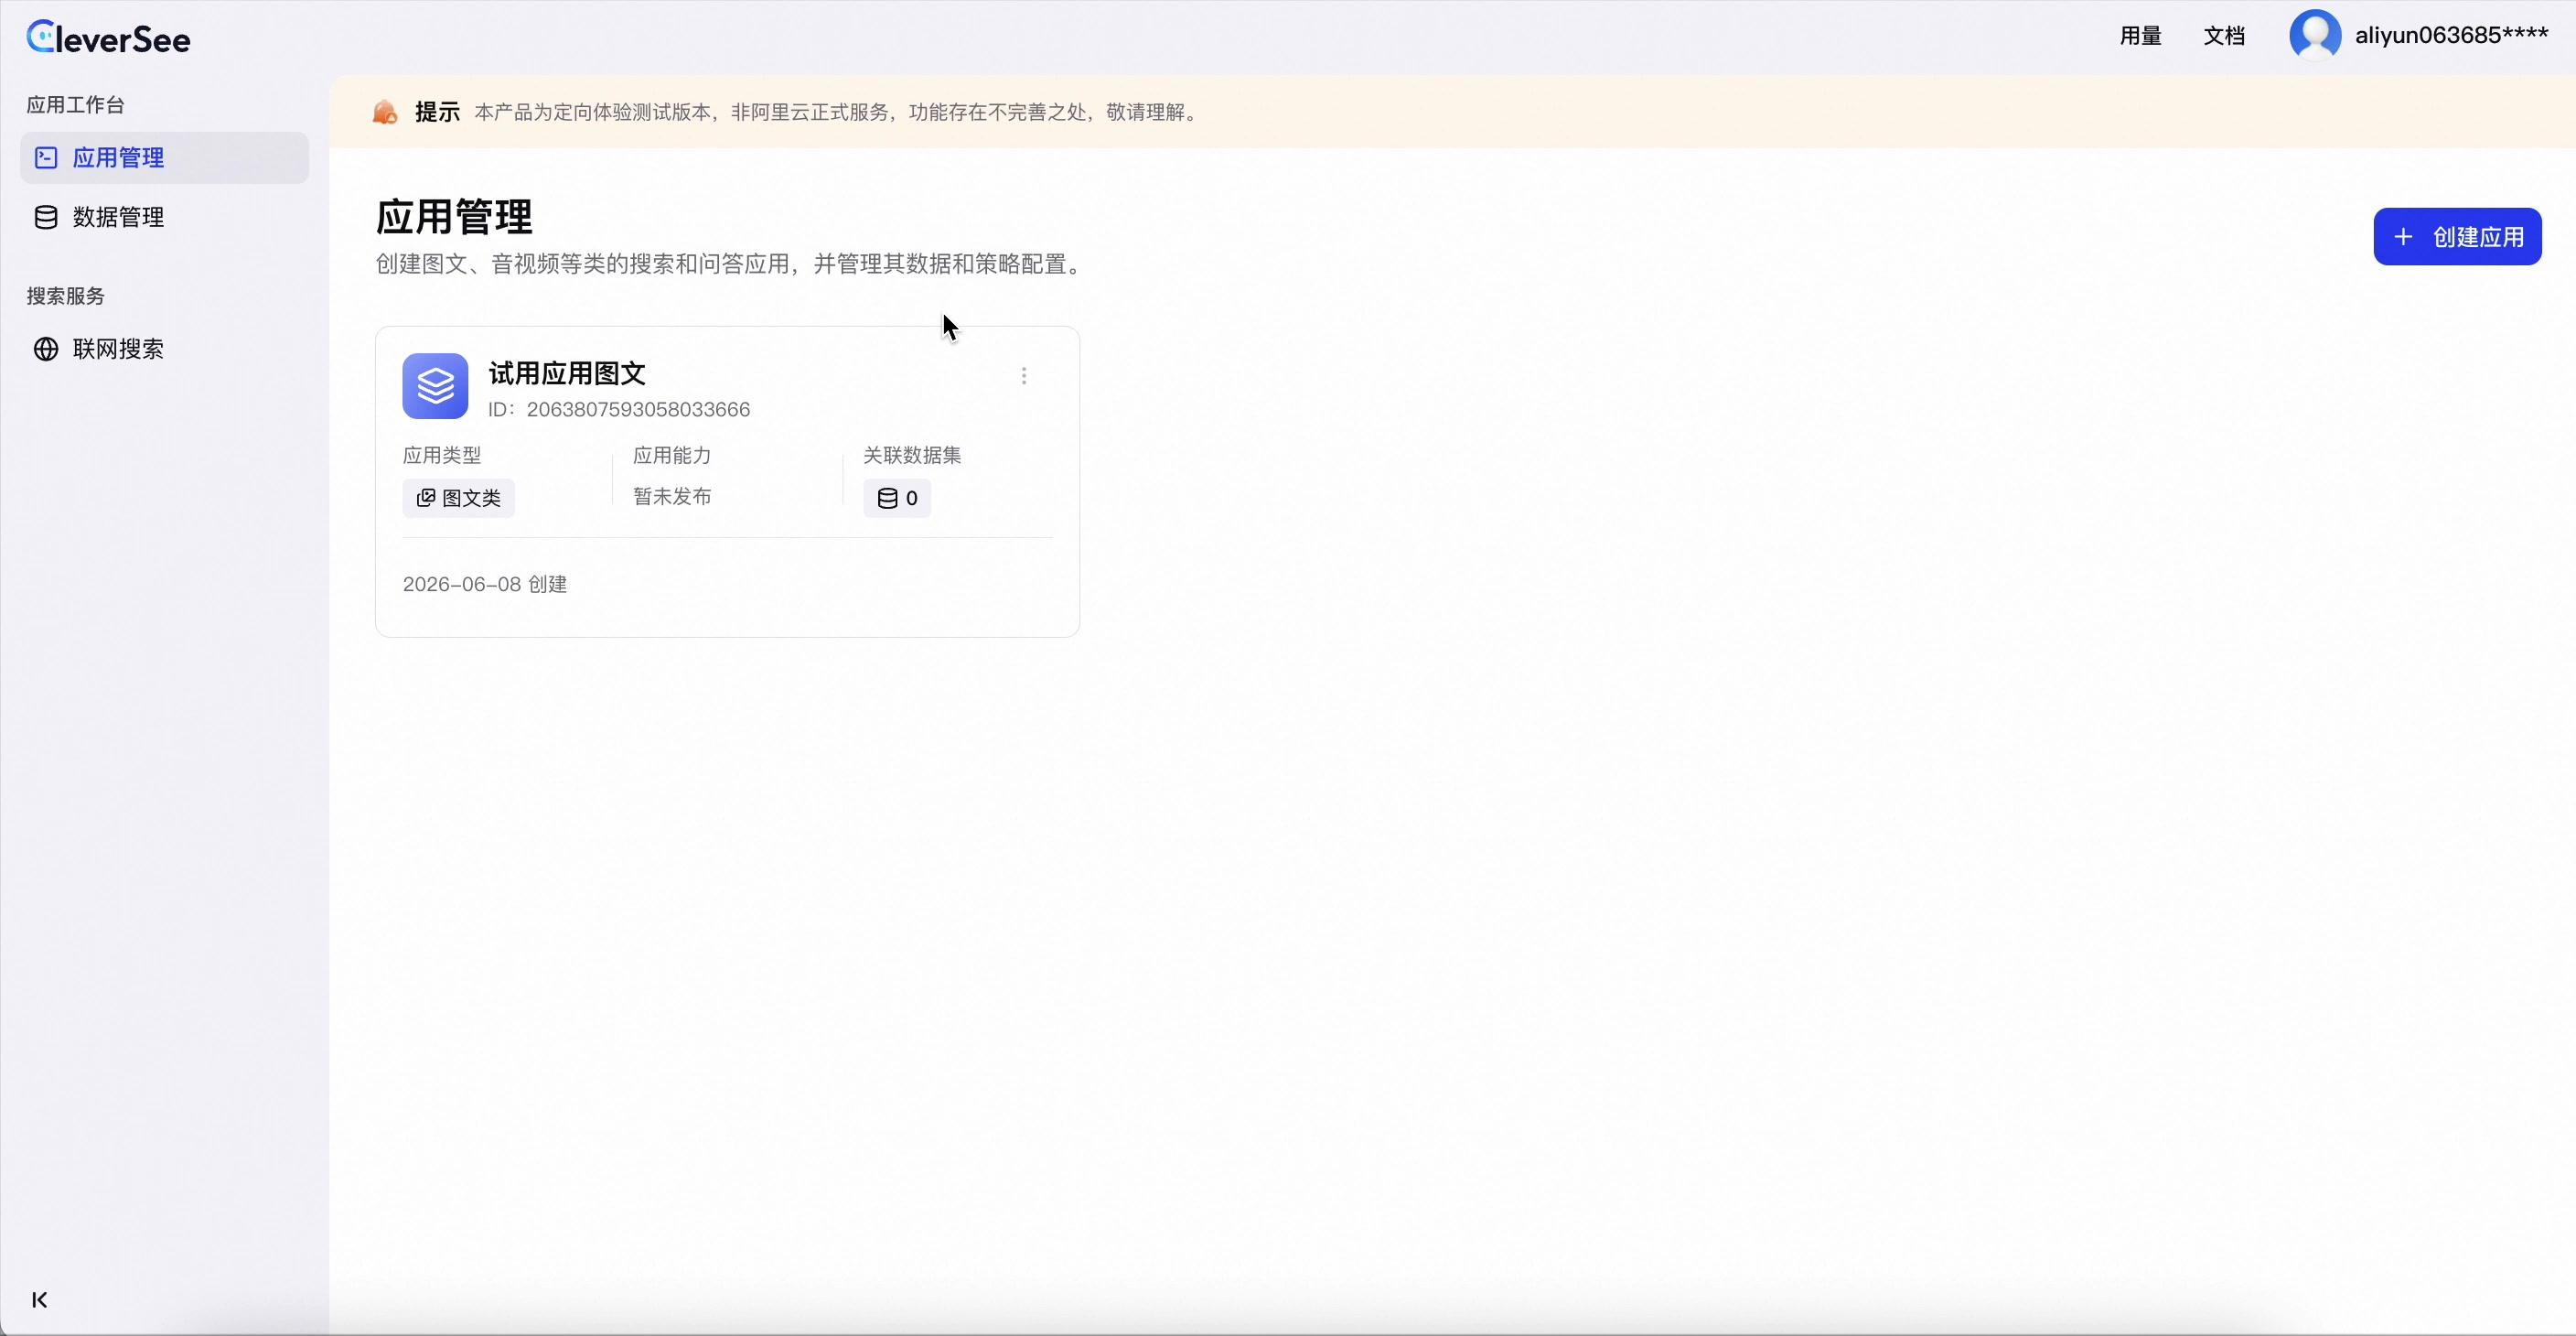
Application Management: View and create applications
Tip: You don't need to create a separate "Q&A application." Instead, navigate to your target application's configuration page and select the "Q&A" tab.
Step 2: Switch to the Q&A tab
When you open an application, it defaults to the Search configuration page, which includes settings for associated datasets, search modes, and search configurations.
Use the toggle at the top center of the page to switch between the configuration panels for the Search and Q&A capabilities.
Click the Q&A tab at the top to open the Q&A configuration panel.
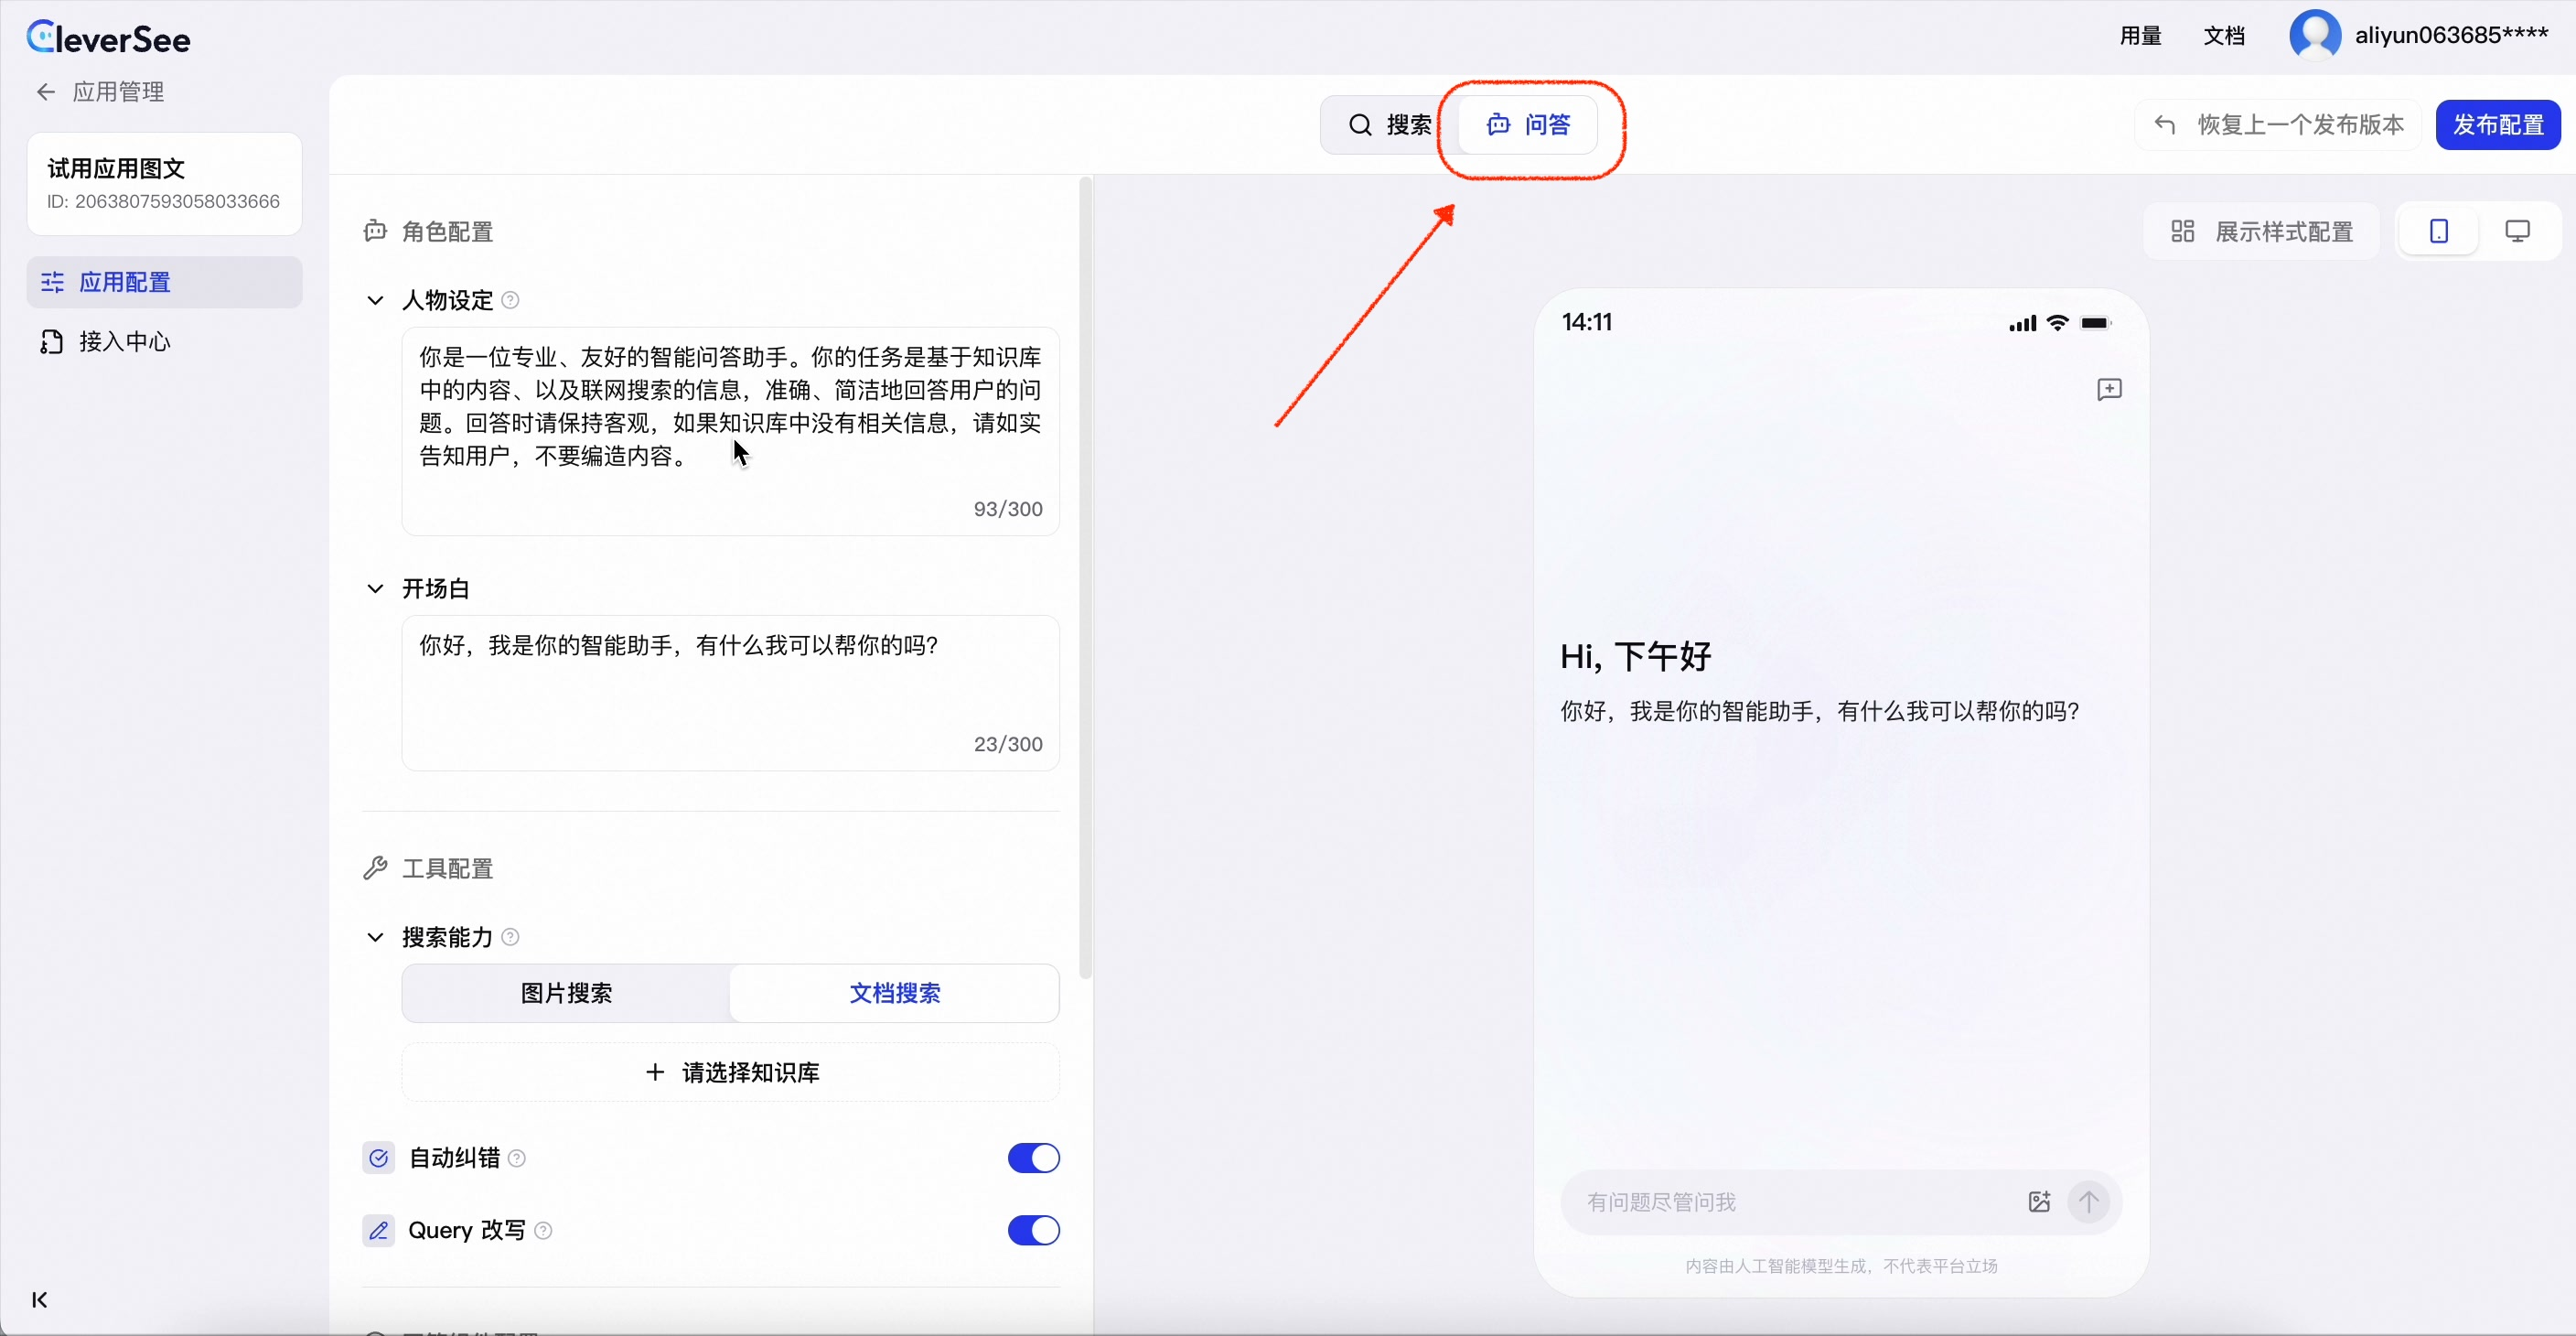
Q&A configuration page: Switch at the top
The Q&A configuration panel is divided into four modules, with a form on the left and a real-time preview on the right:
Module | Purpose |
role configuration | Defines the assistant's persona and opening statement. |
tool configuration | Controls search enhancement capabilities, auto correction, and query rewriting. |
Answer component configuration | Controls how answers are displayed, such as including knowledge source citations. |
rejection word settings | Configures sensitive words and the rejection strategy. |
Step 3: Role configuration
The role configuration defines the core identity of your Q&A assistant, determining its response style and boundaries.
3.1 Define the persona
In the "persona" input box, describe the assistant's identity, capabilities, and constraints in natural language. The system provides a default prompt that you can use directly or modify as needed.
3.2 Set the opening statement
The "opening statement" is the first message users see when they start a Q&A session. We recommend keeping it short and friendly. After you make changes, a Saved notification appears in the upper-right corner of the page, and all changes are automatically saved as a draft.
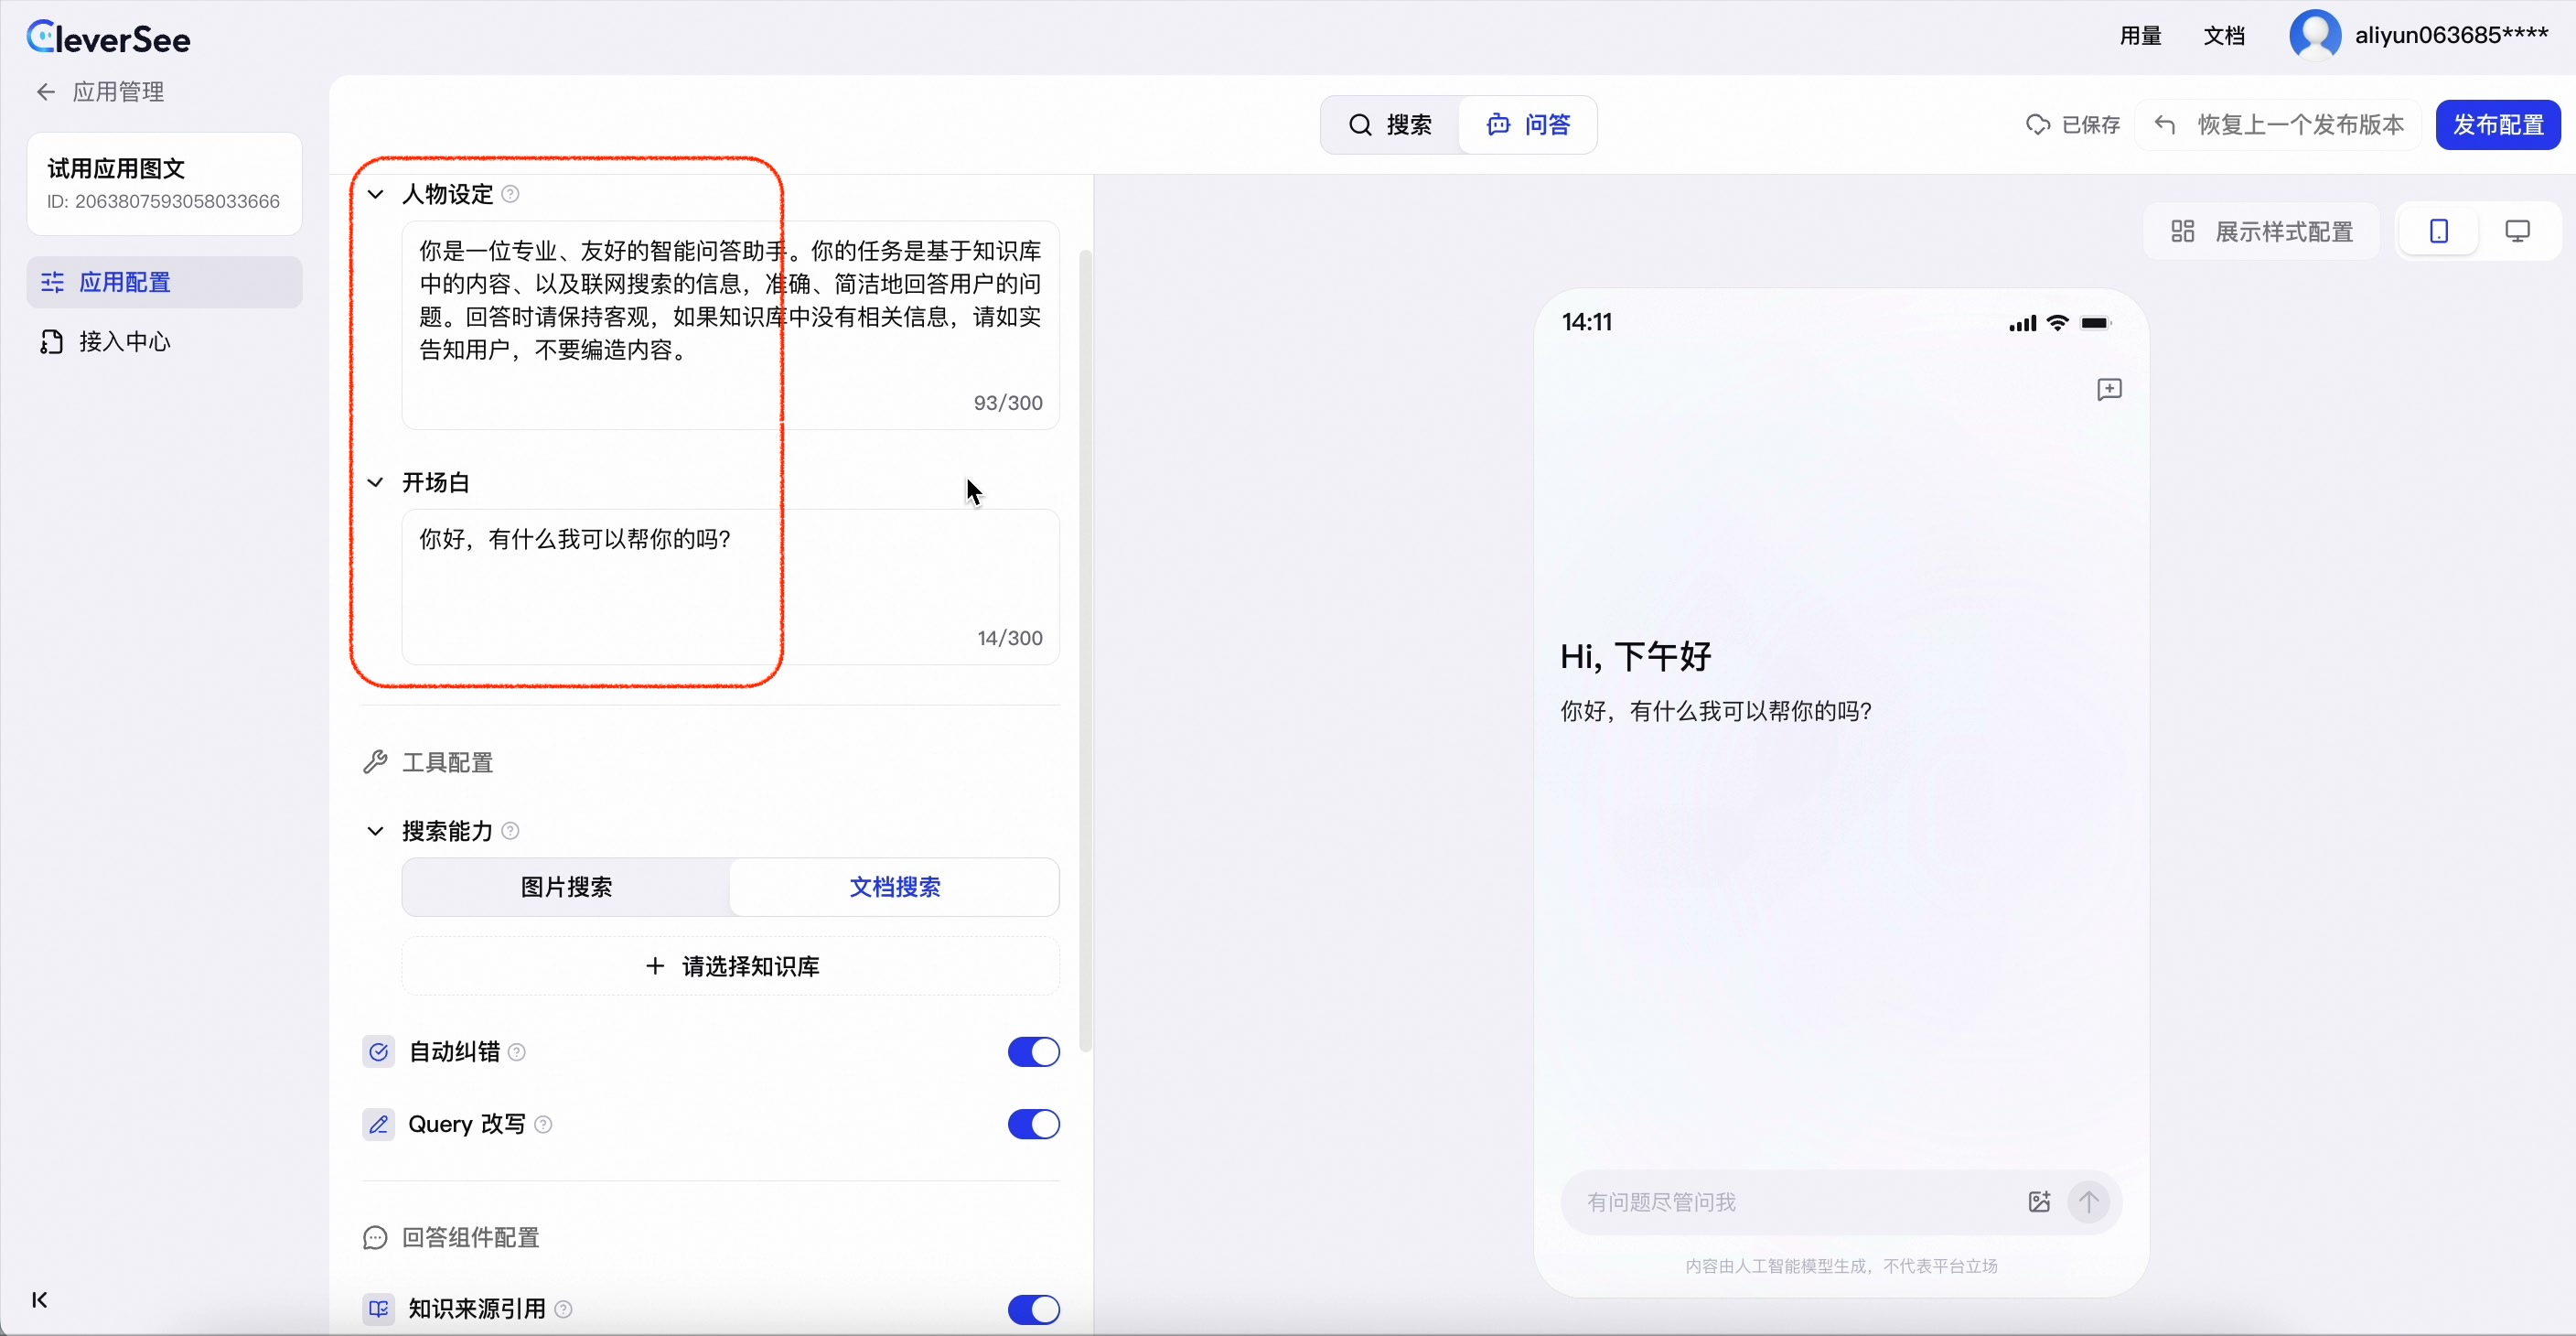
Role configuration: Persona and opening statement
Step 4: Tool configuration
"tool configuration" determines which data sources and enhancement capabilities the Q&A assistant can use to generate answers.
4.1 Select search type
In the "Search Capability" module, two retrieval sources are available:
image search: For applications that use image assets as the Q&A data source. You must first configure the application's Search mode.
document search: For applications that use documents such as PDF, DOC, or TXT files as the Q&A data source.
Note
To use the image search capability, you must first configure and publish the "Search" mode within the same application. In "Search" mode, you can attach image datasets. For more information, see Image Search.
4.2 (Optional) Attach a document knowledge base
If you select the "document search" capability, switch to its tab and click the + Select Knowledge Base button to attach document datasets.
Scenario 1: Use existing datasets
A drawer opens on the right, listing all available document datasets. Each record displays information such as the dataset name, ID, number of data entries, and readiness status. Select the checkboxes for the datasets you want to attach and click Confirm. You can attach multiple datasets at once.
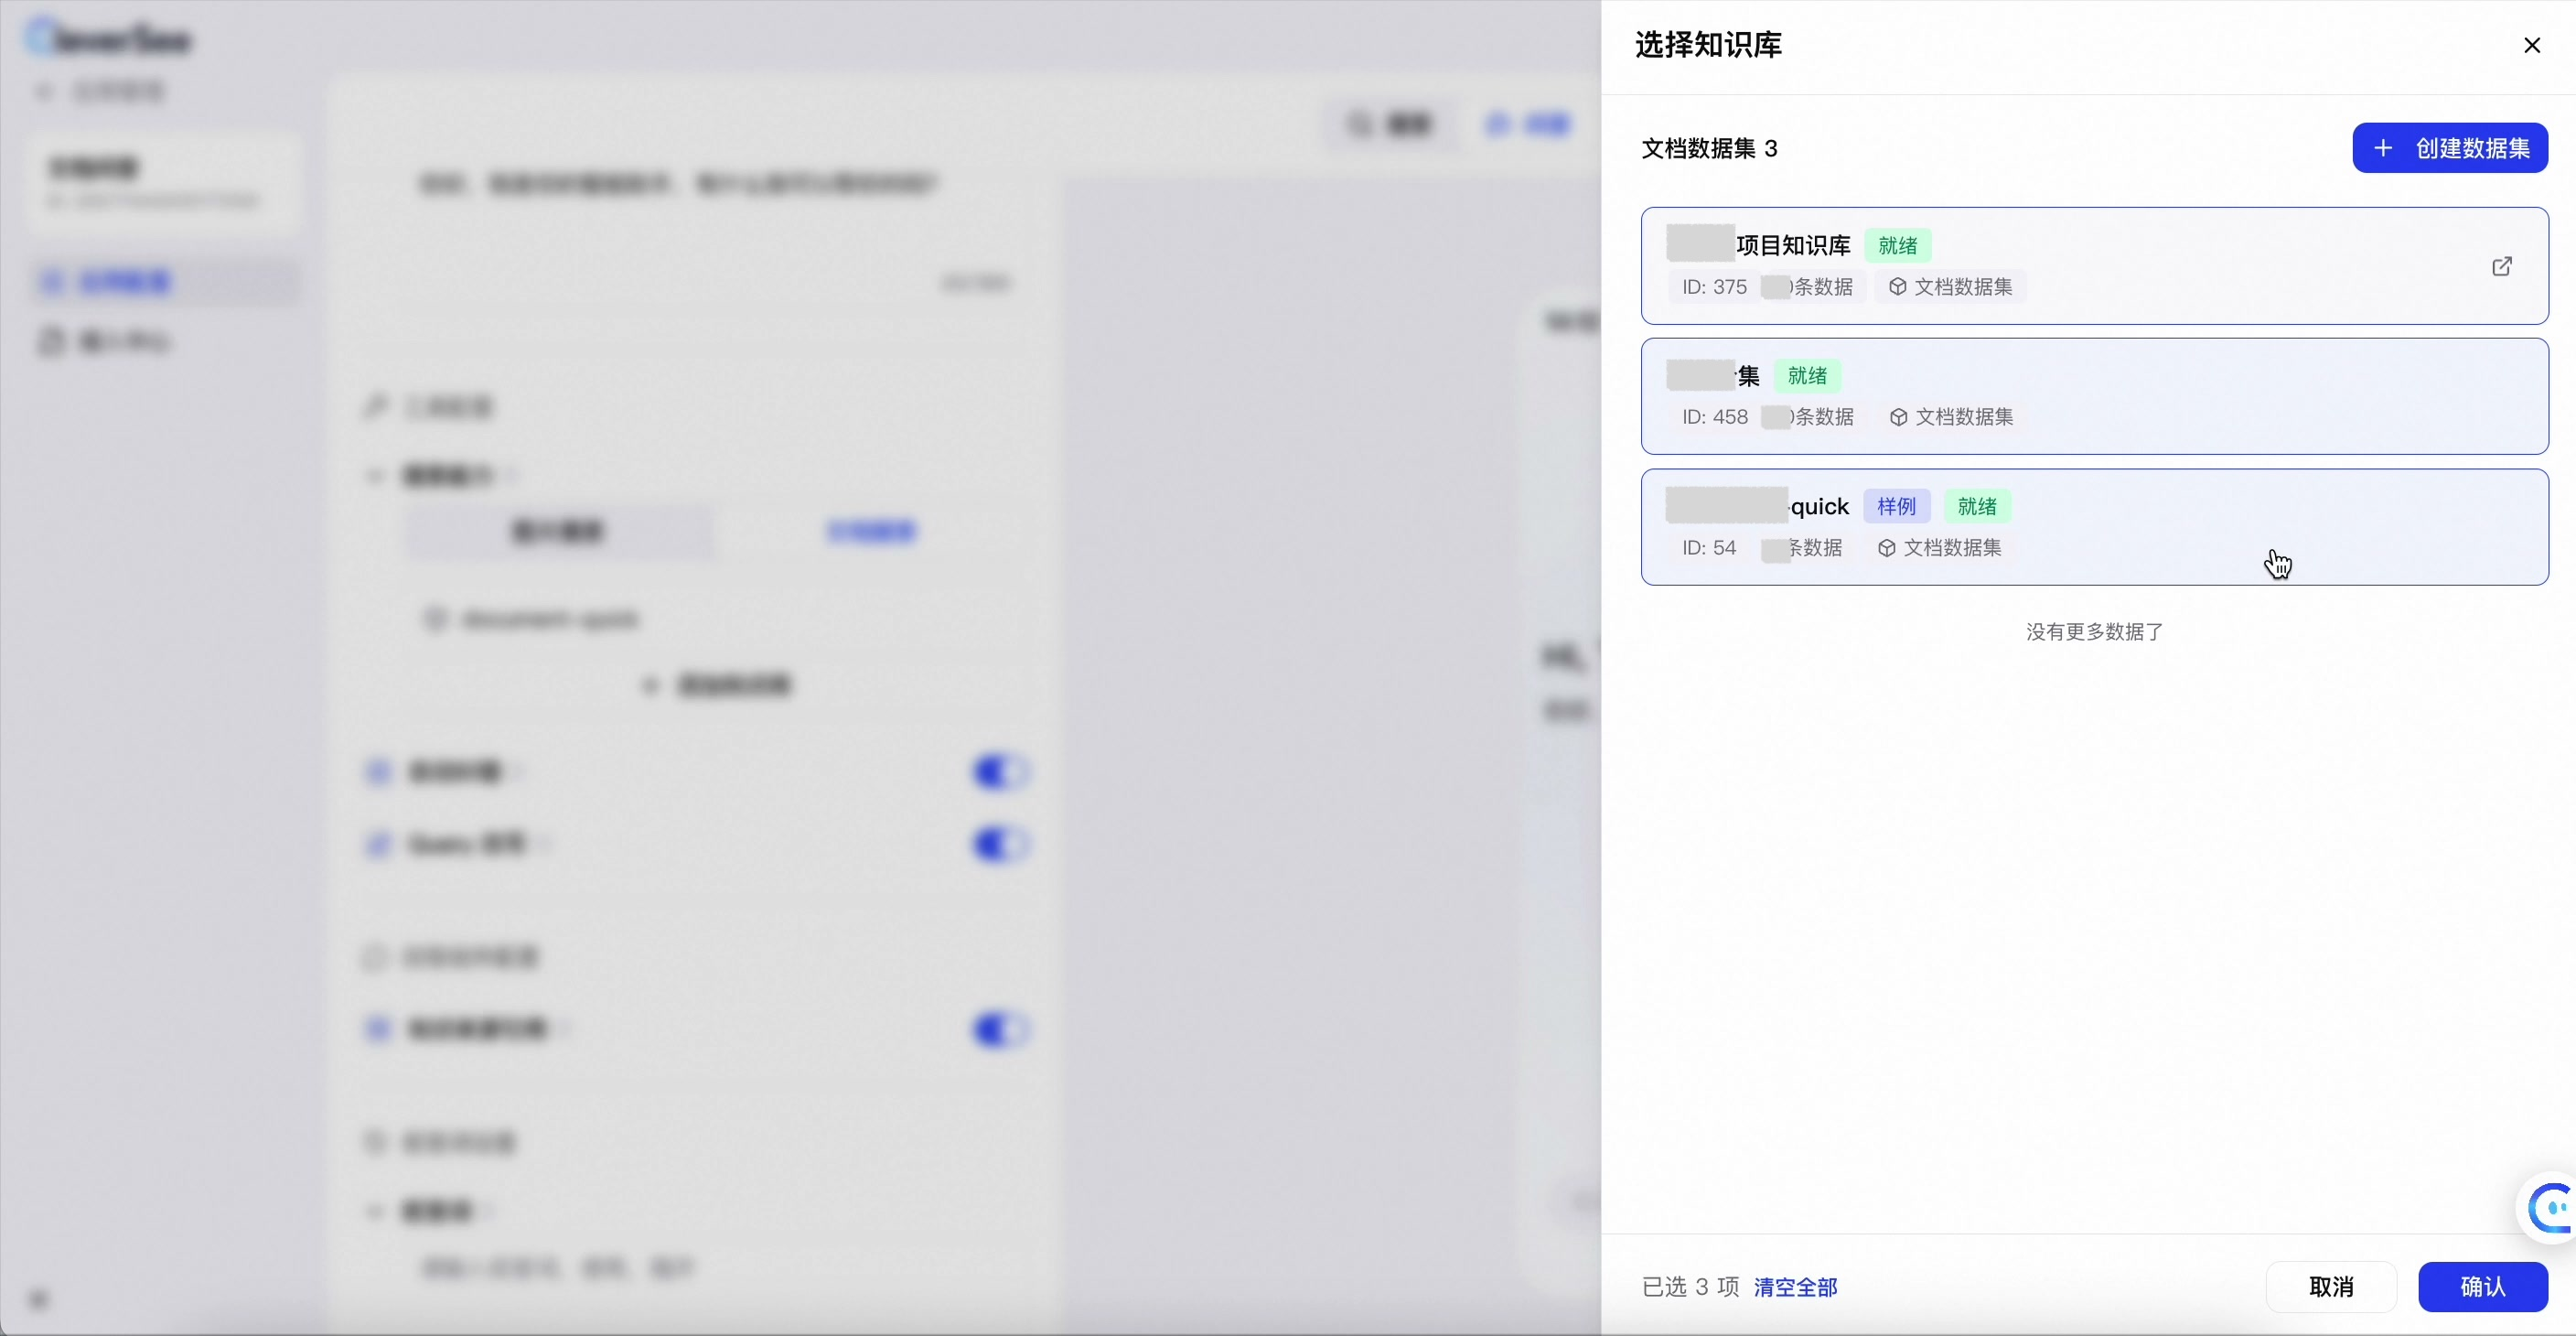
Attaching a knowledge base: Select multiple datasets
Scenario 2: Create a new dataset
If you have not created a document dataset, the panel prompts you to click + Create dataset in the upper-right corner to create one immediately.
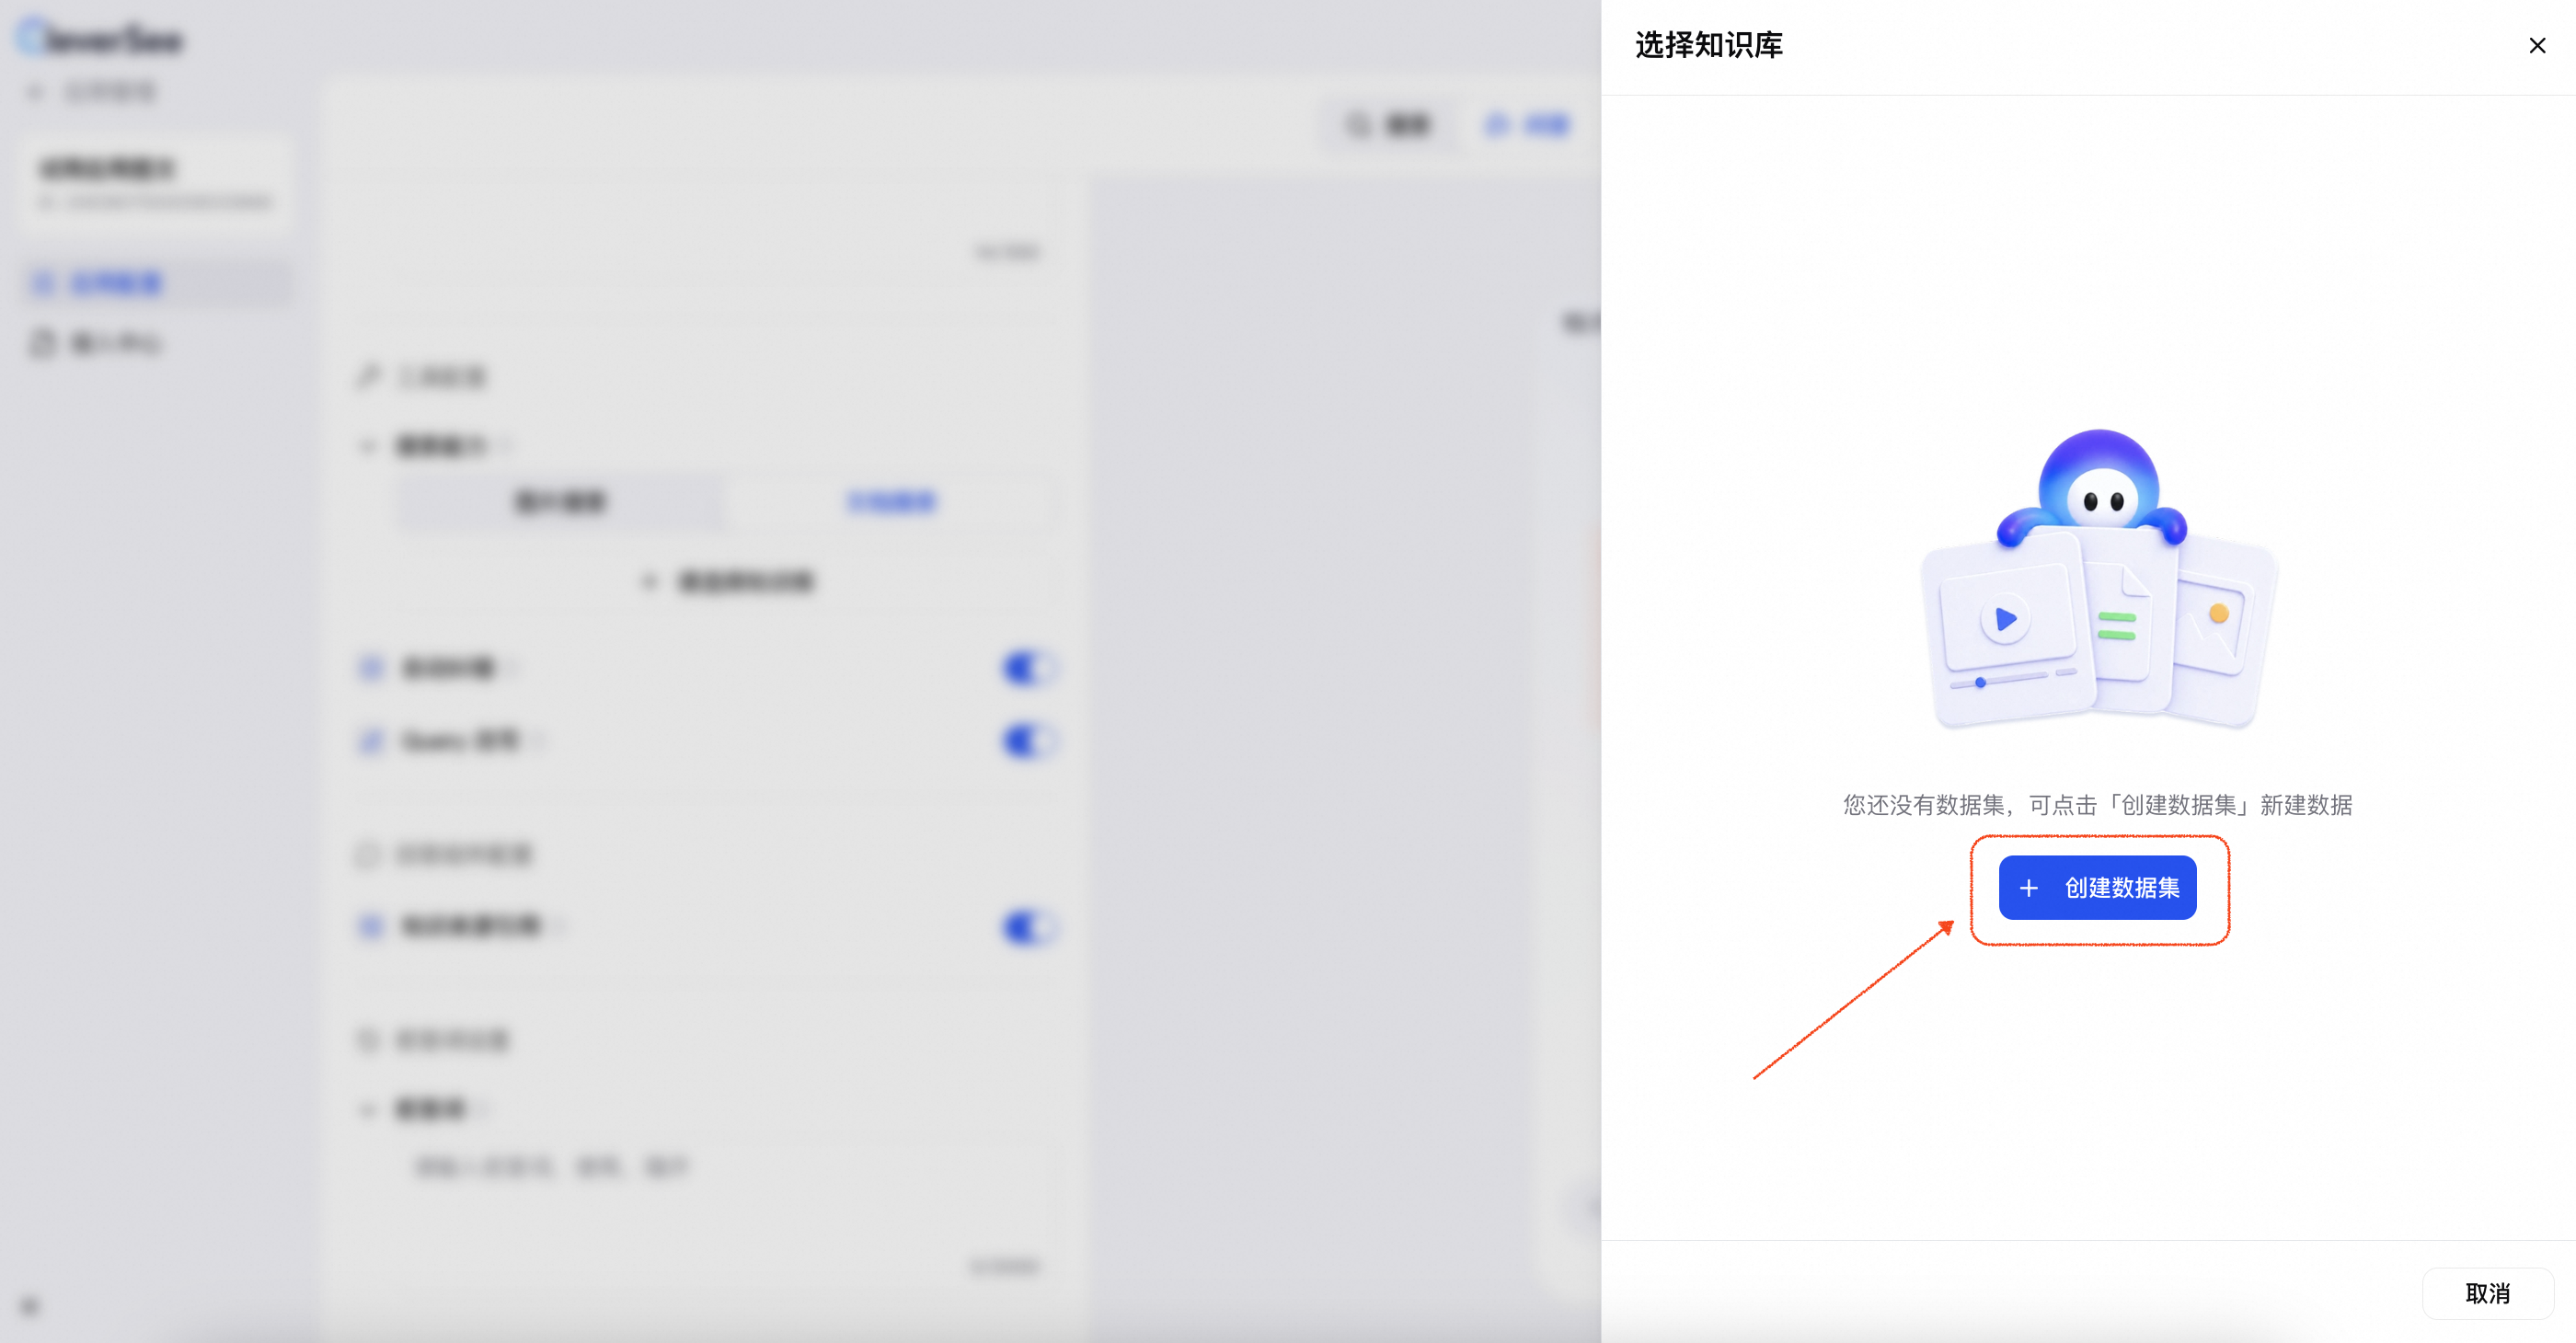
Create a new document dataset
4.3 Search enhancements
Two enhancement capabilities are available, which you can enable as needed:
Toggle | Description |
auto correction | Automatically identifies and corrects spelling errors in search terms (e.g., |
query rewriting | Semantically rewrites and expands user questions to better match the user's intent during retrieval. |
Step 5: Answer and rejection settings
5.1 Knowledge source citation
In "Answer component configuration," enable knowledge source citation. The assistant will then cite its sources (such as document names, document snippets, or image information) at the end of its response, allowing users to verify the information.
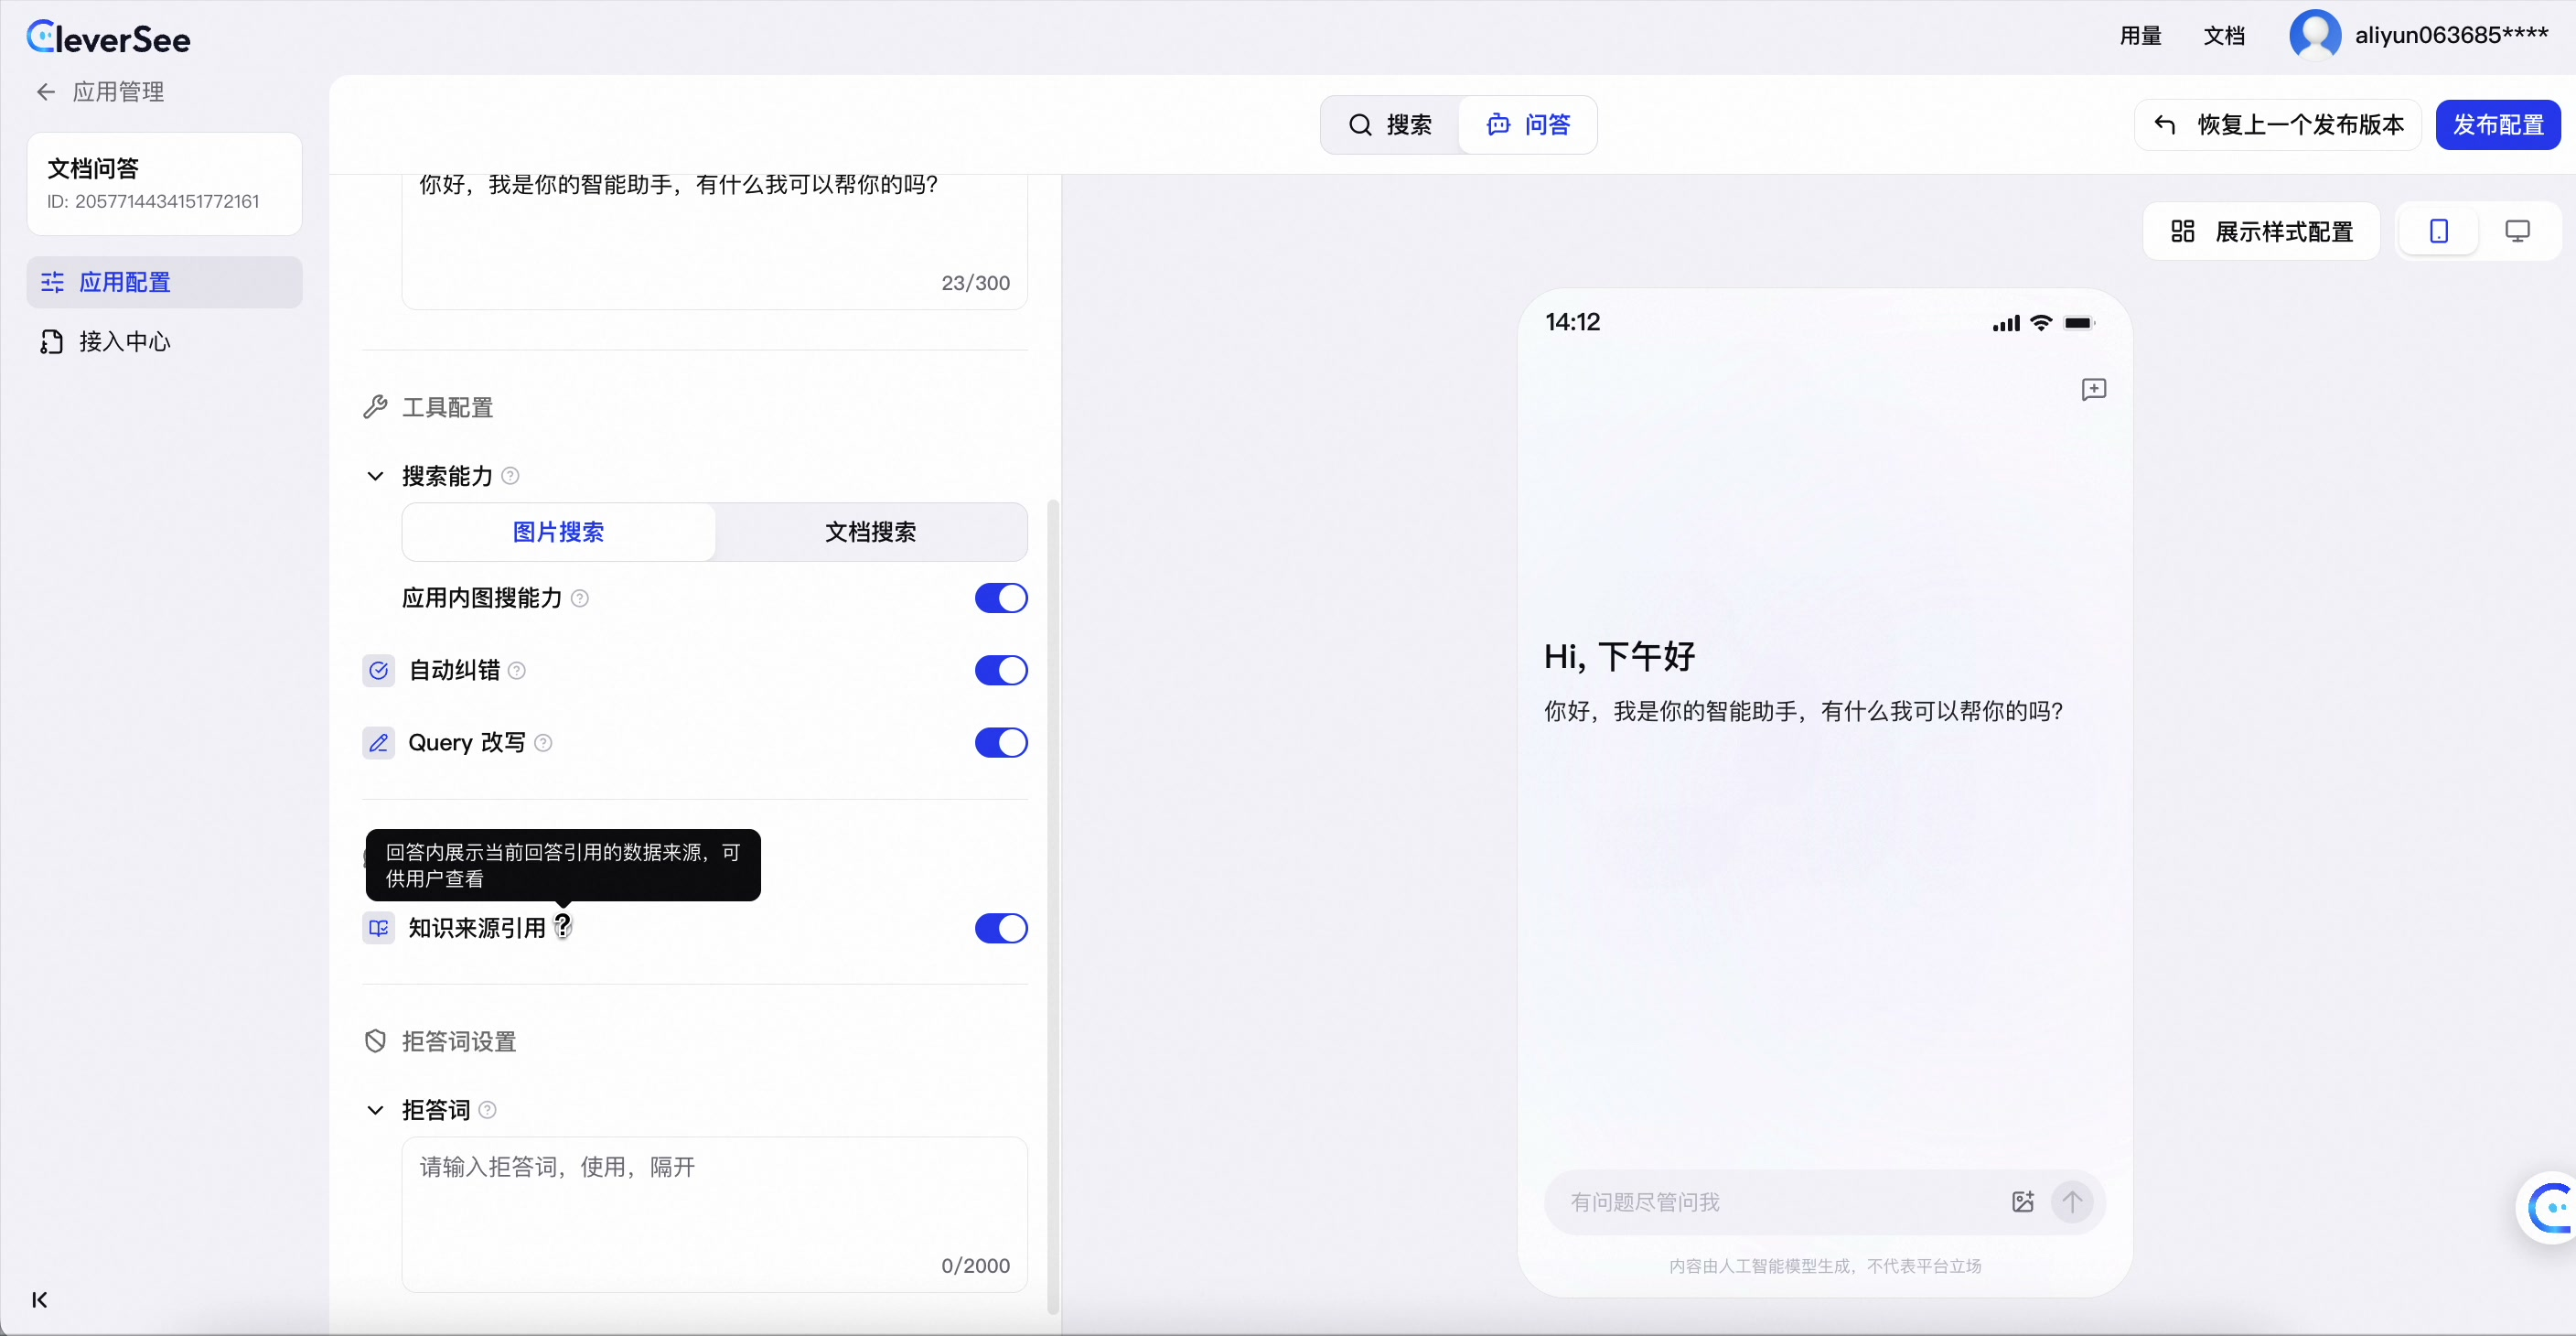
Q&A configuration: Source citation
5.2 Rejection word settings
"rejection words" are used to configure application-level sensitive or forbidden words. If a user's query contains a rejection word, the application declines to answer and does not call the large model. This helps mitigate compliance risks.
Rejection word input: In the text box, enter the keywords you want to block. Separate multiple words with a comma (
,). The maximum length is 2,000 characters.Leaving this field blank disables the rejection strategy.
Step 6: Publish configuration
All configurations are automatically saved as a draft during editing, indicated by the "Saved" status at the top. However, changes take effect only after you publish them.
6.1 Click "Publish Configuration"
After you have finished all your changes, click the Publish configuration button in the upper-right corner.
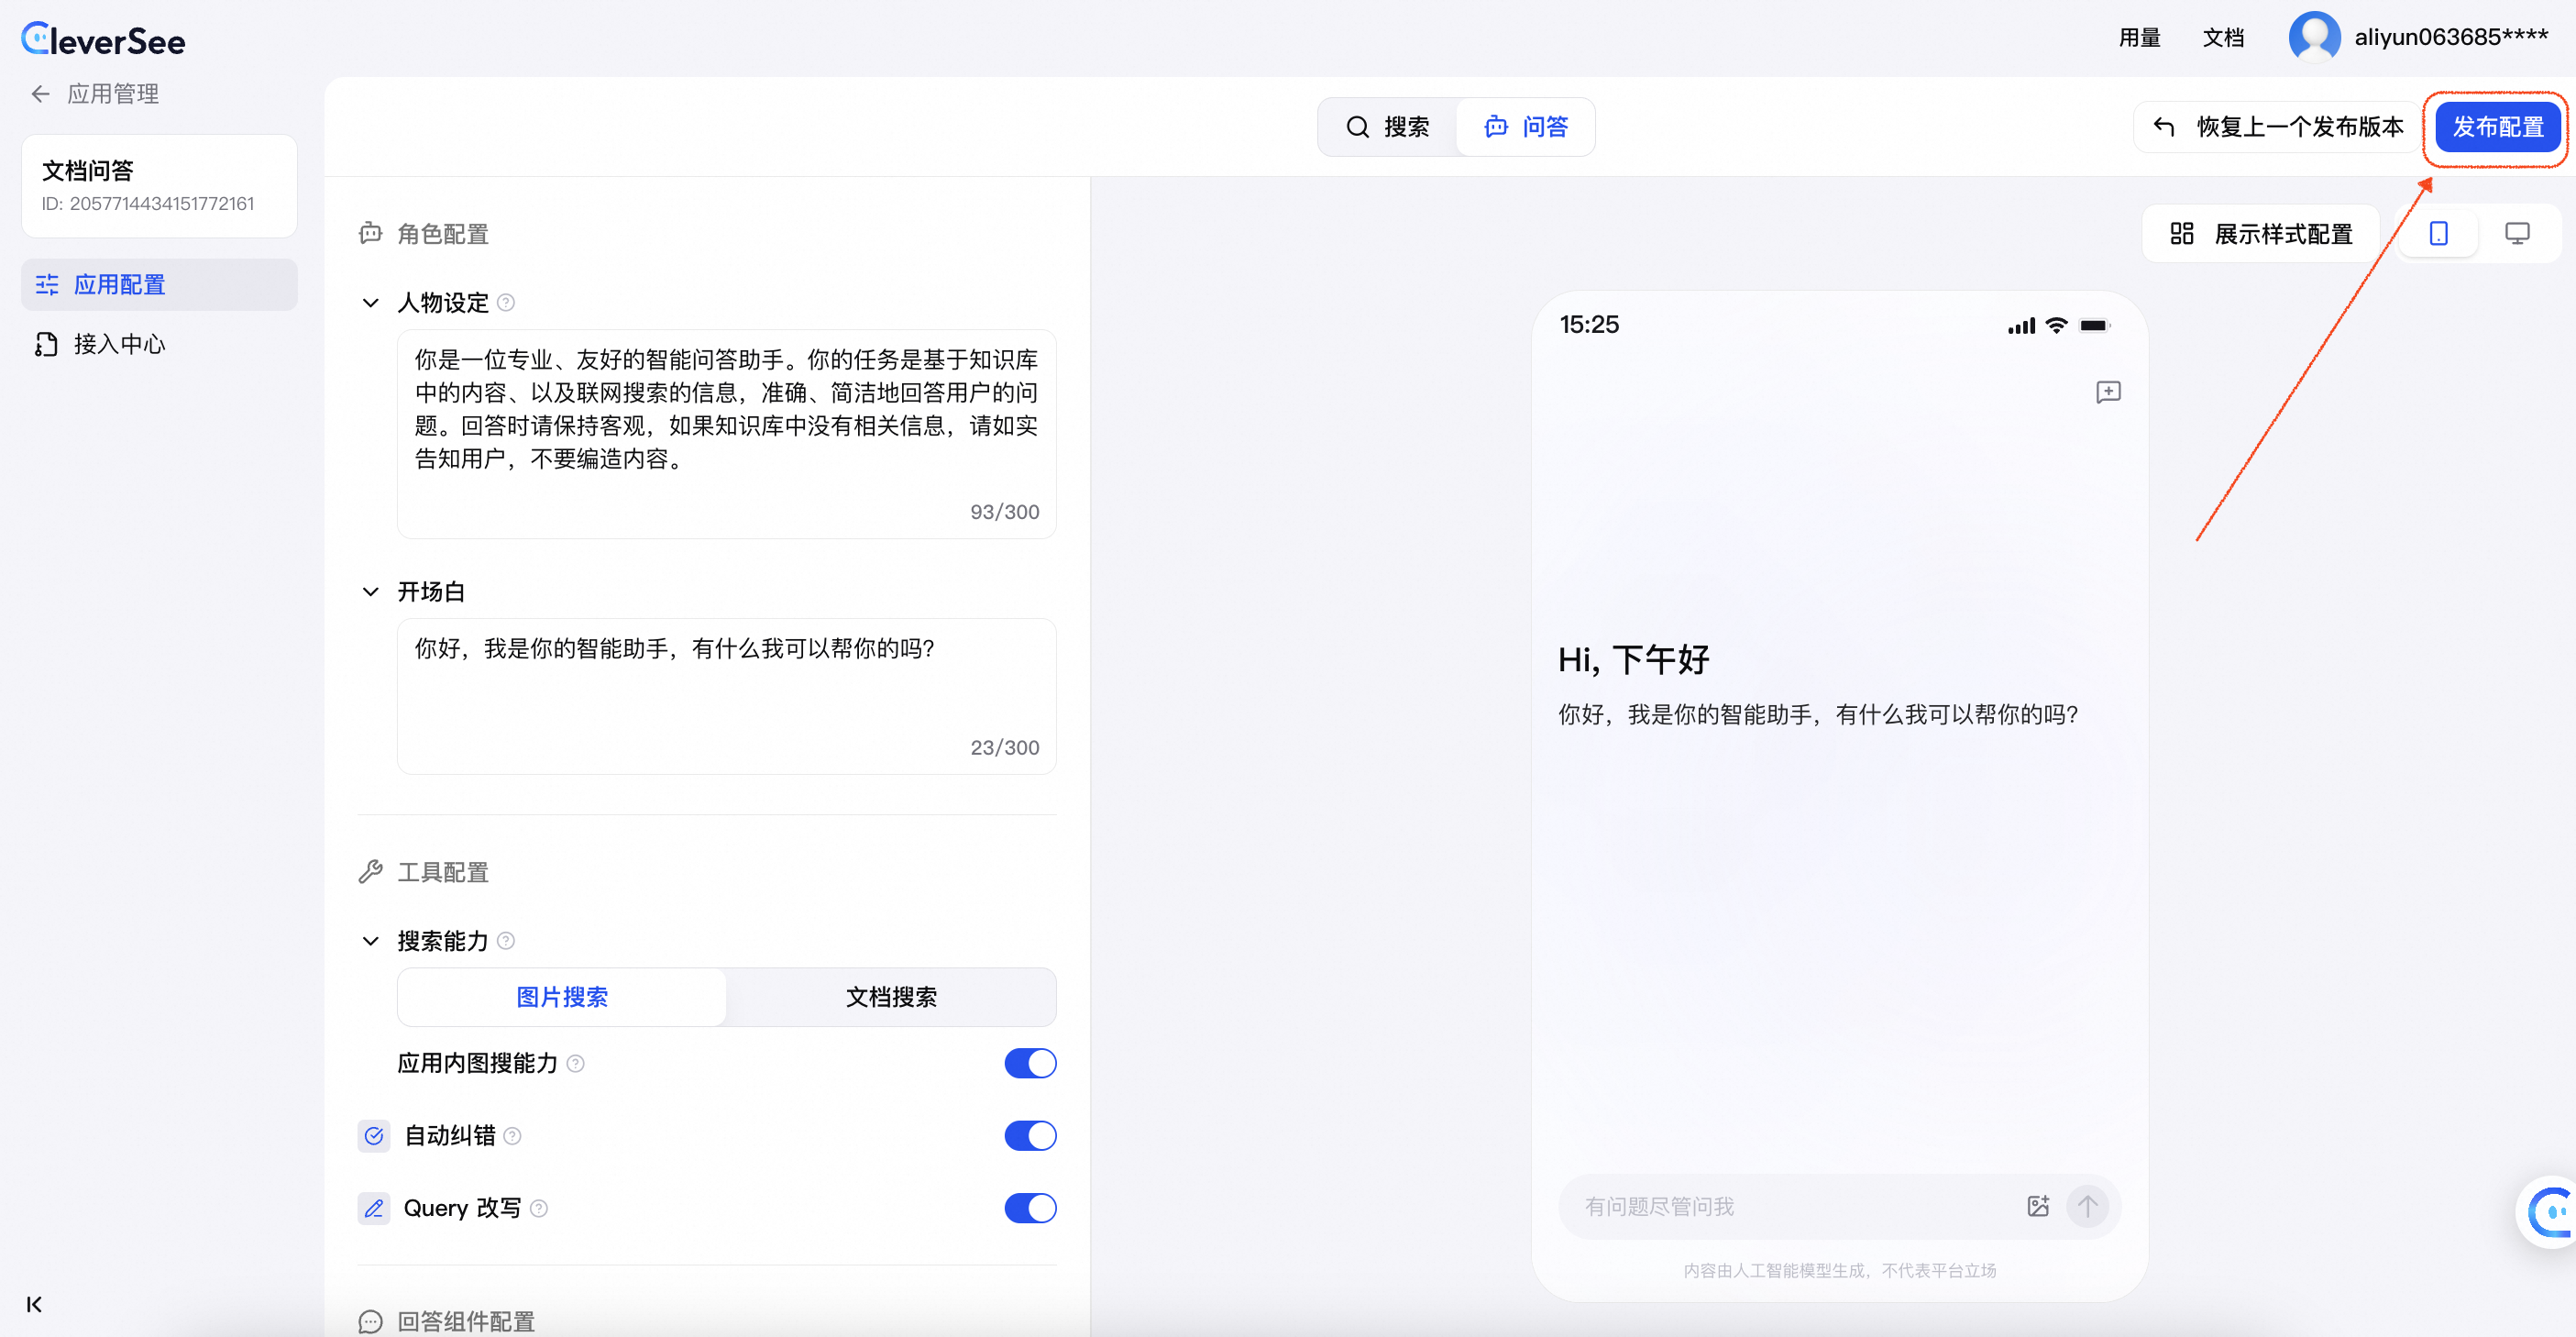
Publish configuration: Q&A application
6.2 Preview and confirm changes
The system opens a change preview drawer, which lists all changes since the last published version. These include:
Search: Associated datasets, maximum number of results, display style (cover image, main title field mapping), etc.
Q&A: persona, opening statement, in-app image search capability, search capabilities (image search / document search), etc.
Review the changes and click Confirm publish in the lower-right corner.
Note: There is a 60-second cooldown period between publications to prevent accidental submissions. The "Confirm publish" button will display a countdown timer (e.g., 50s).
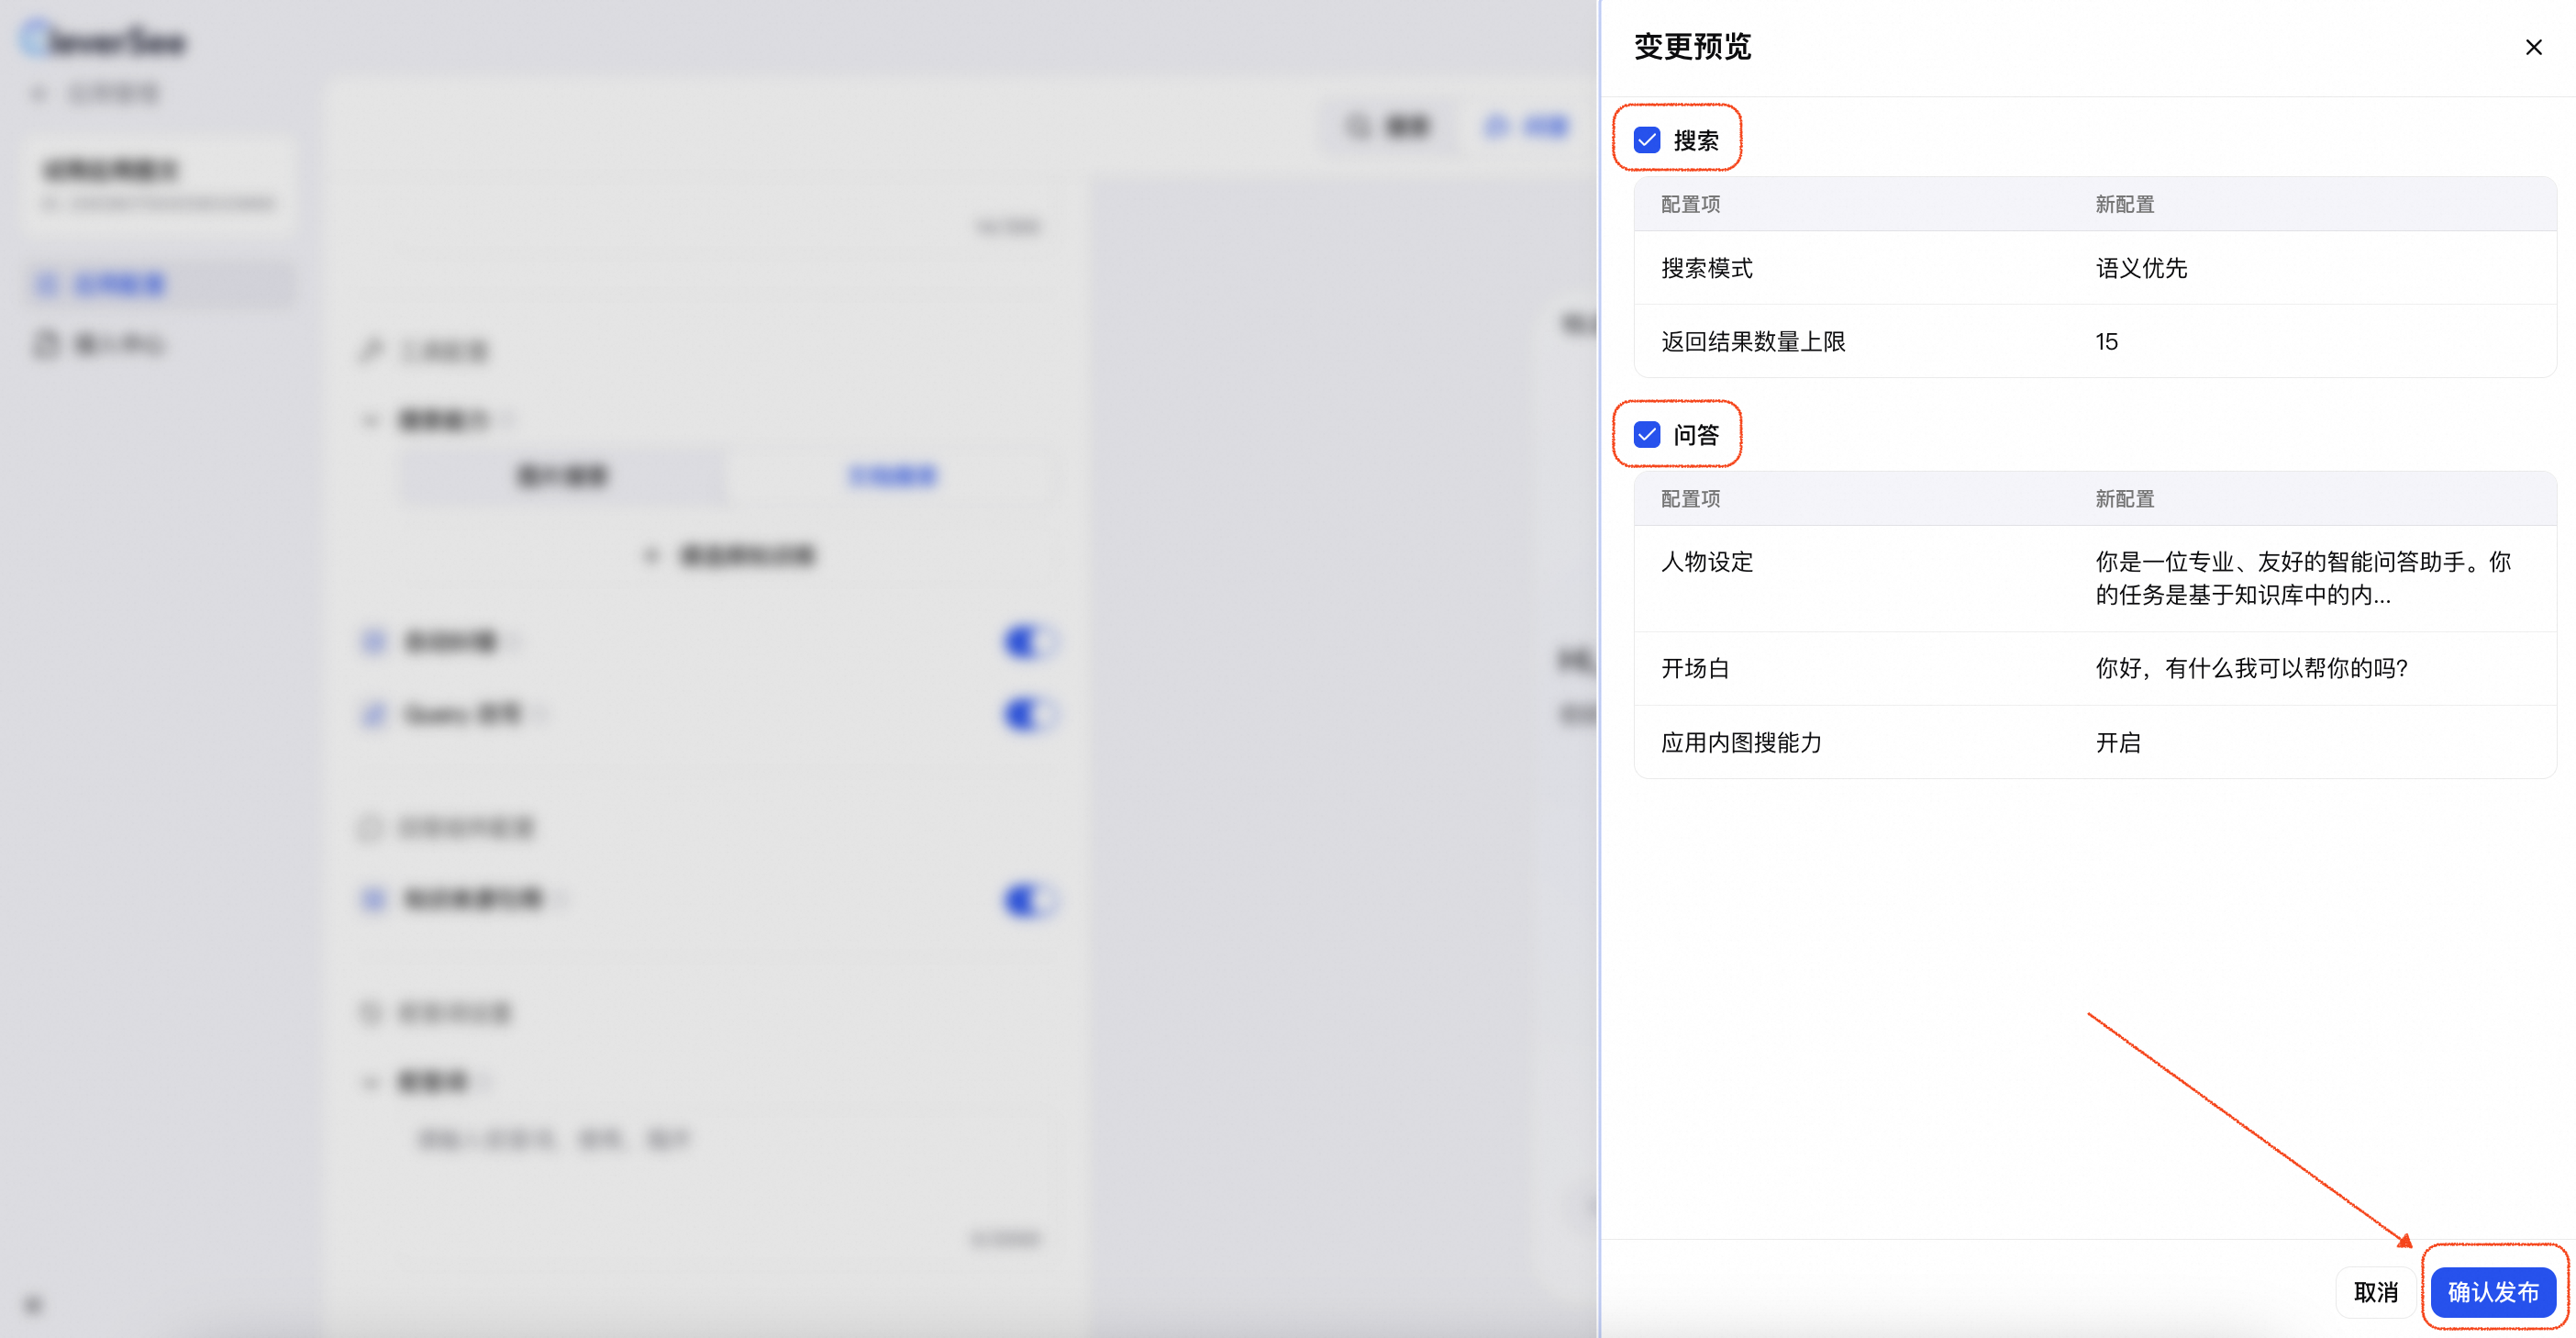
Preview changes and publish them to the live environment
6.3 Publication success
After the publication is complete, a New configuration published successfully! message appears at the top of the page. This indicates that the Q&A capability is live and end users can access the latest version.
If you discover an issue after publication, you can click ↺ Restore Last Published Version at the top of the page to perform a one-click version rollback.
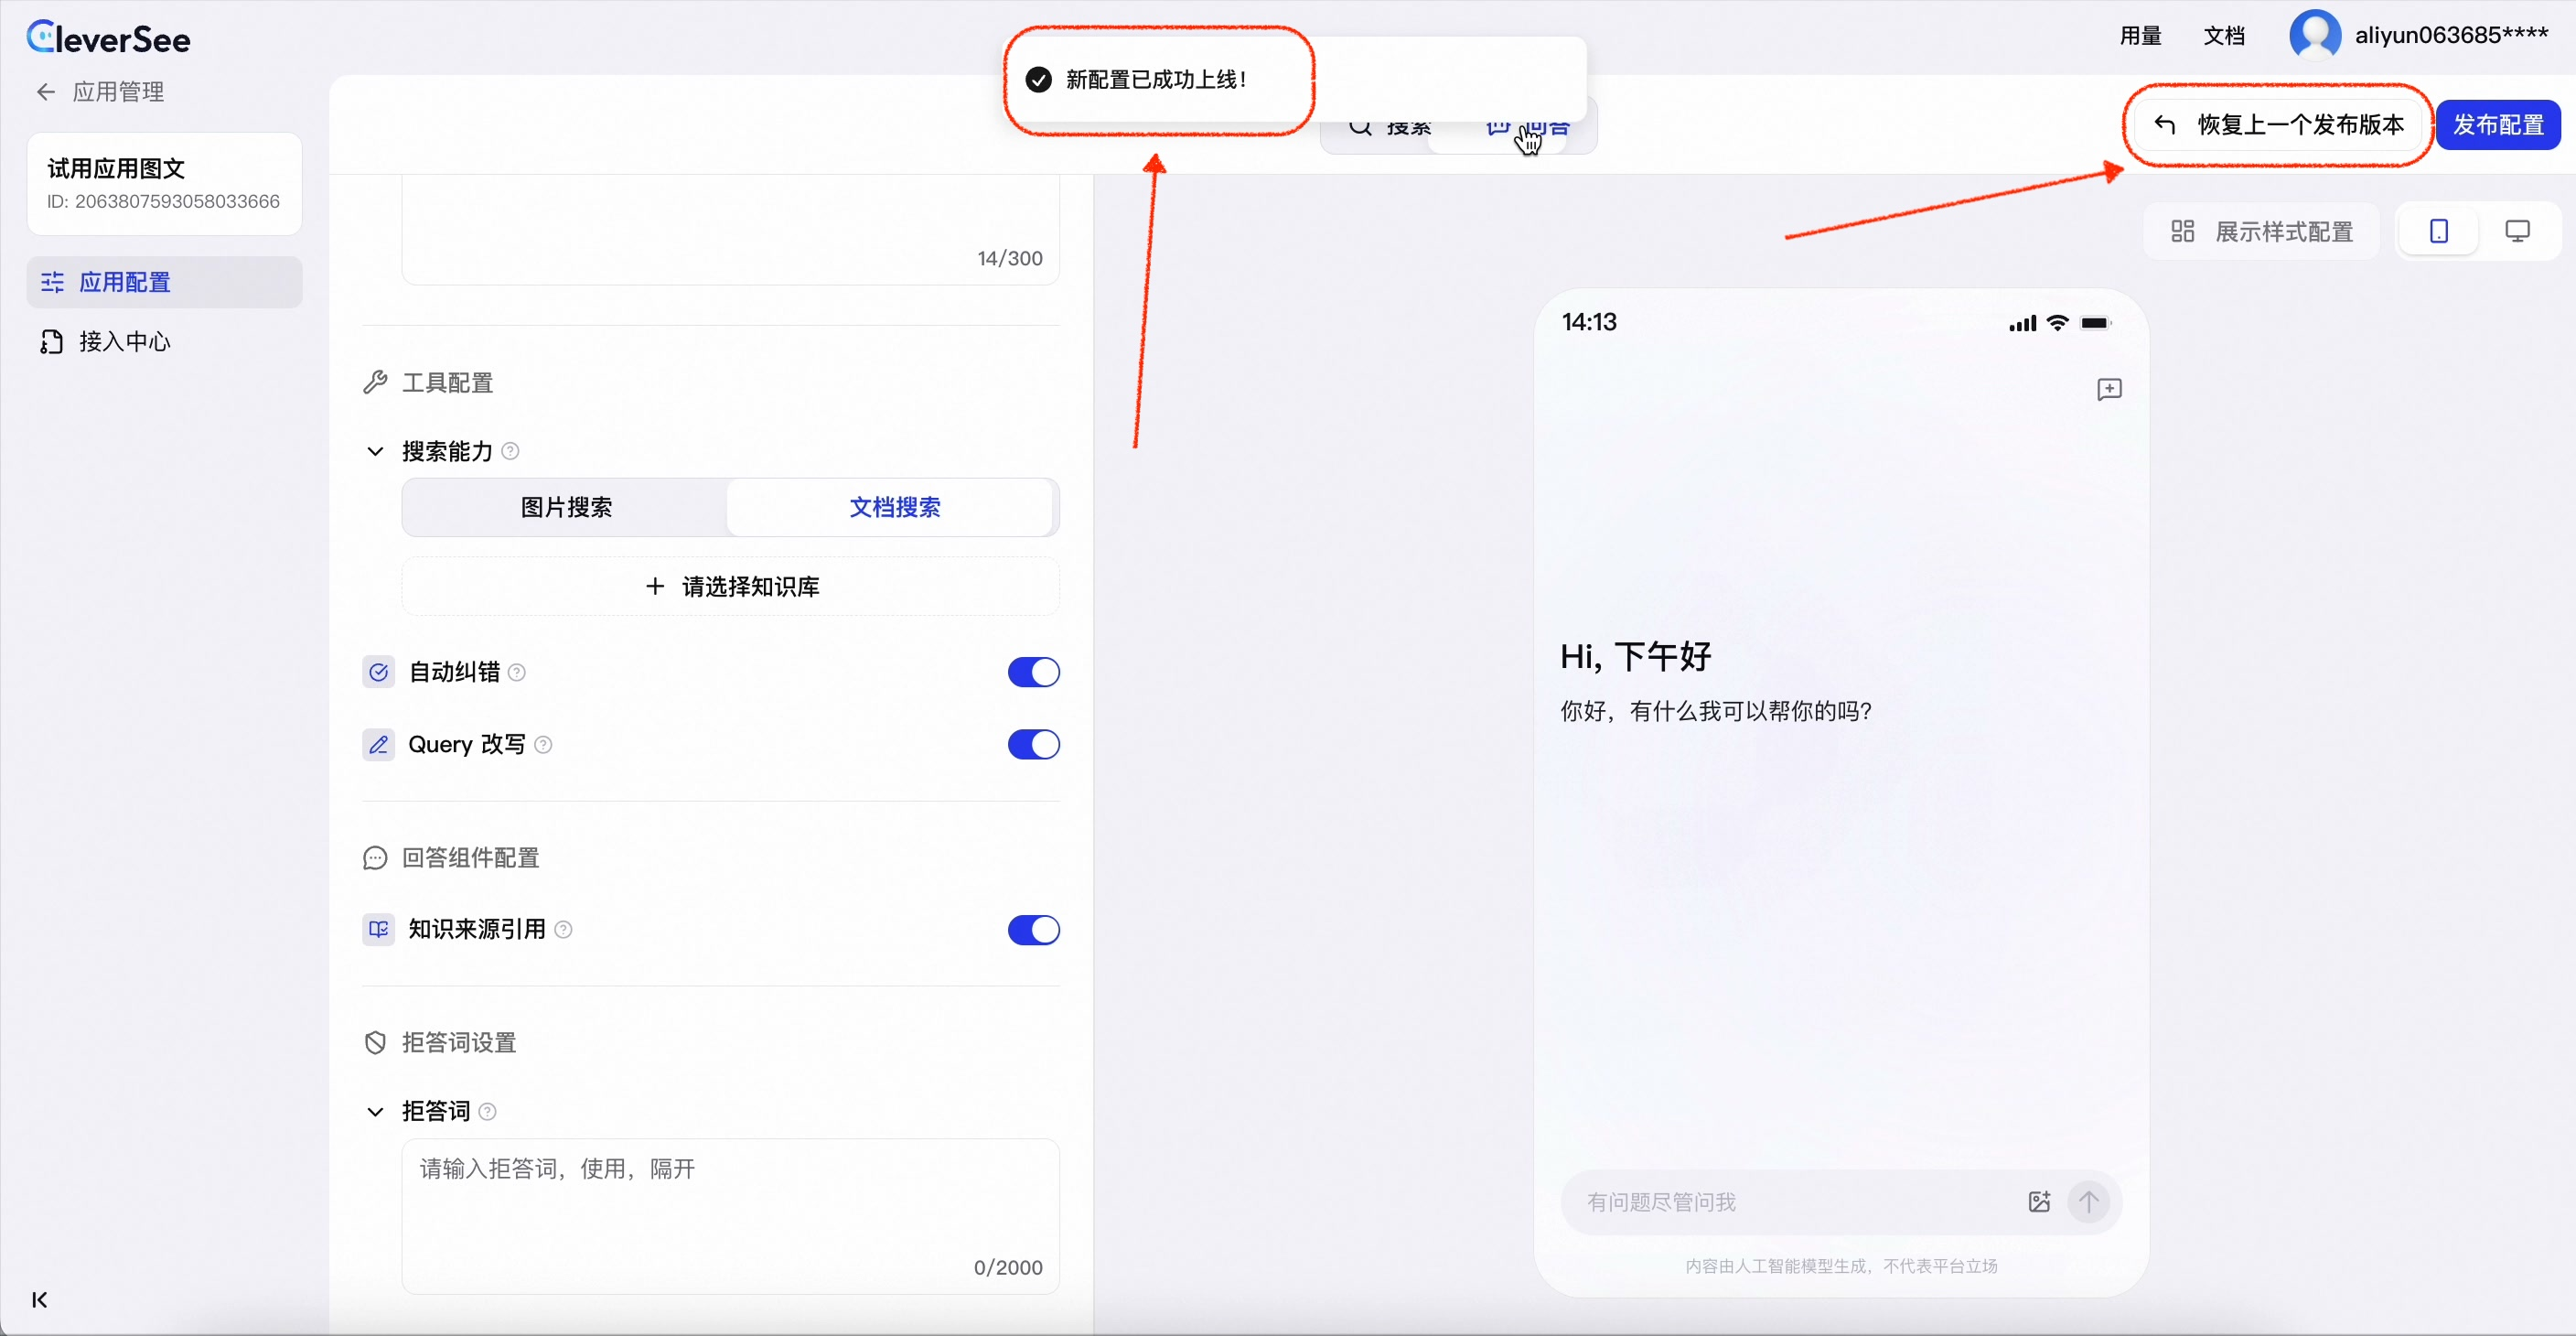
Publication result notification
FAQ
Q1: I modified the configuration, but the changes haven't taken effect. Why?
A: Make sure you have clicked Confirm publish after clicking "Publish configuration". Changes that are not confirmed are only saved as a draft and do not affect live users.
Q2: When I enable "In-app image search" under "Search Capability - image search," an "Image search application not published" error appears. What should I do?
A: You must first configure and publish the image search capability on the Search configuration page. Then, return to the Q&A configuration page to enable this capability.
Q3: After I attach a knowledge base, why don't answers reference content from my documents?
A: The Q&A application cites a knowledge base document only when the user's query is highly relevant to a document snippet. Therefore, not every answer will include a citation.
Summary
By following this tutorial, you have learned the complete workflow for building a Q&A application on the CleverSee AI search PaaS platform:
Open the application → Select a target application and switch to the Q&A tab.
role configuration → Set the persona and opening statement.
tool configuration → Attach a knowledge base and enable search enhancements.
Answer components → Display knowledge source citations to improve credibility.
rejection words → Configure sensitive word filtering to ensure compliance.
publish configuration → Preview changes and publish them.
To learn more about other features (such as dataset management, application integration, and usage monitoring), see the corresponding chapters in our product documentation center.