My agents
To obtain a trusted identity and enable global secure discovery and mutual trust, an agent must complete registration, DNS verification, and certificate issuance. The My Agents module provides a 3-step wizard for registration and full agent lifecycle management.
Agents must be registered in the ATS console. Real-time registration using the SDK or API is not supported. After registration, you can download the certificate and configure it in the SDK.
Register an agent
Prerequisites
Registrant identity verification: Complete identity verification in the ATS console, and ensure the registrant status is "Approved".
Domain ownership: The host address (FQDN) bound to the agent must be a domain under your control.
Step 1: Fill out form
Log on to the ATS console. In the left navigation pane, choose My Agents.
Click Register Agent.
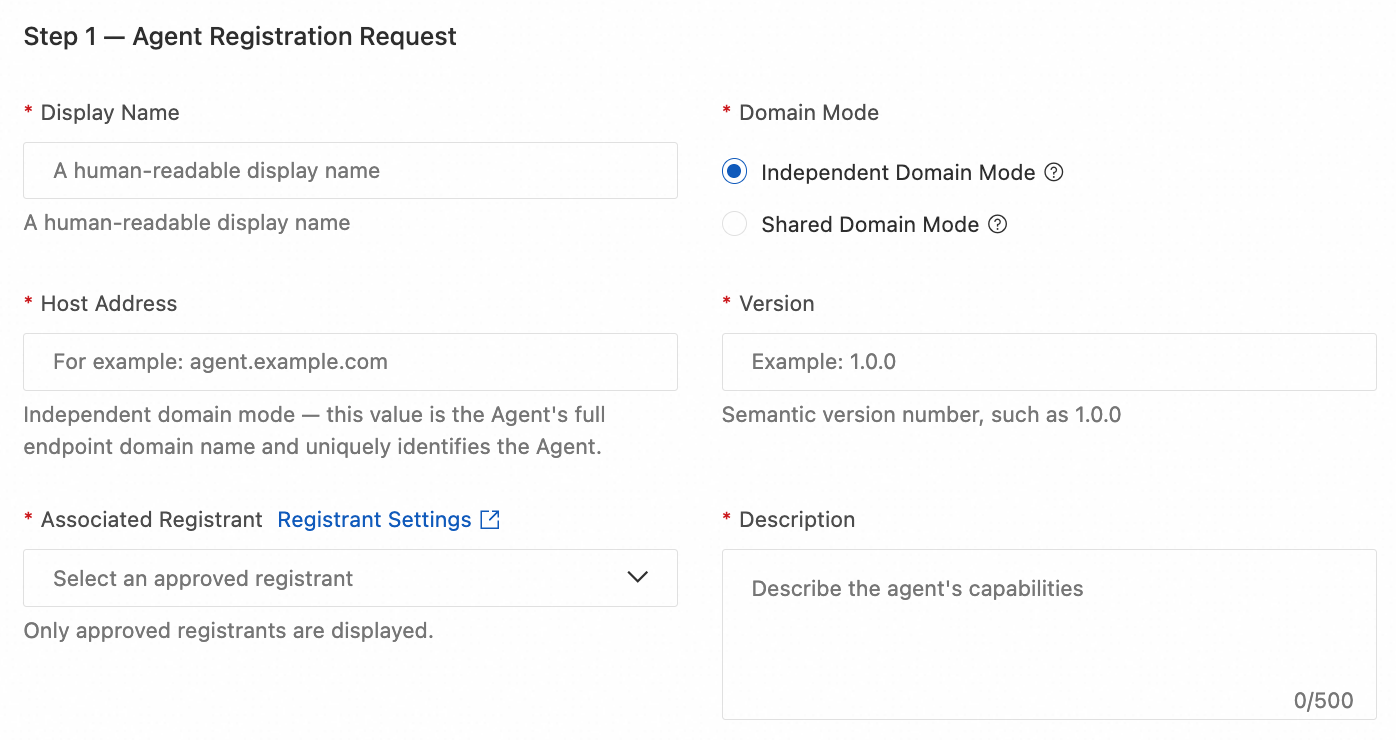
In the Register Agent panel, fill in the basic information:
Parameter
Description
Display Name
A human-readable display name for the agent.
Domain Mode
Determines the relationship between the agent's Access Hostname and Identity Hostname:
Independent Domain Mode: The agent uses a dedicated domain. The Access Hostname and Identity Hostname are the same, serving as the unique identity of the agent.
Shared Domain Mode: Multiple agents share the same parent domain as the Access Hostname. An additional subdomain is required as the Identity Hostname to uniquely identify the agent.
Host Address
The fully qualified domain name (FQDN) of the agent, for example
agent.example.com. Must be a domain under your control.In Independent Domain Mode, this value is the agent's complete endpoint domain.
In Shared Domain Mode, this value is the parent domain shared by multiple agents.
Endpoint Subdomain Name
Required only in Shared Domain Mode. Used to uniquely identify the agent. Must meet the following requirements:
Must be a first-level subdomain of the parent domain specified in Host Address. For example, if the parent domain is
example.com,abc.example.comis valid, buta.b.example.comis not.Must be globally unique and cannot be shared with other agents. One subdomain corresponds to one agent.
Must be publicly resolvable.
Version
Semantic version number in the format
X.Y.Z, for example1.0.0.Associated Registrant
Select an approved registrant. The dropdown list only shows registrants with "Approved" status.
Description
A description of the agent's capabilities, up to 150 characters.
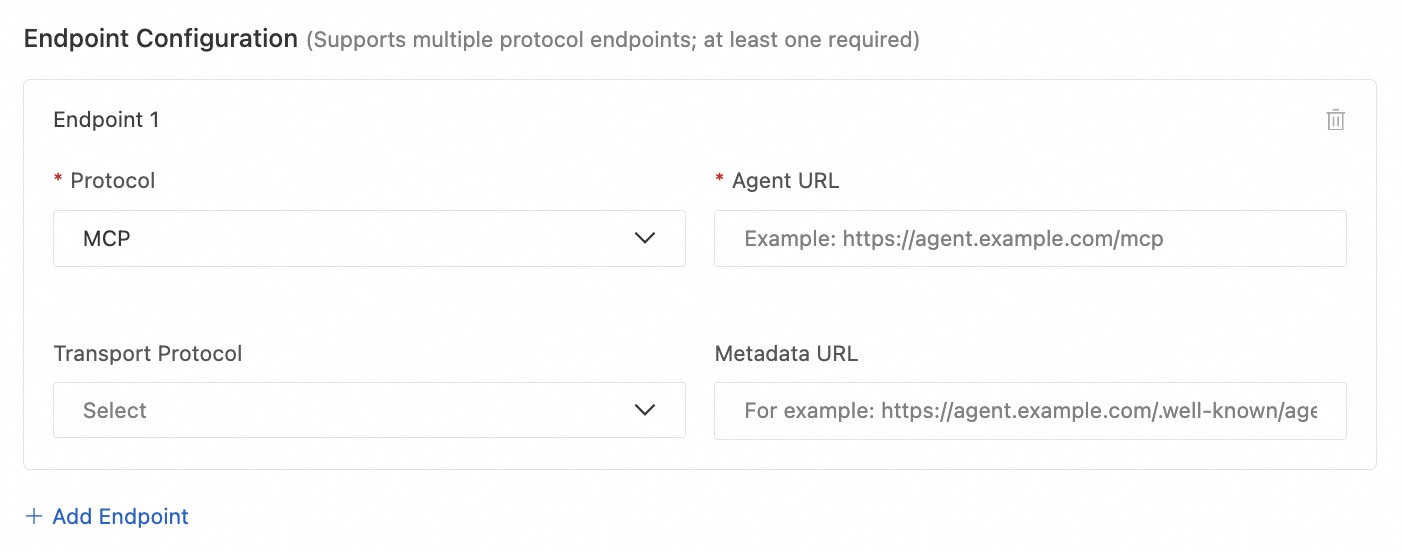
In the Endpoint Configuration section, fill in the agent's service endpoint information. At least one endpoint must be configured. Multiple protocol endpoints are supported.
Parameter
Description
Protocol
The endpoint communication protocol. Options: MCP, A2A, OpenAPI.
Agent URL
The access URL of the agent service.
Transport Protocol
The data transport method. Options are updated based on the selected protocol:
MCP/A2A: STREAMABLE-HTTP, SSE
OpenAPI: REST, HTTP
Metadata URL
The URL of the agent metadata descriptor file.
To add more endpoints, click Add Endpoint. Each endpoint supports independent protocol and transport configuration.
Click Next to proceed to the ACME pre-check step.
The system automatically generates an ATI Name as the globally unique trust identifier for the Agent. Format:
Independent Domain Mode:
ati://v{version}.{host address}Shared Domain Mode:
ati://v{version}.{endpoint subdomain}
Step 2: ACME pre-check
After submitting the basic information, the system automatically generates the TXT record required for ACME DNS-01 verification. You need to manually add the record at your DNS provider, then trigger the pre-check to complete domain control verification.
In the ACME DNS-01 Authentication Configuration section, view and copy the TXT record information to be added (record type, hostname, and record value).
The number of TXT records to add depends on the domain mode selected in Step 1:
In Independent Domain Mode, one TXT record is generated to verify control of the domain corresponding to the host address.
In Shared Domain Mode, two TXT records are generated. The parent domain verification is for certificate issuance, and the subdomain verification proves ownership of the Identity Hostname. Both records must be configured on their respective domains and take effect before the pre-check can pass.
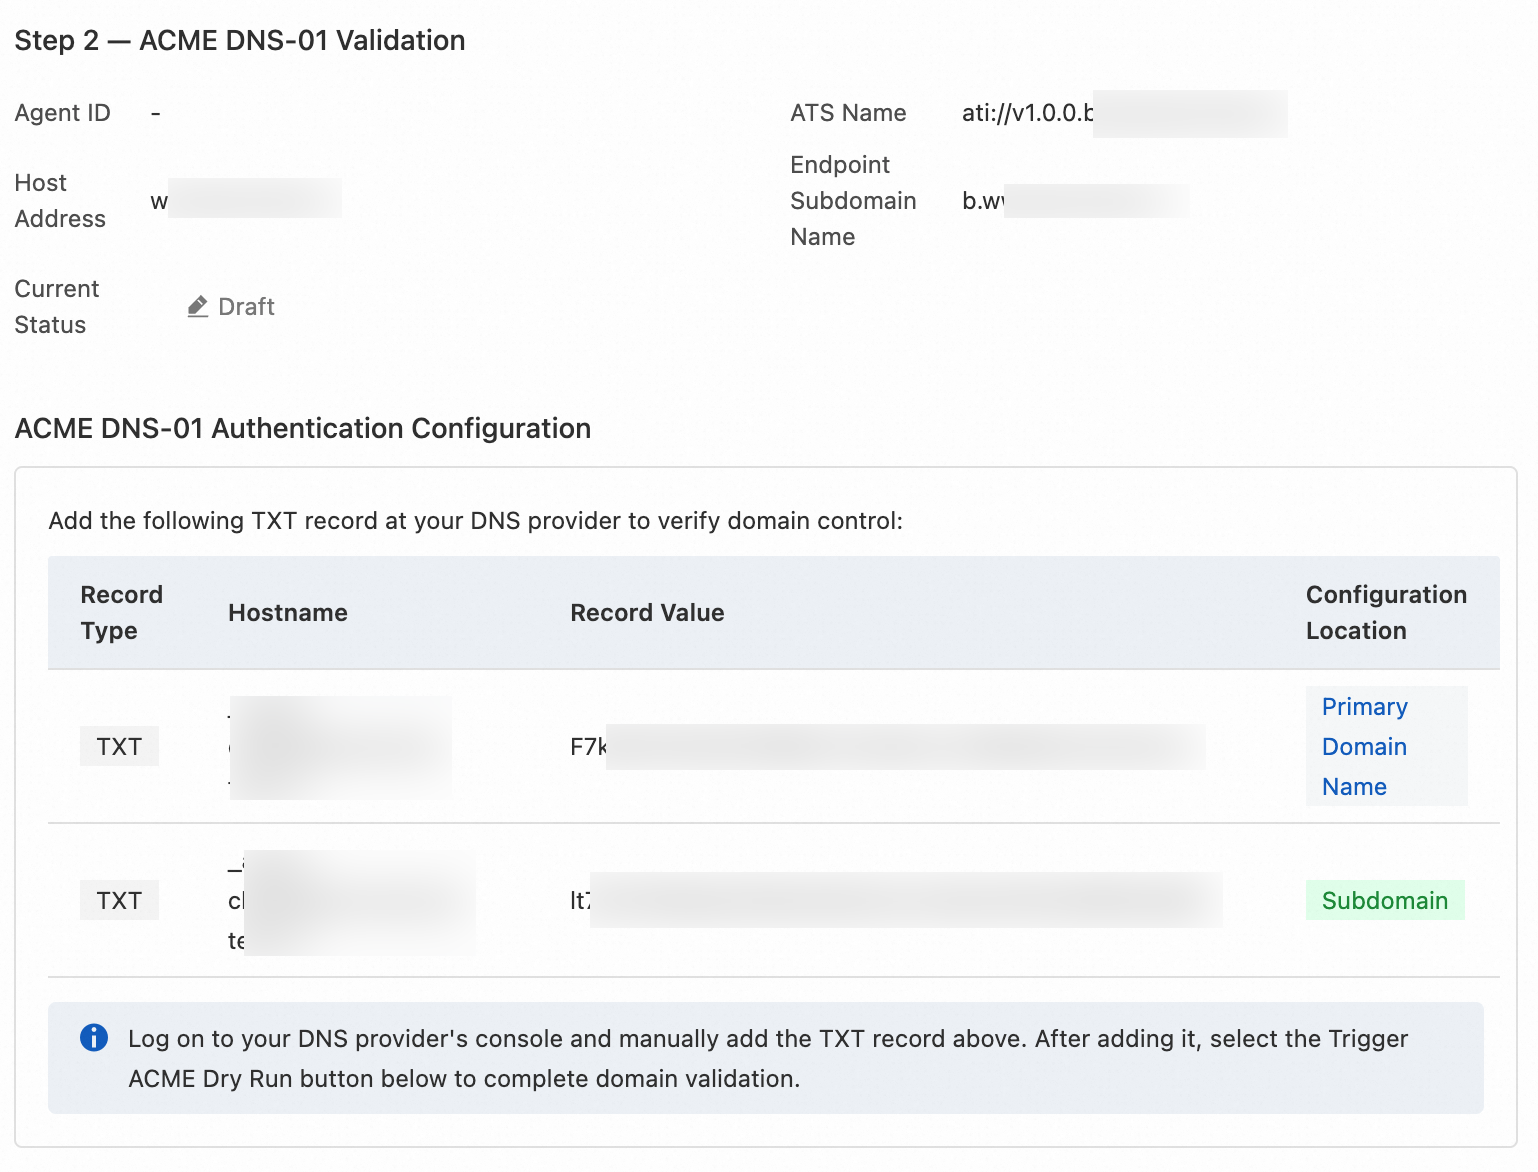
Log in to your DNS provider's console and manually add the TXT record(s) listed above.
Regardless of which DNS provider hosts your domain, you must manually add the records. Ensure the TXT records have taken effect before proceeding. Propagation times may vary across DNS providers.
Return to the ATS console and click Trigger ACME Dry Run. The system performs ACME DNS-01 verification. Once passed, the request is submitted to CNNIC for final review.
If the pre-check fails, verify that the TXT records are correctly added and have taken effect, then click Trigger ACME Dry Run again.
Step 3: Submit registration
After passing the ACME pre-check, fill in the Identity Certificate Signing Request (Identity CSR) and the Server Certificate public key, then submit the registration.
Configure the Identity Certificate
The Identity Certificate is issued by CNNIC Private CA through Alibaba Cloud RA proxy and is used for agent identity authentication. Generate an Identity CSR (PEM format) locally and paste the CSR content into the Identity CSR (PEM) input box.
ImportantThe key pair for the Identity Certificate must be generated locally. Keep the private key safe and never upload the private key to the platform or any third party. Alibaba Cloud RA only receives the CSR (containing the public key portion) and does not generate, process, or access the agent's private key.
If you do not have a CSR yet, click View Generation Guide and follow these steps to generate one locally using OpenSSL:
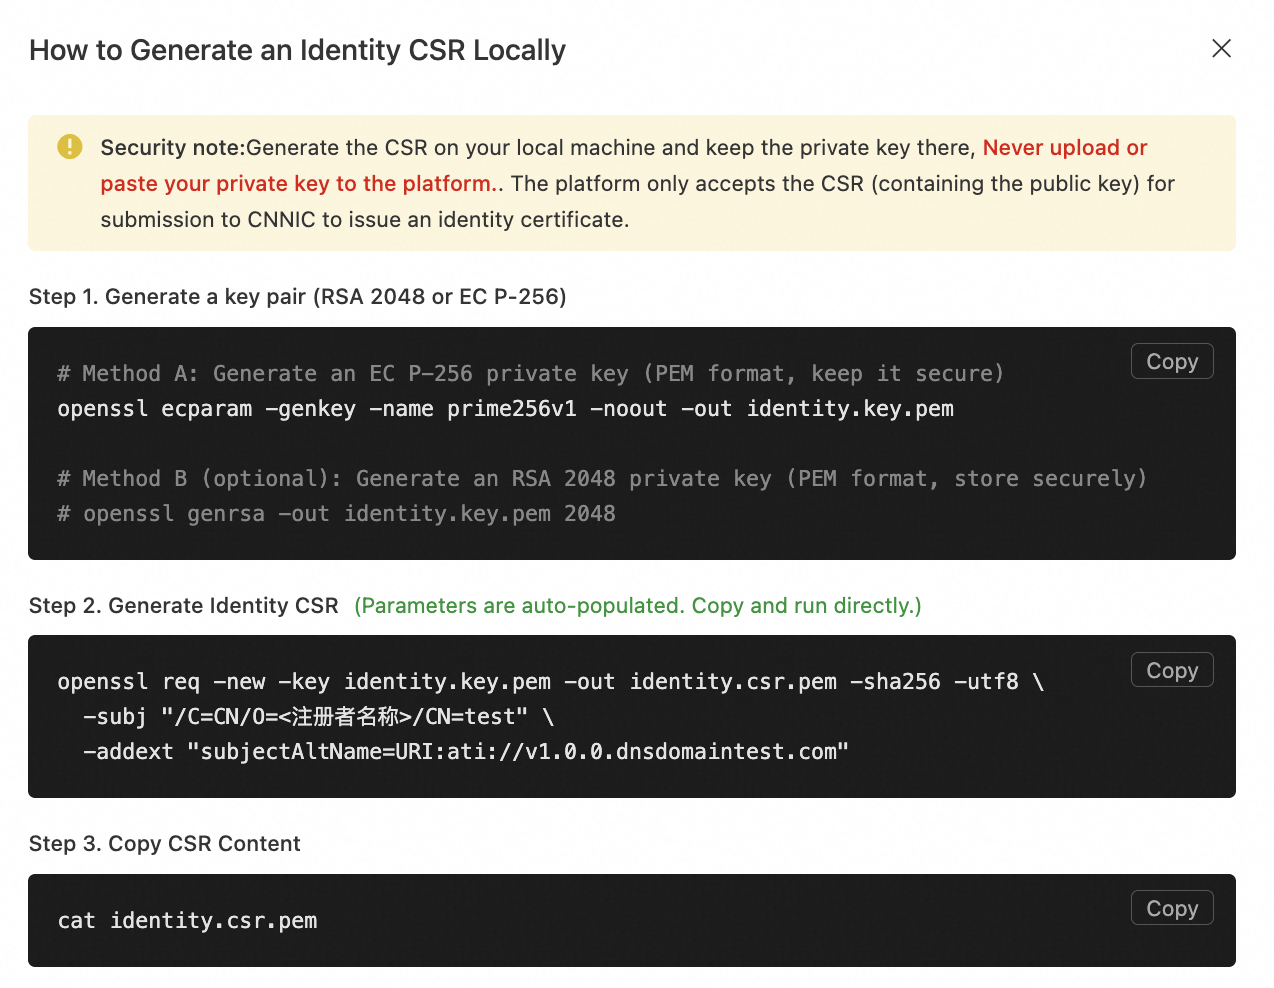
Generate a key pair.
# Method A: RSA 2048
openssl genrsa -out identity.key.pem 2048

# Method B: EC P-256
openssl ecparam -genkey -name prime256v1 -noout -out identity.key.pem
Generate the Identity CSR. The console automatically generates the command based on your configuration. You can copy and execute it directly:
openssl req -new -key identity.key.pem -out identity.csr.pem -sha256 -utf8 \
  -subj "/C={country_code}/O={registrant_name}/CN={display_name}" \
  -addext "subjectAltName=URI:ati://v{version}.{endpoint_domain}"
The value of
{endpoint domain}depends on the domain mode:In Exclusive Domain Mode, it is the host address entered in Step 1.
In Shared Domain Mode, it is the Endpoint Subdomain entered in Step 1.
It is recommended to copy and execute the command generated by the console to avoid SAN mismatches caused by manual placeholder replacement, which may result in issuance failure.
The above command uses the
-addextparameter, which requires OpenSSL 3.0+ (built into macOS / Ubuntu 22.04+ / CentOS 9+). If you are using OpenSSL 1.x, upgrade first.Copy the CSR content.
cat identity.csr.pemPaste the CSR content
Paste the content of
identity.csr.peminto the Identity CSR (PEM) input box above. Do not paste the private key.
Configure the server certificate
In the Server Certificate Public Key (PEM) input box, paste the public key of the Server Certificate issued by a Public CA (such as Let's Encrypt, DigiCert, etc.) in X.509 PEM format. Only the leaf certificate is required; the intermediate CA chain is not needed.
The system automatically extracts the SPKI fingerprint from the certificate for generating DANE/TLSA records.
Submit registration information
After confirming that both the Identity CSR and the Server Certificate public key are filled in, click Submit Registration.
After successful submission, the agent enters the Pending Private CA Issuance status. Alibaba Cloud submits the Identity CSR to CNNIC for Identity Certificate issuance and generates DANE/TLSA records for the Server Certificate. The subsequent review and issuance process is completed automatically by the system. You can monitor the status changes in the agent list.
Configure DNS records
After agent registration is submitted, ATS automatically generates a set of standard DNS records for identity discovery, trust verification, and secure communication. When the agent status changes to DNS Pending Verification, configure these records in your DNS provider's console and complete verification to transition the agent to Active status.
DNS record types
The system automatically generates a set of DNS records for each registered agent, consisting of TXT and TLSA record types.
In Independent Domain Mode,
{host}is the host address entered during registration.In Shared Domain Mode,
{host}is the Endpoint Subdomain entered during registration.
Record type | Hostname | Full Domain | Purpose |
TXT |
|
| Agent identity declaration: declares that a registered agent exists under this domain, defines supported protocol versions and metadata retrieval methods, enabling standard DNS-based discovery. |
TXT |
|
| Agent Badge identifier: points to the Transparency Log Badge endpoint, indicating the trust level of the agent. |
TLSA |
|
| Server Certificate anchoring (DANE): binds the public key fingerprint of the Server Certificate issued by a Public CA. |
TLSA |
|
| Identity Certificate anchoring (DANE): binds the public key fingerprint of the Identity Certificate issued by CNNIC Private CA. |
The records to configure depend on the authentication level you want the agent to achieve:
Basic authentication: Verify the
_atiTXT record.Enhanced authentication: Verify the
_atiTXT +_ati-badgeTXT records.Advanced authentication: Verify all records (including both TLSA records).
Verify DNS records
When the agent status is DNS Pending Verification, configure the DNS records in your DNS provider's console, then trigger verification. You can use One-Click Configuration or manually add DNS records depending on where your domain is hosted.
Method 1: One-click DNS configuration
If the agent's domain is hosted on Alibaba Cloud DNS, use the one-click configuration feature to automatically write the system-generated DNS records to Alibaba Cloud DNS.
Prerequisites:
The domain has been added to Alibaba Cloud DNS under your current Alibaba Cloud account; otherwise, one-click configuration is unavailable.
The domain's NS records point to Alibaba Cloud DNS. If they still point to another DNS provider, the written records will not take effect.
Steps:
Log on to the ATS console, and select My Agents in the left navigation pane.
Find the target agent and click DNS Record in the Actions column.
NoteThis option is only displayed when the agent status is DNS Pending Verification, TL Pending Archival, Active, or Expired.
In the DNS Record panel, select the Trust Level. The panel displays the DNS records required for the selected level.
Click Configure Cloud DNS. The system calls the Alibaba Cloud DNS OpenAPI to write DNS records one by one. You can view the write status of each record during the process. If a record already exists in Alibaba Cloud DNS, it is treated as successfully written.
After all required DNS records have been written, click Verify DNS.
After verification passes, the console displays the corresponding trust level based on the verified DNS records.
You can add or remove DNS records for a specific level and re-verify at any time to upgrade or downgrade the trust level without re-registering the agent.
Method 2: Manual DNS Record Configuration
If the agent's domain is hosted on a third-party DNS provider, you need to manually configure the DNS records in the third-party DNS provider's console.
Log in to the ATS console, and select My Agents in the left navigation pane.
Find the target Agent and click DNS Record in the Actions column.
NoteThis option is only displayed when the agent status is DNS Pending Verification, TL Pending Archival, Active, or Expired.
In the DNS Records panel, select the Trust Level. The panel displays the DNS records required for the selected level.
Log in to your DNS provider's console and add the records listed above one by one.
After confirming that all DNS records are configured, return to the ATS console and click Verify DNS.
View the verification results:
All passed and sealing completed: If CNNIC has reviewed and completed Transparency Log sealing, the agent status changes to Active, and the agent can be discovered and trust-verified globally.
All passed but sealing not completed: If CNNIC has not yet completed Transparency Log sealing, the agent enters the TL Pending Archival (CNNIC) status. No further action is needed; the agent will automatically become Active once sealing is completed.
Some records failed: The verification status column is updated to Verified or Verification Failed based on actual results. Check the DNS configuration for failed records, correct them, and click Verify DNS again.
After verification passes, the console displays the corresponding trust level based on the verified DNS records.
You can add or remove DNS records for a specific level and re-verify at any time to upgrade or downgrade the trust level without re-registering the agent.
Manage agents
Registered agents are listed on the My Agents page. You can search for an agent by Agent ID, agent name, host, version, or status.
Agent status descriptions
Agents have the following statuses during registration and use, corresponding to different lifecycle stages:
Status | Description |
Draft | The agent registration form has been created but not submitted. |
Pending Private CA issuance | The registration has been submitted. Alibaba Cloud has completed the ACME DNS-01 validation and sent the information to CNNIC. The agent is awaiting CNNIC review, identity certificate issuance, and Transparency Log archival. |
Rejected | The registration request was rejected. This may be because the CNNIC ACME final check failed or the registrant information review was not passed. View the specific reason for rejection on the details page. |
Withdrawn | The registration request has been withdrawn. CNNIC no longer issues an identity certificate for the agent. You can start a new registration by clicking Re-apply, or delete the record. |
DNS Pending Verification | CNNIC has issued the identity certificate and archived the Transparency Log, but the DNS record has not been validated. Configure the record in your DNS provider's console and then trigger the validation. |
TL Pending Archival (CNNIC) | The DNS record has been validated. The system is waiting for CNNIC to complete the Transparency Log archival. |
Active | The identity certificate has been issued, the Transparency Log has been archived, and the DNS has been validated. The agent can be discovered and trusted across the network. |
Expired | The agent certificate has expired. Click Re-apply to renew it. |
Revoking | A certificate revocation request has been submitted and is being processed. |
Revoked | The agent's certificate has been revoked, DNS records have been cleaned up, and the agent can no longer be discovered or trust-verified. Cannot be restored to Active status; the record can only be deleted. |
Operations
After registration, you can manage agents on the My Agentspage. The available operation buttons depend on the agent's status:
Operation | Description |
Details | View the complete Agent information, including basic information, endpoint information, certificate information, etc. In Rejected status, you can view the rejection reason. |
Modify | Return to the registration form to modify the basic information and endpoint configuration. Only available in Draft status. |
ACME Pre-check | View/trigger the ACME Pre-check process. Only available in Rejected status. |
DNS Records | View the system-generated DNS records and their verification status for the agent. In DNS Pending Verification or Active status, you can trigger Verify DNS operation to upgrade or downgrade the trust level. For instructions, see Configure DNS records. |
Withdraw | Withdraw the current registration application before CNNIC issues the Identity Certificate. Only available in Pending Private CA Issuance status. |
Reapply | When the Agent is in Rejected, Expired, or Withdrawn status, click Reapply to initiate a new registration process. |
Certificates | Go to the Certificate Management page to view the Identity Certificate and Server Certificate associated with the agent. Only available in Active status. |
Revoke Certificate | Revoke the agent. This operation is irreversible. After revocation, the certificate is simultaneously revoked, DNS records are cleaned up, and the agent enters Revoked status. Cannot be restored to Active status. |
Delete | Permanently remove the agent record. This is irreversible. Only available in Draft, Rejected, Revoked, or Withdrawn status. |