These steps are required to use the mini program SDK. Skipping any step will result in data loss.
SDK basics
SDK name | Version number | MD5 value |
QuickTracking mini program SDK | Latest version: 2.4.19 Changelog: Mini program SDK changelog | qt_mini.umd.js: dabff2c94745d5bdbe314d3d52915c08 qt_mini.cjs.js: dcda44e2291f87e0b723eddafd94e304 qt_mini.esm.js: 366076ad97ddae3790fb3d74a392b1e1 |
Procedure
1. Quick integration
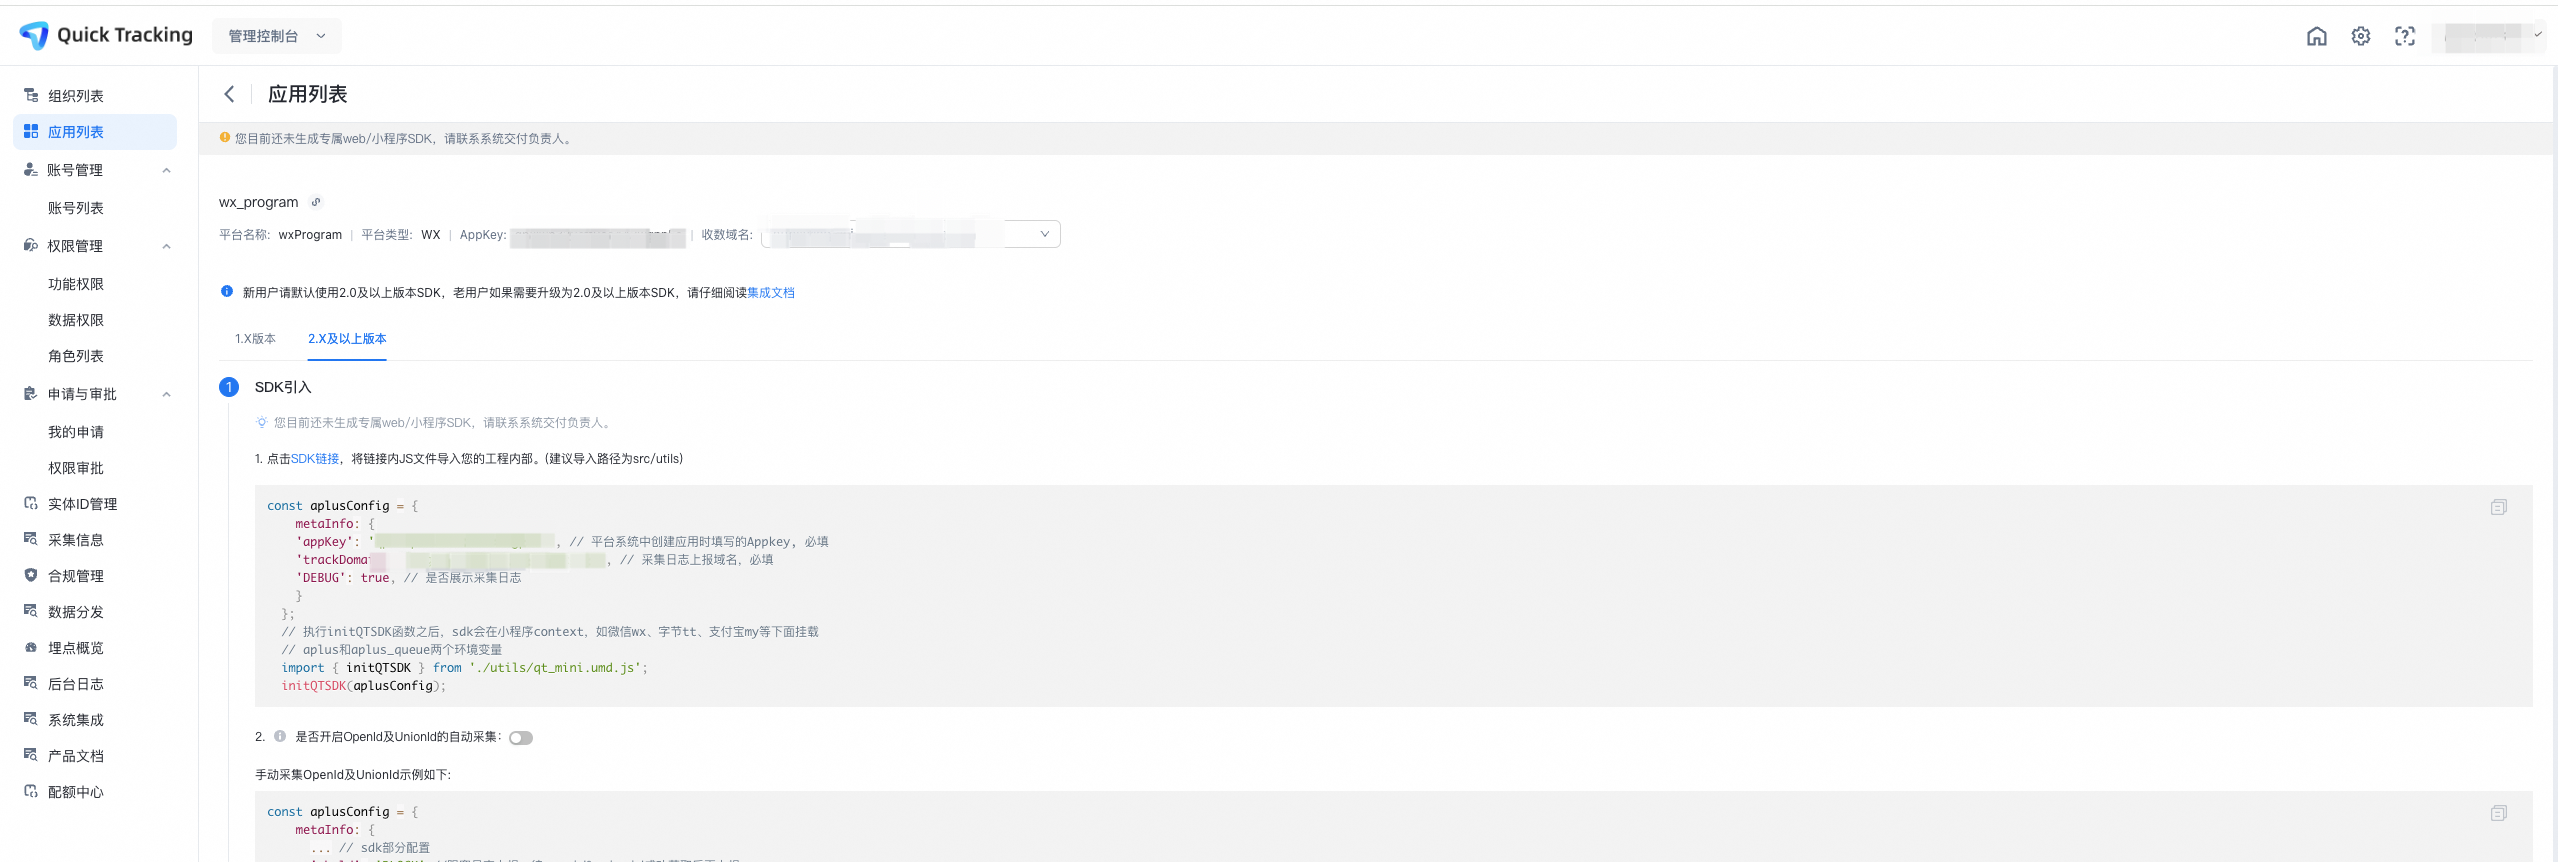
QuickTracking generates unique integration code for each mini program in the backend. Follow the in-product guide to complete the integration.
Product path
From the QuickTracking Homepage, go to the management console and open the organization list. Find your organization, click Manage Applications to go to the application management page. Find your application and click Go to Integration.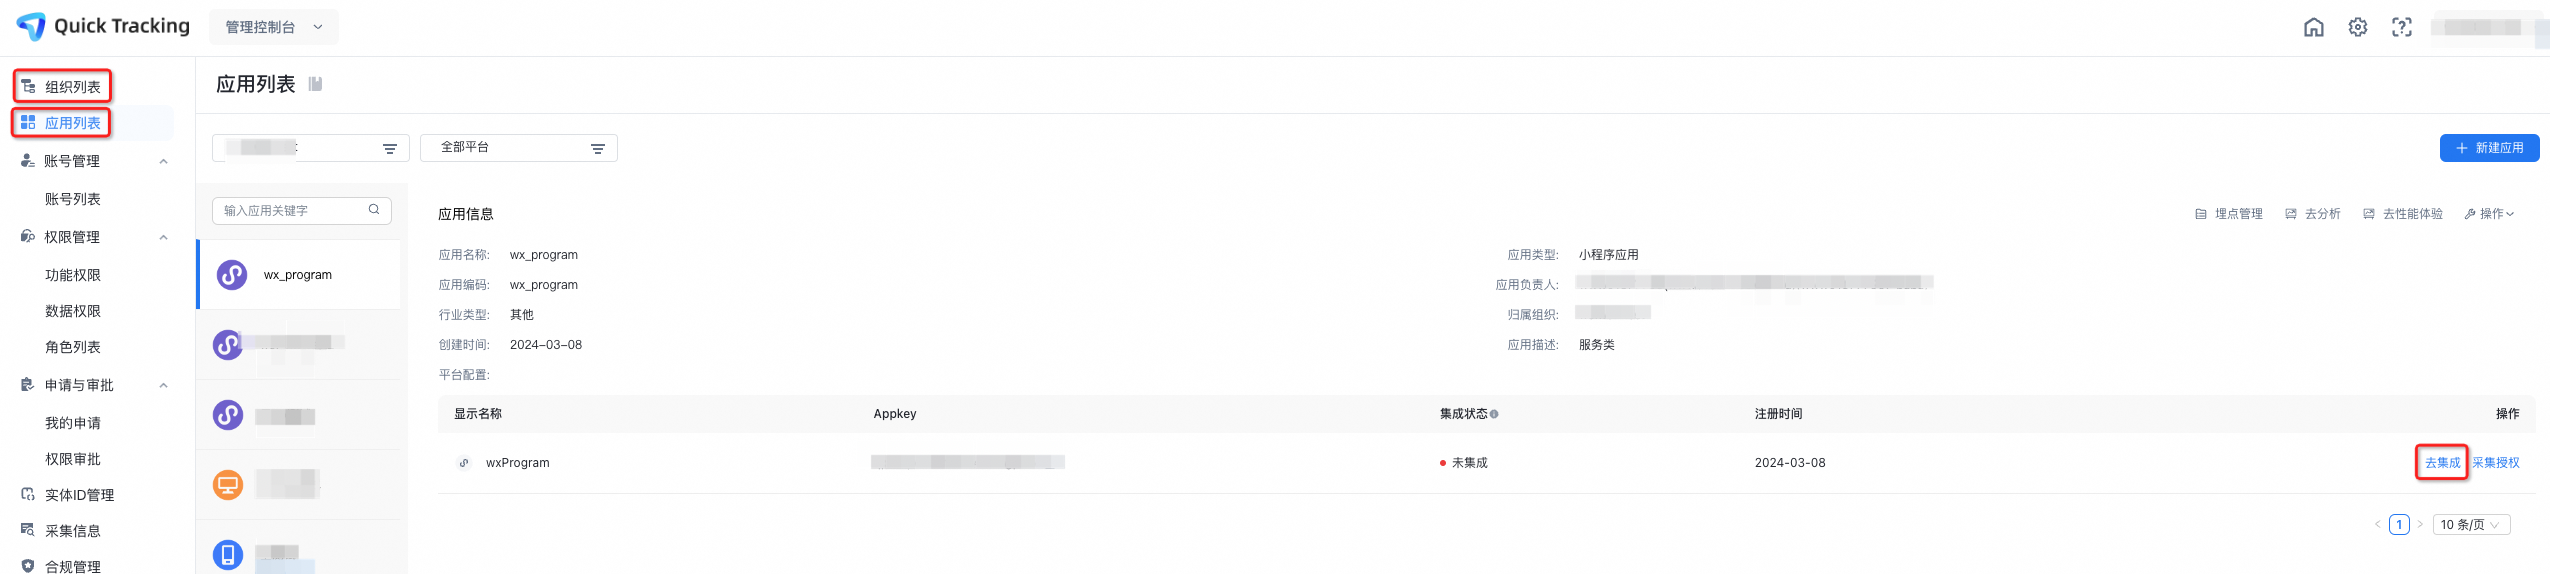
Click Go to Integration to get your unique integration code. Then, click Next and follow the integration verification guide.
2. Manual integration
If you cannot access the preceding page, follow these instructions to complete the integration.
2.1 Prepare parameters
appKey: Get this from the application list.
data collection domain: Get this from the Collection Information module in the management console.
SDK link: Get this from the Collection Information module in the management console.
2.2 Import the SDK
Click the SDK link to download the JavaScript (JS) file and import it into your project. We recommend placing it in the src/utils directory.
const aplusConfig = {
  metaInfo: {
    'appKey': "", // The appKey for the application you created in the platform. Required.
    'trackDomain': "", // The data collection domain for log reporting. Required.
    'DEBUG': true, // Specifies whether to display collection logs.
  },
};
// After the initQTSDK function is executed, the SDK mounts the aplus and aplus_queue environment variables
// under the mini program context, such as wx for WeChat, tt for ByteDance, or my for Alipay.
import { initQTSDK } from "./utils/qt_mini.umd.js";
initQTSDK(aplusConfig);
Note: Initialization enables statistics collection. Place the initialization code in the main entry file, outside of any program lifecycle functions.
2.3 Listen for SDK initialization status
You can listen for the SDK's initialization status. If you need to perform event tracking only after the SDK has initialized, add a listener for aplusReady.
Sample code:
wx.aplus_queue.push({
  action: "aplus.aplus_pubsub.subscribe",
  arguments: ["aplusReady", function(status) {
    if (status === 'complete') {
    }
  }]
})
2.4 Set the device ID
Due to mini program framework limitations, the QuickTracking SDK does not automatically generate a device ID. You must either authorize QuickTracking to automatically get the openid, or you must manually obtain an official mini program ID, such as an openid or unionid, and set it as the device ID. Otherwise, the SDK will not report any logs.
Set the device ID manually
Note: This example uses code for a WeChat mini program. The logic is similar for other mini program platforms.
const aplusConfig = {
  metaInfo: {
  ... // Other SDK configurations
  '_hold': 'BLOCK', // Block log reporting until the openid and unionid are successfully obtained.
  ... // Other SDK configurations
  }
};
// After the initQTSDK function is executed, the SDK mounts the aplus and aplus_queue environment variables
// under the mini program context, such as wx for WeChat, tt for ByteDance, or my for Alipay.
import { initQTSDK } from "./utils/qt_mini.umd.js";
initQTSDK(aplusConfig);

wx.login({
  success: (res) => {
    // Exchange the code for an openid.
    if (res.code) {
      wx.request({
        url: 'YOUR_BACKEND_API_TO_GET_OPENID',
        method: "post",
        data: {
          code: res.code,
        },
        success: (res) => {
          if (res.data && res.data.openid) {
            // Store the obtained openid in storage for later use.
            wx.setStorageSync("openId", res.data.openid);
            wx.setStorageSync("unionId", res.data.unionid);

            wx.aplus_queue.push({
              action: "aplus.setMetaInfo",
              arguments: ["_anony_id", res.data.openid],
            });
          } else {
            wx.aplus_queue.push({
              action: "aplus.setMetaInfo",
              arguments: ["_anony_id", 'YOUR_CUSTOM_PSEUDO_ID'],
            });
          }
        },
      });
    }
  },
  fail: () => {
    // Handle failure, show a message, etc.
  },
  complete: () => {
    wx.aplus_queue.push({
      action: "aplus.setMetaInfo",
      arguments: ["_hold", "START"],
    });
  },
});
Automatic openid collection
QuickTracking can automatically collect the WeChat mini program openid. To enable this feature, grant authorization in the product and fill in the required information as prompted.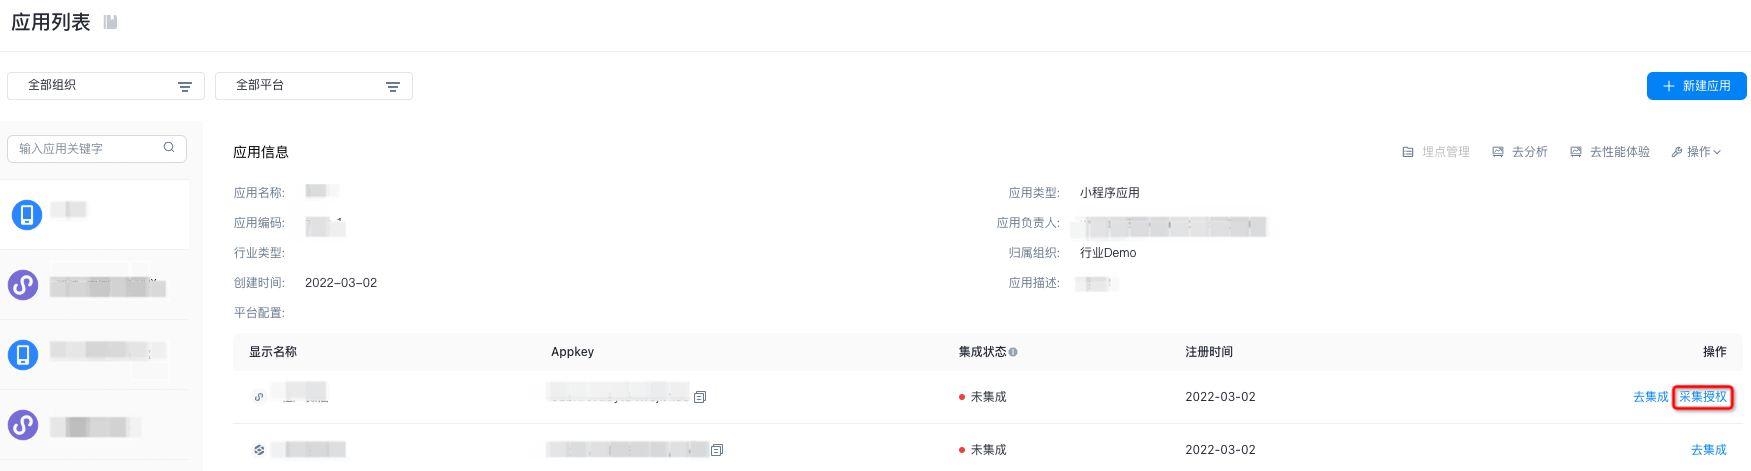
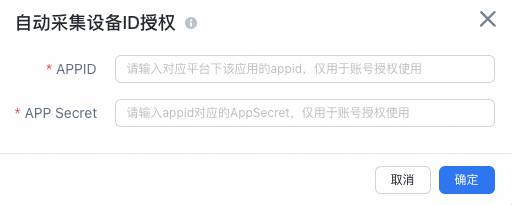
After authorization, set the device ID as follows:
const aplusConfig = {
  metaInfo: {
  ... // Other SDK configurations
  'autoGetOpenid': true, // Enable automatic openid collection.
  ... // Other SDK configurations
  }
};

// After the initQTSDK function is executed, the SDK mounts the aplus and aplus_queue environment variables
// under the mini program context, such as wx for WeChat, tt for ByteDance, or my for Alipay.
import { initQTSDK } from './utils/qt_mini.umd.js';
initQTSDK(aplusConfig);
If you are switching from a manual openid setup to automatic collection, make the following changes:
Remove the
_hold: 'BLOCK'setting frommetaInfo, which blocks SDK log reporting.Comment out the code that manually sets
_anony_idto the openid. This means removing the code that gets the openid fromwx.login.Ensure the
appKeyand data collection domain settings remain correct.
Sample code:
// inside app.js
const aplusConfig = {
  metaInfo: {
  ... // Other SDK configurations

  // 1. Remove the logic that blocks SDK reporting by setting _hold: 'BLOCK'.
  // '_hold': 'BLOCK', // Block log reporting until the openid and unionid are successfully obtained.

  ... // Other SDK configurations
  }
};
// After the initQTSDK function is executed, the SDK mounts the aplus and aplus_queue environment variables
// under the mini program context, such as wx for WeChat, tt for ByteDance, or my for Alipay.
import { initQTSDK } from './utils/qt_mini.umd.js';
initQTSDK(aplusConfig);

/**
2. Remove the code that gets the openid from wx.login.
wx.login({
  success: (res) => {
    // Exchange the code for an openid.
    if (res.code) {
      wx.request({
        url: 'YOUR_BACKEND_API_TO_GET_OPENID',
        method: "post",
        data: {
          code: res.code,
        },
        success: (res) => {
          if (res.data && res.data.openid) {
            // Store the obtained openid in storage for later use.
            wx.setStorageSync("openId", res.data.openid);
            wx.setStorageSync("unionId", res.data.unionid);

            wx.aplus_queue.push({
              action: 'aplus.setMetaInfo',
              arguments: ['_anony_id', res.data.openid]
            });

          } else {
            wx.aplus_queue.push({
              action: 'aplus.setMetaInfo',
              arguments: ['_anony_id', 'YOUR_CUSTOM_PSEUDO_ID']
            });
          }
        },
      });
    }
  },
  fail: () => {
    // Handle failure, show a message, etc.
  },
  complete: () => {
    wx.aplus_queue.push({
      action: 'aplus.setMetaInfo',
      arguments: ['_hold', 'START']
    });
  },
});
*/To grant authorization for a WeChat mini program, provide its AppID and AppSecret. You can find these credentials in the WeChat mini program management backend under Development > Development Management > development settings.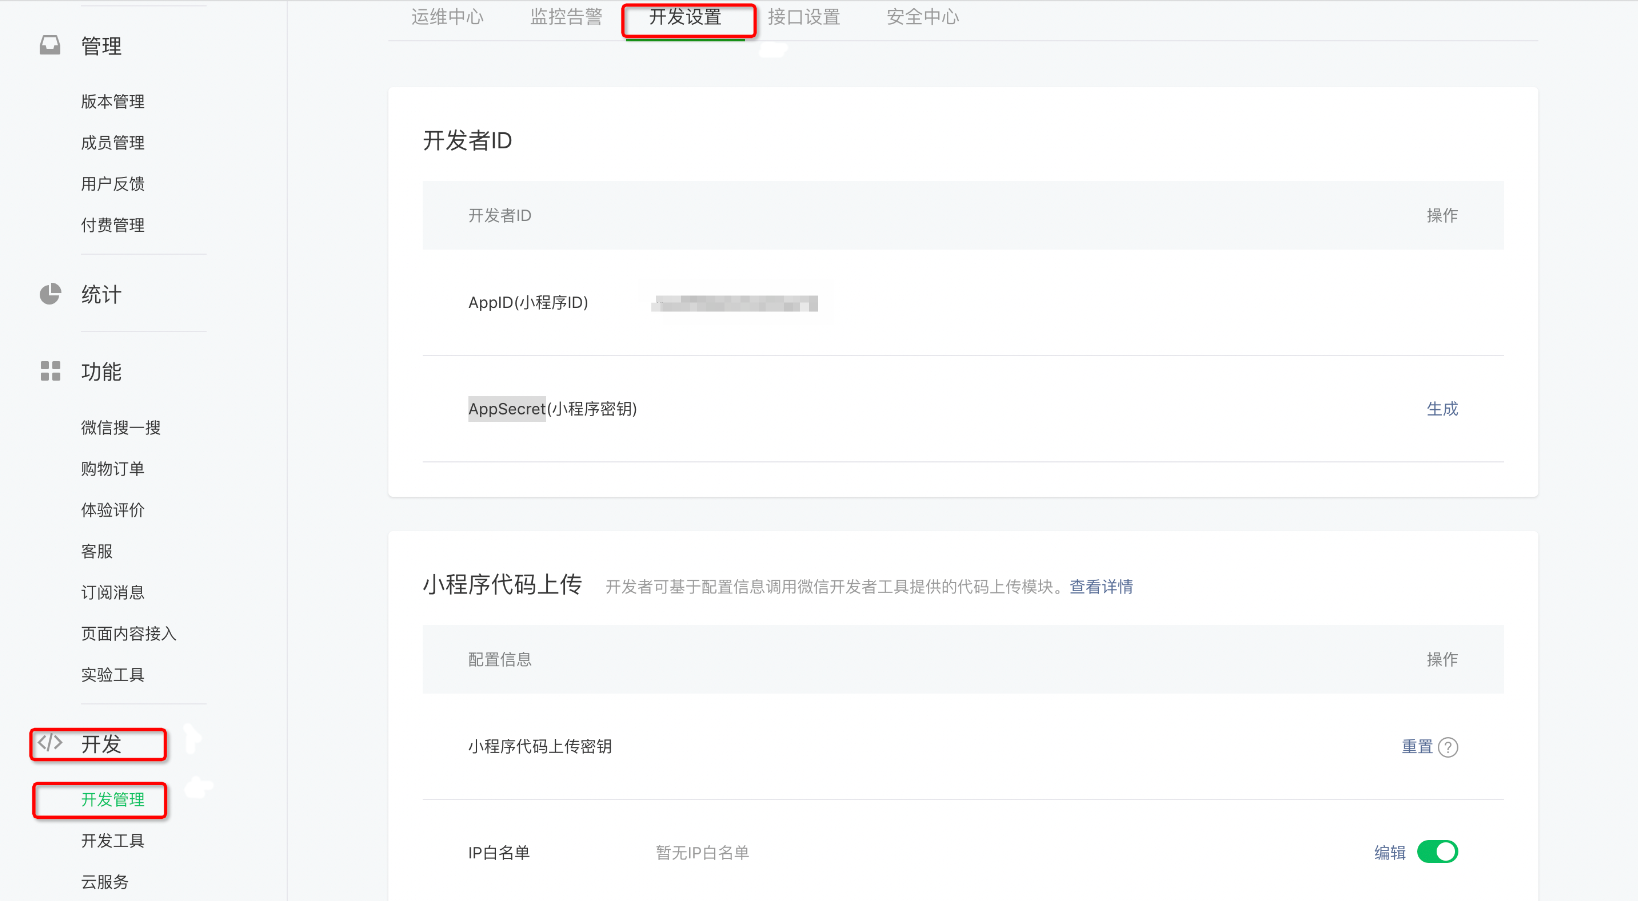
2.5 Configure the domain name allowlist
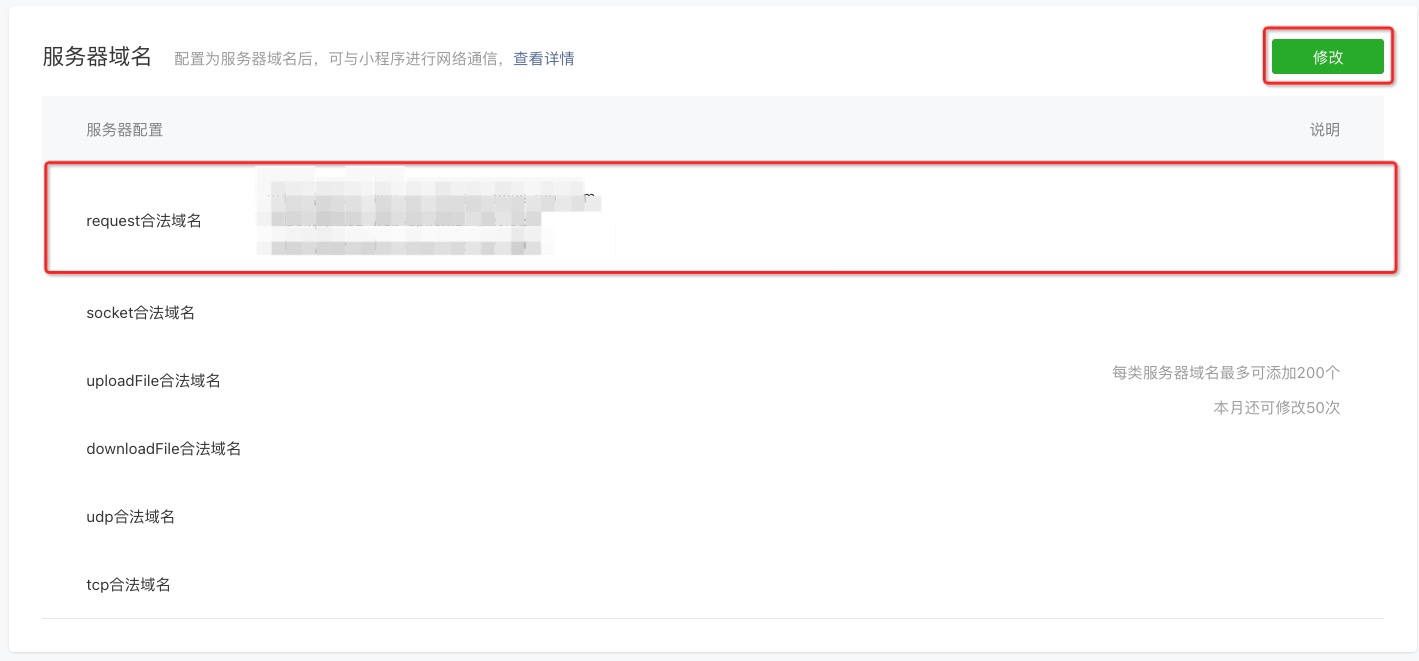
For example, in a WeChat mini program, log in to the mini program's backend, navigate to development settings > server domain name allowlist, and add your data collection domain.
3. FAQ
3.1 Getting the offline SDK
In the QuickTracking management console, get the SDK link from the Collection Information module. Click the link and press Ctrl+S (or Cmd+S on macOS) to download the file.