Migrate ApsaraDB for MongoDB to Lindorm
This topic describes how to use Data Transmission Service (DTS) to migrate data from an ApsaraDB for MongoDB instance (replica set or sharded cluster) to a Lindorm instance.
Prerequisites
The source ApsaraDB for MongoDB instance must be a replica set or a sharded cluster.
ImportantIf the source is an ApsaraDB for MongoDB sharded cluster, you must apply for an endpoint for each shard node and ensure that all shard nodes share the same account and password. For instructions, see Apply for an endpoint for a shard.
You have created a target Lindorm instance that uses the wide table engine. For instructions, see Create an instance.
NoteWe recommend provisioning the target instance with at least 10% more storage capacity than the amount used by the source instance.
You have created a wide table in your Lindorm instance based on your business requirements. For instructions, see Connect to and use the wide table engine by using Lindorm-cli or Access the wide table engine by using Lindorm Shell.
NoteThe objects that you create must adhere to the Naming conventions and limits.
If the wide table in Lindorm is created by using HBase, we recommend that you add a column mapping to the table to make its columns regular columns. For more information, see Add a column mapping to an HBase table.
Limitations
Type | Description |
Limits on the source database |
|
Other limits |
|
Billing
Migration type | Task configuration fee | Data transfer fee |
full data migration | Free. | This tutorial is free. However, a data transfer fee applies if the Access Method for the destination database is Public IP Address. |
incremental data migration | Fees apply. For details, see billing overview. |
Migration types
Migration type | Description |
Full data migration | Migrates all existing data from the source ApsaraDB for MongoDB instance to the destination Lindorm instance. Note Supports full data migration for databases and collections. |
Incremental data migration | After a full data migration, migrates incremental updates from the source ApsaraDB for MongoDB instance to the destination Lindorm instance. Note
|
Database account permissions
Database | Full data migration | Incremental data migration | Actions |
Source ApsaraDB for MongoDB | The | The | |
Target Lindorm | The | ||
If you use ChangeStream as the incremental migration method, the source database account requires instance-wide Change Streams read permissions (such as readAnyDatabase). If the source is an ApsaraDB for MongoDB instance with a custom account, you must also grant the account read permission on the admin database. For details, see Permissions of the root account specified during instance creation.
Procedure
This procedure uses a wide table, created in Lindorm with Lindorm SQL, as an example destination database.
-
Navigate to the migration task list page for the destination region using one of the following methods.
From the DTS console
-
Log on to the Data Transmission Service (DTS) console.
-
In the navigation pane on the left, click Data Migration.
-
In the upper-left corner of the page, select the region where the migration instance is located.
From the DMS console
NoteThe actual operations may vary based on the mode and layout of the DMS console. For more information, see Simple mode console and Customize the layout and style of the DMS console.
-
Log on to the Data Management (DMS) console.
-
In the top menu bar, choose .
-
To the right of Data Migration Tasks, select the region where the migration instance is located.
-
-
Click Create Task to navigate to the task configuration page.
Configure the source and destination databases.
Section
Parameter
Description
N/A
Task Name
DTS automatically generates a task name. We recommend that you specify a descriptive name for easy identification. The name does not need to be unique.
Source Database
Select Existing Connection
-
To use a database instance that has been added to the system (created or saved), select the desired database instance from the drop-down list. The database information below will be automatically configured.
NoteIn the DMS console, this parameter is named Select a DMS database instance..
-
If you have not registered the database instance with the system, or do not need to use a registered instance, manually configure the database information below.
Database Type
Select MongoDB.
Connection Type
Select Alibaba Cloud Instance.
Instance Region
Select the region where the source ApsaraDB for MongoDB instance resides.
Replicate Data Across Alibaba Cloud Accounts
In this example, data is migrated within the same Alibaba Cloud account. Select No.
Architecture
In this example, Replica Set is selected.
NoteIf you set Architecture to Sharded Cluster, you must also specify Shard account and Shard password.
Migration Method
Select a method for incremental data migration based on your requirements.
-
Oplog (Recommended):
This option is available if an oplog is enabled for the source database.
NoteAn oplog is enabled by default for both self-managed MongoDB databases and ApsaraDB for MongoDB instances. This method offers lower latency for incremental data migration due to faster log pulling. Therefore, we recommend selecting Oplog.
-
ChangeStream: This option is available if Change Streams are enabled for the source database.
Note-
If the source database is an Amazon DocumentDB instance (non-elastic cluster), you can only select ChangeStream.
-
If you set Architecture to Sharded Cluster for the source database, you do not need to enter a Shard account or Shard password.
-
Instance ID
Select the ID of the source ApsaraDB for MongoDB instance.
Authentication Database
Enter the name of the database to which the database account of the source ApsaraDB for MongoDB instance belongs. The default value is admin.
Database Account
Enter the database account of the source ApsaraDB for MongoDB instance.
Database Password
Enter the password for the specified database account.
Encryption
DTS supports three connection methods: Non-encrypted, SSL-encrypted, and Mongo Atlas SSL. The options for Encryption vary based on the selected Access Method and Architecture. The options displayed in the console prevail.
Note-
A MongoDB database where the Architecture is Sharded Cluster and the Migration Method is Oplog does not support SSL-encrypted.
-
If the source is a self-managed MongoDB database (Access Method is not Alibaba Cloud Instance) with a Replica Set architecture, and you select SSL-encrypted, DTS also allows you to upload a CA certificate to verify the connection.
Destination Database
Select Existing Connection
-
To use a database instance that has been added to the system (created or saved), select the desired database instance from the drop-down list. The database information below will be automatically configured.
NoteIn the DMS console, this parameter is named Select a DMS database instance..
-
If you have not registered the database instance with the system, or do not need to use a registered instance, manually configure the database information below.
Database Type
Select Lindorm.
Connection Type
Select Alibaba Cloud Instance.
Instance Region
Select the region where the destination Lindorm instance resides.
Instance ID
Select the ID of the destination Lindorm instance.
Database Account
Enter the database account of the destination Lindorm instance.
Database Password
Enter the password for the specified database account.
-
-
After you complete the configuration, click Test Connectivity and Proceed at the bottom of the page.
Note-
Ensure that the IP address segment of the DTS service is automatically or manually added to the security settings of the source and destination databases to allow access from DTS servers. For more information, see Add DTS server IP addresses to a whitelist.
-
If the source or destination database is a self-managed database (the Access Method is not Alibaba Cloud Instance), you must also click Test Connectivity in the CIDR Blocks of DTS Servers dialog box that appears.
-
Configure the task objects.
On the Configure Objects page, configure the objects that you want to migrate.
Parameter
Description
Migration Types
-
If you only need to perform a full migration, select Full Data Migration.
-
To perform a migration with no downtime, select both Full Data Migration and Incremental Data Migration.
NoteIf you do not select Incremental Data Migration, do not write new data to the source instance during data migration to ensure data consistency.
Processing Mode of Conflicting Tables
You can retain the default settings.
Capitalization of Object Names in Destination Instance
You can configure the case sensitivity policy for the names of migrated objects, such as databases and collections, in the destination instance. By default, DTS default policy is selected. You can also choose to keep the case sensitivity consistent with the default policy of the source or destination database. For more information, see Case sensitivity of object names in the destination database.
Source Objects
In the Source Objects pane, click the collections that you want to migrate and click the
 icon to move them to the Selected Objects pane.
Selected Objects
If the destination wide table was created using Lindorm SQL, you must add new columns for data migration. DTS will not migrate unconfigured columns.
Edit the database name mapping.
In the Selected Objects pane, right-click the database that contains the collection to migrate.
Change the Schema Name to the name of the destination database in Lindorm.
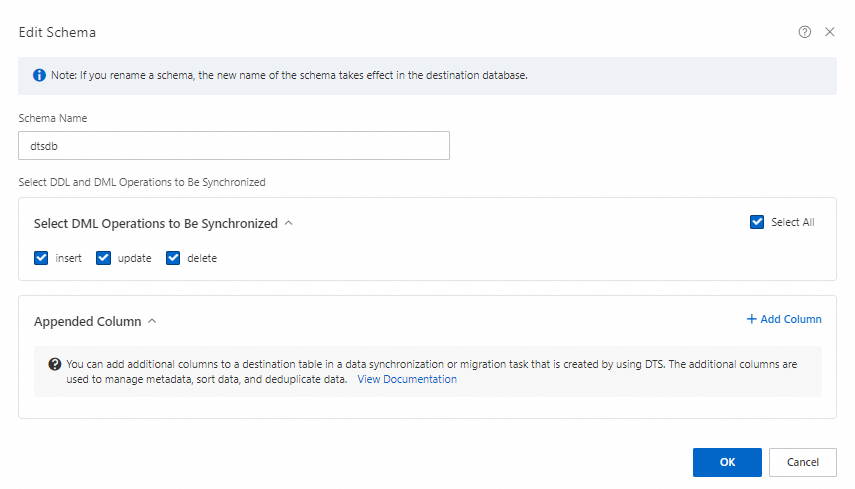
Optional: In the Select DDL and DML Operations to Be Synchronized section, select the operations for incremental migration.
Click OK.
Edit the table name mapping.
In the Selected Objects pane, right-click the collection to migrate.
Change the Table Name to the name of the destination table in Lindorm.
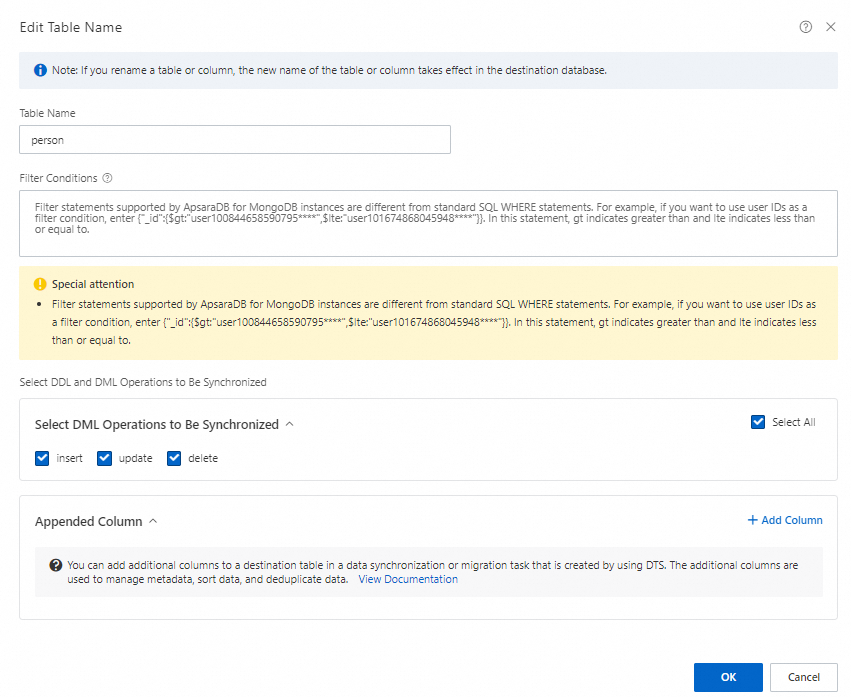
Optional: Specify filter conditions. For more information, see Filter task data with an SQL condition.
Optional: In the Select DDL and DML Operations to Be Synchronized section, select the operations for incremental migration.
Configure the fields to migrate from MongoDB.
By default, DTS maps the data of the collection to migrate and configures an expression in the Parameter Value column. You need to check whether the expression meets your requirements and configure parameters such as Column Name, Type, Length, and Precision.
In the Parameter Value column, view the field name for the row in MongoDB in the
bson_value()expression.The string in
""specifies the field name in MongoDB. For example, if the expression isbson_value("age"), the data in this row corresponds to theagefield in MongoDB.Optional: Delete the fields that you do not want to migrate.
NoteTo delete a field that you do not want to migrate, click the
 icon in the field's row.
Configure the fields to migrate.
Take further action based on whether the
bson_value()expression meets your requirements.Matching expressions
Enter a Column Name.
NoteEnter the name of the destination column in the Lindorm table.
If the destination table is created by using SQL, set Column Name to the name of the destination column in the Lindorm table.
If the destination table is created by using the HBase API and you need to add new columns, you must add column mappings before you modify column names. For more information, see Example of adding column mappings for a table created by calling the Apache HBase API. Set Column Name based on the following rules:
If the column is a primary key, set the name to ROW.
If the column is not a primary key, use the column family:column name format. Example: person:name.
Select a data Type for the column.
ImportantMake sure that the data type of the destination table is compatible with the data type in the source MongoDB database.
Optional: Configure the Length and Precision of the column data.
Repeat the preceding steps to map each required field.
Custom expressions
NoteFor example, fields with hierarchical relationships (parent-child structures).
In the Actions column, click the
icon in the row of the field.Click + Add Column.

Configure the Column Name, Type, Length, and Precision.
In the text box under Parameter Value, enter the
bson_value()expression. For more information, see Value Configuration Example.ImportantThe primary key column of the target table must be assigned the value
bson_value("_id").When you configure the
bson_value()expression, you must specify the path to the lowest-level subfield. Otherwise, data loss or task failure may occur.
Repeat the preceding steps to map each required field.
Click OK.
-
Click Next: Advanced Settings to configure advanced parameters.
Parameter
Description
Dedicated Cluster for Task Scheduling
By default, DTS schedules tasks on a shared cluster. You do not need to select one. If you want more stable tasks, you can purchase a dedicated cluster to run DTS migration tasks.
Retry Time for Failed Connections
After the migration task starts, if the connection to the source or destination database fails, DTS reports an error and immediately begins to retry the connection. The default retry duration is 720 minutes. You can customize the retry time to a value from 10 to 1440 minutes. We recommend that you set the duration to more than 30 minutes. If DTS reconnects to the source and destination databases within the specified duration, the migration task automatically resumes. Otherwise, the task fails.
Note-
For multiple DTS instances that share the same source or destination, the network retry time is determined by the setting of the last created task.
-
Because you are charged for the task during the connection retry period, we recommend that you customize the retry time based on your business needs, or release the DTS instance as soon as possible after the source and destination database instances are released.
Retry Time for Other Issues
After the migration task starts, if a non-connectivity issue, such as a DDL or DML execution exception, occurs in the source or destination database, DTS reports an error and immediately begins to retry the operation. The default retry duration is 10 minutes. You can customize the retry time to a value from 1 to 1440 minutes. We recommend that you set the duration to more than 10 minutes. If the related operations succeed within the specified retry duration, the migration task automatically resumes. Otherwise, the task fails.
ImportantThe value of Retry Time for Other Issues must be less than the value of Retry Time for Failed Connections.
Enable Throttling for Full Data Migration
During full migration, DTS consumes read and write resources on the source and destination databases, which may increase the database load. If required, you can enable throttling for the full migration task. You can set Queries per second (QPS) to the source database, RPS of Full Data Migration, and Data migration speed for full migration (MB/s) to reduce the load on the destination database.
Note-
This configuration item is available only if you select Full Data Migration for Migration Types.
-
You can also adjust the full migration speed after the migration instance is running.
Only one data type for primary key _id in a table of the data to be synchronized
In the data to be migrated, is the data type of the primary key
_iduniform within a single collection?Important-
Select an option based on your requirements. Otherwise, data loss may occur.
-
This parameter is available only if you select Full Data Migration for Migration Types.
-
Yes: The data type is unique. During full data migration, DTS does not scan the data types of primary keys in the source data. For a single collection, DTS migrates only the data corresponding to one primary key data type.
-
No: The data type is not unique. During full data migration, DTS scans the data types of primary keys in the source data and migrates all data.
Enable Throttling for Incremental Data Migration
If required, you can also choose to set speed limits for the incremental migration task. You can set RPS of Incremental Data Migration and Data migration speed for incremental migration (MB/s) to reduce the load on the destination database.
Note-
This configuration item is available only if you select Incremental Data Migration for Migration Types.
-
You can also adjust the incremental migration speed after the migration instance is running.
Environment Tag
You can select an environment tag to identify the instance based on your business requirements. In this example, you do not need to select a tag.
Configure ETL
Based on your business needs, select whether to configure the ETL feature to process data.
-
Yes: Configures the ETL feature. You must also enter data processing statements in the text box.
-
No: Does not configure the ETL feature.
NoteIf the destination table is created by using the HBase API, note the following:
The ETL syntax includes columns to configure and columns to exclude. During migration, all top-level fields of the MongoDB documents for which ETL is configured are stored in the default column family f of the HBase table. The following example shows how to write all elements except for the top-level elements _id and name as dynamic columns to the destination table. For more information, see Example of configuring an ETL task for a table created by calling the Apache HBase API.
script:e_expand_bson_value("*", "_id,name")If you need to use both the new column and ETL features, make sure that no duplicate data exists in the Lindorm instance.
Columns for which neither the new column nor the ETL feature is configured are not migrated to the destination database.
Monitoring and Alerting
Select whether to set alerts and receive alert notifications based on your business needs.
-
No: Does not set an alert.
-
Yes: Configure alerts by setting an alert threshold and an alert contact. If a migration fails or the latency exceeds the threshold, the system sends an alert notification.
-
-
Save the task and run a precheck.
-
To view the parameters for configuring this instance when you call the API operation, move the pointer over the Next: Save Task Settings and Precheck button and click Preview OpenAPI parameters in the bubble that appears.
-
If you do not need to view or have finished viewing the API parameters, click Next: Save Task Settings and Precheck at the bottom of the page.
Note-
Before the migration task starts, DTS performs a precheck. The task starts only after it passes the precheck.
-
If the precheck fails, click View Details next to the failed check item, fix the issue based on the prompt, and then run the precheck again.
-
If a warning is reported during the precheck:
-
For check items that cannot be ignored, click View Details next to the failed item, fix the issue based on the prompt, and then run the precheck again.
-
For check items that can be ignored, you can click Confirm Alert Details, Ignore, OK, and Precheck Again to skip the alert item and run the precheck again. If you choose to ignore a warning, it may cause issues such as data inconsistency and pose risks to your business.
-
-
Purchase the instance.
When the Success Rate reaches 100%, click Next: Purchase Instance.
-
On the Purchase page, select the link specification for the data migration instance. For more information, see the following table.
Category
Parameter
Description
New Instance Class
Resource Group Settings
Select the resource group to which the instance belongs. The default value is default resource group. For more information, see What is Resource Management?
Instance Class
DTS provides migration specifications with different performance levels. The link specification affects the migration speed. You can select a specification based on your business scenario. For more information, see Data migration link specifications.
-
After the configuration is complete, read and select Data Transmission Service (Pay-as-you-go) Service Terms.
-
Click Buy and Start. In the OK dialog box that appears, click OK.
You can view the progress of the migration task on the Data Migration Tasks list page.
Note-
If the migration task does not include incremental migration, it stops automatically after the full migration is complete. After the task stops, its Status changes to Completed.
-
If the migration task includes incremental migration, it does not stop automatically. The incremental migration task continues to run. While the incremental migration task is running, the Status of the task is Running.
-

HBase table column mapping
This example shows the commands to run in the SQL Shell.
This feature requires Lindorm 2.4.0 or later.
Add a column mapping to the HBase table.
ALTER TABLE test MAP DYNAMIC COLUMN f:_mongo_id_ HSTRING/HINT/..., person:name HSTRING, person:age HINT;Create a secondary index on the HBase table.
CREATE INDEX idx ON test(f:_mongo_id_);
HBase table migration (ETL)
MongoDB document
{
  "_id" : 0,
  "person" : {
    "name" : "cindy0",
    "age" : 0,
    "student" : true
  }
}
ETL statement
script:e_expand_bson_value("*", "_id")Migration result

Assignment configuration example
Source ApsaraDB for MongoDB structure
{
  "_id":"62cd344c85c1ea6a2a9f****",
  "person":{
    "name":"neo",
    "age":"26",
    "sex":"male"
  }
}
Destination Lindorm table schema
Parameter | Type |
id | STRING |
person_name | STRING |
person_age | BIGINT |
Additional column configuration
Configure the bson_value() expression according to the data hierarchy to prevent data loss or task failure. For example, if you configure the expression as bson_value("person"), Data Transmission Service (DTS) cannot write incremental changes from the sub-fields of the source person object, such as name, age, and sex, to the destination.
Parameter | Type | Value |
id | STRING | bson_value("_id") |
person_name | STRING | bson_value("person","name") |
person_age | BIGINT | bson_value("person","age") |