Synchronize data from a self-managed MySQL database connected over Express Connect, VPN Gateway, or Smart Access Gateway to ApsaraDB RDS for MySQL
Synchronize incremental data in real time from a self-managed MySQL instance connected over Express Connect, VPN Gateway, or Smart Access Gateway to an ApsaraDB RDS for MySQL instance.or a Serverless ApsaraDB RDS for MySQL
How it works
-
DTS connects to the self-managed MySQL instance through the Express Connect, VPN Gateway, or Smart Access Gateway connection to the Alibaba Cloud VPC.
-
During initial synchronization, DTS copies the schema and full dataset from the source instance to the destination RDS instance.
-
After initial synchronization completes, DTS continuously replicates incremental changes using binary logging.
Prerequisites
Before you begin, ensure that you have:
-
An ApsaraDB RDS for MySQL instance. See Create an ApsaraDB RDS for MySQL instanceor a Serverless instance.
-
A self-managed MySQL instance running MySQL 5.1, 5.5, 5.6, 5.7, or 8.0.
-
The self-managed MySQL instance connected to an Alibaba Cloud VPC. See Connect an on-premises database to DTS by using CEN.
-
DTS access allowed to the VPC. See Connect a data center to DTS by using VPN Gateway.
-
A database account with the required permissions and binary logging enabled on the self-managed MySQL instance. See Create an account for a self-managed MySQL database and configure binary logging.
Source database account permissions
The database account used for the source instance must have the following permissions:
| Permission | Scope | Purpose |
|---|---|---|
SELECT |
Required objects | Read data for synchronization |
REPLICATION CLIENT |
Global | Check replication status |
REPLICATION SLAVE |
Global | Read binary log events |
SHOW VIEW |
Global | Synchronize view definitions |
To create a dedicated account with the minimum required permissions:
CREATE USER 'dts_sync_user'@'%' IDENTIFIED BY '<your_password>';
GRANT SELECT, REPLICATION CLIENT, REPLICATION SLAVE, SHOW VIEW ON *.* TO 'dts_sync_user'@'%';
To verify binary logging is enabled on the source instance:
SHOW VARIABLES LIKE 'log_bin';
-- Expected output: log_bin | ON
Usage notes
-
During initial full data synchronization, DTS reads from and writes to both instances, increasing load. Run synchronization during off-peak hours when CPU utilization on both instances is below 30%. Load risk is higher if the source has slow queries, tables without primary keys, or if deadlocks occur on the destination.
-
Do not use gh-ost or pt-online-schema-change for DDL operations during synchronization. These tools can cause the task to fail.
-
Tables in the source database must have PRIMARY KEY or UNIQUE constraints, with all fields unique. Without these constraints, the destination database may contain duplicate records.
-
After initial full data synchronization, the destination tablespace is larger than the source due to fragmentation from concurrent INSERT operations.
Billing
| Synchronization type | Fee |
|---|---|
| Schema synchronization and full data synchronization | Free of charge |
| Incremental data synchronization | Charged. See Billing overview. |
Supported synchronization topologies
The following synchronization topologies are supported:
-
One-way one-to-one synchronization
-
One-way one-to-many synchronization
-
One-way cascade synchronization
-
One-way many-to-one synchronization
-
Two-way one-to-one synchronization
For all supported topologies, see Synchronization topologies.
SQL operations that can be synchronized
| Operation type | SQL statements |
|---|---|
| DML | INSERT, UPDATE, DELETE, REPLACE |
| DDL | ALTER TABLE, ALTER VIEW, CREATE FUNCTION, CREATE INDEX, CREATE PROCEDURE, CREATE TABLE, CREATE VIEW, DROP INDEX, DROP TABLE, RENAME TABLE, TRUNCATE TABLE |
RENAME TABLE operations can cause data inconsistency between the source and destination databases. If you rename a table that is selected as a synchronization object, the renamed table's data is not synchronized to the destination. To avoid this, select the entire database — rather than individual tables — as the synchronization object, and make sure both the pre-rename and post-rename database names are included in the synchronization objects.
Limits
-
Trigger incompatibility: If the source database contains a trigger that updates a table, and you select that database as the synchronization object, data inconsistency may occur. See Configure a data synchronization or migration task for a source database that contains a trigger for resolution steps.
-
RENAME TABLE behavior: If you select a specific table as the synchronization object and rename it during synchronization, the renamed table is not synchronized. To prevent this, select the entire database as the synchronization object.
Configure the data synchronization task
Step 1: Purchase a DTS instance
Purchase a DTS instance. When purchasing:
-
Select MySQL for both the source and destination instance types.
-
Select One-Way Synchronization as the synchronization topology.
Step 2: Log on to the DTS console
Log on to the DTS console.
If you are redirected to the Data Management Service (DMS) console, move the pointer over theicon in the lower-right corner and click the
icon to return to the DTS console. If the new version of the DTS console appears, click the
icon in the lower-right corner to switch to the previous version.
Step 3: Open the synchronization task configuration
-
In the left-side navigation pane, click Data Synchronization.
-
At the top of the Data Synchronization Tasks page, select the region where the destination instance resides.
-
Find the data synchronization instance and click Configure Task in the Actions column.

Step 4: Configure source and destination instances

Task name
| Parameter | Description |
|---|---|
| Synchronization Task Name | DTS automatically generates a name. Specify a descriptive name to identify the task. A unique name is not required. |
Source instance details
| Parameter | Description |
|---|---|
| Instance Type | Select User-Created Database Connected over Express Connect, VPN Gateway, or Smart Access Gateway. |
| Instance Region | The region you selected when purchasing the data synchronization instance. Read-only. |
| Peer VPC | The ID of the VPC connected to the self-managed MySQL instance. |
| Database Type | Set to MySQL based on your purchase selection. Read-only. |
| IP Address | The IP address of the self-managed MySQL instance server. |
| Port Number | The service port of the self-managed MySQL instance. Default: 3306. |
| Database Account | The account used to connect to the source instance. The account must have the SELECT privilege on the required objects and the REPLICATION CLIENT, REPLICATION SLAVE, and SHOW VIEW privileges. |
| Database Password | The password for the database account. |
Destination instance details
| Parameter | Description |
|---|---|
| Instance Type | Select RDS Instance. |
| Instance Region | The region you selected when purchasing the data synchronization instance. Read-only. |
| Instance ID | The ID of the destination RDS instance. |
| Database Account | The account used to connect to the destination RDS instance. Note
Skip this parameter if the destination instance runs MySQL 5.5 or MySQL 5.6. |
| Database Password | The password for the database account. Skip if the destination runs MySQL 5.5 or MySQL 5.6. |
| Encryption | Select Non-encrypted or SSL-encrypted based on your security requirements. To use SSL encryption, enable SSL on the RDS instance first. See Use a cloud certificate to enable SSL encryption. |
Step 5: Set whitelist and proceed
Click Set Whitelist and Next.
DTS automatically adds its CIDR blocks to the whitelist of Alibaba Cloud instances (such as RDS instances) and to the security group rules of Elastic Compute Service (ECS) instances hosting self-managed databases. For self-managed instances in data centers or from other cloud providers, manually add the DTS CIDR blocks to your firewall rules. See Add the CIDR blocks of DTS servers to the security settings of on-premises databases.
Adding DTS CIDR blocks to whitelists or security groups introduces potential security exposure. Take preventive measures, including strengthening account credentials, limiting exposed ports, authenticating API calls, regularly auditing whitelist and security group rules to remove unauthorized CIDR blocks, or connecting the database to DTS by using Express Connect, VPN Gateway, or Smart Access Gateway.
Step 6: Select synchronization policy and objects
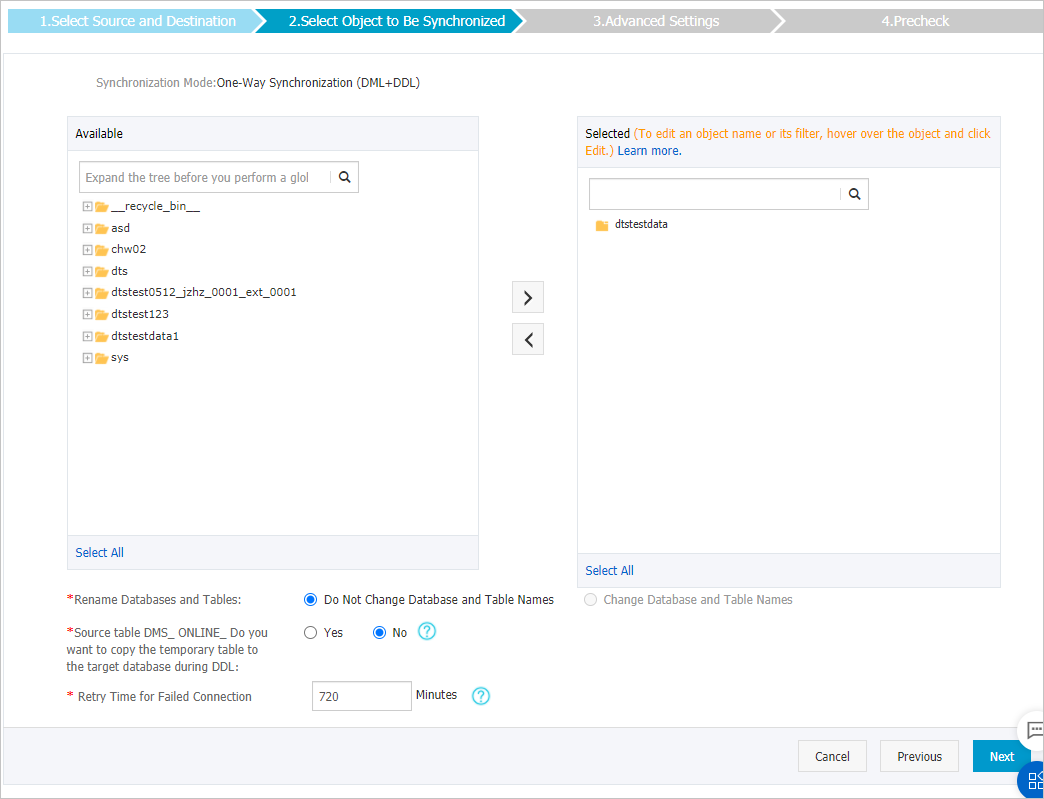
| Parameter | Description |
|---|---|
| Select Object to Be Synchronized | In the Available section, select the objects to synchronize and click  to move them to the Selected section. Select tables or entire databases. Note
Selecting a database synchronizes all schema changes in that database to the destination. To rename synchronized objects, see Rename an object to be synchronized. |
| Rename Databases and Tables | Use object name mapping to rename objects in the destination instance. See Object name mapping. |
| Source table DMS_ONLINE_Do you want to copy the temporary table to the target database during DDL | If you use DMS to perform online DDL operations on the source, specify whether to synchronize the temporary tables generated by those operations. Select Yes to synchronize temporary tables (note: large online DDL operations may increase synchronization latency). Select No to skip temporary tables and synchronize only the original DDL (note: destination tables may be temporarily locked). |
| Retry Time for Failed Connection | If DTS loses connectivity to the source or destination, it retries for up to 720 minutes (12 hours) by default. Adjust this based on your business requirements. If DTS reconnects within the specified window, it resumes the task automatically; otherwise, the task fails. Note
DTS instance charges continue to accrue during retry periods. Release the DTS instance promptly if the source and destination instances are no longer available. |
Click Next.
Step 7: Configure initial synchronization

Select both Initial Schema Synchronization and Initial Full Data Synchronization. These are required in most cases — initial synchronization copies the schema and data that incremental synchronization builds on.
Step 8: Run the precheck
Click Precheck.
DTS validates the configuration before starting the task. If any checks fail, click the  icon next to the failed item to view the cause. After you troubleshoot the issues based on the causes, you can run a precheck again. If you do not need to troubleshoot the issues, you can ignore failed items and run a precheck again.
The task cannot start until the precheck passes.
Step 9: Start the synchronization task
After the precheck passes and The precheck is passed. appears in the Precheck dialog box, close the dialog. The task starts automatically.
Wait until initial synchronization is complete and the task status changes to Synchronizing. When the task is in the Synchronizing state, incremental data synchronization is running.

View the task status at any time on the Data Synchronization page.
What's next
-
Synchronization topologies — explore other supported topologies
-
Object name mapping — rename objects in the destination instance
-
Billing overview — understand DTS incremental synchronization charges