When you create an application-consistent snapshot, the system pauses data writes to ensure the integrity and consistency of the data captured in the snapshot. When you use an application-consistent snapshot to restore data, you reduce the risk of data corruption and loss. This process ensures that applications, such as MySQL, can start normally and that the data is in the same state as when the snapshot was created. This topic uses a CentOS 7.9 instance with a MySQL 8.0 database as an example to demonstrate the effectiveness of application-consistent snapshots for data backup.
Prerequisites
-
The Elastic Compute Service (ECS) instance uses enterprise SSDs (ESSDs), and the multi-attach feature is disabled for the disks.
-
The ECS instance is in the Running state and the Cloud Assistant client is running correctly. To learn how to check the client status, see View the status of the Cloud Assistant client and handle exceptions.
-
You have installed a MySQL database and have the username and password for the database. For more information, see Manually deploy a MySQL database (Linux).
-
You have configured a RAM role and a custom policy with the required permissions for application-consistent snapshots and attached the role to the ECS instance. For more information, see Step 1: Create a RAM role.
NoteBecause creating an application-consistent snapshot requires Cloud Assistant to access the ECS instance and run commands, you must grant it the necessary permissions through a RAM role.
-
RAM role: A custom role, for example,
AppSnapshotRoleName. -
Custom policy: The following policy grants permissions to query snapshots and disk information, create snapshots, and add tags to resources during the snapshot creation process.
{
    "Version": "1",
    "Statement": [
        {
            "Effect": "Allow",
            "Action": [
                "ecs:DescribeSnapshot*",
                "ecs:CreateSnapshot*",
                "ecs:TagResources",
                "ecs:DescribeDisks"
            ],
            "Resource": [
                "*"
            ],
            "Condition": {}
        }
    ]
}
-
Workflow
This best practice shows you how to create an application-consistent snapshot to ensure application consistency. This process guarantees that the database is in the same state as when the snapshot was created. The workflow is as follows:

-
Step 1: Create the prescript.sh and postscript.sh scripts
Create a prescript (prescript.sh) to pause database write operations and a postscript (postscript.sh) to resume them. These scripts are required to create an application-consistent snapshot. The prescript pauses database writes before the snapshot is created, and the postscript resumes them after.
-
Step 2: Prepare the database verification environment
Create a database table and a stored procedure to simulate continuous data write operations. This lets you verify the effectiveness of the application-consistent snapshot. You will call the stored procedure (TestPIT) to insert data, which helps you check the effects of pausing the database and rolling back data.
-
Step 3: Create an application-consistent snapshot in the console
Create an application-consistent snapshot for the Linux instance that hosts the MySQL database. When you create the snapshot, you will use the prescript and postscript to temporarily stop and then resume database write operations, which ensures data consistency.
-
Step 4: Verify that the application-consistent snapshot is created
Verify the snapshot creation by checking the Cloud Assistant command execution results. Note the times when database write operations were paused and resumed.
-
Step 5: Verify the data restoration from the application-consistent snapshot
Roll back the disk using the application-consistent snapshot. Then, compare the last data write time in the MySQL database with the database pause time, which is the execution time of the prescript.sh script. This comparison verifies that the data was restored correctly from the application-consistent snapshot.
-
If the last data write time is earlier than the prescript execution time, it means no write operations occurred while the database was paused. The restored data is consistent with the state of the database when the snapshot was created.
-
If the last data write time is the same as or later than the prescript execution time, it means write operations occurred while the database was paused. This indicates that the application-consistent snapshot did not work as expected.
-
Procedure
Step 1: Create the prescript.sh and postscript.sh scripts
The content of the prescript.sh and postscript.sh scripts in this topic is for demonstration purposes only. To create application-consistent snapshots for your own business applications, you must write the prescript.sh and postscript.sh scripts based on your actual business needs. For more information about the scripts, see Create an application-consistent snapshot.
-
Remotely connect to the ECS instance as the root user.
For more information, see Log on to a Linux instance using Workbench.
-
Create the /tmp/prescript.sh script and write content to it.
-
Use the root user to create /tmp/prescript.sh.
vim /tmp/prescript.sh -
Press
ito enter edit mode. -
In the script, customize the content of prescript.sh for your application.
-
Press the
Esckey, enter:wq, and then press the Enter key to save the script and exit. -
Set read, write, and execute permissions on the script for the root user only.
ImportantTo ensure script security, make sure that only the root user has read, write, and execute permissions on the script (permission 700). Otherwise, the script execution fails.
chmod 700 /tmp/prescript.sh
-
-
Create the /tmp/postscript.sh script and write content to it.
-
Use the root user to create /tmp/postscript.sh.
vim /tmp/postscript.sh -
Press
ito enter edit mode. -
In the script, customize the content of postscript.sh for your application.
-
Press the
Esckey, enter:wq, and then press the Enter key to save the script and exit. -
Set read, write, and execute permissions on the script for the root user only.
ImportantTo ensure script security, make sure that only the root user has read, write, and execute permissions on the script (permission 700). Otherwise, the script execution fails.
chmod 700 /tmp/postscript.sh
-
-
Go to the /tmp directory to check if the script permissions are correct.
cd /tmp
ls -l
The following output shows that the script permissions are correct.

Step 2: Prepare the database verification environment
-
Create the test script (/root/test.sql).
-
Create and open the test script (/root/test.sql).
vim /root/test.sql -
Press
ito enter edit mode. -
Write the SQL script for verification.
The SQL script contains statements to create a database table (PointInTime) and a verification stored procedure (TestPIT). The content is as follows.
USE AdventureWorks; CREATE TABLE PointInTime(id int, t datetime); DELIMITER $$ CREATE PROCEDURE `TestPIT`() BEGIN DECLARE i int; SET i=1; WHILE i < 180 DO INSERT INTO PointInTime VALUES(i, now()); SELECT SLEEP(1); SET i=i+1; END WHILE; END $$ DELIMITER ; -
Press the
Esckey, enter:wq, and then press the Enter key to save the script and exit.
-
-
Log on to the MySQL database.
Enter the following command, press the Enter key, and enter the MySQL password as prompted.
mysql -u <mysqlUserName> -pReplace
<mysqlUserName>with your MySQL username. -
Create a new database named AdventureWorks.
CREATE DATABASE AdventureWorks; -
Run the test script.
source /root/test.sql -
Call the stored procedure (TestPIT).
CALL TestPIT;ImportantYou must create the application-consistent snapshot before the TestPIT stored procedure finishes. The procedure takes about 3 minutes to complete. Otherwise, you cannot verify the result of the application-consistent snapshot.
Step 3: Create an application-consistent snapshot in the console
In the top navigation bar, select the region and resource group of the resource that you want to manage.

-
On the Snapshot-consistent Groups tab, click Create Snapshot-consistent Group.
-
In the Create Snapshot dialog box, set the parameters for the snapshot-consistent group.
-
Resource Types is set to Instance by default.
-
Select a single instance and the ESSD disks within that instance.
-
Expand Advanced Settings and configure the application-consistent snapshot.
-
Select Enable Application-consistent Snapshot.
-
Set the paths for the prescript.sh and postscript.sh scripts to match the paths of the scripts created in Step 1.
-
Set the duration for File System I/O Pause and Resume.
-
-
-
Click OK.
The command returns a Cloud Assistant command execution ID. You can use this ID to view the execution result.
Step 4: Verify that the application-consistent snapshot is created
-
Click the Cloud Assistant command execution ID to view the execution result on the Cloud Assistant page.

As shown in the figure above, an Exit Code of
0indicates that the command to create the application-consistent snapshot was successfully executed by Cloud Assistant. The output displays the IDs of the created application-consistent snapshot and the snapshot-consistent group.NoteIf the Exit Code is not
0, troubleshoot the issue based on the Exit Code error code information. For more information, see Error codes. -
In the output from Cloud Assistant, view the pause and resume times for the database.
In the output, find the start time of the prescript.sh script and the completion time of the postscript.sh script.
-
The prescript.sh script ran at
2024-08-27 15:27:55, which means the database paused write operations at this time.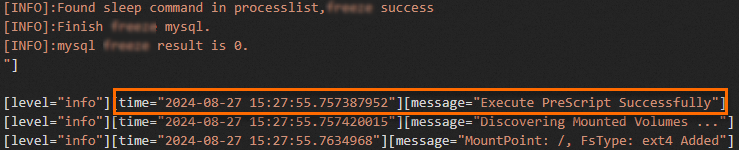
-
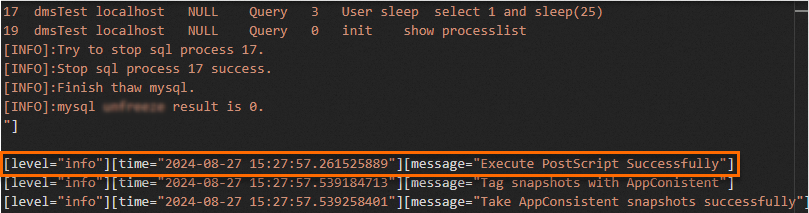
The postscript.sh script ran at
2024-08-27 15:27:57, which means the database resumed write operations at this time.
-
-
View the snapshot-consistent group and disk snapshot information.
-
On the Snapshot-consistent Groups tab, find the created snapshot-consistent group and click its ID to view the snapshot details.
-
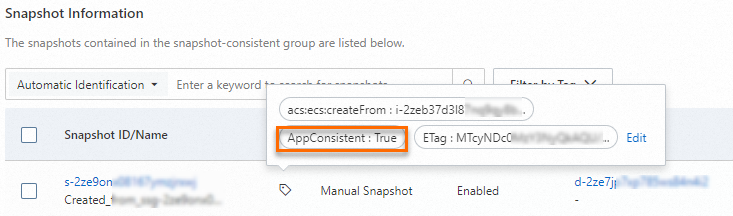
In the Snapshot Information section, check the snapshot's tags to verify that an application-consistent snapshot was successfully created.
In the example, the disk snapshot's tag is
APPConsistent:True, which indicates that an application-consistent snapshot was created.
-
Connect to the MySQL database and check the data commit pause time.
-
Remotely connect to the ECS instance.
For more information, see Log on to a Linux instance using Workbench.
-
Log on to the MySQL database.
Enter the following command, press the Enter key, and enter the MySQL password as prompted.
mysql -u <mysqlUserName> -pReplace
<mysqlUserName>with your MySQL username. -
Query the content of the PointInTime table.
USE AdventureWorks; SELECT * FROM PointInTime; -
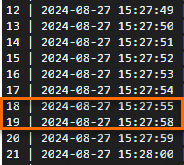
In the query results, view the database pause time.
You can see that no data was inserted between
2024-08-27 15:27:55and2024-08-27 15:27:58.
-
Step 5: Verify the data restoration from the application-consistent snapshot
-
Roll back the disk using the created snapshot-consistent group.
For more information, see Roll back disks using a snapshot-consistent group.
-
Log on to the MySQL database again and query the content of the PointInTime table.
-
Remotely connect to the ECS instance.
For more information, see Log on to a Linux instance using Workbench.
-
Log on to the MySQL database.
Enter the following command, press the Enter key, and enter the MySQL password as prompted.
mysql -u <mysqlUserName> -pReplace
<mysqlUserName>with your MySQL username. -
Query the content of the PointInTime table.
USE AdventureWorks; SELECT * FROM PointInTime; -
In the query results, view the timestamp of the last record in the database after data restoration.
You can see that the last data record was inserted into the database at
2024-08-27 15:27:54, which is earlier than the pause timestamp2024-08-27 15:27:55that you noted in Step 4. This proves that the data was restored correctly from the application-consistent snapshot.
-
