Quickly deploy BT-Panel
BT-Panel is an easy-to-use and powerful server and website management software that supports Linux and Windows. With BT-Panel, you can configure environments such as LAMP, LNMP, websites, databases, FTP, and SSL with a single click. You can also manage servers from a web interface to improve operations and maintenance (O&M) efficiency. This document describes how to use an Alibaba Cloud Marketplace image to quickly deploy BT-Panel on an ECS instance.
For more information about BT-Panel, see the official BT-Panel website.
Quick deployment
Click Run Now to open Terraform Explorer. In Terraform Explorer, you can view and run the Terraform code to automatically deploy BT-Panel on an ECS instance.
Deployment guide
This document provides two methods to quickly deploy BT-Panel. You can choose a method based on your operating system.
|
Deployment method |
Example operating system |
Description |
|
Alibaba Cloud Linux 3 Note
This is the only supported operating system. |
You can use Resource Orchestration Service (ROS) to automate the deployment of BT-Panel. For more information, see What is Resource Orchestration Service?. |
|
|
Method 2: Deploy BT-Panel using an Alibaba Cloud Marketplace image |
Alibaba Cloud Linux 3 Note
If you have specific requirements for the operating system, use this method. You can select an Alibaba Cloud Marketplace image for the corresponding operating system. |
Alibaba Cloud Marketplace provides BT-Panel images. These images help you quickly set up BT-Panel and lower the barrier to deploying the environment. This method is suitable for enterprise or individual users who are new to Alibaba Cloud ECS. For more information, see Understand the image marketplace. |
Method 1: Quickly deploy BT-Panel using ROS
Step 1: Deploy BT-Panel
-
Click One-click Deployment. On the page that appears, configure the parameters as prompted, and then click Deploy Now.
The key parameters are described as follows:
-
Region: Select the region where the ECS instance is located.
-
Instance Source:
If you have specific requirements for the billing method, disk, or network of the ECS instance, you must first purchase an ECS instance that runs Alibaba Cloud Linux 3. Then, select the existing instance. For more information, see Create an instance on the custom launch tab.
Create a new instance
ROS automatically creates a spot instance and deploys BT-Panel on the instance.
-
Instance Image: Alibaba Cloud Linux 3
-
Instance Type: Select an instance type based on your requirements. For more information, see Instance families.
-
Instance Password: Enter and confirm the password for the ECS instance.
Select an existing instance
ROS automatically deploys BT-Panel on the selected instance. The ECS instance must have internet access and run Alibaba Cloud Linux 3.2104.
NoteA public IP address is automatically assigned to the ECS instance. Alternatively, an elastic IP address (EIP) is associated with the ECS instance. For instructions on how to enable public bandwidth, see Enable public bandwidth.
-
-
-
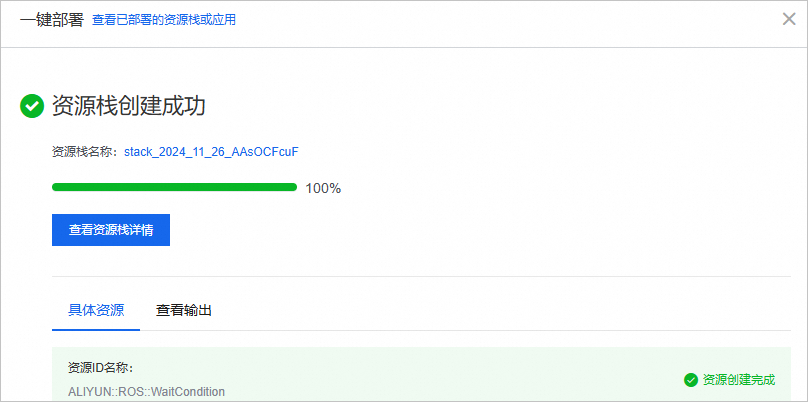
ROS starts the automatic deployment. The deployment is successful when the progress reaches 100%.
NoteYou can click the stack name to view information about the created resources, such as the ECS instance, VPC, and security group, in the ROS console. For more information, see View a stack.
-
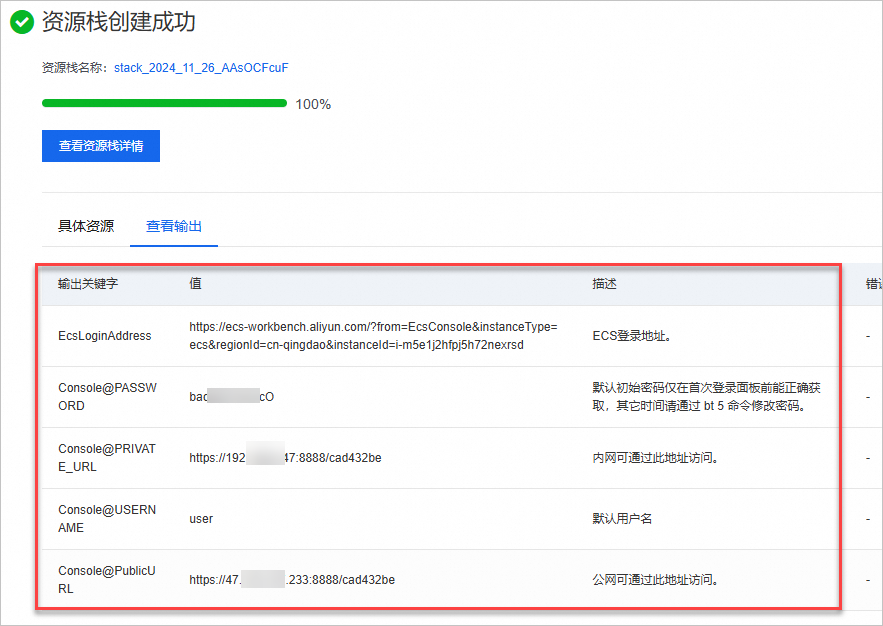
Click the View Outputs tab to view and record the logon information for BT-Panel.
The output keywords are described as follows:
-
EcsLoginAddress: The remote connection address of the ECS instance.
-
Console@PRIVATE_URL: The private network logon address for BT-Panel.
-
Console@PASSWORD: The logon password for BT-Panel.
-
Console@USERNAME: The username for BT-Panel.
-
Console@PublicURL: The public network logon address for BT-Panel.
-
Step 2: Log on to BT-Panel for Linux
-
On a Windows host with internet access, enter the public address of BT-Panel in a browser.
In this example, the public address of BT-Panel is
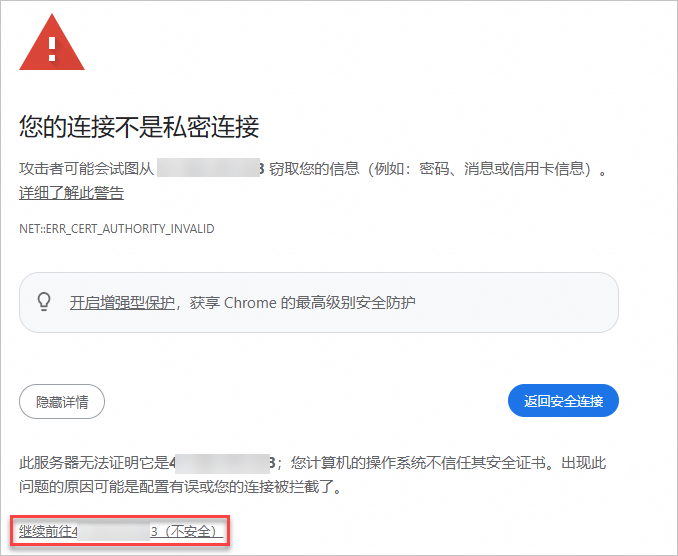
https://47.105.XX.XX:8888/cad432be. Use the address that is displayed on the View Outputs tab. If you cannot access BT-Panel, see the following documents to troubleshoot the issue:NoteWhen you access the public address of BT-Panel from a browser for the first time, a message similar to "Your connection is not private" appears. Click Advanced, and then click Continue to 47.105.XX.XX (unsafe) to proceed. For more information, see the official BT-Panel documentation.
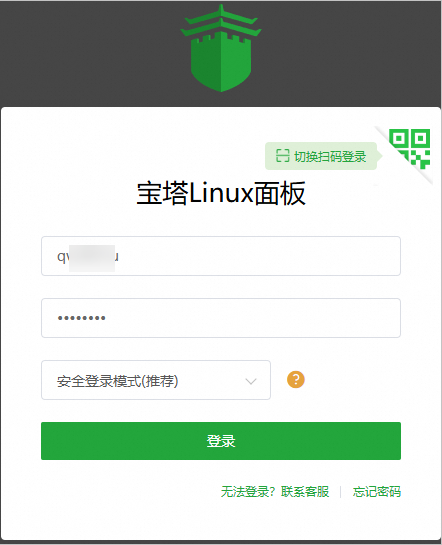
Enter the username and password that you recorded, and then log on to BT-Panel for Linux.
Select I have read and agree to the User Agreement and click Enter Panel.
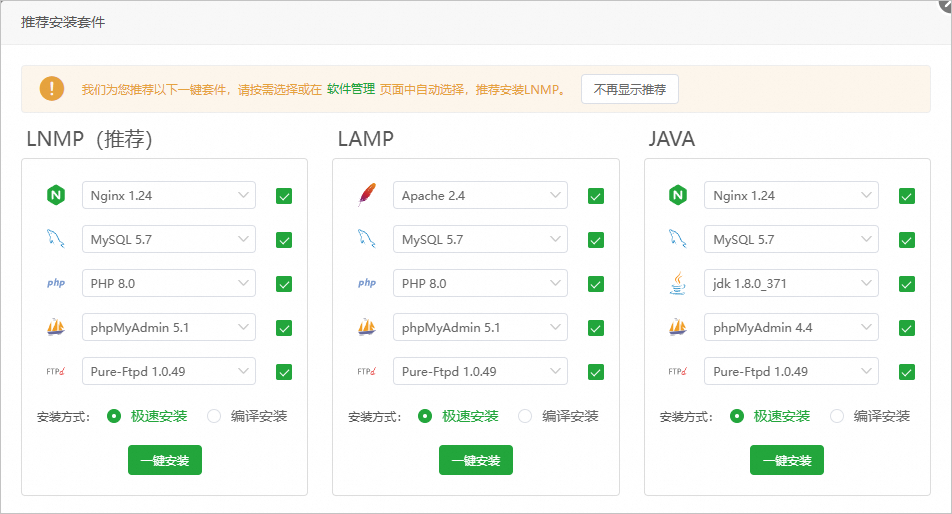
After you bind your BT-Panel account, the Recommended installation suite dialog box appears. Install the software that you need.
For detailed usage instructions, see the BT-Panel official documentation.
Method 2: Deploy BT-Panel using an Alibaba Cloud Marketplace image
Step 1: Use a BT-Panel image to create an ECS instance
-
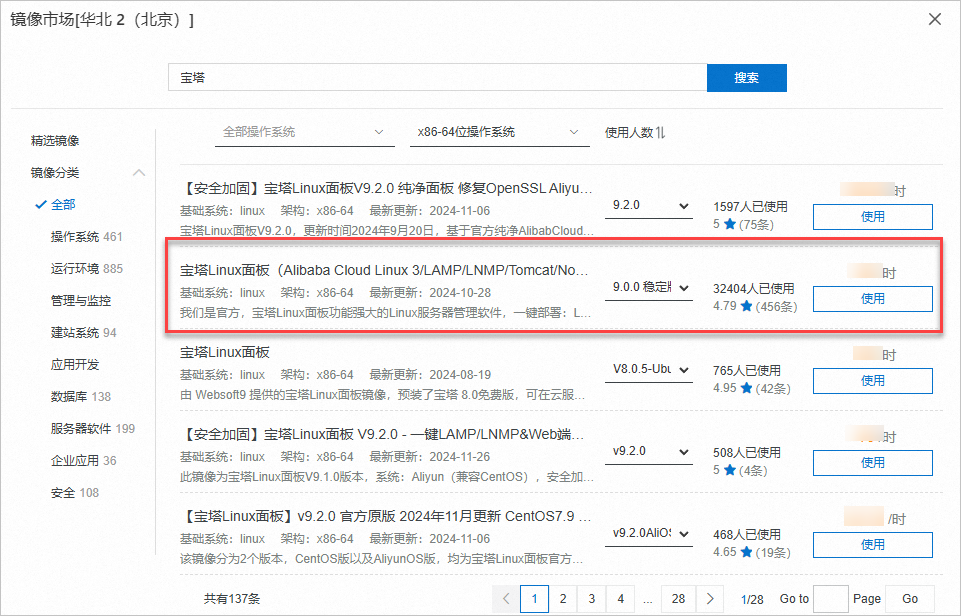
If you have an ECS instance that does not contain important data, you can replace its OS image. In the Marketplace Image section, select the BT-Panel for Linux (Alibaba Cloud Linux 3/LAMP/LNMP/Tomcat/Node.js/) image. For more information, see Replace the system disk (change the operating system).
-
If a public IP address was not assigned when you purchased the instance, you must associate an EIP with the instance. For more information, see Associate an EIP.
Log in to the ECS console.
In the left-side navigation pane, choose .
In the upper-left corner of the page, select a region and resource group.

-
On the Instances page, click Create Instance.
-
On the Custom Launch page, in the Image section, choose .
-
In the search box, enter
BT-Panel, click Search, select an image, and then click Use.You can click the title of an image in the search results to go to the Alibaba Cloud Marketplace page for the image and view its configuration details. This example uses the BT-Panel for Linux (Alibaba Cloud Linux 3/LAMP/LNMP/Tomcat/Node.js/) image.
Note-
If you have specific requirements for the operating system and its version, select an Alibaba Cloud Marketplace image for the corresponding operating system.
-
When you select an Alibaba Cloud Marketplace image, note the image fee. If the image fee is
¥0/hour, the image is free of charge. -
You can click the image name to go to the image details page. On this page, you can view the image details and user guide.
-
-
On the Custom Launch page, configure the other parameters as prompted and complete the purchase.
Note the following parameters. For more information about the other parameters, see Create an instance on the custom launch tab.
-
Instance: Select an instance type with at least 2 GiB of memory.
-
Image: The Image section is automatically set to the image you selected.
-
Public IP: Select Assign Public IPv4 Address and set a bandwidth value as needed.
-


Step 2: Log on to BT-Panel
-
Obtain the logon information for BT-Panel.
-
Remotely connect to the ECS instance. For more information, see Log on to a Linux instance using Workbench.
-
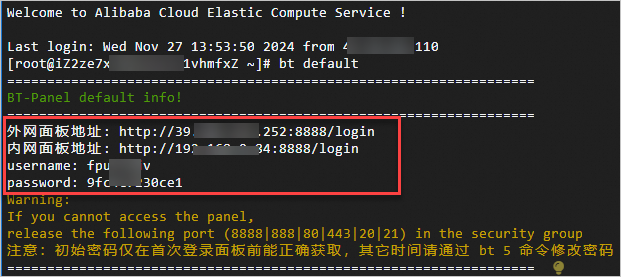
Run the following command to obtain the private and public addresses, username, and password for BT-Panel:
bt defaultThe command output is similar to the following:
-
-
In the inbound direction, add a rule to the security group of the ECS instance to allow access to port
8888of BT-Panel. For more information, see Add a security group rule.In this example, the BT-Panel port is
8888. Use the port number that you obtained in Step 1. For data security, this example allows access only to the required ports in addition to the default ports that are allowed when the server is created. -
On a Windows host with internet access, enter the public address of BT-Panel,
http://<ECS instance public IP>:8888/login, in a browser.If you cannot access BT-Panel, see the following documents to troubleshoot the issue:
ImportantUse the public address of BT-Panel that you obtained in Step 1.
Enter the username and password that you recorded, and then log on to BT-Panel for Linux.
Select I have read and agree to the User Agreement and click Enter Panel.
After you bind your BT-Panel account, the Recommended installation suite dialog box appears. Install the software that you need.
For detailed usage instructions, see the BT-Panel official documentation.

Method 3: Quickly deploy BT-Panel using Terraform
Step 1: Deploy BT-Panel
-
Click Run Now to open Terraform Explorer. The following Terraform code is automatically loaded.
-
Modify the parameters based on your requirements. By default, a VPC-connected instance and a pay-as-you-go ECS instance that runs Debian are created in the China (Beijing) region. For more information about instance billing, see Billing overview.
-
Click Start Debugging to preview the details of the resources to be created. If the resource information is correct, click Preview and Execute to start creating the resources. The deployment is complete when the task execution status is Successful.
Step 2: Log on to BT-Panel for Linux
-
Obtain the logon information for BT-Panel.
-
Remotely connect to the ECS instance. For more information, see Log on to a Linux instance using Workbench.
-
Run the following command to obtain the private and public addresses, username, and password for BT-Panel:
bt defaultThe command output is similar to the following:
-
-
In the inbound direction, add a rule to the security group of the ECS instance to allow access to port
8888of BT-Panel. For more information, see Add a security group rule.In this example, the BT-Panel port is
8888. Use the port number that you obtained in Step 1. For data security, this example allows access only to the required ports in addition to the default ports that are allowed when the server is created. -
On a Windows host with internet access, enter the public address of BT-Panel,
http://<ECS instance public IP>:8888/login, in a browser.If you cannot access BT-Panel, see the following documents to troubleshoot the issue:
ImportantUse the public address of BT-Panel that you obtained in Step 1.
Enter the username and password that you recorded, and then log on to BT-Panel for Linux.
Select I have read and agree to the User Agreement and click Enter Panel.
After you bind your BT-Panel account, the Recommended installation suite dialog box appears. Install the software that you need.
For detailed usage instructions, see the BT-Panel official documentation.