Use the EDAS plugin in Jenkins to create application deployment tasks
After you integrate the edas-jenkins-plugin into your Jenkins environment, you can use the plugin to continuously deploy applications to Enterprise Distributed Application Service (EDAS). This topic describes how to deploy applications from the Jenkins console, use a pipeline for deployment, and use a Job DSL template to quickly generate deployment tasks.
Prerequisites
The Job DSL plugin is installed.
Install the edas-jenkins-plugin
-
Download the edas-jenkins-plugin installation package.
-
Log in to the Jenkins home page. Click Manage Jenkins. On the Manage Jenkins page, click Manage Plugins.
-
On the Plugin Manager page, select the Advanced tab. In the Upload Plugin section, click Choose File, select the downloaded plugin, and then click Upload.
-
On the Installing Plugins/Upgrades page, wait for the plugin to install.
Configure account information
-
Log in to the Jenkins home page. Click Manage Jenkins. On the Manage Jenkins page, click Configure System.
-
In the Deploy to EDAS section, configure the account information. Click Add and then Advanced to enter the region information.
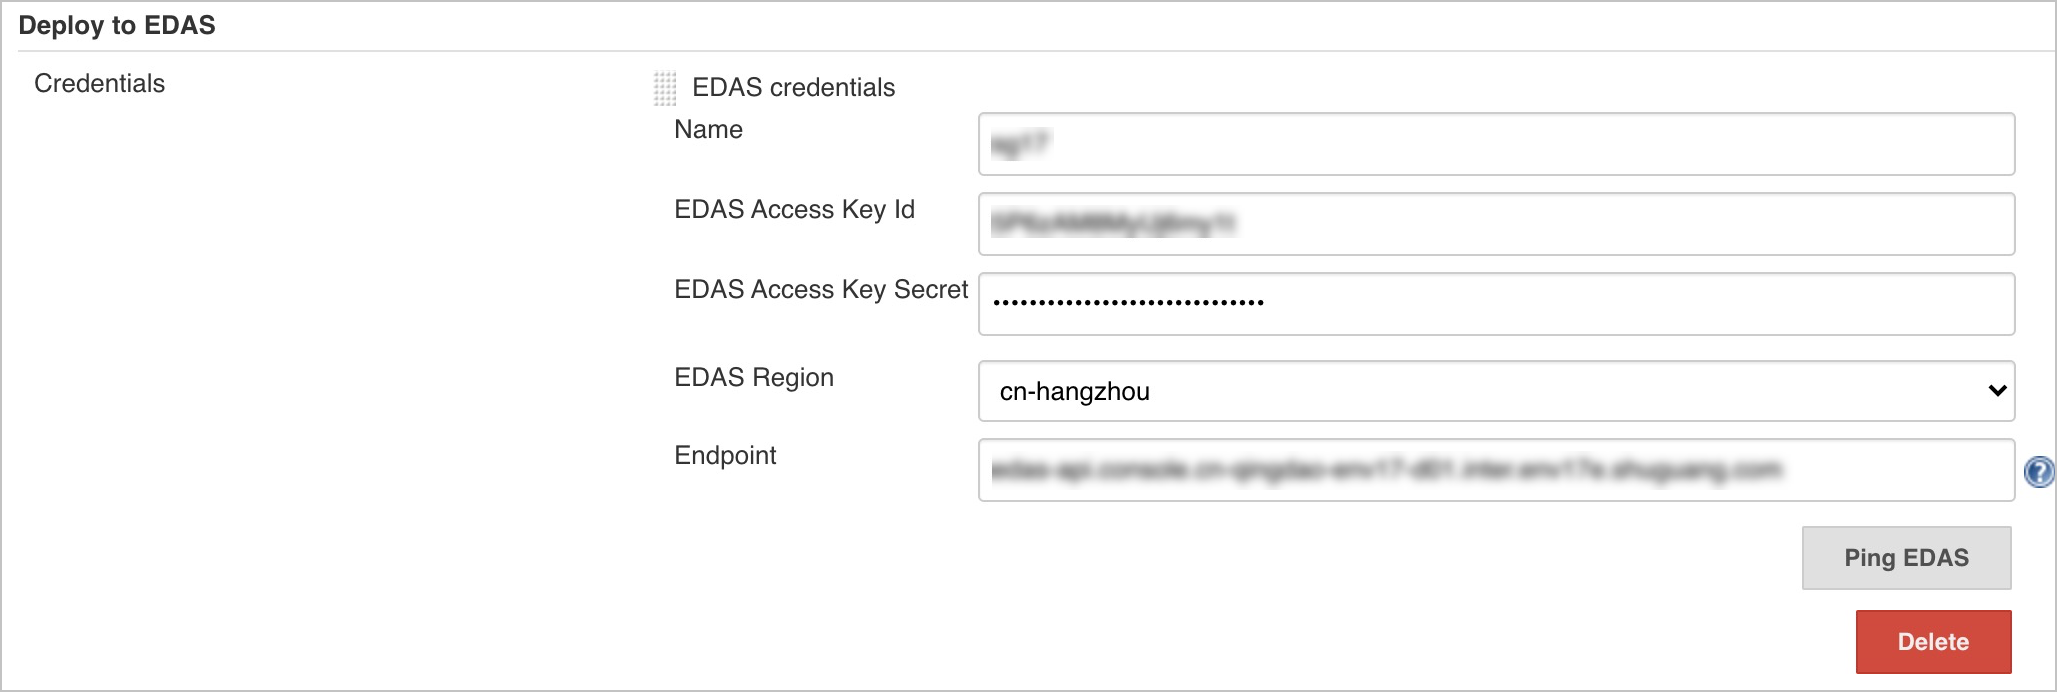
Parameter
Description
EDAS credentials name
Set a name for the AccessKey.
EDAS Access Key ID
Enter the AccessKey ID for your account. For more information, see Create an AccessKey.
EDAS Access Key Secret
Enter the AccessKey secret for your account. For more information, see Create an AccessKey.
EDAS Region
Enter the region ID where you want to deploy the application, such as cn-hangzhou.
Endpoint (Apsara Stack)
Before using Jenkins in Apsara Stack, enter the EDAS Endpoint in this configuration item. Contact EDAS technical support to obtain the Endpoint.
NoteYou do not need to configure this parameter when using Jenkins in the public cloud.
-
After you complete the configuration, click Ping EDAS in the Deploy to EDAS section. If the message success is displayed, the account information is correct.
NoteClick Add to set up multiple EDAS accounts.
Create a Freestyle project task in Jenkins to deploy an application
-
Log in to the Jenkins home page and click New Item.
-
In the Enter an item name field, enter a project name. Select Freestyle project and then click OK.
-
In the Post-build Actions section, click Add post-build actions and select Deploy to EDAS from the drop-down list.
-
In the Deploy to EDAS section, click Add and select a cluster for deployment from the drop-down list.
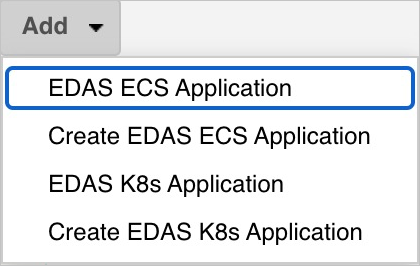
Parameter
Description
EDAS ECS Application
Upgrade and deploy an application that is already deployed in an ECS cluster using the Jenkins plugin. For detailed parameter settings, see Deploy an application in an ECS cluster.
Create EDAS ECS Application
Create and deploy an application in an ECS cluster using the Jenkins plugin. For detailed parameter settings, see Create and deploy an application in an ECS cluster.
EDAS K8s Application
Upgrade and deploy an application that is already deployed in a Container Service for Kubernetes cluster using the Jenkins plugin. For detailed parameter settings, see Deploy an application in a Container Service for Kubernetes cluster.
Create EDAS K8s Application
Create and deploy an application in a Container Service for Kubernetes cluster using the Jenkins plugin. For detailed parameter settings, see Create and deploy an application in a Container Service for Kubernetes cluster.
-
After you complete the settings, click Save or Apply at the bottom of the page.
-
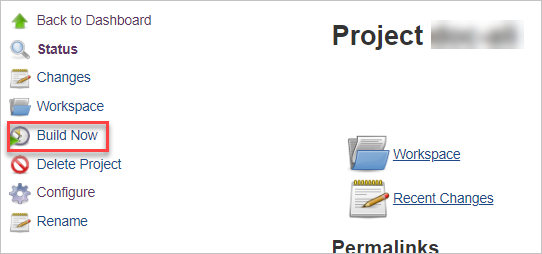
On the project task page, click Build Now in the navigation pane on the left to run the task.
You can view build records in the Build History section. Click a build record to view its details.
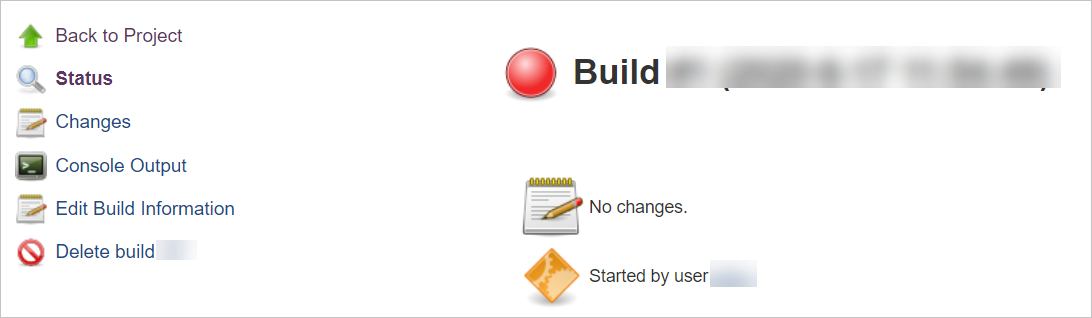
Use the Pipeline plugin to deploy an application to EDAS
The edas-jenkins-plugin supports the pipeline snippet generator. You can build a pipeline in Jenkins to deploy applications to EDAS.
-
Log in to the Jenkins home page and click New Item.
-
In the Enter an item name field, enter a project name. Select Pipeline and then click OK.
-
In the Pipeline section, click Pipeline Syntax.
NoteIf you have an existing pipeline, click its name in the project list to open the pipeline management page. In the navigation pane on the left, click Pipeline Syntax to open the Snippet Generator page.
-
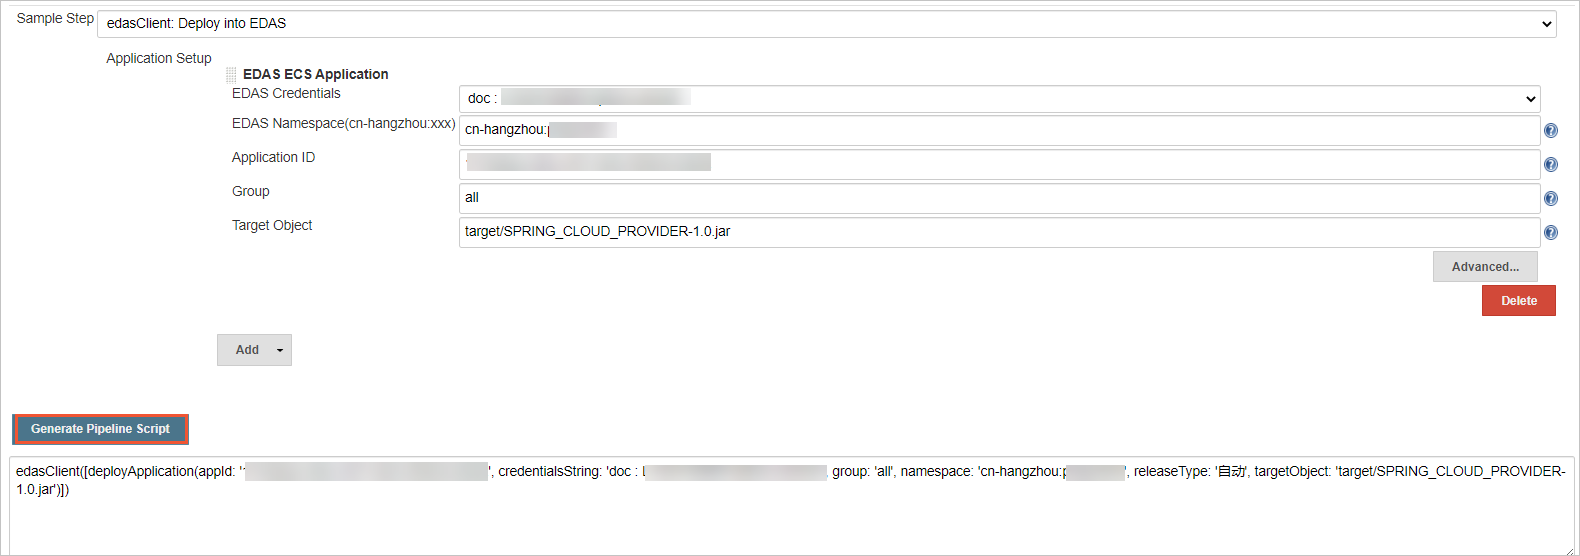
On the Snippet Generator page, select edasClient: Deploy into EDAS from the Sample Step drop-down list. Next to Application Setup, click Add, and then select a cluster and application deployment type from the drop-down list.
-
Configure the deployment parameters. For more information, see Parameter settings for deploying applications using the edas-jenkins-plugin in Jenkins.
-
After you configure the parameters, click Generate Pipeline Script and copy the generated pipeline script.
-
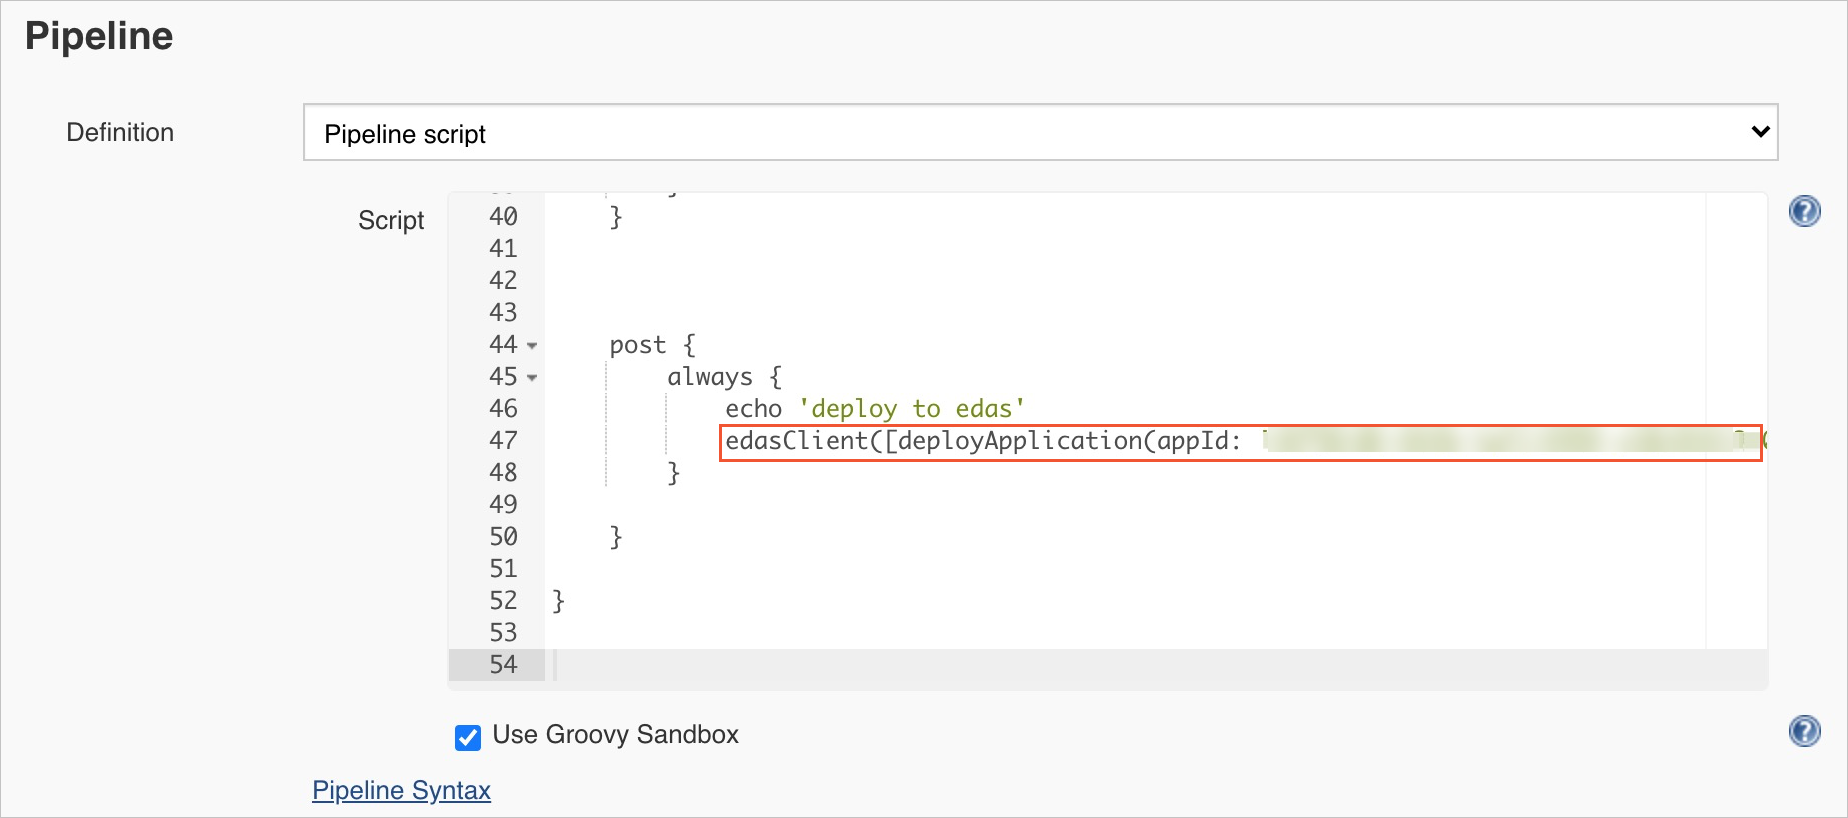
In the navigation pane on the left, click Back to return to the pipeline management page. In the navigation pane, click Configure. Then, in the Pipeline section, paste the script that you copied, as shown in the following figure.
NoteReplace the content in the orange box in the figure with the script that you generated in the previous step.

-
After you complete the settings, click Save or Apply at the bottom of the page.
-
On the project task page, click Build Now in the navigation pane on the left to run the task.
You can view build records in the Build History section. Click a build record to view its details.
Use the Job DSL plugin to create deployment tasks
In Jenkins, you can use the Job DSL plugin to create a task template. This lets you quickly create deployment tasks based on the template.
-
Log in to the Jenkins home page and click New Item.
-
In the Enter an item name field, enter a project name. Select Freestyle project and then click OK.
-
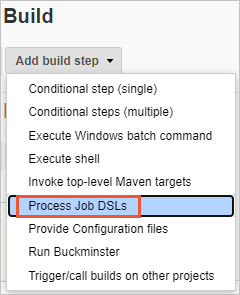
In the Build section, click Add build step, and then select Process Job DSLs from the drop-down list.
NoteIf you have created a pipeline, click its name in the project list to open the pipeline management page. Then, in the left navigation pane, click Pipeline Syntax to open the Snippet Generator page.
-
In the Process Job DSLs section, select Use the provided DSL script and enter your configuration script in the text box.
job('edas') {    // Name of the target task
  publishers { // Type of the EDAS plugin
    edasClient { // Name used to call the EDAS plugin
      deployApplication('', '', '', '', '') // EDAS method to call
    }
  }
}
Supported method examples are as follows:
// Deploy an application in an ECS cluster void deployApplication( String namespace, String credentialsString, String group, String appId, String targetObject); void deployApplication( String namespace, String credentialsString, String group, String appId, String targetObject, String versionLabelFormat, String versionDescriptionFormat, String batch, String batchWaitTime, String releaseType); // Create and deploy an application in an ECS cluster void insertApplication( String namespace, String credentialsString, String applicationName, String packageType, String clusterId, String targetObject, String ecuInfo); void insertApplication( String namespace, String credentialsString, String applicationName, String packageType, String clusterId, String targetObject, String ecuInfo, String versionLabelFormat, String versionDescriptionFormat, String buildPackId, String healthCheckUrl); // Deploy an application in a Container Service for Kubernetes cluster void deployK8sApplication( String namespace, String credentialsString, String appId, String targetObject, Boolean image); void deployK8sApplication( String namespace, String credentialsString, String appId, String targetObject, Boolean image, String edasContainerVersion, String webContainer, String jdk, String versionLabelFormat, String envs, String startupCommand, String args, String cpuLimit, String memoryLimit, String cpuRequest, String memoryRequest, String replicas, String postStart, String preStop, String readiness, String liveness, String updateStrategy); // Create and deploy an application in a Container Service for Kubernetes cluster void insertK8sApplication( String namespace, String credentialsString, String applicationName, String packageType, String clusterId, String targetObject, String k8sNamespace, String jdk); void insertK8sApplication( String namespace, String credentialsString, String applicationName, String packageType, String clusterId, String targetObject, String k8sNamespace, String jdk, String descFormat, String edasContainerVersion, String webContainer, String versionLabelFormat, String envs, String startupCommand, String args, String cpuLimit, String memoryLimit, String cpuRequest, String memoryRequest, String replicas, String postStart, String preStop, String readiness, String liveness); -
After you complete the settings, click Save or Apply at the bottom of the page.
-
On the project task page, click Build Now in the navigation pane on the left to run the task.
You can view build records in the Build History section. Click a record to view its details.
More information
For more information, see Parameter settings for deploying applications using the edas-jenkins-plugin in Jenkins.