After you create a custom error page, if the requested content does not exist or an error occurs, points of presence (POPs) return the custom error page instead of the default error page, improving user experience with clear, actionable feedback.
How it works
Dynamic Content Delivery Network (DCDN) can redirect requests to custom error pages when errors occur.
If a client requests a web service by using a browser and the requested URL does not exist, the server returns a default 404 Not Found page. To display a custom page instead, you can create a custom error page and specify the complete URL of the page. DCDN redirects requests to this URL based on the HTTP status code in the responses.
If the custom error page is delivered through DCDN, standard DCDN billing applies.
Supported status codes
You can configure custom error pages only for the following status codes: 400, 403, 404, 405, 414, 416, 500, 501, 502, 503, and 504.
|
Status code |
Description |
|
400 |
The request contains a syntax error. |
|
403 |
The server understood the request but refuses to authorize it. |
|
404 |
The server could not find the requested resource. |
|
405 |
The server recognizes the request method but does not support it for the target resource. |
|
414 |
The request URL is too long for the server to process. |
|
416 |
The server cannot serve the requested range. |
|
500 |
The server encountered an unexpected condition that prevented it from fulfilling the request. |
|
501 |
The server does not support the functionality required to fulfill the request. |
|
502 |
The server, while acting as a gateway or proxy, received an invalid response from an upstream server. |
|
503 |
The server is temporarily unable to handle the request, often due to maintenance or overload. |
|
504 |
The server, while acting as a gateway or proxy, did not receive a timely response from an upstream server. |
Procedure
-
Log on to the DCDN console.
-
In the left-side navigation pane, click Domain Names.
-
On the Domain Names page, find the domain name that you want to manage and click Configure.
-
In the left-side navigation tree of the domain name, click Caching.
-
Click the Custom Page tab.
-
Click Add. In the dialog box that appears, configure the error code and URL of the custom page.
-
Click OK.
To modify or delete a custom page, click Modify or Delete in the Actions column.
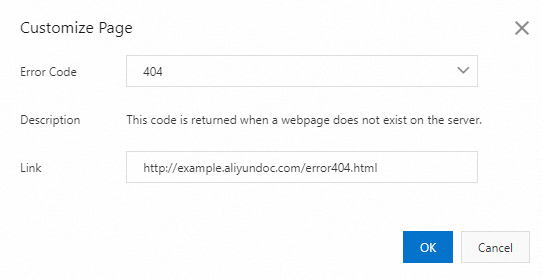
Example
Suppose you saved error404.html in the root directory of the origin server and users access it through the accelerated domain example.aliyundoc.com. Configure the following settings to use this page as the custom 404 error page:
-
Error Code: 404
-
Link: URL of the custom error page. Example:
http://example.aliyundoc.com/error404.html. -
Result: 404 errors redirect to
http://example.aliyundoc.com/error404.html.