Enable Kerberos authentication in a Serverless Spark workspace so that clients must authenticate before submitting Spark tasks, which improves task execution security.
Prerequisites
-
You have created a principal and uploaded its exported keytab file to OSS.
If you use an EMR on ECS cluster, see Basic Kerberos usage for more information.
-
A Serverless Spark workspace has been created. For more information, see Manage workspaces.
Limitations
-
A workspace can be bound to only one Kerberos cluster.
-
Kerberos authentication is supported only for Spark batch jobs.
Procedure
Step 1: Prepare the network
Before configuring Kerberos authentication, set up network connectivity between Serverless Spark and your VPC. For more information, see Establish network connectivity between EMR Serverless Spark and other VPCs.
When adding a security group rule, we recommend opening UDP port 88, which is the default port for the Kerberos service.
Step 2: Configure Kerberos authentication
-
Navigate to the Kerberos Authentication page.
-
Log on to the EMR console.
-
In the left navigation pane, choose EMR Serverless > Spark.
-
On the Spark page, click the name of the target workspace.
-
On the EMR Serverless Spark page, choose in the left navigation pane.
-
-
Click Bind Kerberos.
-
On the Bind Kerberos page, configure the following parameters and click OK.
Parameter
Description
Kerberos Name
Enter a custom name.
Normal Network Connection
Select the network connection that you created.
Kerberos krb5.conf
-
Enter the content of the
krb5.conffile.The
krb5.conffile is typically located at/etc/krb5.confon the Kerberos server. Obtain the file content based on your environment:-
If you use the Kerberos service of an EMR Datalake cluster, perform the following steps to obtain the content:
-
Log on to the master node of the EMR cluster. For more information, see Log on to a cluster.
-
Run the following command to view and manually copy the content of the
/etc/krb5.conffile.cat /etc/krb5.conf -
Paste the content into the Kerberos krb5.conf field.
-
-
For other EMR clusters or self-managed Kerberos services, replace the
hostnamein the file with a private IP address in the VPC.
-
-
(Optional) Depending on the network protocol, you might need to add configurations to the
krb5.conffile.-
If you opened UDP port 88 when you configured the network connection in Step 1: Prepare the network, no additional configuration is required.
-
If you use the TCP protocol for the network connection configured in Step 1: Prepare the network, you must add the
udp_preference_limit = 1configuration under the[libdefaults]section.
-
-
-
In the Actions column, click Enable.
-
In the dialog box, click OK.
Step 3: Submit a Spark batch job
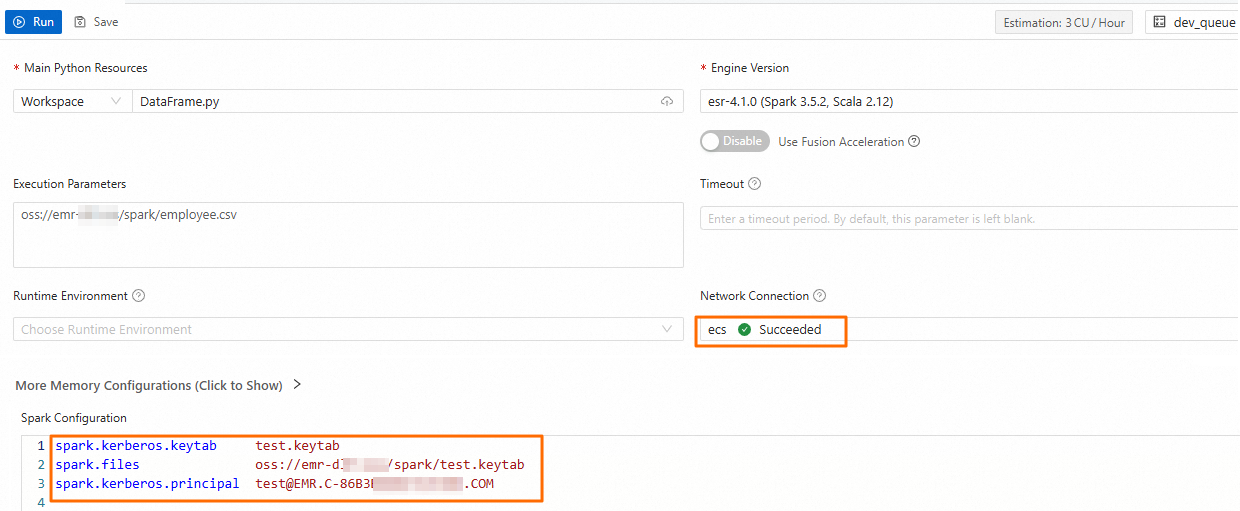
After you enable Kerberos authentication, you must provide client credentials when submitting a Spark batch job. Without the required configurations, the job fails with an error indicating that spark.kerberos.keytab and spark.kerberos.principal not configured.
-
Create a Spark batch job. For more information, see PySpark Quick Start.
-
On the new development tab, add the following configurations and then click Run.
Parameter
Description
Normal Network Connection
Select the name of the network connection that you created in Step 1.
Spark Configuration
Configure the following parameters.
spark.files oss://<bucketname>/path/test.keytab
spark.kerberos.keytab test.keytab
spark.kerberos.principal <username>@<REALM>
The following table describes the parameters.
-
spark.files: The complete OSS path of the uploaded keytab file. -
spark.kerberos.keytab: The name of the keytab file. -
spark.kerberos.principal: The principal in the keytab file used for authentication with the Kerberos service. You can run theklist -kt <keytab_file>command to view the principal name in the target keytab file.
If you need to connect to a Kerberos-enabled Hive Metastore to obtain metadata, add the following information to the Spark Configuration section.
spark.hive.metastore.sasl.enabled true
spark.hive.metastore.kerberos.principal hive/<hostname>@<REALM>
For
spark.hive.metastore.kerberos.principal, specify the principal from the keytab file used by the Hive Metastore. To find the keytab file path, go to the EMR on ECS console, find the Hive service, and navigate to the Configure page. On the hive-site.xml tab, check the value of hive.metastore.kerberos.keytab.file. Then run theklist -kt <path_to_hive_metastore_keytab_file>command to view the principal.The value of the
spark.hive.metastore.kerberos.principalparameter must be in one of the following formats:-
The typical format is
hive/<hostname>@<REALM>. In this format,<hostname>is the fully qualified domain name (FQDN) of the Hive Metastore node. You can run thehostname -fcommand to obtain the FQDN.<REALM>is the realm of the Key Distribution Center (KDC). -
If the Hive Metastore connection address uses a hostname, you can simplify the format to
hive/_HOST@<REALM>. When connecting, Spark automatically replaces_HOSTwith the hostname in the Hive Metastore connection address. This format is required if you need to configure multiple Hive Metastores.
-
-
Once the job is running, go to the Execution Records section and click Details in the Actions column of the job.
-
On the Application page in Job History, you can view the log information.

Step 4 (Optional): Connect to a Kerberos metastore
If your workspace data catalog connects to a Kerberos-enabled Hive Metastore, you must specify the keytab file path and principal name when adding the external Hive Metastore.

-
Metastore service address: The address must match the service address defined in the metastore service's principal. The address is typically a hostname.
-
Kerberos keytab file: The path to the Kerberos keytab file.
-
Kerberos principal: The principal in the keytab file used for authentication. To find the principal name, run the
klist -kt <keytab_file>command.