The Index Management Center for Indexing Service and OpenStore instances provides end-to-end management, from template definition to data ingestion. It covers four hierarchical levels: component templates, index templates, data streams, and indexes. Integrated with ILM, it allows index data to automatically transition between the hot, cold, and delete phases according to defined policies, reducing storage costs.
How it works
Key concepts and dependencies
The Index Management Center involves four key concepts:
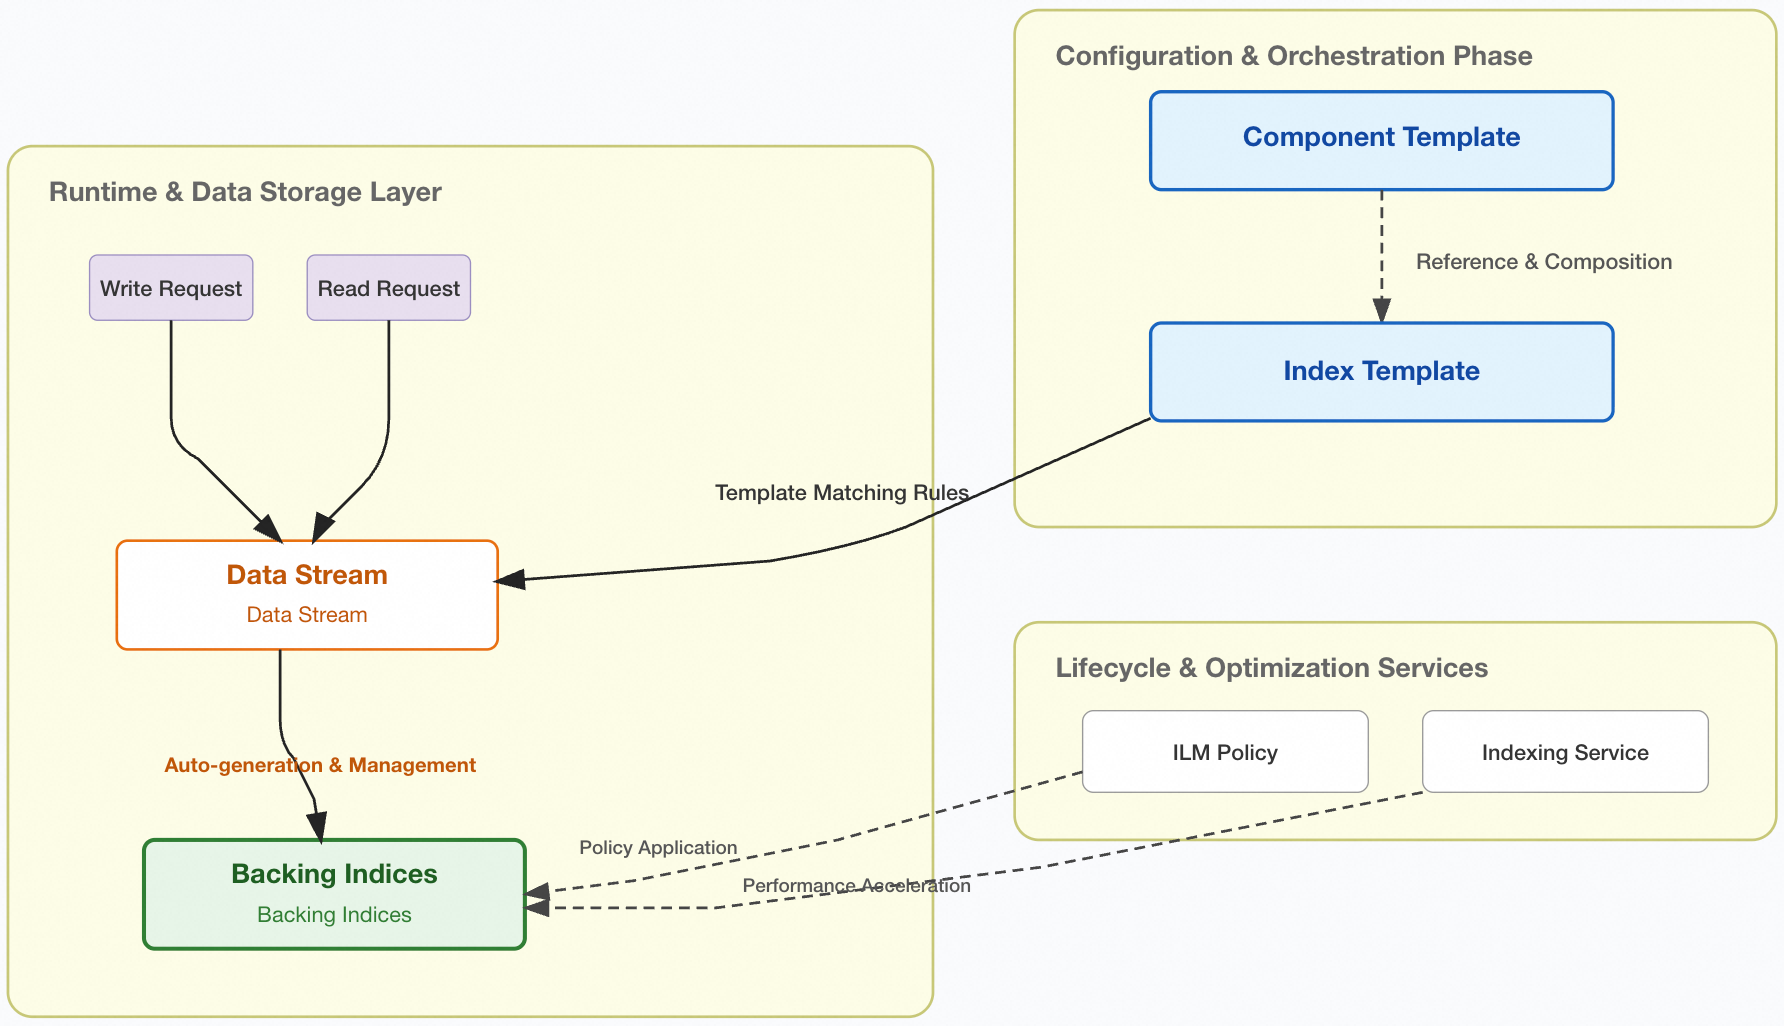
Component template
A reusable block for configuring index settings, mappings, or an alias. Multiple index templates can reference the same component template, creating a composable template that avoids redundant parameter definitions. A typical use case is to define common configurations, such as codecs and lifecycle policies for OpenStore, in a single component template.
Index template
Defines the mappings, settings, aliases, and lifecycle policy for an index. When you create a data stream or an index, the system automatically applies the configurations from a matching index template to the backing index based on the template's index patterns. An index template can either define configurations directly or be composed of one or more component templates.
Data stream
An abstraction layer for time-series data, providing a single, named resource for read and write operations. A data stream is internally composed of one or more auto-generated backing indexes. Write requests are routed to the latest backing index (the write index), while read requests are routed to all backing indexes. Data streams are append-only, making them ideal for time-series data such as logs, events, and metrics that are continuously generated and rarely updated.
Index
The actual storage unit for your data. In a data stream, indexes are automatically created and managed as backing indexes. When you enable Indexing Service, it hosts the write operations for an index on a cloud-based Elasticsearch cluster to accelerate write performance. An ILM policy automatically manages the lifecycle of an index, transitioning it through the hot and cold phases until it is eventually deleted.
Data ingestion workflow
A client sends an ingest request to a data stream. Each document must contain a @timestamp field.
The data stream routes the data to the current write index (the latest backing index) based on a matching index template.
Indexing Service performs index creation in the cloud to accelerate write performance.
When the write index meets the ILM rollover policy conditions, such as reaching a specified size or age, a rollover automatically occurs. A new backing index becomes the write index, and cloud-based write hosting for the old backing index is disabled.
The ILM policy automatically moves the old backing index from the hot phase to the cold phase (OpenStore storage) until it meets the deletion criteria and is automatically removed.
Indexing Service cloud hosting
Indexing Service hosts the write operations for index building on a cloud-based Elasticsearch cluster and is ideal for the fast ingestion of large-scale time-series log data. After you enable Indexing Service, write operations for both data stream indexes and standalone indexes in the cluster are hosted in the cloud by default (excluding system indexes). These managed indexes are automatically released from management after 3 days by default, at which point they become read-only.
When using Indexing Service, note the following:
Indexing Service is billed on a pay-as-you-go basis based on the total size of hosted indexes and write traffic. We recommend using data streams and ILM rollover policies to optimize your cloud hosting storage.
The ILM shrink action is incompatible with indexes in a hosted state. You must wait for the index to be unhosted before applying a shrink configuration. For more information, see ILM-shrink.
Data synchronization between your Indexing Service instance and your cluster depends on the apack/cube/metadata/sync task. You can view task information by running the
GET _cat/tasks?vcommand. Do not manually terminate this task. If it is terminated, run thePOST /_cube/meta/synccommand immediately to restore it. Otherwise, your application's write operations will be affected.Frequent
Put Mappingoperations consume significant computing resources and can severely impact hosting service stability. We recommend defining index templates before writing data to reducePut Mappingoperations.
Access the index management center
The index management feature is available in the Elasticsearch console only for version 7.10 instances with Indexing Service or OpenStore enabled.
For standard commercial instances, log on to Kibana and go to the Management page to use Kibana's native index management features. The UI may vary between Kibana versions. For specific instructions, see your version's official Kibana documentation.
Log on to the Alibaba Cloud Elasticsearch console.
In the left-side navigation pane, click Elasticsearch Clusters.
Navigate to your target instance.
In the top menu bar, select a resource group and a region.
In the Elasticsearch Clusters list, click the ID of your target instance.
In the left-side navigation pane, choose .
The Index Management Center contains the following tabs: Data Stream Management, Index Management, Index Template Management, and Content Template Management.
Manage component templates
If multiple index templates share settings, mappings, or alias configurations, we recommend creating a component template and referencing it in your index templates to avoid redundant definitions. If you do not need to reuse configurations across templates, you can skip this step and define all configurations directly in the index template.
Create using the console
Click the Content Template Management tab.
Click Create Content Template.
In the Create Content Template panel, enter a Name and Note, and then complete the Configuration by configuring the index settings, mappings, and aliases. The configuration format must strictly follow the official Elasticsearch specifications.
Example of settings code:
{
  "index": {
    "lifecycle": {
      "name": "zlopenstore_default_ilm_policy"
    },
    "apack": {
      "cube": {
        "following_index": "true"
      }
    },
    "codec": "OpenIndex87",
    "refresh_interval": "1s"
  }
}
Click View Configuration to preview the component template configuration. If everything is correct, click OK.
Create using the API
Log on to the Kibana console of your target Elasticsearch instance. For more information, see Connect to an Elasticsearch cluster through Kibana.
On the Kibana homepage, click Dev Tools.
In the Console, run the Put component template API command to create a component template.
Example of creating an OpenStore component template:
PUT _component_template/zlcomponent-openstore-index-template
{
  "template" : {
    "settings" : {
      "index" : {
        "lifecycle" : {
          "name" : "openstore_default_ilm_policy"
        },
        "apack" : {
          "cube" : {
            "following_index" : "true"
          }
        },
        "codec" : "OpenIndex87",
        "refresh_interval" : "1s"
      }
    }
  }
}
View and modify component templates
On the Content Template Management page, view the component templates you have created.
Alibaba Cloud Elasticsearch provides several default component templates. We recommend that you do not modify the configurations of these default templates.
The Usage Count column indicates the number of index templates that reference the component template. You can hover over the number to view the names of the referencing index templates.
You cannot delete a component template that is currently in use. You must first modify the corresponding index templates to no longer use it before you can delete the component template.
In the Actions column for the target component template, click Modify.
In the Modify Content Template panel, modify the template information and click OK.
Create an index template
Before you create a data stream, you must first create a matching index template to define the structure and lifecycle policy for its backing indexes. This process has two steps: configuring the index lifecycle policy (optional) and configuring the index template.
Click the Index Template Management tab, and then click Create Index Template.
Optional: In the Create Index Template panel, configure an index lifecycle policy.
If you do not need to manage the lifecycle of the data stream's backing indexes, click Skip. We recommend configuring a lifecycle policy to automatically manage the rollover and data migration of backing indexes with ILM, which helps optimize cloud hosting space and reduce storage costs.
Parameter
Description
Index Lifecycle Policy
New Index Lifecycle Policy: Create a new ILM policy.
Existing Index Lifecycle Policy: Choose from existing lifecycle policies in the cluster.
Policy Name
If you choose to create a new policy, you must enter a custom name.
If you choose to select an existing policy, select one from the drop-down list. The configurations of the selected policy are automatically applied to the current index template, and you can modify them if needed.
Hot Phase
Enabled by default and cannot be disabled.
Rolling Update
We recommend enabling this option. By default, ILM checks for indexes that meet the policy criteria every 10 minutes. An index might not roll over immediately after meeting the rollover conditions. You can modify the check interval by using the indices.lifecycle.poll_interval parameter. If no rollover policy is configured, all index data is stored in Indexing Service, which increases your cloud hosting costs.
Duration After Which Hosting Is Canceled
The default is 3 days. After this period, the index automatically exits write hosting in Indexing Service to reduce billing overhead. If the specified duration exceeds the start time of the cold or delete phase, the index is automatically unhosted when it enters that phase and becomes read-only.
ImportantLong-term data hosting incurs index hosting storage fees. We recommend setting an unfollow time to unhost an index after it no longer receives writes. The cloud service has limits on the duration of write hosting and the number of hosted shards. For more information, see OpenStore storage engine.
Cold Phase
OpenStore Custom Hot/Cold Storage edition: Supports enabling and configuring the cold phase.
OpenStore Smart Hot/Cold Storage edition: Does not have a cold phase.
OpenStore
This can be configured only after the Cold Phase is enabled. It is suitable for scenarios with high query complexity and high costs for mass storage. For more information, see OpenStore storage-compute separation (high-performance retrieval) engine.
Notes:
Only version 7.10 kernel-enhanced edition Indexing Service instances with OpenStore Custom Hot/Cold Storage enabled at the time of purchase support OpenStore configuration.
After the cold phase and OpenStore storage are enabled, the system automatically migrates data to cold data nodes and OpenStore storage when the index reaches its migration time.
Delete Phase
Set the deletion time for the index. For OpenStore Smart Hot/Cold Storage, Elasticsearch intelligently tiers data based on the index's read/write frequency before the index is deleted.
Click Save and Next. In the Index Template Configuration wizard, configure the index template information.
Every document written to a data stream must contain a @timestamp field mapped as a date or date_nanos type. Otherwise, the write operation will fail. If the source data does not have a @timestamp field, you can use an ingest pipeline to automatically add it by retrieving the metadata value from
_ingest.timestamp. We recommend specifying the mapping for the @timestamp field in the index template's mappings. If not specified, the field is automatically mapped to the date or date_nanos type.NoteThe kernel-enhanced edition instance provides a low-priority
aliyun_default_index_templatetemplate for the*index pattern to reduce costs for logging scenarios. This template enables field presorting (index.sort.field) to improve search performance for time-series data. Presorting is not supported fornestedtype fields. We recommend disabling it in your template if you use nested fields.Parameter
Description
Index Template Name
Enter a custom name for the index template.
Index Pattern
Define index patterns to match data stream and index names. Wildcard characters (*) are supported. Spaces and the following special characters are not allowed:
\,/,?,",<,>, and |.Create Data Stream
Enable data stream mode. If this option is not enabled, this template cannot be used to create a data stream. For more information, see Data streams.
Priority
Define the template priority. A higher number indicates a higher priority.
Index Lifecycle Policy
If you created an index lifecycle policy in the previous step, the system automatically references that policy, and it cannot be changed. If you did not create a policy, you can leave this blank or enter the name of an existing policy in the cluster (only one name is supported). For more information about lifecycle policies, see ILM.
Configuration
Configure index settings, mappings, and aliases. The configuration format must strictly follow the official Elasticsearch specifications. You can provide settings (example:
{
  "index.number_of_replicas": "1",
  "index.number_of_shards": "5"
}
), mappings (example:{ "properties": { "like": { "type": "keyword" }, "name": { "type": "text" }, "age": { "type": "integer" }, "email": { "type": "keyword" } } }), aliases (example:{ "aliases": { "demo": {} } }), or compose the template from component templates. Examples of component templates includecomponent-openstore-index-templatefor OpenStore Custom Hot/Cold Storage andcomponent-hybrid-openstore-index-templatefor OpenStore Smart Hot/Cold Storage.Click OK.
After the template is created, a Created. dialog box appears. You can click Go to Create Data Stream to navigate directly to the data stream creation page, or close the dialog box to return to the index template list.
The created index template appears in the index template list. When you first visit the Index Template Management page, you can see the default index templates created by Alibaba Cloud Elasticsearch. We recommend that you do not modify the configuration of these default templates.
The Content Template column of the index template lists the component templates it references. Referencing component templates allows you to create composable templates. Click a component template name to go to the Content Template Management page to manage that template.
In the index template list, you can modify an index template by clicking Modify in the Actions column for the target template. You can also view and modify an index template by clicking its Index Template Name or Index Lifecycle Policy.
Manage data streams
Before creating a data stream, you must create a matching index template with data stream mode enabled.
Create a data stream
Click the Data Stream Management tab.
Click Create Data Stream.
In the Create Data Stream panel, click View Existing Index Templates, and then enter a data stream name that matches the corresponding index template.
ImportantBefore creating a data stream, a matching index template must exist. This template contains the information used to configure the mappings and settings of the backing indexes. The data stream name must match the index patterns of the template. For example, if the
index_patternsof the index template islogs-*-*, the data stream name must start withlogs-, such aslogs-myapp-prod.Data stream names can end with a hyphen (-) but do not support wildcard characters (*).
Click OK. The system automatically generates the data stream and its first backing index.
After you successfully create a data stream, a backing index is automatically generated with a name in the following format.
.ds-<data-stream>-<yyyy.MM.dd>-<generation>Parameter
Description
.ds
A standard prefix for hidden indexes. Backing indexes generated by data streams are hidden by default and start with .ds.
<data-stream>
The name of the data stream.
<yyyy.MM.dd>
The creation date of the backing index.
<generation>
A six-digit, zero-padded integer that increments for each new backing index, starting from 000001. A backing index with a higher generation number contains newer data.
View data streams
On the Data Stream Management page, click a data stream name to view its backing index names, index status, storage size, creation time, current lifecycle phase, and write hosting status.
NoteClicking a backing index name takes you to the index monitoring page in the Kibana console, where you can view detailed monitoring information for the index.
In the row for the target data stream, click View Details. On the Data Stream Details page, you can view the Data Stream Name, Data Stream Status, Indexes, Index Template, Index Lifecycle Policy, and Storage Space.
The data stream status can be GREEN, YELLOW, or RED:
GREEN: All shards for the indexes backing the data stream are allocated.
YELLOW: All primary shards of the backing indexes are allocated, but some replica shards are not.
RED: At least one primary shard of a backing index is not allocated, which can cause some data to be unavailable.
View index hosting
On the Data Stream Management page, you can view information related to index hosting.
Parameter | Description |
Total Size of Hosted Indexes | The current total size of all indexes under cloud-based write hosting. Important This value is a real-time measurement and does not reflect the historical total size of indexes. |
Indexes | The current total number of all indexes under cloud-based write hosting. This value is a real-time measurement. Important This value is a real-time measurement and does not reflect the historical total number of indexes. |
Data Write Hosting |
Note
|
Roll over a data stream
On the Data Stream Management page, click Perform Manual Rolling Update in the row for the target data stream.
In the dialog box that appears, click OK.
By default, Indexing Service hosts the write operations for the new backing index created by the rollover, and write hosting for the old backing index is automatically disabled.
Delete a data stream
Deleting a data stream also deletes all its backing indexes. This action is irreversible, so proceed with caution.
On the Data Stream Management page, click Delete in the row for the target data stream.
In the dialog box that appears, click OK.
Manage indexes
After a data stream is created, its backing indexes are automatically generated and hosted in Indexing Service. You can use the index management feature to view and manage these cloud-hosted indexes, including filtering indexes, viewing lifecycle phases, and controlling their write hosting status.
Click the Index Management tab to view and manage the indexes in your cluster.
By default, all indexes are displayed. You can also filter or search for specific indexes based on your needs:
For the OpenStore Custom Hot/Cold Storage edition, you can filter indexes by using Hosted Indexes and OpenStore Indexes.
For the OpenStore Smart Hot/Cold Storage edition, you can only filter indexes by using Hosted Indexes. The top of the Index Management page also displays the Total OpenStore Index Size and the Indexes.
Parameter | Description |
Hosted Indexes This parameter is supported only for version 7.10 kernel-enhanced edition Indexing Service instances. | When this filter is selected, the page displays the following information:
|
OpenStore Indexes This parameter is supported only for version 7.10 kernel-enhanced edition instances with the OpenStore Custom Hot/Cold Storage feature enabled. | When this filter is selected, the page displays the following information:
|
Current Lifecycle Phase | Displays the current lifecycle status of the index, including the current phase, the actions being executed in the phase, the time the index entered the phase, and any error information. For more information, see Explain lifecycle API. Indexes with the OpenStore Smart Hot/Cold Storage feature enabled only support the hot and delete phases, not the cold phase. |
Data Write Hosting This parameter is supported only for version 7.10 kernel-enhanced edition Indexing Service instances. | The following two states are supported:
|
API reference
Cancel index hosting.
POST /<yourIndexName>/_cube/unfollowForcefully canceling index hosting: During cancellation, an index must complete segment merging before hosting ends. The time required for merging depends on factors like the number of segments, data write activity, and data volume. If this process takes too long, you can use the following command to forcefully cancel index hosting on kernel-enhanced edition instances with kernel version 1.6 or later.
POST /<yourIndexName>/_cube/unfollow?force=trueReplace <yourIndexName> with your actual index name.
ImportantThe APIs for canceling and forcefully canceling index hosting do not support batch operations. Frequent cancellations can affect the stability of the hosting service.
Forceful cancellation of index hosting is supported only on kernel-enhanced edition instances with kernel version 1.6 or later. For instances with kernel versions earlier than 1.6, you must first upgrade the kernel version. For more information, see Upgrade versions.
Get hosting status information.
GET /<yourIndexName>/_cube/statsReplace <yourIndexName> with your actual index name.
Get the overall hosting status of the cluster in Indexing Service.
GET /_cube/statsRestore a snapshot to an Indexing Service instance.
For example, to restore the index_1 index from the snapshot_1 snapshot in the my_backup repository to an Indexing Service instance, use the following command. Replace the placeholder information with your actual values.
POST /_snapshot/my_backup/snapshot_1/_restore
{
  "indices": "index_1",
  "ignore_index_settings": [
    "index.apack.cube.following_index"
  ]
}
Manually trigger a data stream rollover.
POST <yourDatastreamName>/_rolloverReplace <yourDatastreamName> with your actual data stream name.