Prerequisites
- Activate EventBridge and grant the required permissions.
- Activate the Serverless App Engine (SAE) service. For more information, see Preparations.
- Create a virtual private cloud (VPC) and a vSwitch. For more information, see Build an IPv4 VPC.
- Purchase and deploy a Message Queue for Apache Kafka instance. For more information, see Purchase and deploy an instance.
Step 1: Create a data table
- Log on to the Object Storage Service (OSS) console and create a bucket. For more information, see Create a bucket.
- Download the kafka-connect-oss file. In the src/main/resources directory, create a
core-site.xmlfile with the following content. Update the region information as needed.<configuration> <property> <name>fs.oss.endpoint</name> <value>oss-cn-hangzhou-internal.aliyuncs.com</value> </property> <property> <name>fs.oss.accessKeyId</name> <value>${env.accessKeyId}</value> </property> <property> <name>fs.oss.accessKeySecret</name> <value>${env.accessKeySecret}</value> </property> <property> <name>fs.oss.impl</name> <value>org.apache.hadoop.fs.aliyun.oss.AliyunOSSFileSystem</value> </property> <property> <name>fs.oss.connection.secure.enabled</name> <value>false</value> </property> <property> <name>fs.oss.connection.maximum</name> <value>2048</value> </property> <property> <name>fs.AbstractFileSystem.oss.impl</name> <value>org.apache.hadoop.fs.aliyun.oss.OSS</value> </property> </configuration> - After the instance is created, go to the instance details page and complete the following steps in the left-side navigation pane.
- Click Create Account. You can also use an existing account. For more information, see Create an account and a database.
- Click Create Database. You can also use an existing database. For more information, see Create an account and a database.
- Click Database Connection and record the internal endpoint and port number.
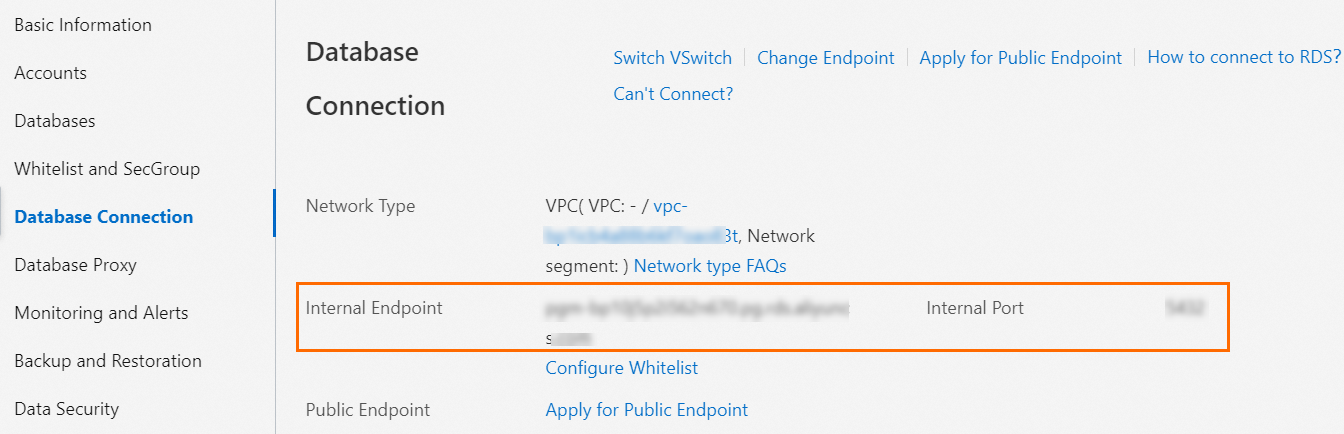
- On the instance details page, click Log On to Database to open the Data Management (DMS) platform. Click the target database and use a SQL statement to create a table. For example, to create a table with the columns
idandnumber, run the following command. For more information, see SQL Commands.CREATE TABLE sql_table(id INT ,number INT);Important When you create the table, set one column as an auto-incrementing primary key. For more information, see Query and modify table structures.
Step 2: Create a connector
Source connector
- Download the JDBC Connector file and upload it to the OSS bucket that you created. For more information, see Upload a file from the console.
Log on to the ApsaraMQ for Kafka console. In the Resource Distribution section of the Overview page, select the region where the ApsaraMQ for Kafka instance that you want to manage resides.
In the left-side navigation pane, choose .
On the Message Inflow page, click Create Task.
- In the Create Message Inflow Task panel, set Task Name and set Message Inflow Task Type to Apache Kafka Connect.
- In the connector configuration section, configure the following parameters.
Parameter Parameter Description Kafka Connect plug-in bucket Select the OSS bucket. File Select the uploaded .zip file. Kafka resource information Kafka instance Select the instance that you created in the Prerequisites section. VPC Select the VPC ID. vSwitch Select the vSwitch ID. Security group Select the security group. Kafka Connect configuration Parse properties file in the ZIP package Select Create .properties File. Select the .properties file that corresponds to the source connector from the .zip file. The file path is /etc/source-xxx.properties.Update the fields in the input box. Expand to view field descriptionsField Description tasks.maxThe maximum number of tasks. This value cannot exceed the number of tables created in Step 1. connection.url- MySQL:
jdbc:mysql://<host>:<port>/<database> - PostgreSQL:
jdbc:postgresql://<host>:<port>/<database> - IBM DB2:
jdbc:db2://<host>:<port>/<database> - IBM Informix:
jdbc:informix-sqli://:/:informixserver=<debservername> - SQL Server:
jdbc:sqlserver://<host>[:<port>];databaseName=<database> - Oracle:
jdbc:oracle:thin://<host>:<port>/<service>orjdbc:oracle:thin:<host>:<port>:<SID>
incrementing.column.nameEnter the name of the auto-incrementing column that you configured in Step 1. topic.prefixThe prefix for the destination topic. The destination topic name is formatted as . Before you deliver data, create the destination topic according to this naming convention. connection.userThe database username. connection.passwordThe database password. table.whitelistA comma-separated list of database tables. - MySQL:
- In the Instance section, configure the following parameters.
Parameter Parameter Description Worker specifications Worker Type Select appropriate worker specifications. Min. Number of Workers Set this to 1. Max. Number of Workers Set this to 1. Kafka Connect worker configuration Automatically create dependent resources for Kafka Connect Worker Select this option to automatically create the required internal topics and consumer group in the selected Kafka instance. The system also populates the required configuration parameters: - Offset topic: Stores source data offsets. Naming convention:
connect-eb-offset-<TaskName>. - Config topic: Stores connector and task configurations. Naming convention:
connect-eb-config-<TaskName>. - Status topic: Stores connector and task status information. Naming convention:
connect-eb-status-<TaskName>. - Kafka Connect consumer group: The consumer group that the Kafka Connect worker uses to consume internal topics. Naming convention:
connect-eb-cluster-<TaskName>. - Kafka source connector consumer group: Applies only to sink connectors. This group is used to consume data from the source Kafka topic. Naming convention:
connector-eb-cluster-<TaskName>.
- Offset topic: Stores source data offsets. Naming convention:
- In the Running Configurations section, set the log delivery method to Deliver Data to Log Service or Deliver Data to ApsaraMQ for Kafka. In the Role Authorization card, configure the role required by the connector.
Important We recommend that the configured role has the AliyunSAEFullAccess permission. Otherwise, the task may fail.
- Click Confirm.
Wait for the task status to change to Running. This indicates that the connector is working correctly. - In the connector configuration section, configure the following parameters.
Sink connector
- Download the JDBC Connector file and upload it to the OSS bucket that you created. For more information, see Upload a file from the console.
Log on to the ApsaraMQ for Kafka console. In the Resource Distribution section of the Overview page, select the region where the ApsaraMQ for Kafka instance that you want to manage resides.
In the left-side navigation pane, choose .
On the Message Outflow page, click Create Task.
- In the Create Message Outflow Task panel, set Task Name and set Message Outflow Task Type to Apache Kafka Connect.
- In the connector configuration section, configure the following parameters.
Parameter Parameter Description Kafka Connect plug-in bucket Select the OSS bucket. File Select the uploaded .zip file. Kafka resource information Kafka instance Select the instance that you created in the Prerequisites section. VPC Select the VPC ID. vSwitch Select the vSwitch ID. Security group Select the security group. Kafka Connect configuration Parse properties file in the ZIP package Select Create .properties File. Select the .properties file that corresponds to the sink connector from the .zip file. The file path is /etc/sink-xxx.properties.Update the fields in the input box. Expand to view field descriptionsField Description tasks.maxThe maximum number of tasks. topicsThe name of the source topic. connection.url- MySQL:
jdbc:mysql://<host>:<port>/<database> - PostgreSQL:
jdbc:postgresql://<host>:<port>/<database> - IBM DB2:
jdbc:db2://<host>:<port>/<database> - IBM Informix:
jdbc:informix-sqli://:/:informixserver=<debservername> - Microsoft SQL Server:
jdbc:sqlserver://<host>[:<port>];databaseName=<database> - Oracle:
jdbc:oracle:thin://<host>:<port>/<service>orjdbc:oracle:thin:<host>:<port>:<SID>
pk.fieldsThe name of the primary key. If there are multiple primary keys, separate them with commas (,). connection.userThe database username. connection.passwordThe database password. table.name.formatThe name of the destination table. - MySQL:
- In the Instance section, configure the following parameters.
Parameter Parameter Description Worker specifications Worker Type Select appropriate worker specifications. Min. Number of Workers Set this to 1. Max. Number of Workers Set this to 1. This value cannot exceed tasks.max.Kafka Connect worker configuration Automatically create dependent resources for Kafka Connect Worker Select this option to automatically create the required internal topics and consumer group in the selected Kafka instance. The system also populates the required configuration parameters: - Offset topic: Stores source data offsets. Naming convention:
connect-eb-offset-<TaskName>. - Config topic: Stores connector and task configurations. Naming convention:
connect-eb-config-<TaskName>. - Status topic: Stores connector and task status information. Naming convention:
connect-eb-status-<TaskName>. - Kafka Connect consumer group: The consumer group that the Kafka Connect worker uses to consume internal topics. Naming convention:
connect-eb-cluster-<TaskName>. - Kafka source connector consumer group: Applies only to sink connectors. This group is used to consume data from the source Kafka topic. Naming convention:
connector-eb-cluster-<TaskName>.
- Offset topic: Stores source data offsets. Naming convention:
- In the Running Configurations section, set the log delivery method to Deliver Data to Log Service or Deliver Data to ApsaraMQ for Kafka. In the Role Authorization card, configure the role required by the connector.
Important We recommend that the configured role has the AliyunSAEFullAccess permission. Otherwise, the task may fail.
- Click Confirm.
Wait for the task status to change to Running. This indicates that the connector is working correctly. - In the connector configuration section, configure the following parameters.
Step 3: Test the connector
Source connector
- In the DMS platform, insert a record into the data table that you created in Step 1. For example, to insert a record where
idis 12 andnumberis 20, run the following command.INSERT INTO sql_table(id, number) VALUES(12,20); - Log on to the Message Queue for Apache Kafka console and click the name of the target instance.
- On the instance details page, click the target topic, and then click Query Message to view the inserted message. The following is a sample message value.
{"schema":{"type":"struct","fields":[{"type":"int32","optional":false,"field":"id"},{"type":"int32","optional":true,"field":"number"}],"optional":false,"name":"sql_table"},"payload":{"id":12,"number":20}}
Sink connector
- Log on to the Message Queue for Apache Kafka console and click the name of the target instance.
- In the left-side navigation pane, click Topic Management. Click the target topic, and then click Query Message to view the inserted message data. The following is a sample message value.
{"schema":{"type":"struct","fields":[{"type":"int32","optional":false,"field":"id"},{"type":"int32","optional":true,"field":"number"}],"optional":false,"name":"sql_table"},"payload":{"id":12,"number":20}} - In the upper-right corner of the topic details page, click Send a Sample Message.
- In the Quick Experience for Message Sending and Receiving panel, specify the message content. For example, to add a record where
idis 13 andnumberis 14 to the target table, use the following message content.{"schema":{"type":"struct","fields":[{"type":"int32","optional":false,"field":"id"},{"type":"int32","optional":true,"field":"number"}],"optional":false,"name":"sql_table"},"payload":{"id":13,"number":14}} - In the DMS platform, verify that the data has been written to the target table.

Common errors
Scenario 1: All tasks fail
Error message:
All tasks under connector mongo-source failed, please check the error trace of the task.Solution: On the task details page, click Basic Information in the Diagnostics section to go to the connector monitoring page, where you can view detailed error information for the failed tasks.
Scenario 2: Kafka Connect exits
Error message:
Kafka connect exited! Please check the error log /opt/kafka/logs/connect.log on sae application to find out the reason why kafka connect exited and update the event streaming with valid arguments to solve it.Solution: Status updates may be delayed. Refresh the page first. If the task still fails after the refresh, follow these steps to view error details.
-
On the task details page, click the instance name next to SAE Application in the Worker Information section to go to the SAE application details page.
-
On the Basic Information page, click the Instance deployment information tab.
-
Find your instance in the list. In the Actions column, click Webshell to log on to the Kafka Connect runtime environment. The Webshell terminal for the instance opens.
-
Run
vi /home/admin/connector-bootstrap.logto view connector startup logs and check for errors. -
Run
vi /opt/kafka/logs/connect.logto view connector runtime logs. Search forERRORorWARNto locate errors.
-
After you fix the issue based on the error message, you can restart the task.
Scenario 3: Connector parameter validation fails
Error message:
Start or update connector xxx failed. Error code=400. Error message=Connector configuration is invalid and contains the following 1 error(s):
Value must be one of never, initial_only, when_needed, initial, schema_only, schema_only_recovery
You can also find the above list of errors at the endpoint `/connector-plugins/{connectorType}/config/validate`
Solution: Use the error message to identify the invalid parameter and update it. If you cannot identify the parameter based on the error message, log on to the Kafka Connect runtime environment as described in Scenario 2, and then run the following command to validate the configuration.
curl -i -X PUT -H "Accept:application/json" -H "Content-Type:application/json" -d @$CONNECTOR_PROPERTIES_MAPPING http://localhost:8083/connector-plugins/io.confluent.connect.jdbc.JdbcSinkConnector/config/validateThis command returns the validation result for each connector parameter. If validation fails for a parameter, its errors field is not empty.
"value":{
    "name":"snapshot.mode",
    "value":null,
    "recommended_values":[
        "never",
        "initial_only",
        "when_needed",
        "initial",
        "schema_only",
        "schema_only_recovery"
    ],
    "errors":[
        "Value must be one of never, initial_only, when_needed, initial, schema_only, schema_only_recovery"
    ],
    "visible":true
}