Kafka triggers
ApsaraMQ for Kafka triggers invoke Function Compute functions when messages are published to a Kafka topic, enabling event-driven processing without polling.
How it works
ApsaraMQ for Kafka integrates with Function Compute through EventBridge. When you create a trigger in the Function Compute console, FC automatically creates event streams in EventBridge based on the trigger configuration.
Once active, the trigger monitors the specified topic. When a message is published to ApsaraMQ for Kafka, EventBridge delivers one or more messages in a batch to the associated function, based on your batch settings.
Limits
-
The ApsaraMQ for Kafka instance must reside in the same region as the function.
-
If the number of event streams reaches the upper limit, no additional Kafka triggers can be created. For the limit, see Limits.
Prerequisites
Before you begin, ensure that you have:
-
EventBridge: Activated EventBridge and granted permissions to a RAM user
-
Function Compute: An event function
-
ApsaraMQ for Kafka: A and a topic and consumer group
Step 1: Create a trigger
-
Log on to the Function Compute console and open the target function.
-
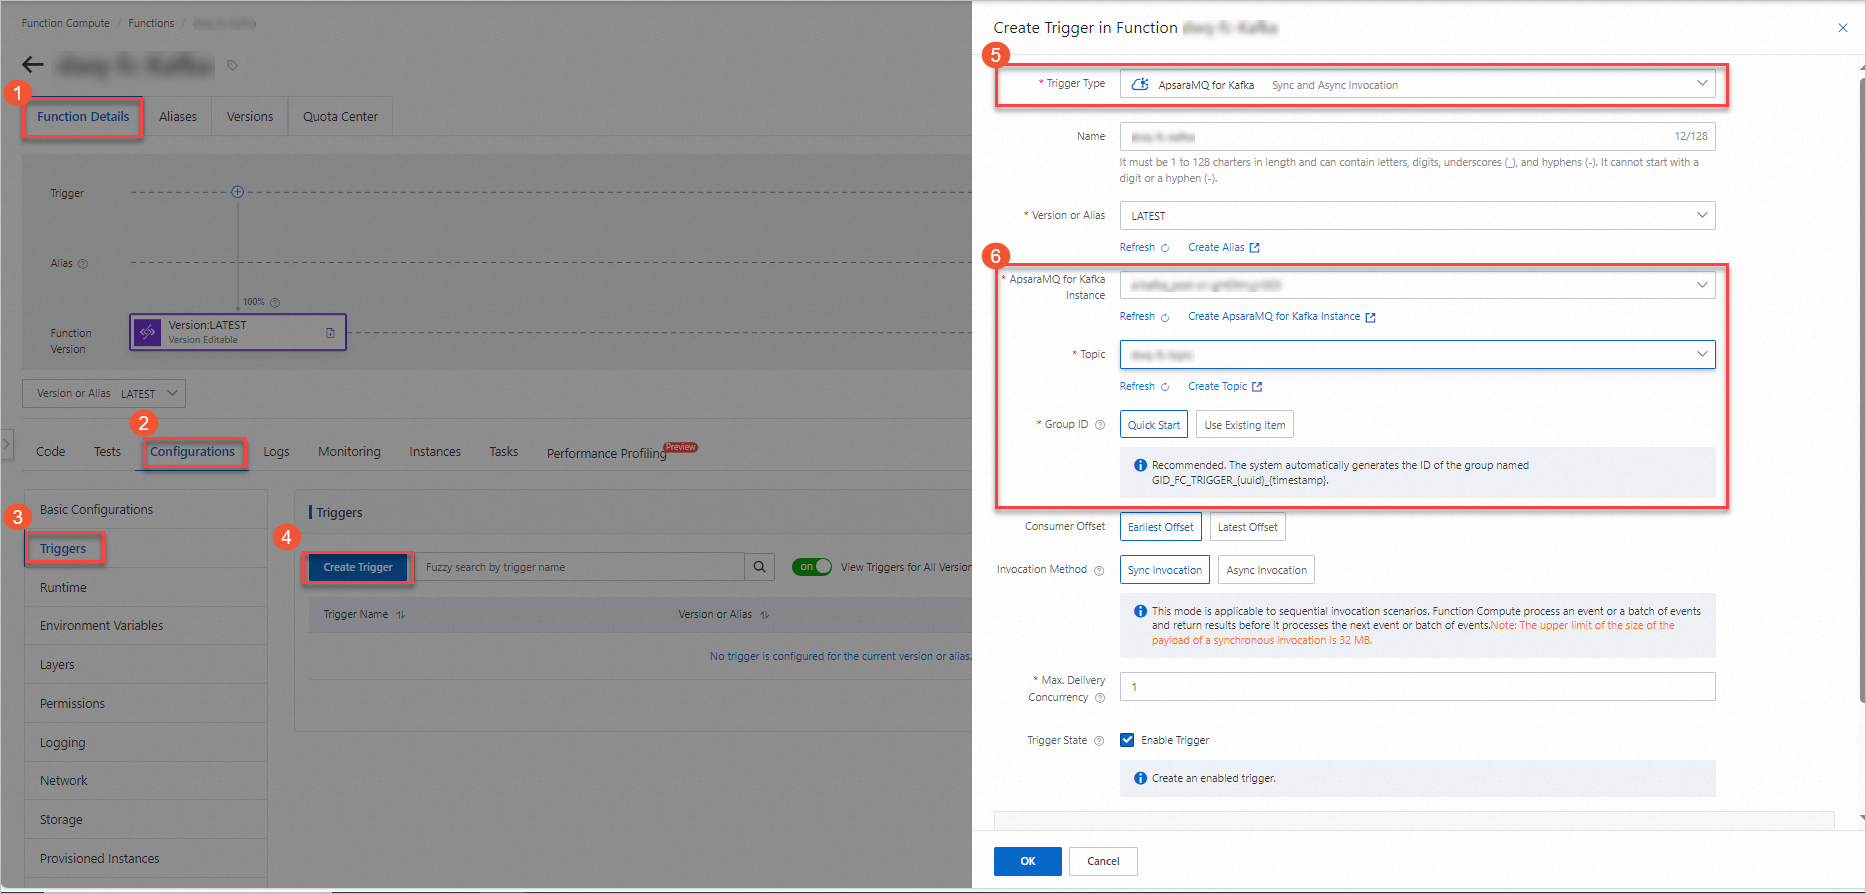
On the Configurations tab, go to the Triggers page and click Create Trigger.
-
Configure the trigger parameters described in the following table, then click OK.
| Parameter | Required | Description | Example |
|---|---|---|---|
| Consumer offset | Yes | The point from which EventBridge starts pulling messages. Earliest Offset: start from the oldest available message. Latest Offset: start from new messages only. | Earliest Offset |
| Invocation method | Yes | How the function is invoked when an event or batch of events is delivered. Sync Invocation: waits for a response before processing the next batch; payload limit is 32 MB. See Synchronous invocation. Async Invocation: returns immediately and continues to the next batch; payload limit is 128 KB. See Asynchronous invocation. | Sync Invocation |
| Max. Delivery Concurrency | No | The maximum number of Kafka messages delivered to Function Compute concurrently. Valid values: 1–300. Available only for Sync Invocation. To increase the limit, go to Quota Center of EventBridge, find EventStreaming FC Sink Maximum Concurrent Number of Synchronous Posting, and click Apply. | 1 |
For advanced settings such as push settings, retry policies, and dead-letter queues, see Advanced features of triggers.
Step 2: (Optional) Configure test parameters
The trigger passes Kafka messages to the function as the event parameter. To test the function without publishing a real message, manually configure a test event that simulates the trigger payload.
Note: The simulated test is useful for validating your parsing logic, but it does not test the full trigger pipeline. To verify end-to-end behavior, use an actual Kafka message as described in Step 3.
-
On the Code tab, click the
 icon next to Test Function and select Configure Test Parameters.
 -
In the Configure Test Parameters panel, click Create New Test Event or Modify Existing Test Event, enter a name and event content, and click OK.
The following example shows the event structure for two batched messages:
[
    {
        "specversion": "1.0",
        "id": "8e215af8-ca18-4249-8645-f96c1026****",
        "source": "acs:alikafka",
        "type": "alikafka:Topic:Message",
        "subject": "acs:alikafka_pre-cn-i7m2t7t1****:topic:mytopic",
        "datacontenttype": "application/json; charset=utf-8",
        "time": "2022-06-23T02:49:51.589Z",
        "aliyunaccountid": "164901546557****",
        "data": {
            "topic": "****",
            "partition": 7,
            "offset": 25,
            "timestamp": 1655952591589,
            "headers": {
                "headers": [],
                "isReadOnly": false
            },
            "key": "keytest",
            "value": "hello kafka msg"
        }
    },
    {
        "specversion": "1.0",
        "id": "8e215af8-ca18-4249-8645-f96c1026****",
        "source": "acs:alikafka",
        "type": "alikafka:Topic:Message",
        "subject": "acs:alikafka_pre-cn-i7m2t7t1****:topic:mytopic",
        "datacontenttype": "application/json; charset=utf-8",
        "time": "2022-06-23T02:49:51.589Z",
        "aliyunaccountid": "164901546557****",
        "data": {
            "topic": "****",
            "partition": 7,
            "offset": 25,
            "timestamp": 1655952591589,
            "headers": {
                "headers": [],
                "isReadOnly": false
            },
            "key": "keytest",
            "value": "hello kafka msg"
        }
    }
]
The data object contains the Kafka-specific fields:
| Field | Type | Example | Description |
|---|---|---|---|
topic |
String | TopicName | The topic name. |
partition |
Int | 1 | The partition number from which the message was consumed. |
offset |
Int | 0 | The message offset within the partition. |
timestamp |
String | 1655952591589 | The Unix timestamp (ms) indicating when message consumption started. |
For the CloudEvents envelope fields (specversion, id, source, type, etc.), see Event overview.
Step 3: Write and test function code
-
On the Code tab, write your function code in the editor and click Deploy. The following Node.js example shows the function handler:
'use strict'; /* To enable the initializer feature please implement the initializer function as below: exports.initializer = (context, callback) => { console.log('initializing'); callback(null, ''); }; */ exports.handler = (event, context, callback) => { console.log("event: %s", event); // Parse the event parameters and process the event. callback(null, 'return result'); } -
Test the function using one of the following methods:
-
Simulated test: Click Test Function to use the test event configured in Step 2. This is useful for validating your parsing logic without a live Kafka connection.
-
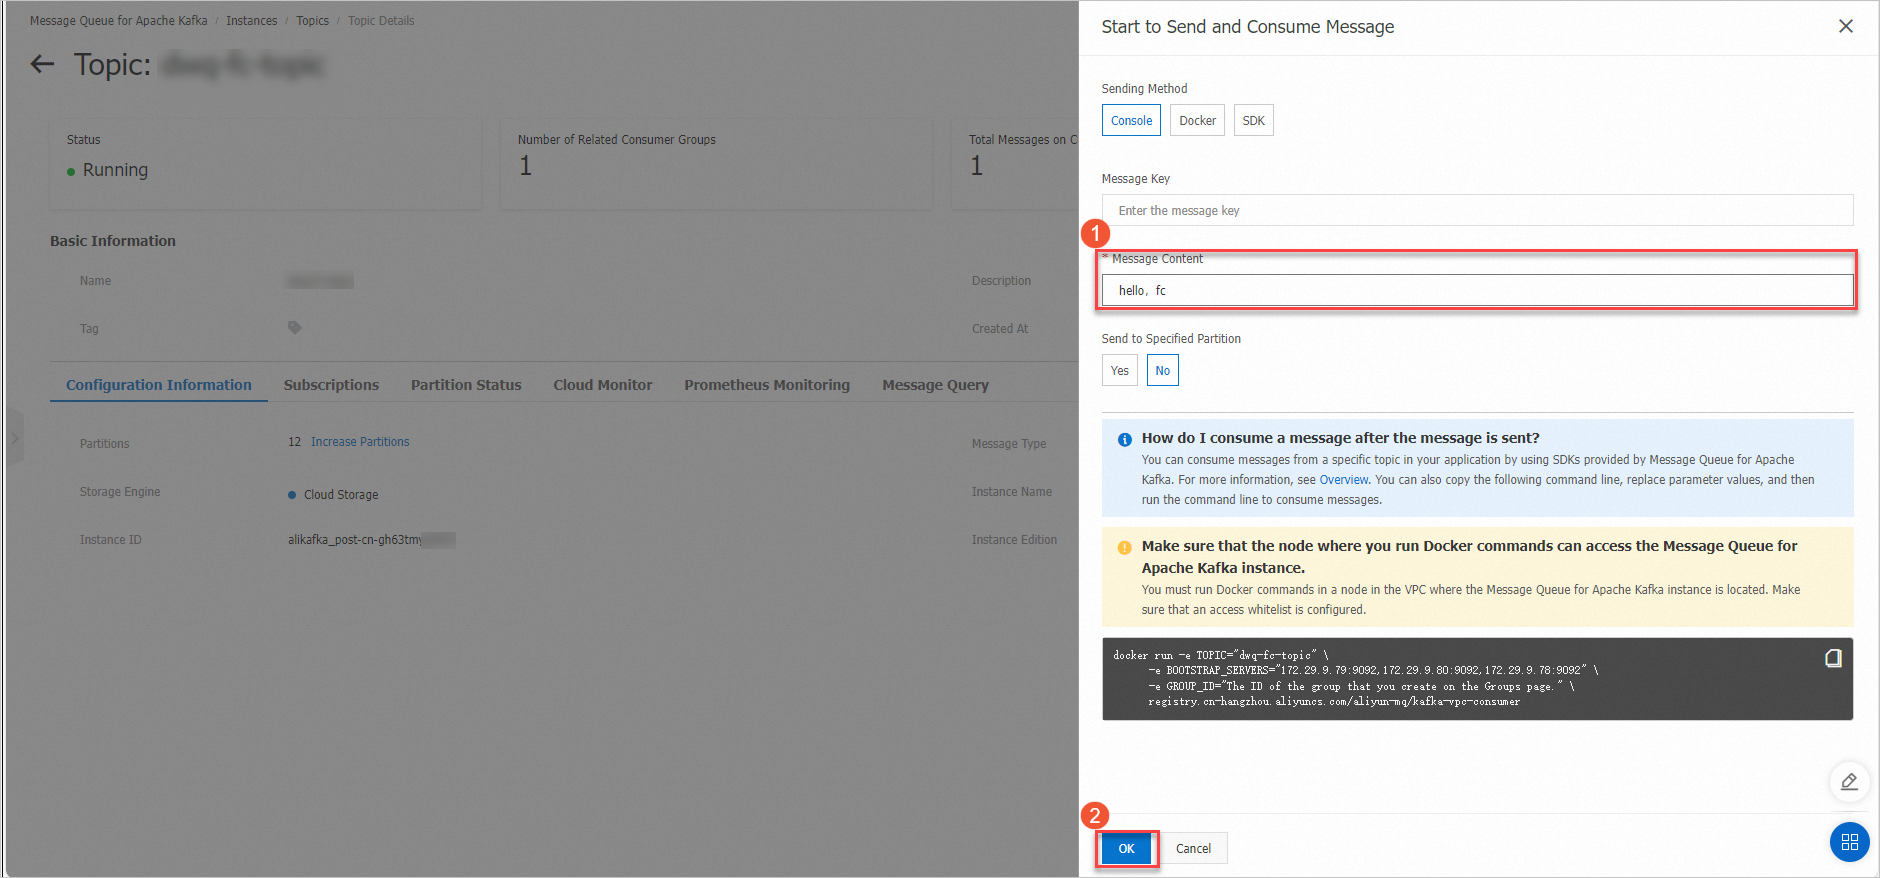
End-to-end test: Log on to the ApsaraMQ for Kafka console, select the topic, and click Send Message to publish a real message. The trigger detects the message and invokes the function automatically.
-
-
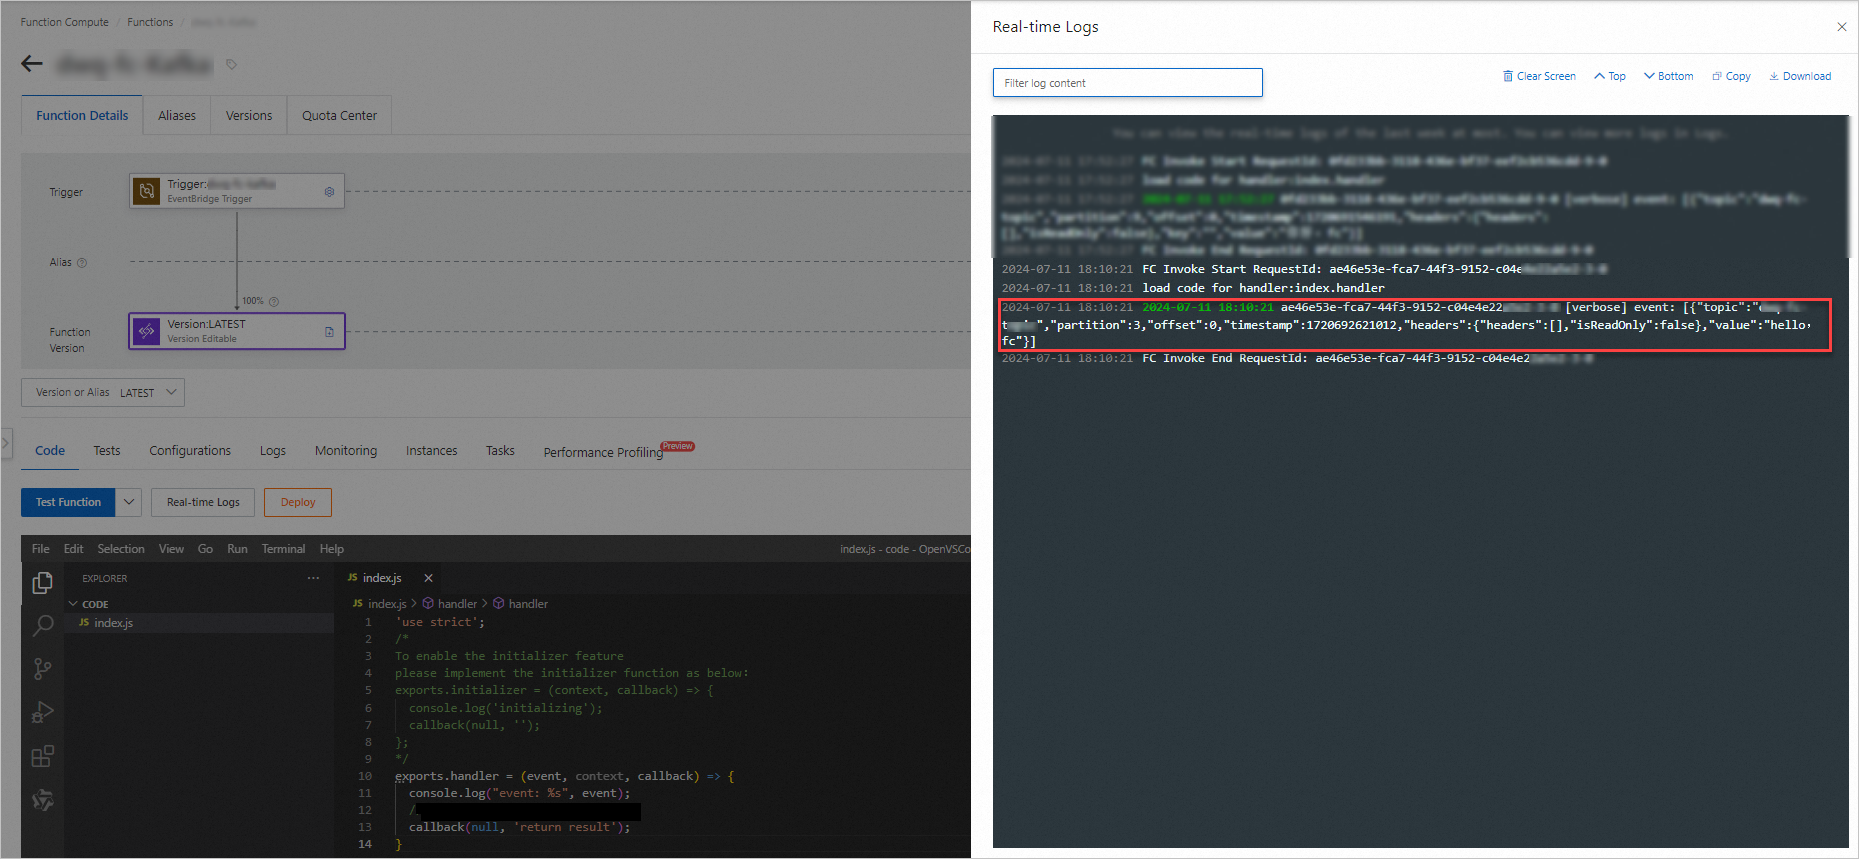
After execution, view the output in Real-time Logs.
What's next
To modify or delete an existing trigger, see Manage triggers.