Function Compute GPU-accelerated instances let you run FFmpeg-based video transcoding at scale without managing GPU drivers, CUDA versions, or hardware clusters. This guide walks you through deploying a GPU-accelerated transcoding function using Serverless Devs and Python, with MP4-to-FLV conversion as the example.
When to use GPU acceleration
GPU acceleration delivers the most value when transcoding jobs are expected to run longer than a few minutes, or when you need multiple output streams per input. Specific scenarios include:
1080p and higher transcoding: A 2-minute 1080p H.264 video takes over 3 minutes on CPU but under 10 seconds on GPU — a 20x speedup.
Multi-stream output (1:N): Generating 3 output resolutions simultaneously takes under 6 minutes on CPU but approximately 45 seconds on GPU.
Latency-sensitive pipelines: Social live streaming, online classrooms, and telemedicine require real-time or near-real-time delivery.
For jobs that complete in well under a minute on CPU, the overhead of GPU instance provisioning may outweigh the speed benefit.
Supported codec formats
GPU-accelerated instances are based on the Turing architecture and use the NVIDIA T4 GPU.
Encoding
| Format |
|---|
| H.264 (AVCHD) YUV 4:2:0 |
| H.264 (AVCHD) YUV 4:4:4 |
| H.264 (AVCHD) Lossless |
| H.265 (HEVC) 4K YUV 4:2:0 |
| H.265 (HEVC) 4K YUV 4:4:4 |
| H.265 (HEVC) 4K Lossless |
| H.265 (HEVC) 8K |
| HEVC 10-bit |
| HEVC B-frame |
Decoding
| Format | Bit depths |
|---|---|
| MPEG-1 | 8-bit |
| MPEG-2 | 8-bit |
| VC-1 | 8-bit |
| VP8 | 8-bit |
| VP9 | 8-bit, 10-bit, 12-bit |
| H.264 (AVCHD) | 8-bit, 10-bit, 12-bit |
| H.265 (HEVC) 4:2:0 | 8-bit, 10-bit, 12-bit |
| *H.265 (HEVC) 4:4:4 | 8-bit, 10-bit, 12-bit |
Performance benchmarks
The following tests used a 2-minute 5-second H.264 source video (1920x1080, 25 fps, 4085 Kb/s; audio: aac (LC), 44100 Hz, stereo, fltp) on machines with identical CPUs (Xeon® Platinum 8163 4C, 16 GB RAM) — one with a T4 GPU, one without. FFmpeg version: git-2020-08-12-1201687.
1:1 transcoding (1 input, 1 output)
| Resolution | Without GPU | With GPU |
|---|---|---|
| H264 1920x1080 (Full HD, 1080p) | 3 min 19.3 s | 9.4 s |
| H264 1280x720 (HD, 720p) | 2 min 3.7 s | 5.8 s |
| H264 640x480 (480p) | 1 min 1.0 s | 5.8 s |
| H264 480x360 (360p) | 44.4 s | 5.7 s |
1:N transcoding (1 input, 3 outputs: 1080p + 720p + 480p)
| Without GPU | With GPU |
|---|---|
| 5 min 58.7 s | 45.3 s |
How it works
The function runs inside a custom container built on an NVIDIA-enabled FFmpeg image. When invoked, it:
Downloads the source video from an Object Storage Service (OSS) bucket.
Runs FFmpeg to transcode the video. With GPU mode, FFmpeg offloads decoding and encoding to the NVIDIA hardware using CUDA — the
-hwaccel cuda -hwaccel_output_format cudaflags keep decoded frames in GPU memory, avoiding a CPU-GPU transfer before encoding. Theh264_nvencflag instructs FFmpeg to use the NVIDIA hardware encoder for H.264 output instead of the software encoder. Without these flags, FFmpeg falls back to software encoding on the CPU.Uploads the transcoded output to OSS.
Prerequisites
Before you begin, ensure that you have:
A DingTalk group membership (group ID: 11721331). To join, provide your organization name, Alibaba Cloud account ID, target region (for example, China (Shenzhen)), and contact details.
A Container Registry Enterprise Edition instance in the same region as your GPU-accelerated instances. Personal Edition works but Enterprise Edition is recommended. See Create a Container Registry Enterprise Edition instance.
A namespace and image repository in that instance. See Create a namespace in the Container Registry documentation. Then create an image repository in the same instance.
An FFmpeg binary compiled with NVIDIA GPU support. Use one of the following:
(Recommended) Pre-built Docker images: willprice/nvidia-ffmpeg. Alternatively, use jrottenberg/ffmpeg.
Manually compiled — see the NVIDIA FFmpeg compilation guide
Audio and video files uploaded to an OSS bucket in the same region. The function needs read and write access to the bucket objects. See Upload objects for upload instructions and Modify the ACL of a bucket for permission settings.
FFmpeg transcoding commands
All examples below use the willprice/nvidia-ffmpeg Docker image.
Without GPU acceleration
Single output (1:1)
docker run --rm -it --volume $PWD:/workspace --runtime=nvidia willprice/nvidia-ffmpeg \
  -y -i input.mp4 -c:v h264 -vf scale=1920:1080 -b:v 5M output.mp4
Multiple outputs (1:N)
docker run --rm -it --volume $PWD:/workspace --runtime=nvidia willprice/nvidia-ffmpeg \
  -y -i input.mp4 \
  -c:a copy -c:v h264 -vf scale=1920:1080 -b:v 5M output_1080.mp4 \
  -c:a copy -c:v h264 -vf scale=1280:720  -b:v 5M output_720.mp4 \
  -c:a copy -c:v h264 -vf scale=640:480   -b:v 5M output_480.mp4
With GPU acceleration
Single output (1:1)
docker run --rm -it --volume $PWD:/workspace --runtime=nvidia willprice/nvidia-ffmpeg \
  -y -hwaccel cuda -hwaccel_output_format cuda \
  -i input.mp4 -c:v h264_nvenc -vf scale_cuda=1920:1080:1:4 -b:v 5M output.mp4
Multiple outputs (1:N)
docker run --rm -it --volume $PWD:/workspace --runtime=nvidia willprice/nvidia-ffmpeg \
  -y -hwaccel cuda -hwaccel_output_format cuda -i input.mp4 \
  -c:a copy -c:v h264_nvenc -vf scale_npp=1920:1080 -b:v 5M output_1080.mp4 \
  -c:a copy -c:v h264_nvenc -vf scale_npp=1280:720  -b:v 5M output_720.mp4 \
  -c:a copy -c:v h264_nvenc -vf scale_npp=640:480   -b:v 5M output_480.mp4
Key parameters
| Parameter | Description |
|---|---|
-hwaccel cuda | Selects the CUDA hardware accelerator for decoding |
-hwaccel_output_format cuda | Keeps decoded frames in GPU memory, avoiding a CPU-GPU transfer before encoding |
-c:v h264_nvenc | Uses the NVIDIA hardware H.264 encoder |
-c:a copy | Copies the audio stream without re-encoding |
-b:v 5M | Sets the output bitrate to 5 Mb/s |
Deploy a GPU function with Serverless Devs
Before you begin, install Serverless Devs and Docker. Then follow the steps to configure Serverless Devs with your credentials.
Procedure
Create a project.
s init devsapp/start-fc-custom-container-event-python3.9 -d fc-gpu-prjThe scaffolded project structure:
fc-gpu-prj
├── code
│   ├── app.py        # Function code
│   └── Dockerfile    # Image Dockerfile
├── README.md
└── s.yaml            # Deployment configuration
Go to the project directory.
cd fc-gpu-prjEdit the configuration files. s.yaml — update the region, service name, and container image URI for your environment. The key GPU-related parameters are
instanceType: fc.gpu.tesla.1andgpuMemorySize: 8192.edition: 1.0.0 name: container-demo access: default vars: region: cn-shenzhen services: customContainer-demo: component: devsapp/fc props: region: ${vars.region} service: name: tgpu_ffmpeg_service internetAccess: true function: name: tgpu_ffmpeg_func description: test gpu for ffmpeg handler: not-used timeout: 600 caPort: 9000 instanceType: fc.gpu.tesla.1 gpuMemorySize: 8192 cpu: 4 memorySize: 16384 diskSize: 512 runtime: custom-container customContainerConfig: # Prerequisites: # 1. Create the namespace "demo" and repository "gpu-transcoding_s" in Container Registry. # 2. Increment the tag (e.g., v0.1 -> v0.2) when updating and redeploying. image: registry.cn-shanghai.aliyuncs.com/demo/gpu-transcoding_s:v0.1 codeUri: ./codeFor the full list of YAML parameters, see YAML specifications. app.py — the function downloads a source video from OSS, transcodes it with FFmpeg (using GPU or CPU based on the
TRANS-MODEheader), and uploads the result back to OSS. Replace thesrc_urlanddst_urlplaceholder values with your actual OSS object URLs.# -*- coding: utf-8 -*- from __future__ import print_function from http.server import HTTPServer, BaseHTTPRequestHandler import json import sys import logging import os import time import urllib.request import subprocess class Resquest(BaseHTTPRequestHandler): def download(self, url, path): print("enter download:", url) f = urllib.request.urlopen(url) with open(path, "wb") as local_file: local_file.write(f.read()) def upload(self, url, path): print("enter upload:", url) headers = { 'Content-Type': 'application/octet-stream', 'Content-Length': os.stat(path).st_size, } req = urllib.request.Request(url, open(path, 'rb'), headers=headers, method='PUT') urllib.request.urlopen(req) def trans(self, input_path, output_path, enable_gpu): print("enter trans input:", input_path, " output:", output_path, " enable_gpu:", enable_gpu) cmd = ['ffmpeg', '-y', '-i', input_path, "-c:a", "copy", "-c:v", "h264", "-b:v", "5M", output_path] if enable_gpu: cmd = ["ffmpeg", "-y", "-hwaccel", "cuda", "-hwaccel_output_format", "cuda", "-i", input_path, "-c:v", "h264_nvenc", "-b:v", "5M", output_path] try: subprocess.run(cmd, stdout=subprocess.PIPE, stderr=subprocess.PIPE, check=True) except subprocess.CalledProcessError as exc: print('\nreturncode:{}'.format(exc.returncode)) print('\ncmd:{}'.format(exc.cmd)) print('\noutput:{}'.format(exc.output)) print('\nstderr:{}'.format(exc.stderr)) print('\nstdout:{}'.format(exc.stdout)) def trans_wrapper(self, enable_gpu): src_url = "https://your.domain/input.mp4" # Replace with your OSS object URL (read access required) dst_url = "https://your.domain/output.flv" # Replace with your OSS object URL (write access required) src_path = "/tmp/input_c.flv" dst_path = "/tmp/output_c.mp4" if enable_gpu: src_url = "https://your.domain/input.mp4" # Replace with your OSS object URL (read access required) dst_url = "https://your.domain/output.flv" # Replace with your OSS object URL (write access required) src_path = "/tmp/input_g.flv" dst_path = "/tmp/output_g.mp4" local_time = time.time() self.download(src_url, src_path) download_time = time.time() - local_time local_time = time.time() self.trans(src_path, dst_path, enable_gpu) trans_time = time.time() - local_time local_time = time.time() self.upload(dst_url, dst_path) upload_time = time.time() - local_time data = {'result':'ok', 'download_time':download_time, 'trans_time':trans_time, 'upload_time':upload_time} self.send_response(200) self.send_header('Content-type', 'application/json') self.end_headers() self.wfile.write(json.dumps(data).encode()) def pong(self): data = {"function":"trans_gpu"} self.send_response(200) self.send_header('Content-type', 'application/json') self.end_headers() self.wfile.write(json.dumps(data).encode()) def dispatch(self): mode = self.headers.get('TRANS-MODE') if mode == "ping": self.pong() elif mode == "gpu": self.trans_wrapper(True) elif mode == "cpu": self.trans_wrapper(False) else: self.pong() def do_GET(self): self.dispatch() def do_POST(self): self.dispatch() if __name__ == '__main__': host = ('0.0.0.0', 9000) server = HTTPServer(host, Resquest) print("Starting server, listen at: %s:%s" % host) server.serve_forever()Dockerfile — builds the container image from the NVIDIA FFmpeg base image and adds a Python runtime.
FROM registry.cn-shanghai.aliyuncs.com/serverless_devs/nvidia-ffmpeg:latest
WORKDIR /usr/src/app
RUN apt-get update --fix-missing
RUN apt-get install -y python3
RUN apt-get install -y python3-pip
COPY . .
ENTRYPOINT [ "python3", "-u", "/usr/src/app/app.py" ]
EXPOSE 9000
Build the container image.
s build --dockerfile ./code/DockerfileDeploy to Function Compute.
If you run
s deployagain with the same service and function names, runuse localfirst to use local configurations.s deployCreate a provisioned instance so the GPU function is ready to handle requests without cold start latency.
s provision put --target 1 --qualifier LATESTVerify the provisioned instance is ready.
s provision get --qualifier LATESTThe instance is ready when
currentequals1. Example output:[2021-12-14 08:45:24] [INFO] [S-CLI] - Start ... [2021-12-14 08:45:24] [INFO] [FC] - Getting provision: tgpu_ffmpeg_service.LATEST/tgpu_ffmpeg_func customContainer-demo: serviceName: tgpu_ffmpeg_service functionName: tgpu_ffmpeg_func qualifier: LATEST resource: 188077086902****#tgpu_ffmpeg_service#LATEST#tgpu_ffmpeg_func target: 1 current: 1 scheduledActions: (empty array) targetTrackingPolicies: (empty array) currentError:Invoke the function. Check the deployed version:
s invokeTranscode with CPU:
s invoke -e '{"method":"GET","headers":{"TRANS-MODE":"cpu"}}'Transcode with GPU:
s invoke -e '{"method":"GET","headers":{"TRANS-MODE":"gpu"}}'When done, release the provisioned instance to stop incurring charges.
s provision put --target 0 --qualifier LATEST
Deploy a GPU function from the console
Set up the container image.
Create a Container Registry Enterprise Edition instance (recommended) or Personal Edition instance. See Create a Container Registry Enterprise Edition instance.
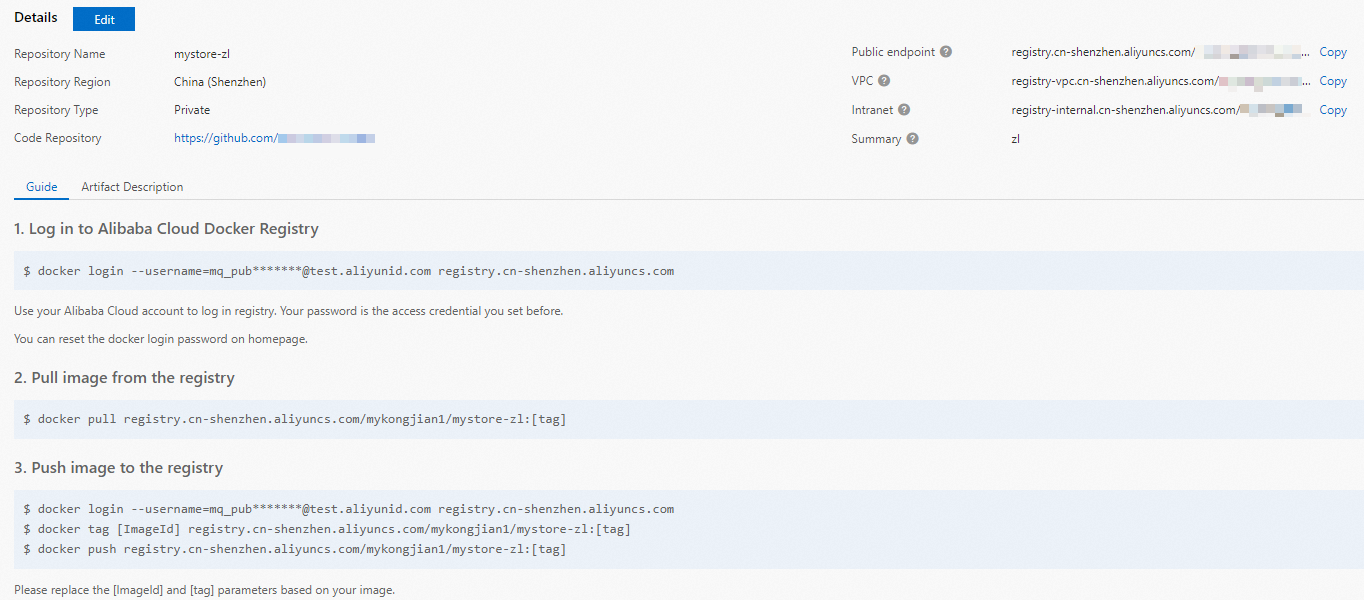
Create a namespace and image repository in the instance. See Create a namespace in the Container Registry documentation. Then follow the steps to create an image repository in the same instance.
Follow the Docker instructions in the Container Registry console to push the
app.pyandDockerfile(from the Serverless Devs/codedirectory) to the image repository.
Create a service. See the Create a service section.
Create a function. See Create a custom container function.
Set Instance Type to GPU Instance and Request Handler Type to Process HTTP Requests.
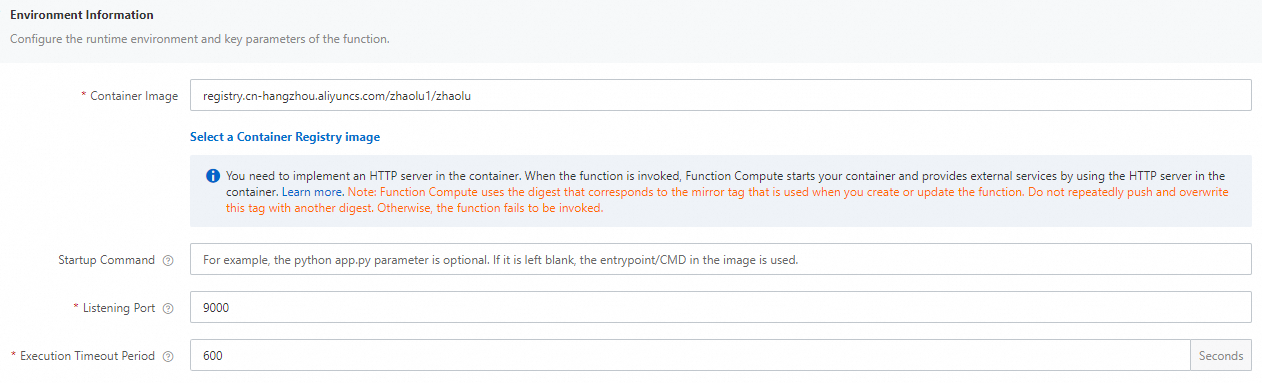
Increase the execution timeout period. CPU transcoding of a 2-minute video takes over 100 seconds — well above the default 60-second timeout.
Find the function and click Configure in the Actions column.
In the Environment Information section, increase Execution Timeout Period and click Save.
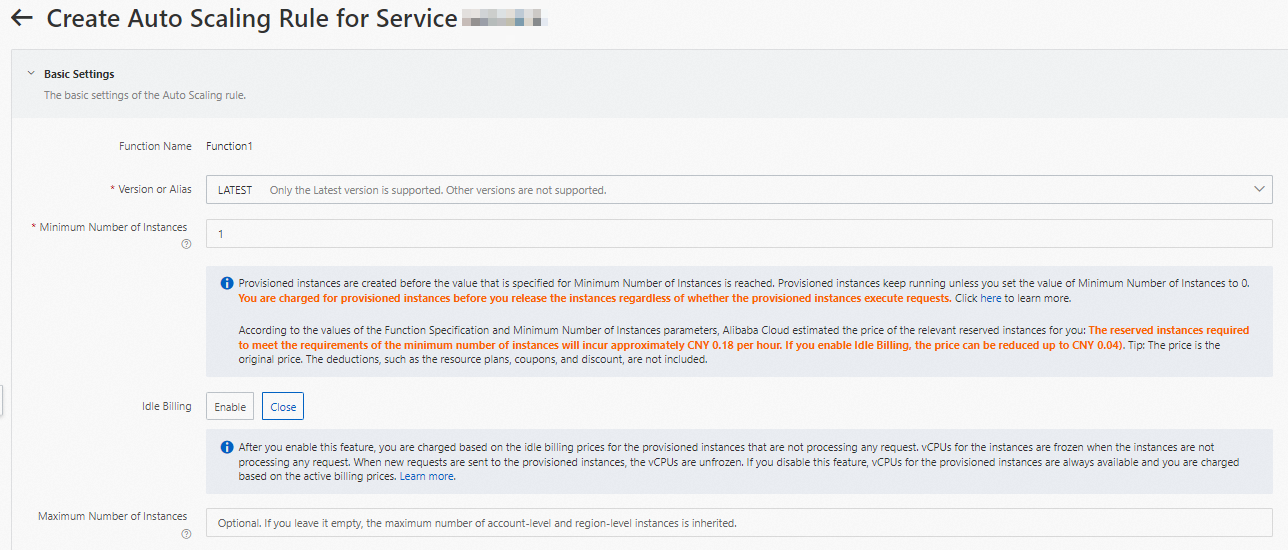
Configure provisioned GPU-accelerated instances. After creation, check the rule list and confirm that Current Reserved Instances matches your target count.
On the function details page, click the Auto Scaling tab, then click Create Rule.
Configure the parameters to provision GPU-accelerated instances and click Create. See Configure auto scaling rules for details.
Test the function with cURL.
On the function details page, click the Triggers tab to get the trigger endpoint.
Run the following commands:
Check the deployed version:
curl -v "https://tgpu-ff-console-tgpu-ff-console-ajezot****.cn-shenzhen.fcapp.run"
{"function": "trans_gpu"}
Transcode with CPU:
curl "https://tgpu-ff-console-tgpu-ff-console-ajezot****.cn-shenzhen.fcapp.run" -H 'TRANS-MODE: cpu'
{"result": "ok", "upload_time": 8.75510573387146, "download_time": 4.910430669784546, "trans_time": 105.37688875198364}
Transcode with GPU:
curl "https://tgpu-ff-console-tgpu-ff-console-ajezotchpx.cn-shenzhen.fcapp.run" -H 'TRANS-MODE: gpu'
{"result": "ok", "upload_time": 8.313958644866943, "download_time": 5.096682548522949, "trans_time": 8.72346019744873}
Result
Access the transcoded output from your browser using the OSS domain name. For example:
https://cri-zbtsehbrr8******-registry.oss-cn-shenzhen.aliyuncs.com/output.flvReplace the domain name with your actual OSS endpoint.
What's next
Instance types and instance modes — learn more about GPU-accelerated instance options
Configure provisioned instances and auto scaling rules — optimize cold start behavior for GPU functions