The session isolation feature in Function Compute is a key upgrade designed for complex application scenarios in the AI era. By providing dual isolation at both the instance and storage levels, it lets you build secure, stable, and efficient long-running applications on a serverless architecture, providing on-demand usage, elastic scaling, and secure control.
Overview
Function Compute has traditionally been "short-lived, stateless, and event-driven"—ideal for short-cycle task processing. However, with the rise of large language models (LLMs) and Generative AI, a growing number of enterprise applications require support for long-running operations, context persistence, and strong data isolation.
To meet these needs, Function Compute introduces the session isolation feature. This feature is built on a core "session" abstraction and provides two key capabilities: session instance isolation and session storage isolation. This helps you build secure, stable, and efficient AI applications.
-
Session instance isolation: When enabled, the system allocates a dedicated function instance to each session and enforces a strict 1:1 binding. This instance serves only this session throughout its lifecycle and is automatically released upon termination.
-
Session storage isolation: Using dynamic mounts, the system allocates a separate storage space to each session. This mechanism uses the operating system's kernel-level POSIX user permission mechanism to create clear data access boundaries and prevent unauthorized access.
This feature is ideal for AI applications that require context persistence, strong data isolation, and long-running operations.
Core capabilities
|
Capability |
Value |
|
Dedicated instance |
Each session is bound to a dedicated function instance, ensuring a continuous execution environment and preventing interference from shared resources. |
|
Storage isolation |
Dynamically mounts a separate NAS directory for each session and uses POSIX permissions to prevent unauthorized data access. |
|
Automatic release |
Automatically reclaims resources when a session ends, preventing costs from idle "zombie" instances. |
|
Flexible lifecycle |
Supports custom idle timeouts to balance performance and cost. |
Applicability
|
Type |
Supported |
|
Function type |
Supports all function types except Task Functions. |
|
Instance type |
Supports only instance types with 2 vCPUs or more (e.g., 2c4g, 4c8g). |
|
Runtime |
If a function uses a Built-in Runtimes, you cannot select MCP SSE Affinity for Session affinity. |
|
Session storage isolation (dynamic mount storage) |
This feature is in private preview. To use it, please submit a ticket to request access. |
|
Regions for session instance isolation |
Supported in all regions except UK (London), Saudi Arabia (Riyadh), South Korea (Seoul), Malaysia (Kuala Lumpur), Thailand (Bangkok), Ulanqab Dedicated Cloud HDG, and Ulanqab General Industry Cloud. |
|
Regions for session storage isolation |
Not supported in compliance clouds, Japan (Tokyo), or China (Hohhot). The dynamic mount for PolarFS is currently supported only in China (Beijing), China (Shanghai), China (Ulanqab), China (Hong Kong), and US (Silicon Valley). |
Configure session instance isolation
Step 1: Configure session instance isolation
You can create a new function with session isolation enabled, or configure it for an existing function. If you configure an existing function, ensure that it meets the requirements for instance type, runtime, and function type as described in Applicability.
New function
These steps detail only the session isolation configuration. For other settings, see Create a function.
-
Log in to the Function Compute console. In the top navigation bar, select a region, such as China (Hangzhou).
Before you deploy, we recommend reviewing the Applicability section to select a region that supports this feature.
-
Go to the Functions page, click Create Function, and select any Function Type except for Task Function, which does not support session isolation.
This topic uses a Web function as an example. The configuration for other supported function types is the same. Task functions are not supported.
-
Configure the Basic Configurations and Sample code: as needed.
-
Navigate to Advanced Settings > Isolation & Affinity.
-
Isolate instance: Enable Instance Isolation and select Session isolation. When you enable session isolation, the system automatically enables session affinity. You must then configure the session affinity parameters.
Note-
After you enable session isolation, the maximum number of concurrent sessions per instance is automatically set to 1 and cannot be changed.
-
Enabling session isolation also enables session affinity.
If you enable session isolation, all requests from the same client are routed to the same function instance. At the same time, a single function instance can serve requests from only that client. Therefore, session isolation meets the requirements for both session affinity and session isolation.
-
-
Session Affinity: For different affinity type configurations, see Instance Isolation Configuration Practice. This topic uses Header field affinity as an example. Configure the Header Name, for example,
x-affinity-header-v1, which is the name of the header used to carry the client's affinity identifier. Keep other settings at their default values or configure them as needed.If you want to pass an affinity identifier named
mySessionId, you must pass the following header and value when making an HTTP call:x-affinity-header-v1: mySessionIdNote-
If you plan to use session storage isolation with this function, you must select either HeaderField affinity or Cookie affinity.
-
If the function's Sample code: uses a Built-in Runtimes, you cannot select MCP SSE Affinity as the affinity type.
-
-
-
Click Create.
Existing function
-
Log in to the Function Compute console. In the top navigation bar, select the region where your target function is located, for example, China (Hangzhou).
Before you deploy, we recommend reviewing the Applicability section to ensure the function's region supports this feature.
-
Go to the Functions page, select the function for which you want to configure session isolation, and go to its details page.
-
On the Configuration tab, find Advanced Settings and click Modify.
-
Configure Isolation & Affinity.
-
Isolate instance: Enable Instance Isolation and select Session isolation. When you enable session isolation, the system automatically enables session affinity. You must then configure the session affinity parameters.
Note-
After you enable session isolation, the maximum number of concurrent sessions per instance is automatically set to 1 and cannot be changed.
-
Enabling session isolation also enables session affinity.
If you enable session isolation, all requests from the same client are routed to the same function instance. At the same time, a single function instance can serve requests from only that client. Therefore, session isolation meets the requirements for both session affinity and session isolation.
-
-
Session Affinity: For different affinity type configurations, see Instance Isolation Configuration Practice. This topic uses Header field affinity as an example. Configure the Header Name, for example,
x-affinity-header-v1, which is the name of the header used to carry the client's affinity identifier. Keep other settings at their default values or configure them as needed.If you want to pass an affinity identifier named
mySessionId, you must pass the following header and value when making an HTTP call:x-affinity-header-v1: mySessionIdNote-
If you plan to use session storage isolation with this function, you must select either HeaderField affinity or Cookie affinity.
-
If the function's Sample code: uses a Built-in Runtimes, you cannot select MCP SSE Affinity as the affinity type.
-
-
-
Click Deploy.
Step 2: Verify the results
-
Using HeaderField affinity as an example, invoke the function with different HTTP header values to test the configuration.
Session 1:
curl -H "x-affinity-header-v1:Session1" https://example.{regionID}.fcapp.runSession 2:
curl -H "x-affinity-header-v1:Session2" https://example.{regionID}.fcapp.runRequest details:
-
x-affinity-header-v1: This is the Header Name you configured for session affinity. Replace it with your actual configuration. -
Session1andSession2: These are the values for the request header. With session instance isolation enabled, requests with the same value are routed to the same function instance, while requests with different values are routed to different instances. -
https://example.{regionID}.fcapp.run: This is the function's trigger URL. You can find it on the function's details page under the HTTP Triggers tab.
-
-
Verification:
In the Function Compute invocation logs, you can see that multiple requests for the same session (Session1) reuse the same instance ID (for example,
c-687e0412-12f6c06f-df), while requests for a different session (Session2) are assigned to a different instance (for example,c-687e03d5-12f6c06f-b). This confirms that the session isolation configuration is working correctly.
Dynamic mount storage
This topic uses NAS as an example. OSS and PolarFS are also supported, and the configuration steps are similar.
Prerequisites
-
You have created a NAS file system and planned the directory structure for tenant data isolation.
-
You have enabled session instance isolation by following the steps in Configure session instance isolation for a function.
-
Check the function configuration to verify that the option to allow VPC access is enabled, and select the Virtual Private Cloud (VPC) that is consistent with the NAS mount point:
-
Navigate to Configuration > Advanced Settings > Network and enable Access to VPC.
-
For Configuration Mode, select Custom Configuration.
-
For VPC, select the VPC where the mount point is located.
-
Step 1: Create a session with NAS
-
Install dependencies
macOS/Linux
# Install with pip3
pip3 install alibabacloud_fc20230330 alibabacloud_credentials alibabacloud_tea_openapi alibabacloud_tea_util
# If you encounter permission issues, use the --user argument
pip3 install --user alibabacloud_fc20230330 alibabacloud_credentials alibabacloud_tea_openapi alibabacloud_tea_util
# For macOS Homebrew Python environments, use --break-system-packages
pip3 install --break-system-packages alibabacloud_fc20230330 alibabacloud_credentials alibabacloud_tea_openapi alibabacloud_tea_util
Windows
# Install with pip pip install alibabacloud_fc20230330 alibabacloud_credentials alibabacloud_tea_openapi alibabacloud_tea_util # Or specify Python 3 py -3 -m pip install alibabacloud_fc20230330 alibabacloud_credentials alibabacloud_tea_openapi alibabacloud_tea_util -
Write the code to create a session
Create a Python file (for example,
createSession.py) and copy the following code into it, replacing the key parameters. This example shows how to create a session for "Tenant A" by mounting its dedicated NAS directory (<YOUR-NAS-SERVER-ADDR>:/tenant-a-data) to the instance's/mnt/datapath, and specifying the user identity asUID=1001andGID=1001.Key methods and parameters
ImportantYou can configure both dynamic session-based NAS mounting and static NAS mounting in the function's Configuration > Advanced Settings > Storage at the same time. However, note the following:
-
The
User IDandGroup IDdefined in theNASConfigmust match theUser IDandGroup IDused in the function's static mount settings. -
The same mount path (
mount_dir) cannot be used for both dynamic session mounting and static function mounting.
-
config.endpoint:-
<Account ID>: Replace with your Alibaba Cloud account ID.
-
<Endpoint>: Refer to the Function Compute 3.0 Service Endpoints list. The format is
fcv3.[region_id].aliyuns.com.
-
-
CreateSessionInput:-
session_ttlin_seconds: The total lifecycle of the session, in seconds.
-
session_idle_timeout_in_seconds: The session's idle timeout period, in seconds.
-
-
client.create_session_with_options: Replace <Function Name> with the name of the function for which you are creating the session.-
NASMountConfig: NAS mount configuration.-
mount_dir: The mount path within the instance, for example,/home/test. -
server_addr: The NAS file storage address and the tenant-specific subdirectory.
-
-
user_id: Specify a unique POSIX User ID for this session. -
group_id: Specify a unique POSIX Group ID for this session.
-
# -*- coding: utf-8 -*- from alibabacloud_fc20230330.client import Client as FC20230330Client from alibabacloud_credentials.client import Client as CredentialClient from alibabacloud_tea_openapi import models as open_api_models from alibabacloud_fc20230330 import models as fc20230330_models from alibabacloud_tea_util import models as util_models # 1. Create the account client. credential = CredentialClient() config = open_api_models.Config(credential=credential) config.endpoint = f'<Account ID>.<Endpoint>' client = FC20230330Client(config) # 2. Prepare the NAS mount configuration. nas_mount_config = fc20230330_models.NASMountConfig( mount_dir='/mnt/data', # The mount path inside the instance server_addr='<YOUR-NAS-SERVER-ADDR>:/<tenant-a-path>' # NAS file storage address and tenant-specific subdirectory ) # 3. Configure NAS and user identity (assign a unique UID/GID to Tenant A). nas_config = fc20230330_models.NASConfig( mount_points=[nas_mount_config], user_id=1001, # Specify a unique POSIX User ID for this session group_id=1001 # Specify a unique POSIX Group ID for this session ) # 4. Construct the CreateSession request. create_session_input = fc20230330_models.CreateSessionInput( nas_config=nas_config, session_ttlin_seconds=3600, session_idle_timeout_in_seconds=600 ) create_session_request = fc20230330_models.CreateSessionRequest( body=create_session_input ) # 5. Send the request. runtime = util_models.RuntimeOptions() response = client.create_session_with_options('<Function Name>', create_session_request, {}, runtime) # 6. Get the session ID from the response. print(response.body.to_map()) session_id = response.body.session_id print(f"Session created successfully. Session ID: {session_id}") -
-
Run the code
export ALIBABA_CLOUD_ACCESS_KEY_ID=LTAI****************
export ALIBABA_CLOUD_ACCESS_KEY_SECRET=<yourAccessKeySecret>
python3 createSession.py
Parameters
-
ALIBABA_CLOUD_ACCESS_KEY_ID: The AccessKey ID of your Alibaba Cloud account or RAM user.
-
ALIBABA_CLOUD_ACCESS_KEY_SECRET: The AccessKey Secret of your Alibaba Cloud account or RAM user.
-
-
Sample response
{
  'containerId': 'c-********-********-************',
  'createdTime': '2025-10-30T06:38:10Z',
  'functionName': '****',
  'lastModifiedTime': '2025-10-30T06:38:10Z',
  'nasConfig':
    {
      'groupId': 1001,
      'mountPoints': [
        {
          'enableTLS': False,
          'mountDir': '/home/test',
          'serverAddr': '*-*.*.nas.aliyuncs.com:/test'
           }
             ],
             'userId': 1001
             },
   'qualifier': 'LATEST',
   'sessionAffinityType': 'HEADER_FIELD',
   'sessionId': '******************',
   'sessionIdleTimeoutInSeconds': 600,
   'sessionStatus': 'Active',
   'sessionTTLInSeconds': 3600
   }
Session created successfully. Session ID: ************
Step 2: Use the mounted NAS
When you invoke the function, include the SessionID obtained in the previous step. The function instance can then access the mounted /mnt/data directory. The following example uses a Web function. Modify the code in your function and redeploy it.
import os
from flask import Flask, request, jsonify
# ... (app setup) ...
# Assume the NAS mount point is /mnt/data
NAS_MOUNT_PATH = '/mnt/data'
app = Flask(__name__)
@app.route('/<path:path>', methods=['GET', 'POST'])
def handle_nas_request(path):
    rid = request.headers.get('x-fc-request-id')
    print(f"FC Invoke Start RequestId: {rid}")
    # Construct the full file path on the NAS.
    # Note: Prevent path traversal attacks.
    safe_path = os.path.normpath(os.path.join(NAS_MOUNT_PATH, path))
    if not safe_path.startswith(NAS_MOUNT_PATH):
        return "Path traversal attempt detected!", 400
    response_data = {}
    if request.method == 'POST':
        # Write to file.
        body = request.data.decode('utf-8')
        try:
            with open(safe_path, 'w') as f:
                f.write(body)
            response_data['message'] = f"Successfully wrote to {safe_path}"
            print(f"Wrote to {safe_path}")
        except Exception as e:
            return str(e), 500
    elif request.method == 'GET':
        # Read from file.
        try:
            if os.path.exists(safe_path) and os.path.isfile(safe_path):
                with open(safe_path, 'r') as f:
                    content = f.read()
                response_data['content'] = content
                print(f"Read from {safe_path}")
            else:
                return f"File not found: {safe_path}", 404
        except Exception as e:
            return str(e), 500
    print(f"FC Invoke End RequestId: {rid}")
    return jsonify(response_data)  # Use jsonify to return a JSON-formatted response.
# ... (if __name__ == '__main__': block) ...
Step 3: Invoke the function and verify
Call the InvokeFunction API to invoke the function with the session.
Key code example and description
-
InvokeFunctionHeaders: Construct the request headers, including thesessionIdreturned in the previous step. -
The
Header Keymust match the value you set in Configure session instance isolation for a function (for example,x-affinity-header-v1) to ensure session-bound routing.
# -*- coding: utf-8 -*-
from alibabacloud_fc20230330.client import Client as FC20230330Client
from alibabacloud_credentials.client import Client as CredentialClient
from alibabacloud_tea_openapi import models as open_api_models
from alibabacloud_fc20230330 import models as fc20230330_models
from alibabacloud_tea_util import models as util_models
session_id = '************'
function_name = 'my-session-nas'
# 1. Create the account client.
credential = CredentialClient()
config = open_api_models.Config(credential=credential)
config.endpoint = f'<Account ID>.<Endpoint>'
client = FC20230330Client(config)
# 2. Construct the request headers. The Header Key (x-affinity-header-v1) must match the session affinity key configured for the function.
headers = fc20230330_models.InvokeFunctionHeaders(
    common_headers={
        "x-affinity-header-v1": session_id
    }
)
# 3. Construct the invocation request. You can pass a body if needed.
invoke_request = fc20230330_models.InvokeFunctionRequest(
    body='your_request_payload'.encode('utf-8')  # Example payload
)
runtime = util_models.RuntimeOptions()
try:
    # 4. Send the invocation.
    invoke_response = client.invoke_function_with_options(
        function_name,
        invoke_request,
        headers,
        runtime
    )
    # 5. Process the response.
    print(f"Status Code: {invoke_response.status_code}")
    print(f"Response Body: {invoke_response.body.decode('utf-8')}")
except Exception as error:
    print(error.message)
Next steps: Delete the session
After the task is complete, call the DeleteSession API to release the session resources.
Production recommendations
-
UID/GID planning: To ensure proper isolation, you must assign a unique POSIX UID to each tenant.
-
Directory quotas: To prevent a single tenant from exhausting shared storage space, we recommend configuring directory quotas on the NAS for each tenant's root directory.
-
Data Garbage Collection (GC): The
Delete Session Resourcesoperation does not automatically delete file data on NAS. You need to establish a corresponding asynchronous garbage collection mechanism to periodically scan and clean up orphaned file directories to reclaim storage space.
How it works
1. 1:1 instance-session binding
When a new session is created, the scheduling system allocates a new, unused function instance from the resource pool and establishes a routing map between the session ID and the instance ID.
-
Behavior: Throughout its lifecycle, this instance responds only to requests for the current session and does not accept any other requests.
-
Concurrency control: The system automatically sets the session concurrency per instance to
1, ensuring that all CPU, memory, and local disk resources are exclusively available to that session.
This mechanism is suitable for applications that require long-term context persistence, such as LLM inference or code debugging workflows.
2. Session lifecycle management
The function instance lifecycle is tightly coupled with the session lifecycle. When a session ends, the platform proactively releases the corresponding instance, regardless of its type. A session can end in two ways: automatic release upon expiration or manual release by the user.
Triggers for automatic release
|
Type |
Description |
Configurable |
|
Idle Timeout |
If there are no requests within a specified time (default is 30 minutes), the system considers the session idle and gracefully terminates it. |
Yes. You can configure the Session idle timeout (in seconds). Valid values: [0, 21600]. |
|
Time to Live (TTL) |
The session is automatically terminated after reaching its maximum lifespan (for example, 6 hours), regardless of its activity. |
No (set by the system). |
Manual release
You can manually delete a session by calling the DeleteSession API:
DELETE /services/{serviceName}/functions/{functionName}/sessions/{sessionId}Upon successful deletion:
-
The corresponding instance is released immediately.
-
The routing rule becomes invalid.
-
Subsequent requests that use the old session ID will be rejected or will trigger a new session, depending on the session ID reuse configuration.
NoteSession ID reuse configuration: When calling the CreateSession API, you can control whether a session ID can be reused by configuring the
disableSessionIdReuseparameter.-
The default value is false, which allows reuse. After a session expires, you can send a new request with the same SessionID. The system treats it as a new session and binds it to a new instance.
-
If set to true, the SessionID cannot be reused after the session expires.
-
3. Dynamic mount for storage isolation
Traditional static NAS mounting, where all instances share one directory, creates security risks. The dynamic mount mechanism solves this problem and can be used to address session-persistent storage isolation in multi-tenant AI Agent Sandbox scenarios. When creating a session, you can dynamically specify the NAS subdirectory to be mounted for that session.
How it works
This feature deeply integrates the NAS mount operation with the CreateSession API call. Using HeaderField affinity as an example, the overall process is as follows:
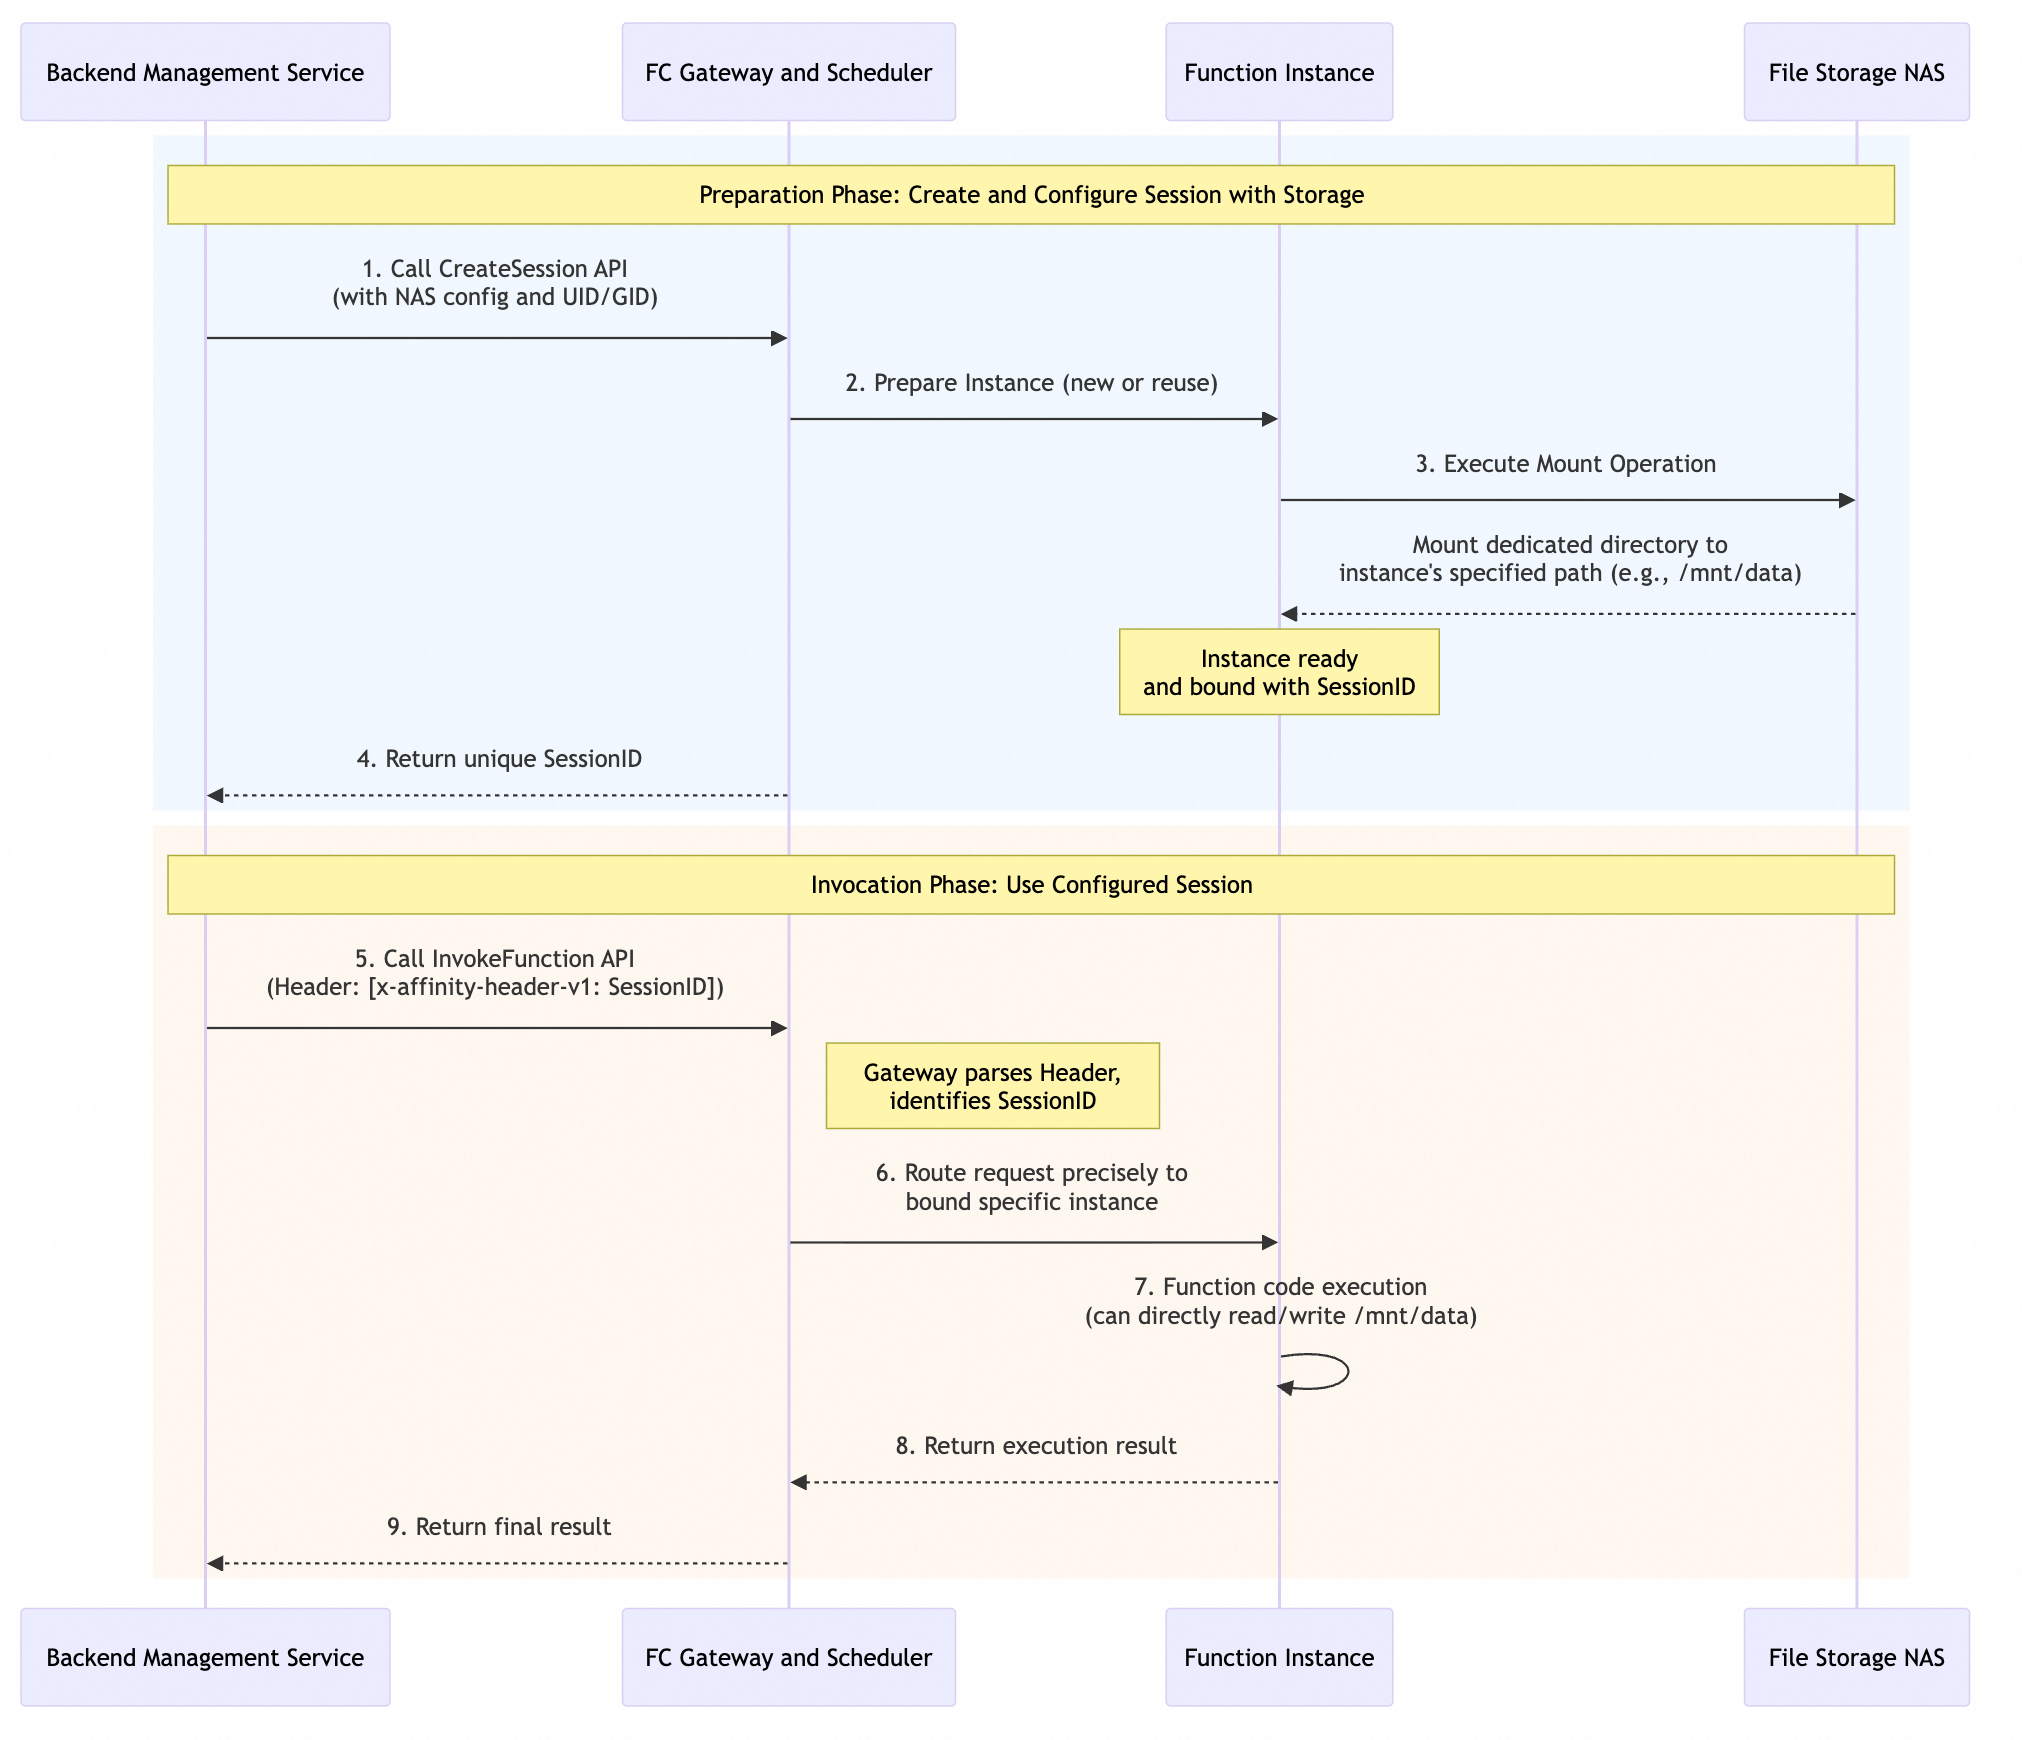
Preparation phase: Create and configure a session with storage
The goal of this phase is to create an isolated session environment that is bound to specific storage for later use.
-
Initiate a creation request: The backend management service calls the
CreateSessionAPI and specifies the NAS mount configuration and the user identity (UID/GID) for isolation in the request. -
Instance preparation and mounting: After receiving a request, the Function Compute (FC) platform prepares a function instance that performs a NAS mount operation based on its configuration to mount a dedicated directory to a specified path, such as
/mnt/data. -
Bind and return ID: After a successful mount, the platform binds this instance to a newly generated, unique
SessionIDand returns the ID to the backend service.
Invocation phase: Use the configured session
This phase uses the prepared session environment to execute the actual business logic.
-
Make a call request: The backend management service calls the
InvokeFunctionAPI and passes the previously obtainedSessionIDin a specific HTTP request header, such as x-affinity-header-v1. -
Request routing: The gateway and scheduler of the Function Compute platform use this
SessionIDto accurately route the request to the specific bound function instance. -
Code execution: The function code is executed in this instance. At this point, because the environment and permissions are pre-configured, the code can directly read from and write to the mounted NAS directory.
-
Return result: After a function completes execution, the result is returned layer by layer to the original caller.
Key features
|
Feature |
Description |
|
Automatic directory creation |
If the remote directory to be mounted does not exist, it is automatically created. The directory's owner is set to the user-configured |
|
POSIX ID permission isolation |
If necessary, you can set the |
|
Coexistence mechanism |
Supports the coexistence of function-level static mounts and session-level dynamic mounts. |
For example, Tenant A (UID=10001) cannot read files belonging to Tenant B (UID=10002), even if they are on the same NAS.