Function Compute supports seamless integration with NAS. You can configure NAS in Function Compute functions to store training data in real time. You can also use the Application Center in Function Compute to quickly deploy a NAS browser application. This lets you visually manage files on a NAS file system, including browsing, editing, uploading, and downloading files.
Background information
Serverless Application Center is a serverless application framework. It allows developers to deploy a complete and ready-to-use serverless application architecture without managing underlying resources. You can set up a serverless application architecture in just a few simple steps. This improves development efficiency and reduces O&M costs.
Billing
Uploading files generates inbound traffic, which is free of charge. Downloading files and the application webpage consume a small amount of traffic. For more information about Function Compute billing, see Billing overview.
Prerequisites
The File Storage NAS service is activated.
The first time you visit the product page of NAS, follow the instructions to activate the service.
The Function Compute service is activated. For more information, see Use event functions to process events from Alibaba Cloud services.
Step 1: Create a file system and obtain the mount target address
If you already have a file system, you can skip this step and obtain the mount target address from the file system list.
Log on to the NAS console.
In the File System Selection Guide table on the Overview page, click Create under General-purpose NAS.
On the Create panel, configure the required parameters. For other parameters, you can use the default configurations.
For more information about the parameters for creating a file system, see Parameter description for creating a file system.
Parameter
Description
Region
From the drop-down list, select China (Chengdu).
Zone
Select Chengdu Zone A.
Protocol Type
Select NFS.
NoteThe NAS Browser application supports only the NFS protocol.
Mount Target Type
Select Virtual Private Cloud.
Virtual Private Cloud
Select a VPC network.
Virtual Switch
Select a vSwitch that is in the selected VPC.
Click Buy Now and follow the prompts to complete the purchase.
Return to the NAS console. In the navigation pane, choose .
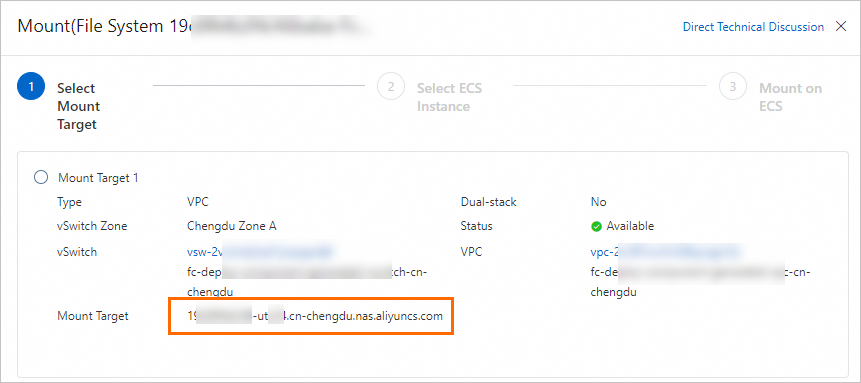
In the Actions column of the file system that you just created, click Mount. Then, copy the mount target address for later use.
Step 2: Create and deploy the fc-nas-filemgr application
On the fc-nas-filemgr application template page, configure the required parameters as described in the following table. For other parameters, use the default configurations or configure them as needed.
ImportantThis application template is contributed by the community and is not officially provided by Alibaba Cloud. Before you use this template, carefully read the application details to ensure the application's security and stability.
Parameter
Example Value
Description
Deployment Type
Deploy Directly
Deploy from Code Repository
Push the code to a specified code repository to trigger a deployment pipeline. To update the project later, you can push the code directly to the remote repository for a secure release.
Deploy Directly
The code is deployed directly. To update and maintain the project later, you must perform operations on resources such as functions and manually adapt CI/CD capabilities.
Direct deployment does not require code repository authorization. Function Compute does not store the sample code in a specified code repository. This method is intended only for a quick trial of the application.
Role Name
AliyunFCServerlessDevsRole
If you are a first-time user, click Go to Authorization to configure role permissions.

If your role already has the required permissions, you do not need to set them.

Region
China (Chengdu)
Select the region where the NAS file system from Step 1 is located.
NAS Mount Target Address
19c8f64****-u****.cn-chengdu.nas.aliyuncs.com
Enter the mount target address of the NAS file system that you created in Step 1.
Click Create and Deploy Default Environment.
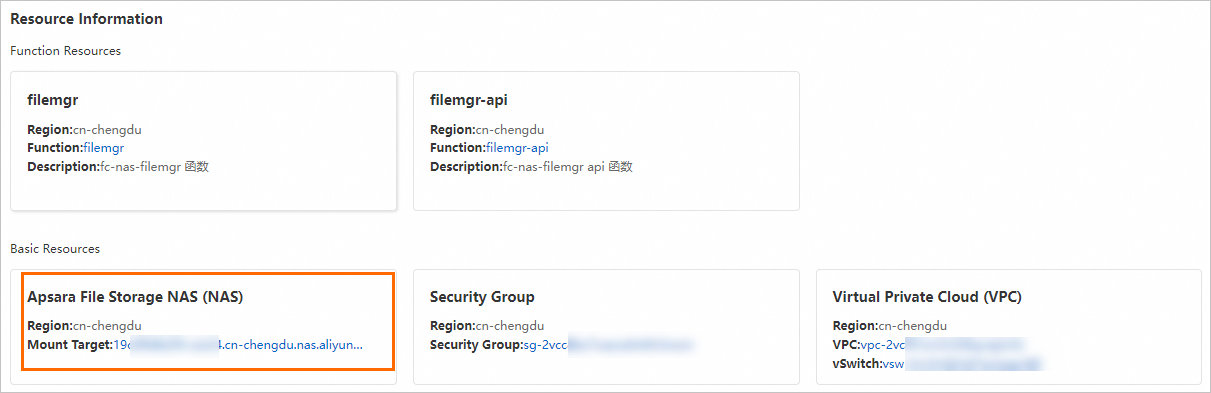
Wait a few minutes for the application to be deployed. On the Environment Details tab of the application, you can view the Region and Mount Target information for NAS in the Resource Information section.
Step 3: Manage the NAS file system
On the application details page, select the Environment Details tab.
Click the domain name to the right of Endpoint to open the web-based NAS Browser page and manage the NAS file system.
For example, you can create a
testfolder in the root directory and upload thetest01.txtfile to the root directory.ImportantThe NAS browser does not support uploading empty files.
Create a folder
On the File Management page, click Create Folder. In the Create Folder dialog box, enter
/testand click Create.Upload a file
On the File Management page, click Upload. In the Upload File dialog box, select the Multipart Upload tab. Drag the
test01.txtfile into the dialog box to upload it. The following figure shows a successful upload. Then, click Cancel.ImportantDo not refresh the page during the upload. This can cause the upload to fail.
After the upload is complete, you can also click the
 icon to the left of the root directory at the top of the page to refresh and view the file.
If you no longer need to use the fc-nas-filemgr application to manage NAS files, you can delete the application and the resources it created. Deleting the application does not affect the data stored in NAS.
Click Applications. On the application details page, click Delete in the upper-right corner. Select the resources to delete and follow the on-screen instructions.

References
You can also use Serverless Devs to deploy your applications and manage your projects. For example, you can view logs, view metrics, and perform debugging in multiple modes. For more information, see Common Serverless Devs commands.
For more information about how to configure the NAS storage mount feature for a function, see Configure a NAS file system.
If you want to delete a configured NAS file system, see Release a file system instance.