An event function can respond to various events from cloud services, such as a file upload to Object Storage Service (OSS) or an alert triggered by a monitoring service. When you use an event function, you only need to write your processing logic. You do not need to manage event integration or the underlying compute resources. Function Compute runs an instance only when needed, scales automatically, and destroys the instance after the event is processed. You are charged only for the resources that you use.
Use case
Imagine you need to store files in OSS. To speed up uploads, you compress the files into ZIP format first. However, you want to use the files directly, not the ZIP archives. This requires an automated process to decompress the files and save them back to OSS.
A traditional approach requires you to build and integrate multiple programs to monitor and handle file changes in OSS. You also need to deploy and maintain these programs. By using an event function, you can focus solely on the file processing logic. Each time a file is uploaded to OSS, an event is generated. If the event meets your specified conditions, it automatically triggers the function to run your handler. After the task is complete, Function Compute automatically releases the compute resources to save costs.
Since you may not have an OSS bucket, this tutorial uses a hands-on example to guide you through implementing an event function.
You will create a simulated OSS file upload event. This event invokes an event function to process the file and prints information, such as the file name and bucket name, in the console.
In this tutorial, you will learn how to:
Use the console to create an event function, write a handler, and test the function end-to-end.
Understand key concepts such as the Function Compute runtime and built-in runtime.
Understand the handler parameters
eventandcontext.
Prerequisites
Procedure
Step 1: Select the function type
Log on to the Function Compute console. In the left-side navigation pane, choose . In the top navigation bar, select the region where you want to create the function, click Create Function, and then select and create an Event Function as prompted.
Step 2: Select a runtime
Python
For Runtime, select Built-in Runtimes > Python > Python 3.10.
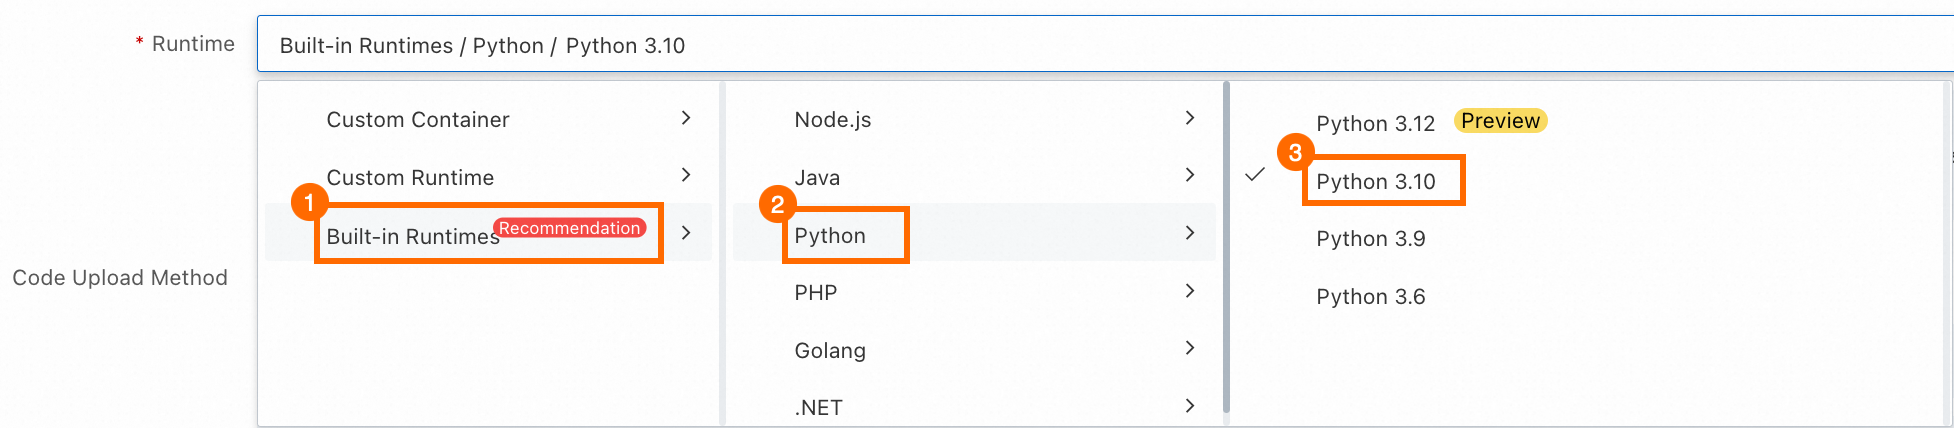
We recommend that you use a built-in runtime for event functions. This is because built-in runtimes include the dependencies required to respond to events from other cloud services (for example, the Python oss2 module). For more information, see Environment overview. If you use a custom runtime or a Custom Container runtime, you must install the dependencies yourself. For a detailed comparison of runtimes, see Select a runtime.Node.js
For Runtime, select Built-in Runtimes > Node.js > Node.js 20.
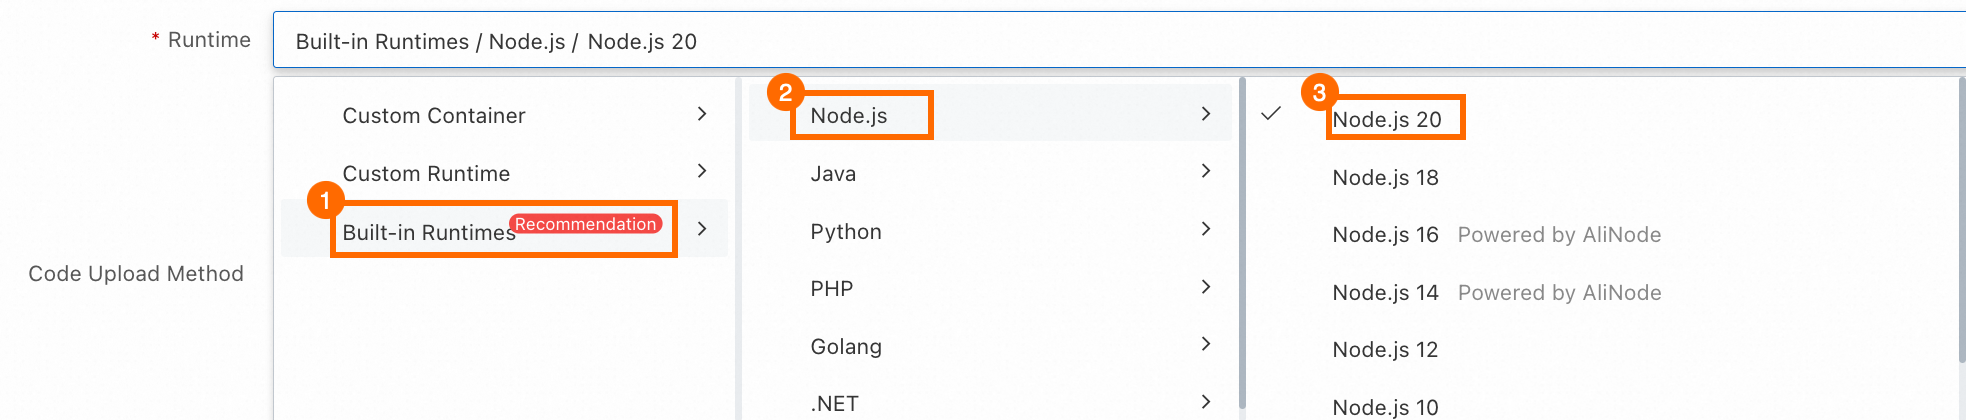
We recommend that you use a built-in runtime for event functions. This is because built-in runtimes include the dependencies required to respond to events from other cloud services (for example, the Node.js ali-oss module). For more information, see Environment overview. If you use a custom runtime or a Custom Container runtime, you must install the dependencies yourself. For a detailed comparison of runtimes, see Select a runtime.Step 3: Create the function
Select the Hello, world! sample to create the function. Keep the default values for Advanced Settings, click Create.
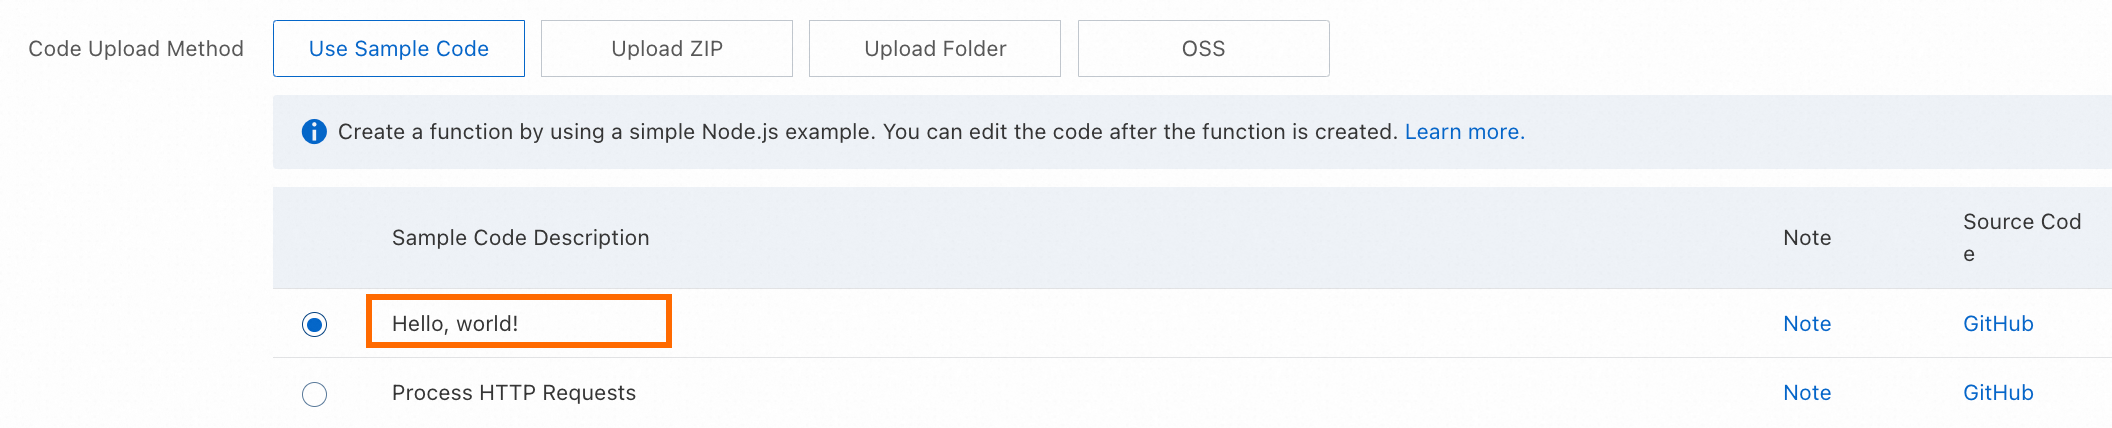
After the function is created, you can view the generated sample code in the WebIDE on the Code tab. The following figure shows the sample code for Python.
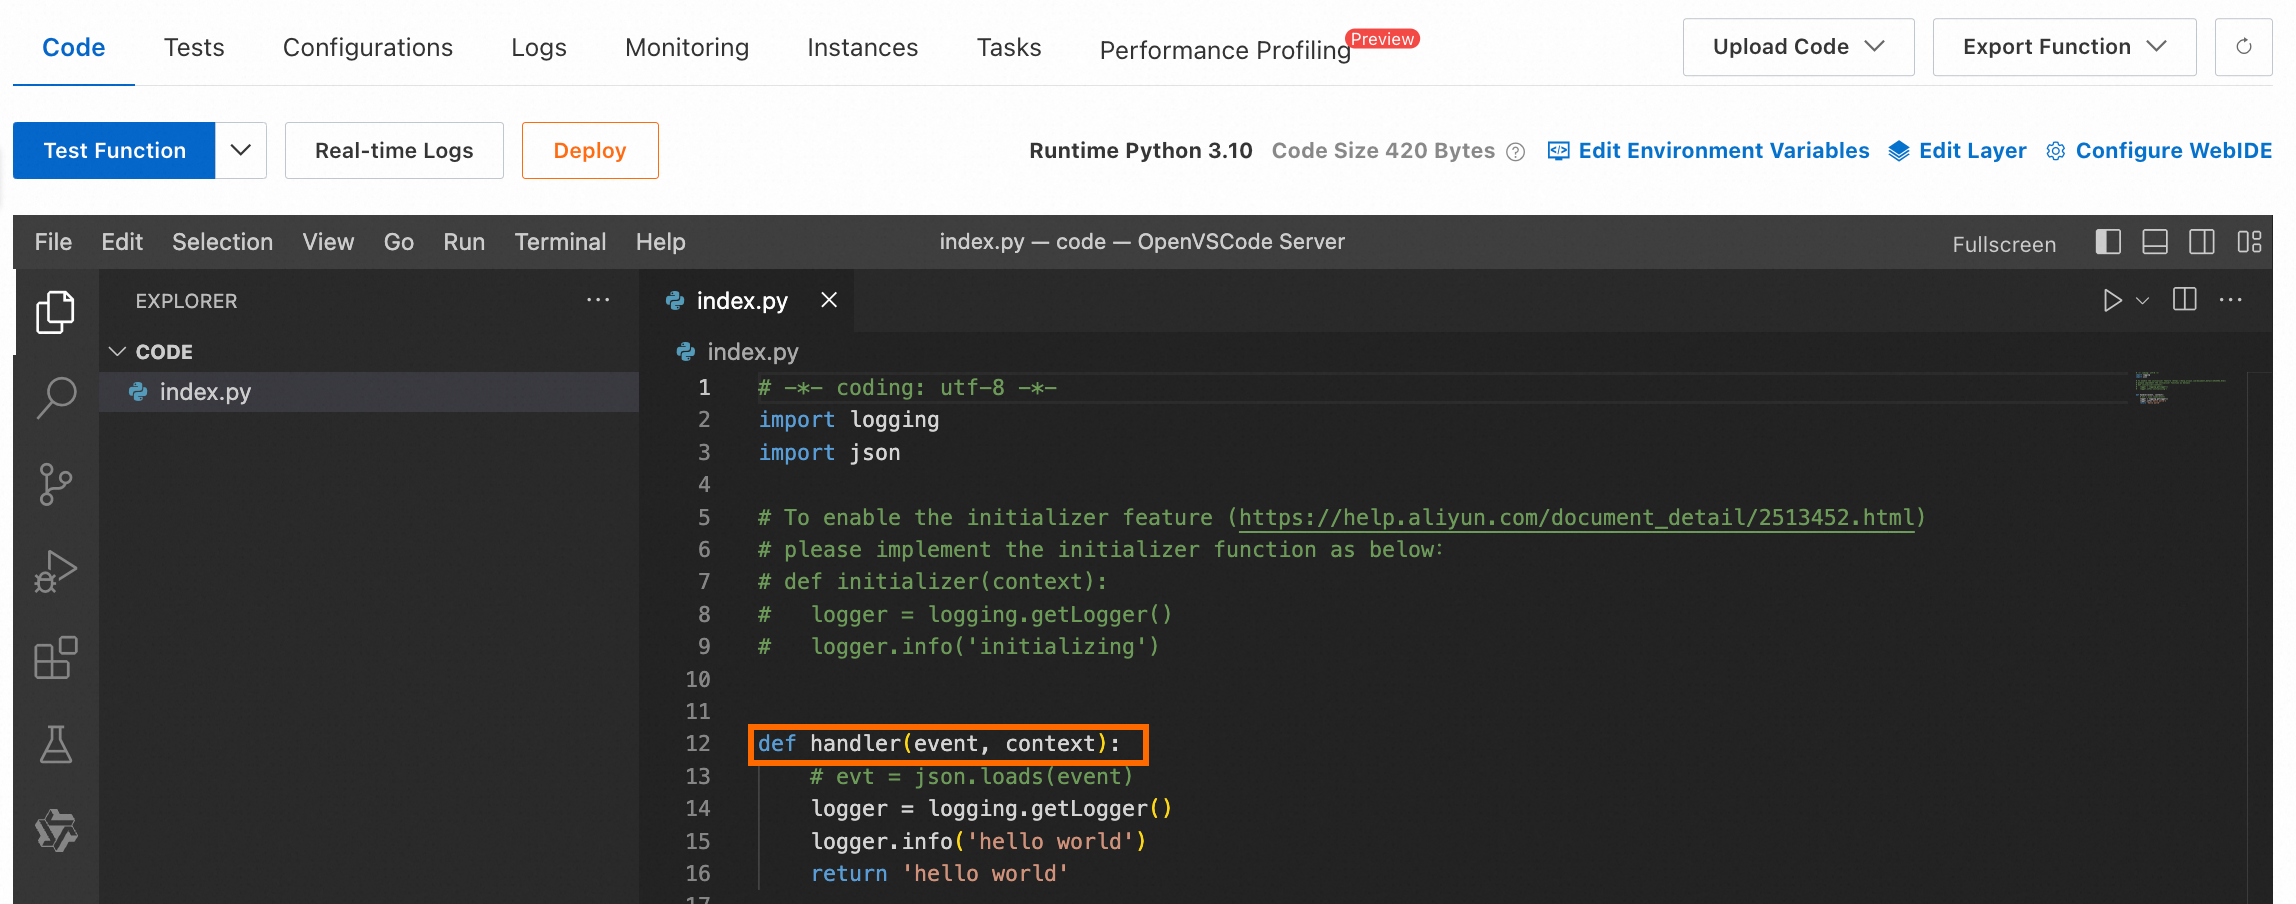
The Hello, world! sample code automatically generates a function template with an entry point. You can build your business code based on this template in the subsequent steps.
Step 4: Modify and deploy the sample code
Compiled languages such as Java do not support the WebIDE; they require local compilation and code package upload.
Python
In the WebIDE of the console, open index.py, replace the existing code with the following code, and then click Deploy.
# -*- coding: utf-8 -*-
import logging
import json
# import oss2  # Uncomment this line if you need to create an OSS client.
logger = logging.getLogger()


def handler(event, context):  # The handler is the entry point for code execution.
    logger.info("Parsing event information...")
    input_events = json.loads(event)
    if not input_events.get('events'):  # Check the format of the input event.
        raise Exception("Invalid event format: The events array does not exist or is empty.")
    event_obj = input_events['events'][0]
    bucket_name = event_obj['oss']['bucket']['name']  # Parse the OSS bucket name.
    object_name = event_obj['oss']['object']['key']  # Parse the file name.
    region = context.region  # Parse the function region.
    logger.info(f"OSS bucket name: {bucket_name}, File name: {object_name}, Region: {region}")
    # If you have an OSS bucket, you can uncomment the following line to create an OSS client instance.
    # bucket = get_bucket(region, bucket_name, context)
    bucket = None
    result = process_event(bucket, object_name)  # Call a helper function to execute the event processing logic.
    return result


def process_event(bucket, object_name):
    logger.info("Starting event processing...")
    # You can write your event processing logic here.
    # zip_file = download_file(bucket, object_name)
    # result = extract_and_upload(bucket, zip_file)
    logger.info("Event processing completed.")
    result = 0
    return result  # A return value of 0 indicates that the event is successfully processed.


# def get_bucket(region, bucket_name, context):
#     # Create an OSS bucket client instance here. The required identity authentication information can be obtained from the context.
#     creds = context.credentials  # Obtain the temporary key.
#     auth = oss2.StsAuth(
#         creds.access_key_id,
#         creds.access_key_secret,
#         creds.security_token)
#     endpoint = f'oss-{region}-internal.aliyuncs.com'
#     bucket = oss2.Bucket(auth, endpoint, bucket_name)
#     return bucket


# def download_file(bucket, object_name):
#     # This is the sample code for downloading a file from OSS.
#     try:
#         file_obj = bucket.get_object(object_name)
#         return file_obj
#     except oss2.exceptions.OssError as e:
#         logger.error(f"Failed to download the file: {e}")


# def extract_and_upload(bucket, file_obj):
#     # You can define the logic for decompressing and uploading files to OSS here.
#     return 0;
Code details
def handler(event, context):handler: This Python function is the handler. Your code can include multiple Python functions, but the handler is always the entry point. Keep the handler name unchanged so Function Compute can find it correctly. For more information, see What is a handler?.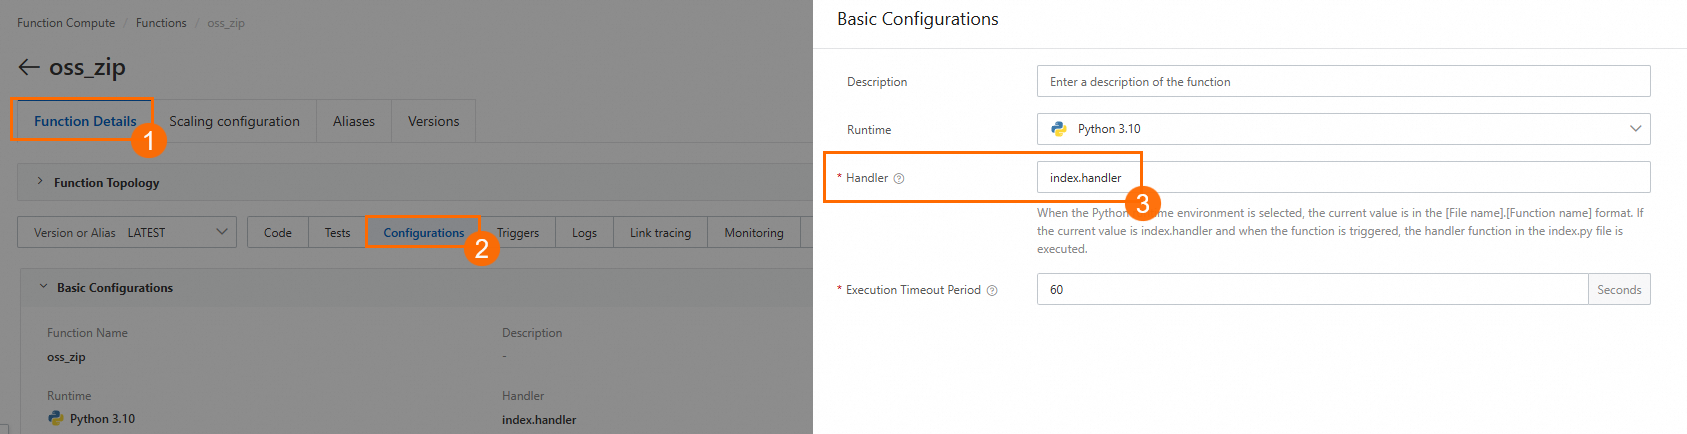
event: When an event triggers the function, information about the event, such as the bucket name and filename for an OSS file upload event, is passed in through theeventparameter. This parameter is a JSON object. For more information about the content of theeventparameter for different trigger types, see Trigger event format.context: Thecontextobject is passed to your function through thecontextparameter. It contains information about the invocation, function configuration, and authentication. The authentication information is derived from the permissions of the role configured for the function. After you configure a role, Function Compute (FC) obtains a temporary key (STS token) by calling the AssumeRole operation and passes the key to your function in thecredentialsfield of thecontextobject. For more information, see Grant Function Compute permissions to access other cloud services by using a function role. To learn about the information that the context object contains, see Context.
logger.info(): You can use the standard logging features of a programming language to output logs. For example, in Python, you can use methods such as theloggingmodule to write information to logs. This example uses a statement to print the Bucket name, file name, and Region name. After the function is called, you can view the log output in the console. For more information, see Logs.
Node.js
In the WebIDE of the console, open index.mjs, replace the existing code with the following code, and then click Deploy.
'use strict';
// import OSSClient from 'ali-oss'; // Uncomment this line if you need to create an OSS client.

export const handler = async (event, context) => { // The handler is the entry point for code execution.
  console.log("Parsing event information...");
  const inputEvents = JSON.parse(event);
  if (!Array.isArray(inputEvents.events) || inputEvents.events.length === 0) { // Check the format of the input event.
    throw new Error("Invalid event format: The events array does not exist or is empty.");
  }
  const eventObj = inputEvents.events[0];
  const bucketName = eventObj.oss.bucket.name; // Parse the OSS bucket name.
  const objectName = eventObj.oss.object.key; // Parse the file name.
  const region = context.region;  // Parse the function region.
  console.log(`OSS bucket name: ${bucketName}, File name: ${objectName}, Region: ${region}`);
  // If you have an OSS bucket, you can uncomment the following line to create an OSS client instance.
  // const bucket = getBucket(region, context)
  const bucket = null;
  const result = processEvent(bucket, objectName); // Call a helper function to execute the event processing logic.
  return result;
};


async function processEvent (bucket, objectName) {
  console.log("Starting event processing...");
  // You can write your event processing logic here.
  // const zipFile = downloadFile(bucket, objectName);
  // const result = extractAndUpload(bucket, zipFile);
  console.log("Event processing completed.");
  const result = 0;
  return result;
}


// function getBucket (region, context) {
//   // Create an OSS bucket client instance here. The required identity authentication information can be obtained from the context.
//   const bucket = new OSSClient({
//     region: region,
//     accessKeyId: context.credentials.accessKeyId,
//     accessKeySecret: context.credentials.accessKeySecret,
//     securityToken: context.credentials.securityToken
//   });
//   return bucket;
// }


// async function downloadFile (bucket, objectName) {
//   try {
//     // This is the sample code for downloading a file from OSS.
//     const result = await bucket.get(objectName, objectName);
//     console.log(result);
//     return result;
//   } catch (e) {
//     console.log(e);
//   }
// }

// async function extractAndUpload (bucket, zipFile) {
//     // You can define the logic for decompressing and uploading files to OSS here.
//     return 0;
// }
Code details
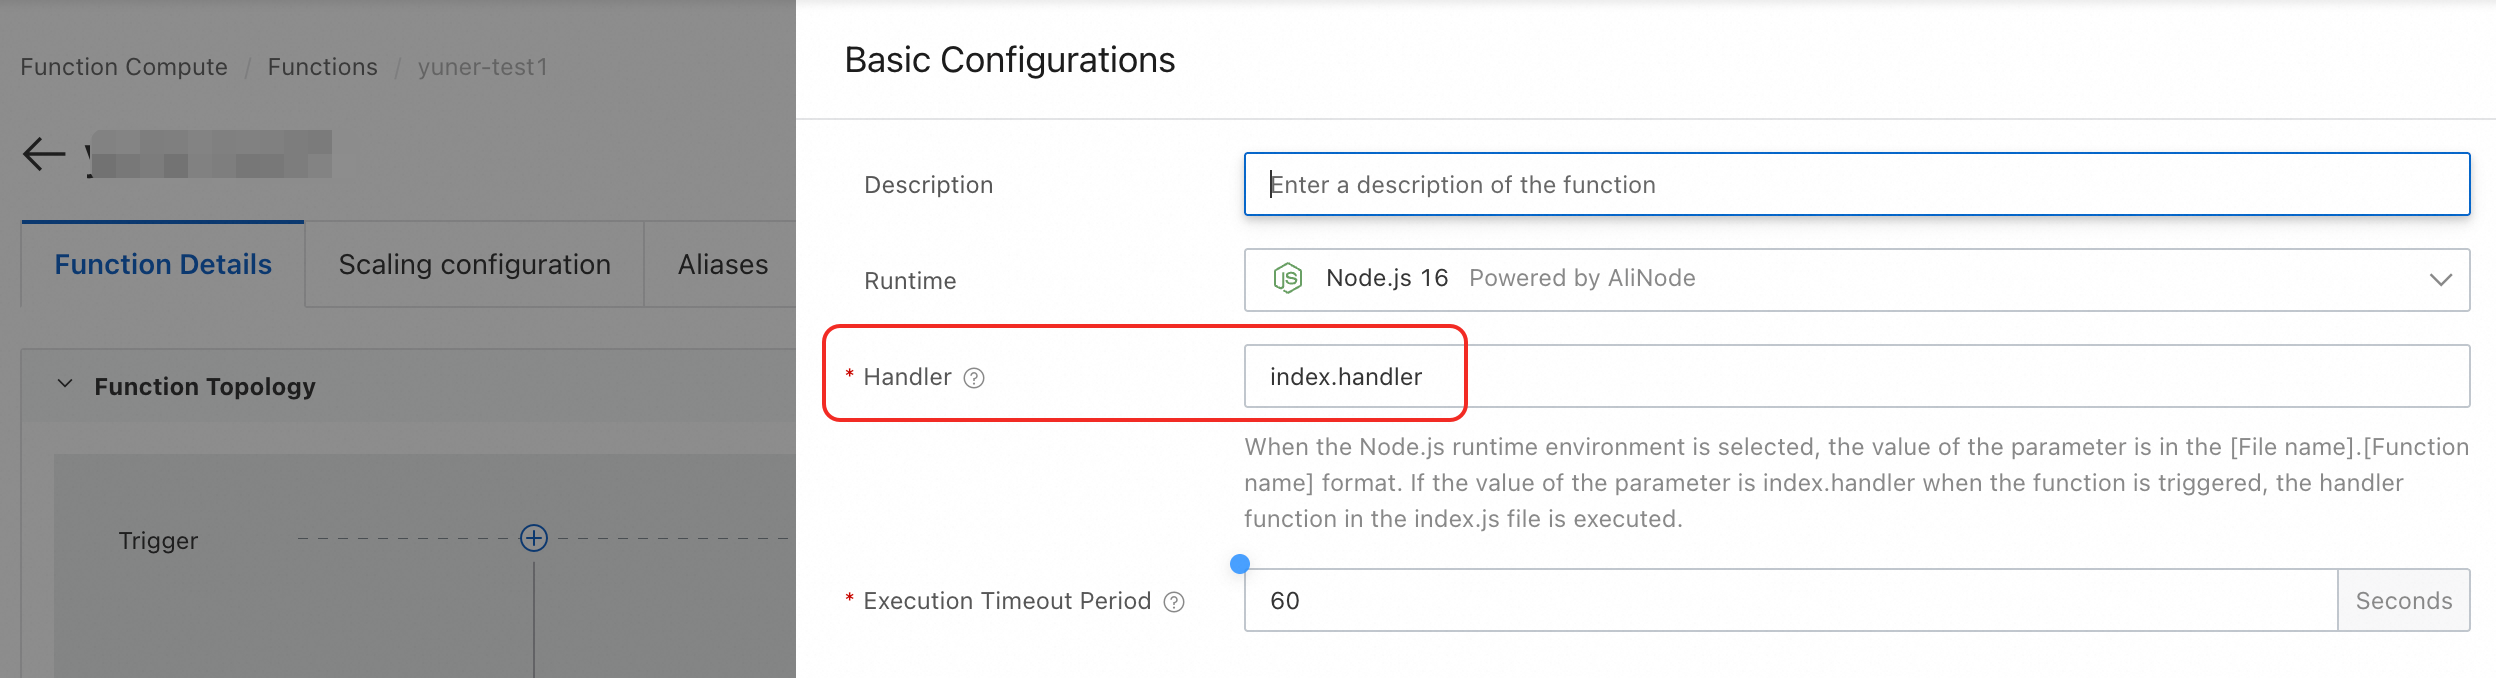
export const handler = async (event, context)handler: This Node.js function is the handler. Your code can include multiple Node.js functions, but the handler is always the entry point. Keep the handler name unchanged so Function Compute can find it correctly. For more information, see What is a handler?.
event: When an event triggers a function, theeventparameter passes information about the event, such as the bucket name and filename for an OSS file upload event. This parameter is a JSON object. To learn what information is included in theeventfor different types of events, see Trigger event format.context: The runtime context object of a function. It is passed to your function through thecontextparameter and contains information such as the invocation, function configuration, and identity authentication. The identity authentication information is derived from the permissions of the role that is configured for the function. After you configure a role for the function, FC obtains a temporary key (STS Token) by calling the AssumeRole operation. Then, FC passes the temporary key to your function through thecredentialsfield in thecontextobject. For more information, see Use a function role to grant Function Compute permissions to access other cloud services. To learn what information the context object contains, see Context.
console.log(): You can use the standard logging features of a programming language, such as theconsolemodule in Node.js, to print information to a log. The example in this topic uses a statement to print the bucket name, file name, and region name. After the function is invoked, you can view the log output in the console. For more information, see Logs.
Step 5: Test the function
To simulate an OSS file upload triggering a function, we will define a simulated event and use it to trigger the function.
In addition to using a simulated event, you can also use a real OSS event to trigger the function for testing. For more information, see Next steps.
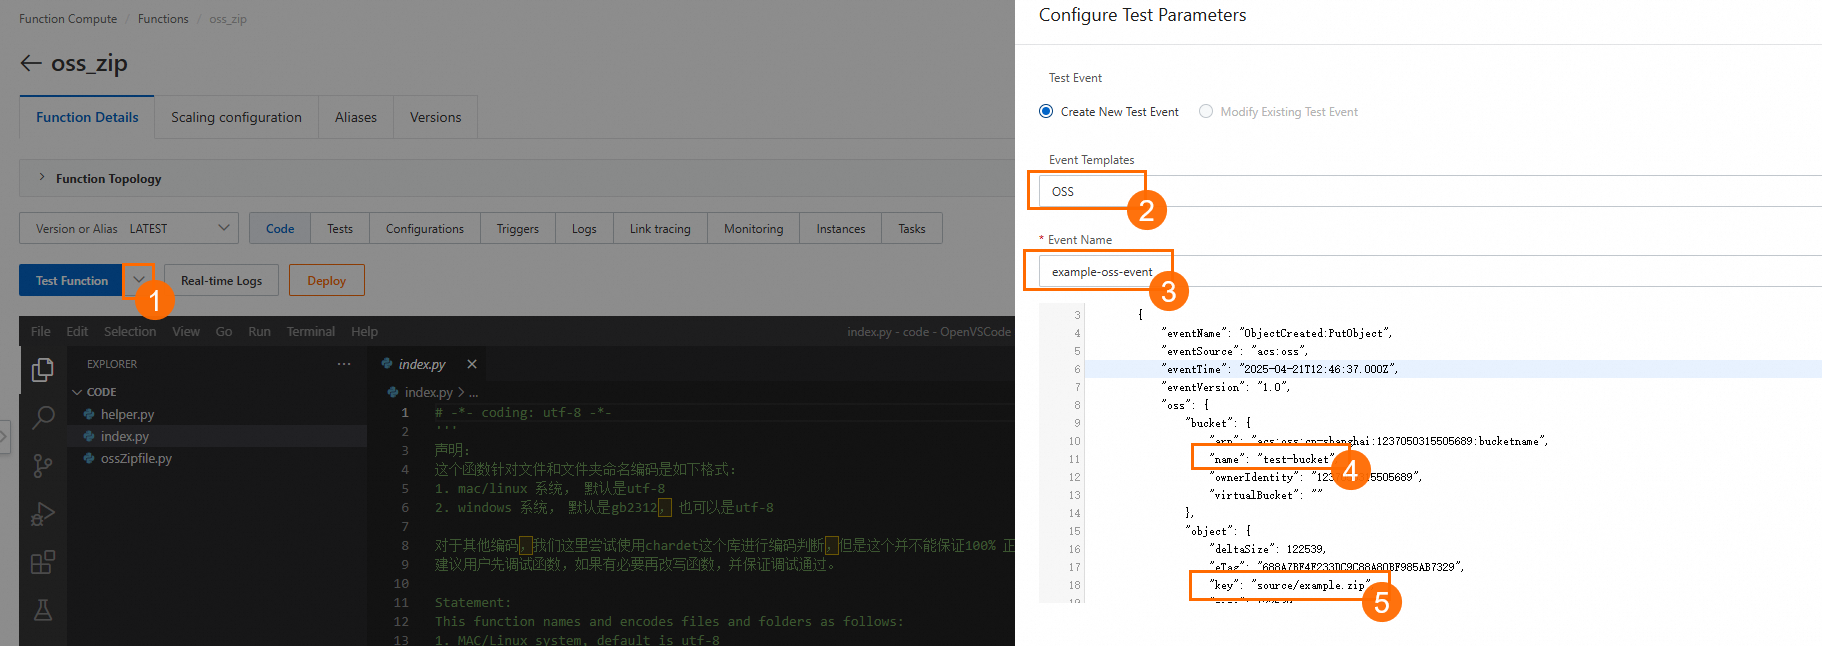
Create a simulated event: On the Function Details page, click the Code tab. Click the drop-down arrow to the right of Test Function and select Configure Test Parameters. In the Event Template list, select OSS. The console automatically generates a simulated event in the same format as a real OSS event.
You can customize the Event Name and the parameter values in the event object, such as the OSS bucket name and file name. When you finish, click OK.
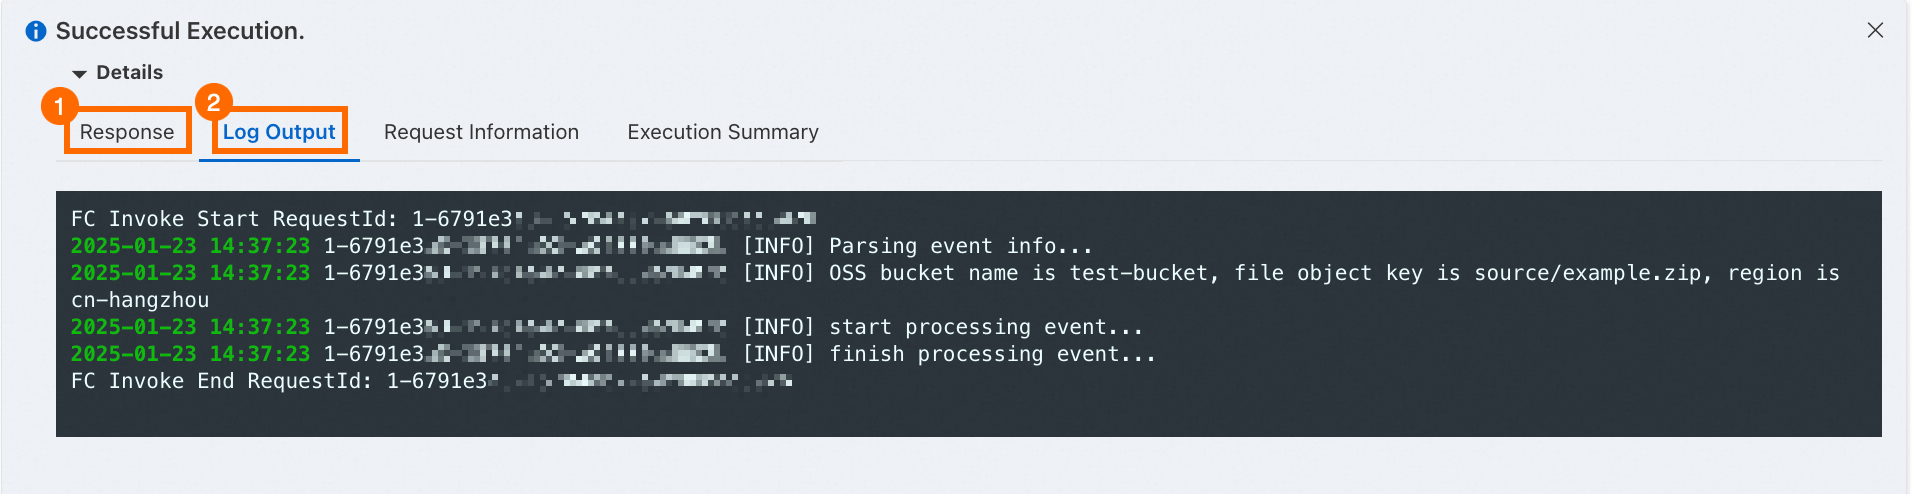
On the Code tab, click Test Function to trigger the function. After the execution is successful, view the Response. A return value of 0 indicates that the event was processed successfully. Click Log Output to view the logs generated during the function execution.
When you test a function, Function Compute passes the content of the mock event to the handler
handlerthrough theeventparameter and executes the code that you defined in the previous step to parse theeventparameter and process the file.
Step 6: (Optional) Clean up resources
Function Compute charges based on actual resource usage. Uninvoked functions do not incur charges. However, be aware of other cloud products or resources associated with the function, such as data stored in OSS and File Storage NAS (NAS).
To delete a function, log on to the Function Compute console, choose , and select a region. In the Actions column of the target function, click Delete. In the dialog box, confirm that the function has no associated resources, such as triggers, then confirm the deletion.
Next steps
You have now created an event function in the console, modified the handler, and tested the function with a mock event. You can refer to the following advanced operations based on your business needs:
Add a trigger:
Because you may not have an OSS bucket, this example uses a simulated OSS upload event for testing. For real workloads, add an OSS trigger to the function. For more information, see Configure a native OSS trigger.
In addition to object storage, events from many Alibaba Cloud services (such as various message queues, Tablestore, and SLS) can also trigger Function Compute. For a list of supported triggers, see Trigger overview.
Add dependencies: Built-in runtimes include common dependencies for event processing, but they may not meet your needs in production. The simplest approach is to package your code and dependencies into a ZIP file (a code package) and deploy it to Function Compute. For more information, see Deploy a code package. To reduce the size of a code package and speed up the cold start of a function, use a layer to manage dependencies. For more information, see Create a custom layer.
Configure logging: To facilitate debugging, troubleshooting, or security auditing of functions, we recommend configuring logging for your functions. For more information, see Configure the logging feature.
References
In addition to using the console, you can also use the Serverless Devs command-line tool to perform the preceding operations. For more information, see Quick start.
For a complete hands-on tutorial for the scenario in this article, see Use Function Compute to automatically decompress ZIP files uploaded to OSS.
We recommend the following tutorials to learn more about event functions: