Deploy the GPT-Sovits speech generation model on Function Compute for AI voice cloning
GPT-Sovits is a popular text-to-speech Large Language Model (LLM). It can create a highly realistic voice clone from a small audio sample. You can deploy the GPT-Sovits model on Function Compute to quickly use the model without managing GPU servers or environments. This approach uses the pay-as-you-go and elastic scaling features of Function Compute, which lets you efficiently provide text-to-speech services to your users.
Solution overview

This solution's architecture includes the following infrastructure and Alibaba Cloud services:
Function Compute: Runs the application service for the GPT-Sovits model.
Apsara File Storage NAS: Stores the pre-trained GPT-Sovits model.
Virtual Private Cloud (VPC): Configures a VPC that allows Function Compute to access Apsara File Storage NAS.
Alibaba Cloud does not guarantee the legality, security, or accuracy of third-party models. Alibaba Cloud is not liable for any damage caused by them.
You must comply with the user agreements, usage specifications, and relevant laws and regulations of third-party models. You are solely responsible for the legality and compliance of your use of third-party models.
Deploy the GPT-Sovits model
Log on to the Function Compute 3.0 console. In the navigation pane on the left, click Applications.
ImportantIf Function Compute FC 3.0 is displayed in the upper-left corner of the console, you are in the 3.0 console. If you are logged on to the Function Compute 2.0 console, click Experience Function Compute 3.0 in the upper-right corner to switch.
On the Applications page, click Create Application and select Create Application From Template. In the template selection area, click the Artificial Intelligence tab. Find the Voice Cloning with GPT-SoVITS card, hover over it, and click Create Now.

On the Create Application page, configure the parameters and click Create Application.
Configuration Item
Description
Example Value
Role Name
The AliyunFCServerlessDevsRole is selected by default. If you are creating an application for the first time, follow the on-screen instructions. Click Go to Authorization to go to the quick authorization page to grant permissions and create the role.
AliyunFCServerlessDevsRole
In the Create Application Reminder dialog box, select the check boxes for the Function Compute (FC) and Apsara File Storage NAS billing items. Select I have read and agree to the terms above, and then click Agree and Deploy.
Wait for about one minute. When the deployment status changes to Deployment Successful, the application is deployed and an endpoint is generated. You can click the link next to the endpoint to start using the application.
ImportantKeep your domain name confidential to avoid possible abuse, which could lead to unexpected charges.
Note that the ***.devsapp.net domain name is provided by Serverless Devs for learning and testing purposes only. It cannot be used in production environments. Serverless Devs periodically sends URL test requests to the domain and revokes the domain one day after issuance. To ensure a better experience, we recommend that you promptly configure a custom domain name for your application. For more information about custom domain configuration, see Custom domain configuration.
Applications without a custom domain for more than one day will become inaccessible once the ***.devsapp.net domain is revoked. In such cases, you will need to redeploy your application to have Serverless Devs issue the domain again.
Quick start
After the deployment is complete, you can use the provided demo voice samples to synthesize and experience the voice cloning feature.
We have prepared some classic lines from childhood animations that you can use to synthesize voices.
Since you've asked so sincerely, we'll be merciful and tell you. To prevent the world from being destroyed, to protect world peace, to uphold love and true evil, we are the charming and fascinating villains, Musashi and Kojiro! We are Team Rocket, soaring through the galaxy. A white hole, a white tomorrow awaits us! — *Pokémon*
Becoming number one in the country has been my dream since I was a child. I won't give up. This little injury won't make me quit. — *Slam Dunk*
Shuk, Shuk, Shuk, Shuk, Shuk the pilot. Beta, Beta, Beta, Beta, Beta the tank driver. — *Shuk and Beta*
Synthesis procedure
Select a Default Voice Template, enter the Text to be generated, and click Synthesize Voice.
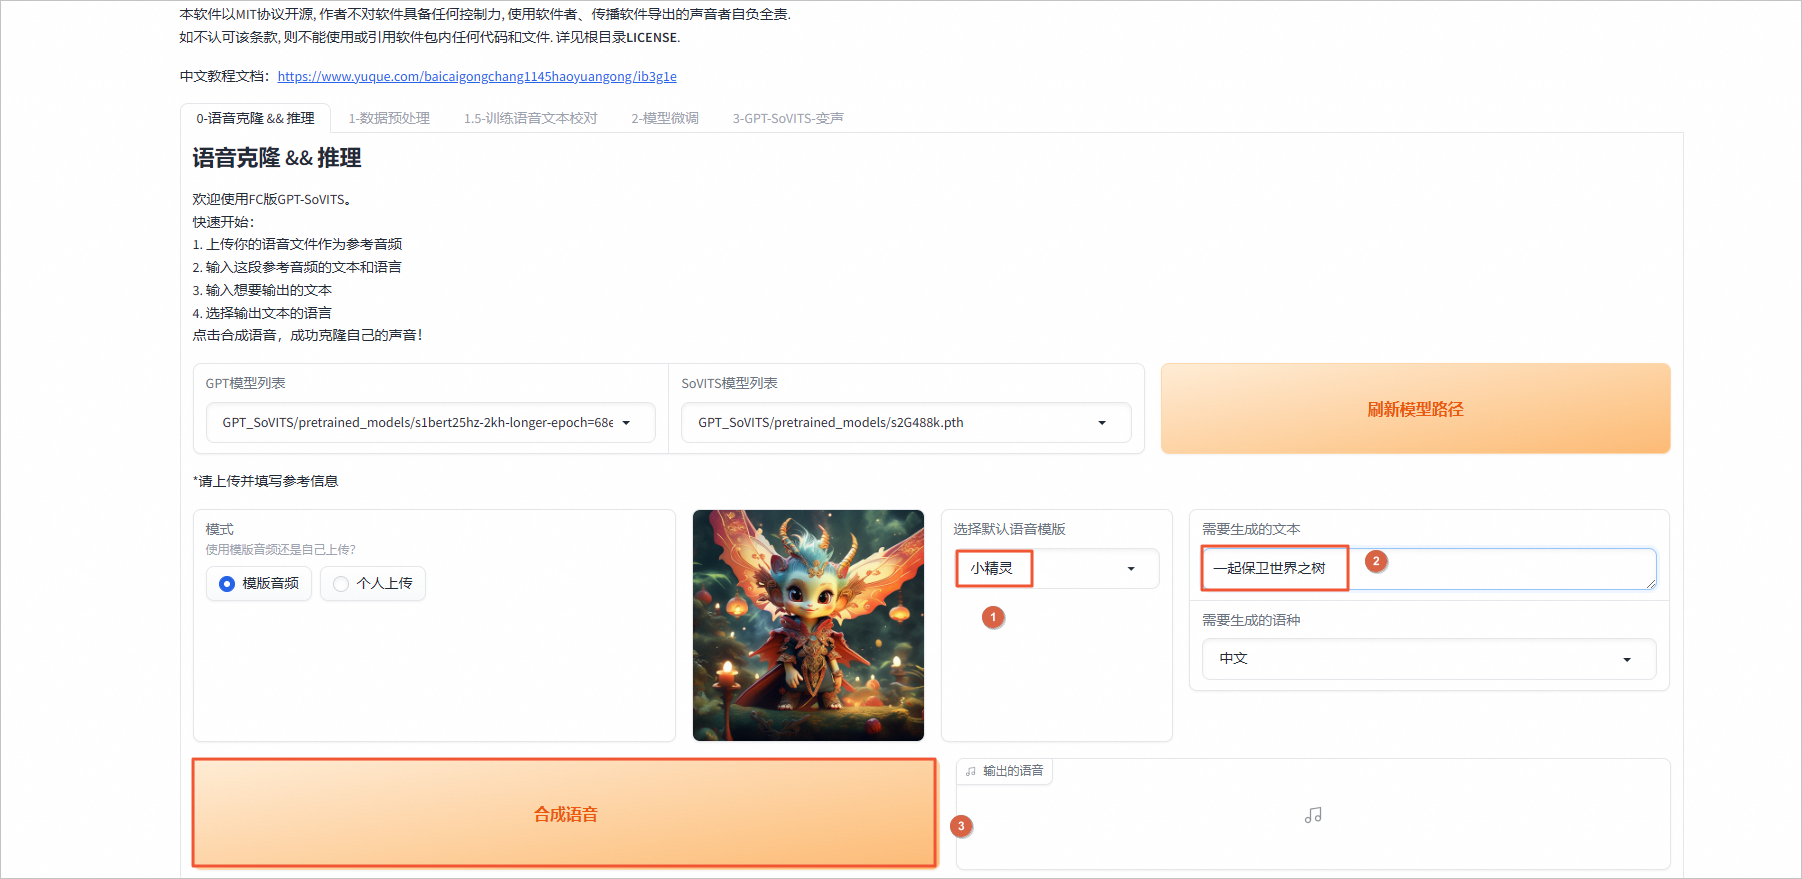
After the speech is synthesized, click the playback button.
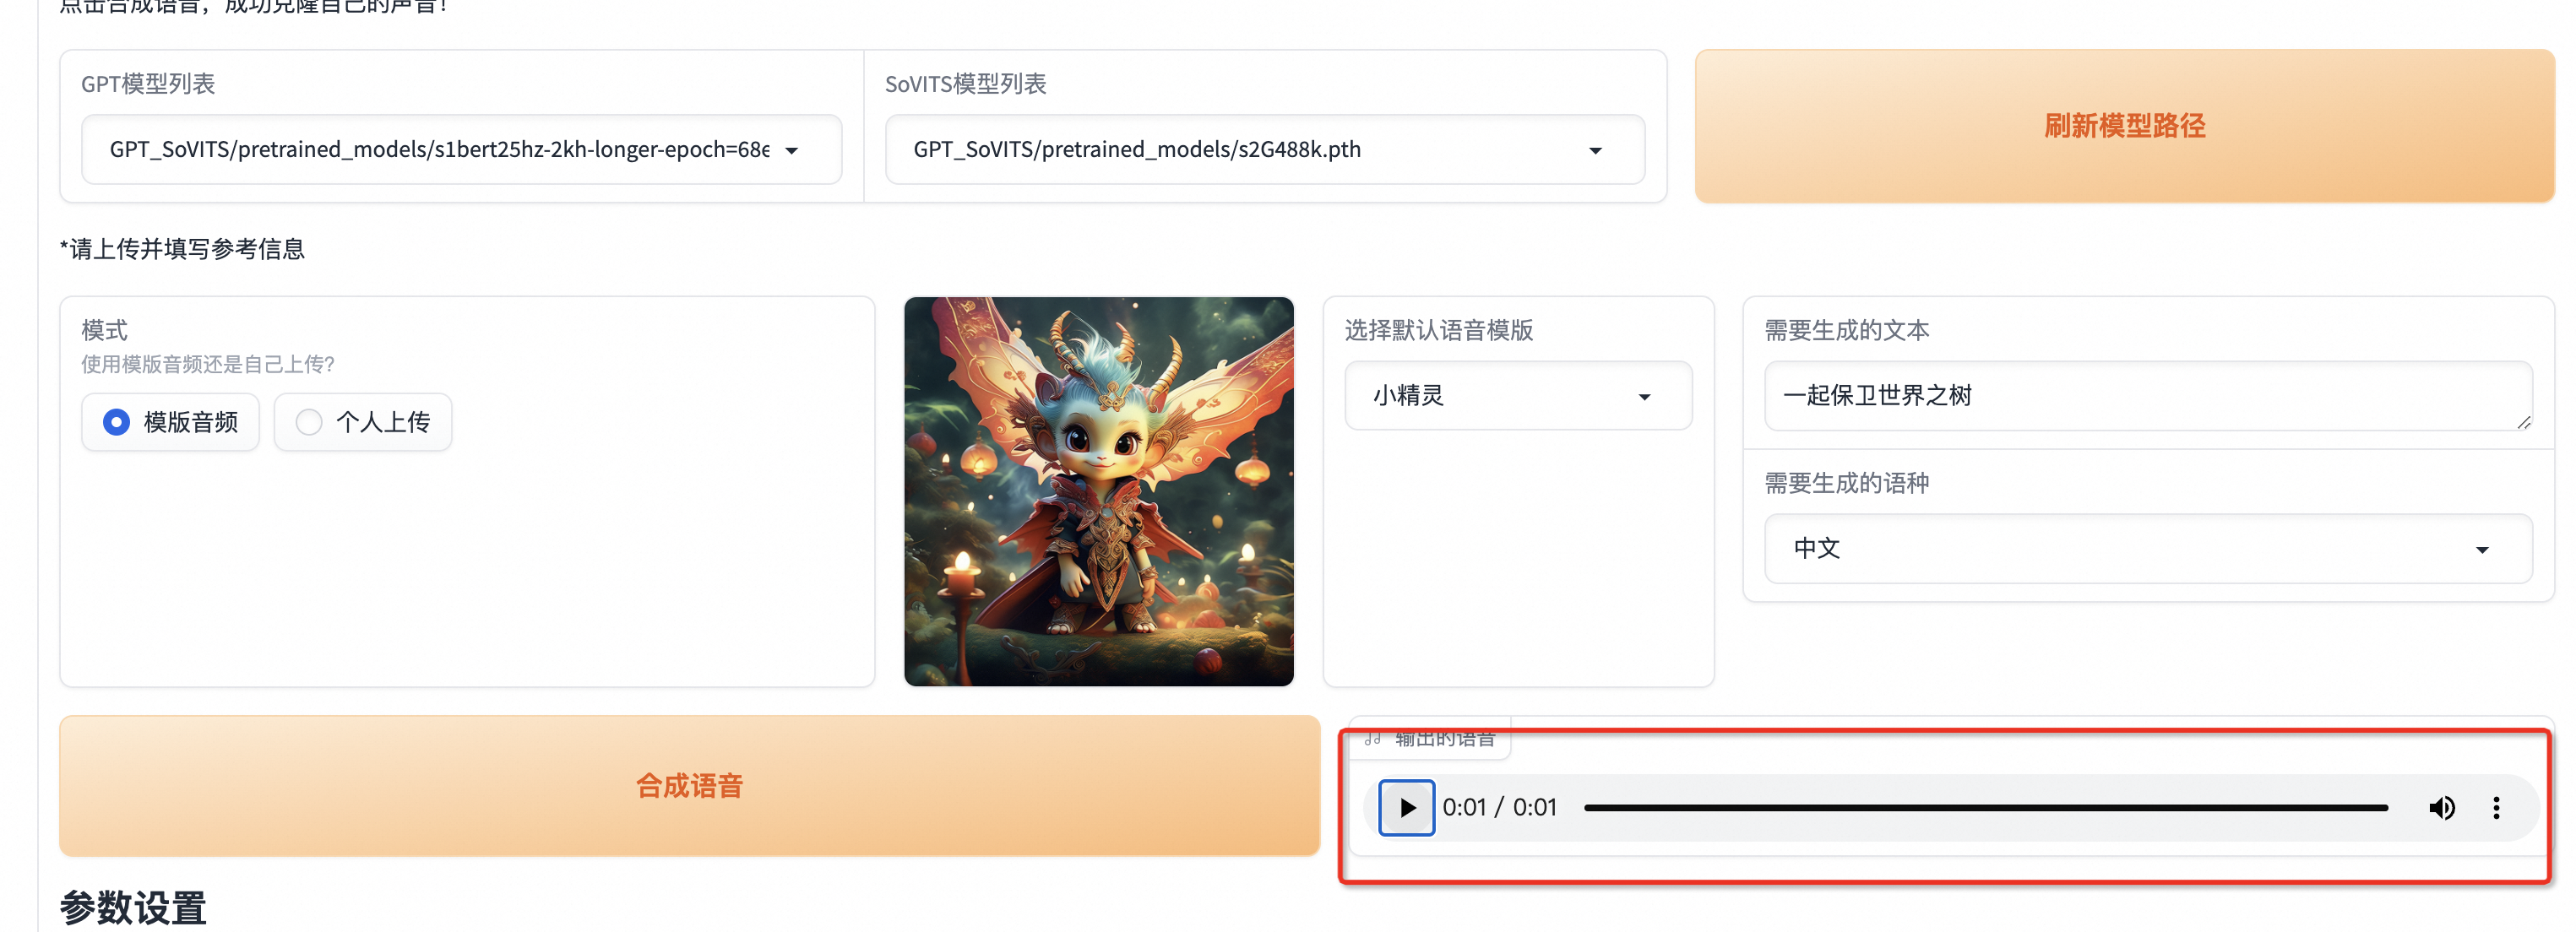
Use the API for speech synthesis
The GPT-Sovits API supports the /tts inference API operation, which can synthesize speech from text. For a list of supported API operations and more information, see the API definitions in the GPT-Sovits GitHub project.
This topic uses Postman to call the /tts operation as an example to demonstrate how to generate AI speech using the GPT-Sovits API.
Obtain the GPT-Sovits API address.
Log on to the Function Compute 3.0 console.
In the navigation pane on the left, click Applications.
On the Applications page, find the application you created in the "Deploy the GPT-Sovits model" step and click the application name.
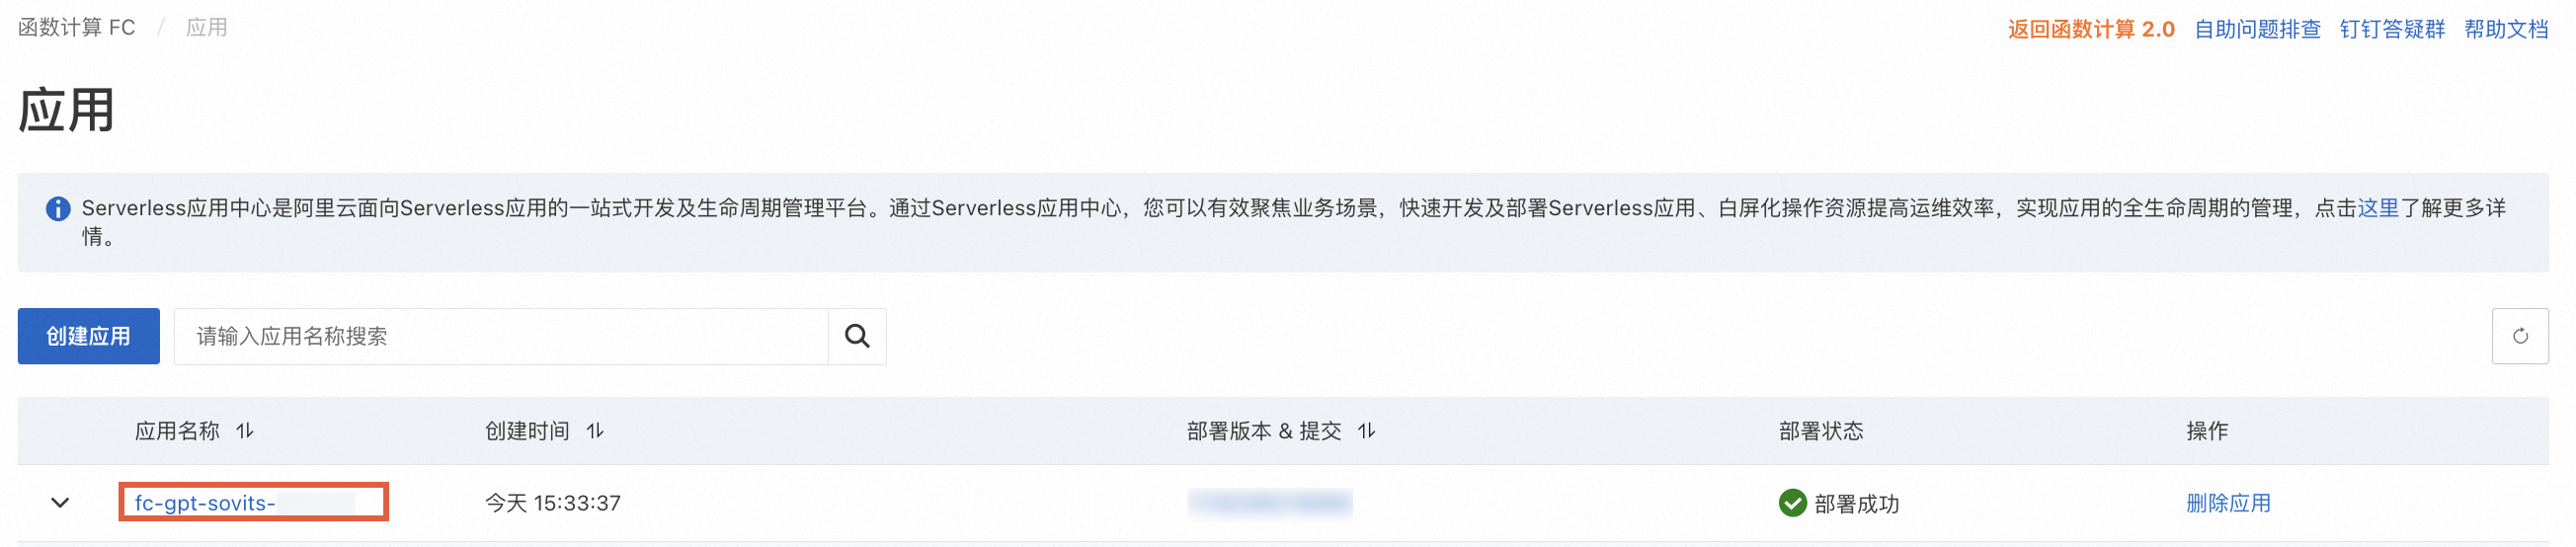
On the Application Details page, under Resource Information, find the function with the
__apisuffix and click the function name.
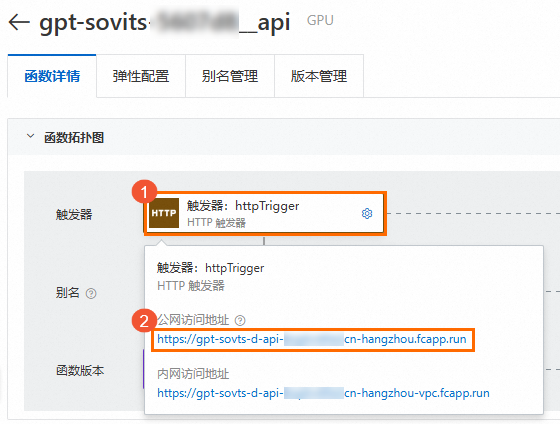
On the function details page, move your pointer over the Trigger card. The address to the right of Public Endpoint is the API domain name. Copy the API domain name to use when you call the API to synthesize speech.
Upload a reference audio file.
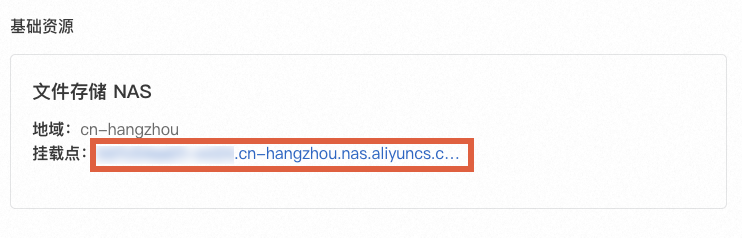
On the Application Details page, under Basic Resources, find Apsara File Storage NAS and click the link to the right of Mount Target.
The name at the top of the File System Details page is the NAS file system name. Click File System List to return to the previous page.
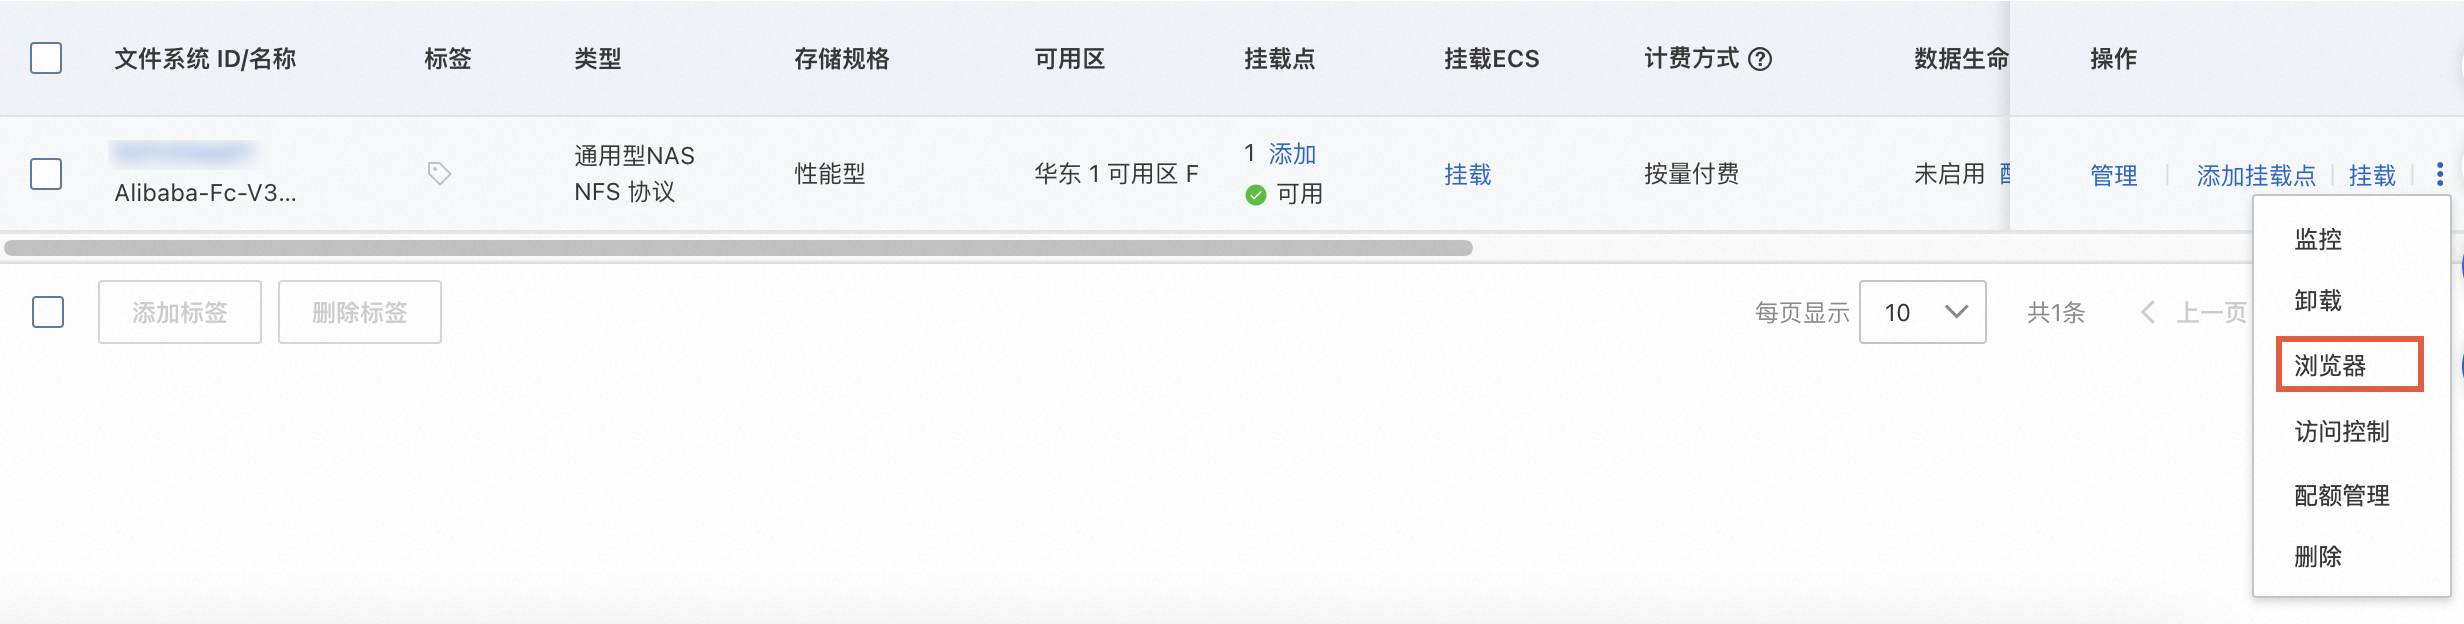
On the File System List page, find the corresponding NAS file system. In the menu on the right, click the Browser option to go to the NAS browser. If you have not created a NAS browser application, follow the prompts to deploy one. After the deployment is complete, you can start using the NAS browser.
In the browser, navigate to the path corresponding to your function application name:
/gpt-sovits-******__api. Click to upload your reference audio file. The reference audio must meet the following conditions:The audio is a WAV format file.
The audio duration is between 3 and 10 seconds.
Use Postman to call the speech synthesis API.
In the Postman interface, enter the domain name you copied in Step 1 and append the
/ttsoperation. Select the POST request method, fill in the request parameters, and then click Send. The following is an example of the body. Forref_audio_path, enter the path of the audio file you uploaded in Step 2. For more optional parameters, see the API definitions in the GPT-Sovits GitHub project.{ "text": "The late emperor was taken from us before he could finish his great task. Today, the realm is divided in three, and our own province of Yizhou is exhausted. This is truly a critical moment of life and death.", // Set the text content "text_lang": "zh", // Text language "ref_audio_path": "/mnt/gpt-sovits-******__api/<AUDIO_FILE_NAME>", // Path to the reference audio file "prompt_lang": "zh" // Language of the generated speech }After the speech is generated, the audio appears in the response. You can listen to or save the audio.




Voice training
You can fine-tune the GPT-Sovits LLM with source audio files to generate your desired voice. During the fine-tuning process, all intermediate files from the training steps are saved to the `output` folder in NAS. The training uses the default UVR5 and ASR models. To use other UVR5 and ASR models, you can download them as described in the official README and place them in the `tools/asr/models` and `tools/uvr5/uvr5_weights` directories in NAS, respectively.
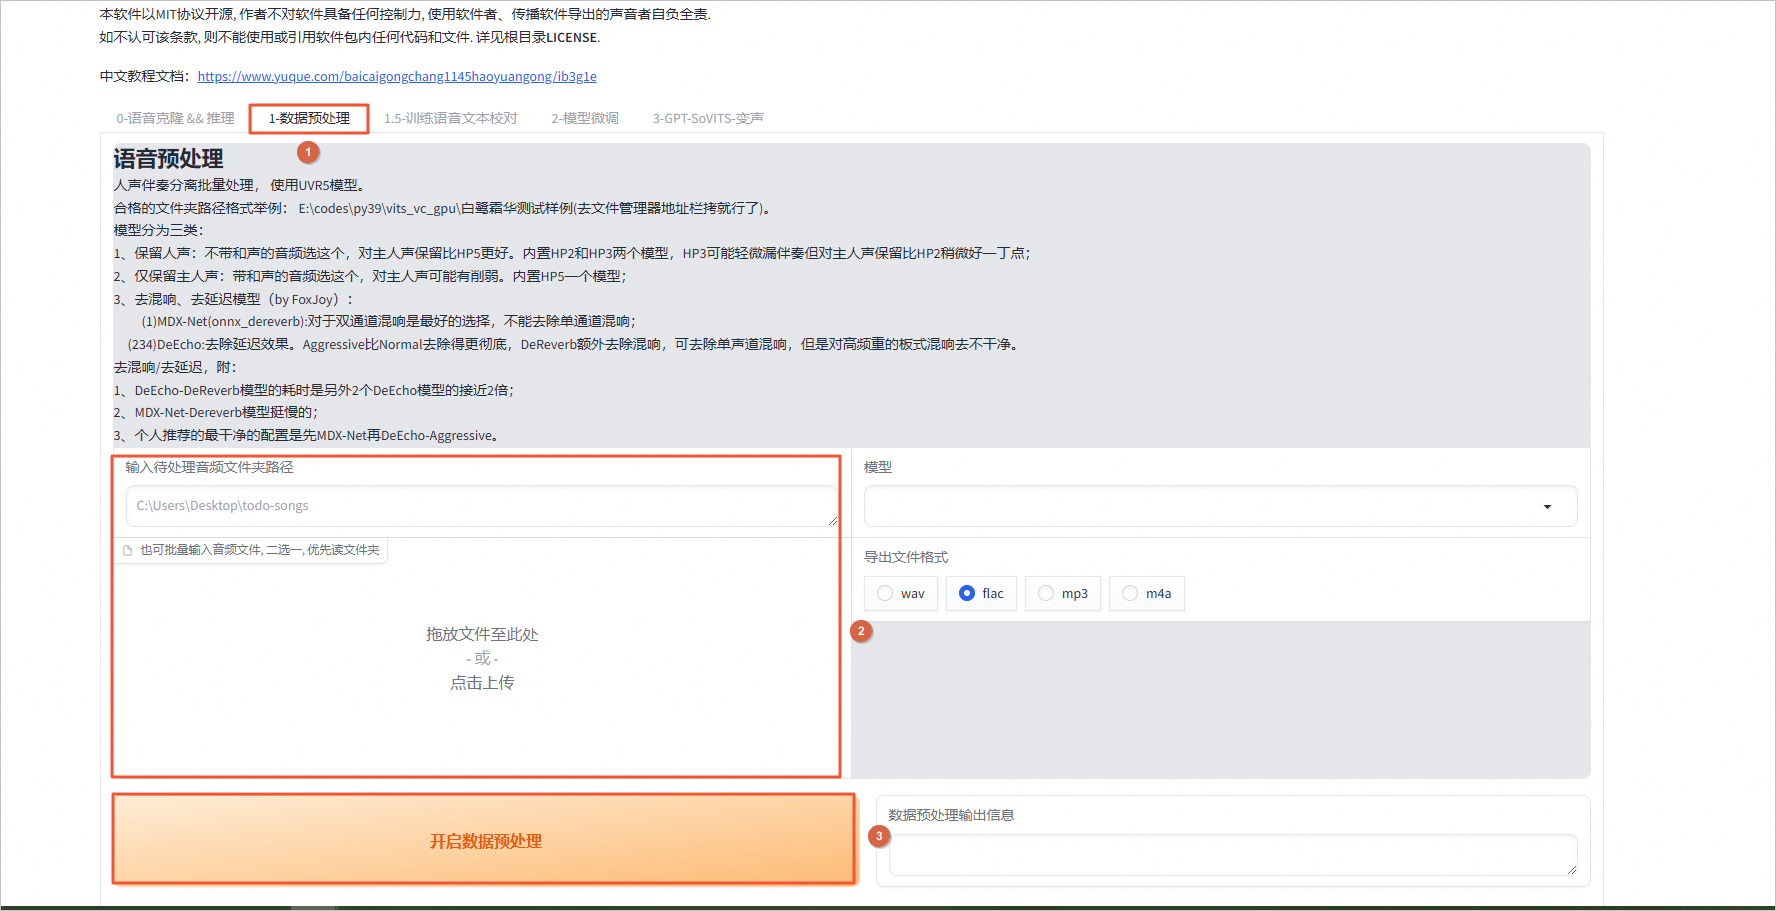
Pre-process the data. Prepare a long audio file of the original voice you want to clone. Click Data Pre-processing, select the audio file to upload, and click Start Data Pre-processing.
Proofread the text. Click Training Voice Text Proofreading to adjust the content of the original text.
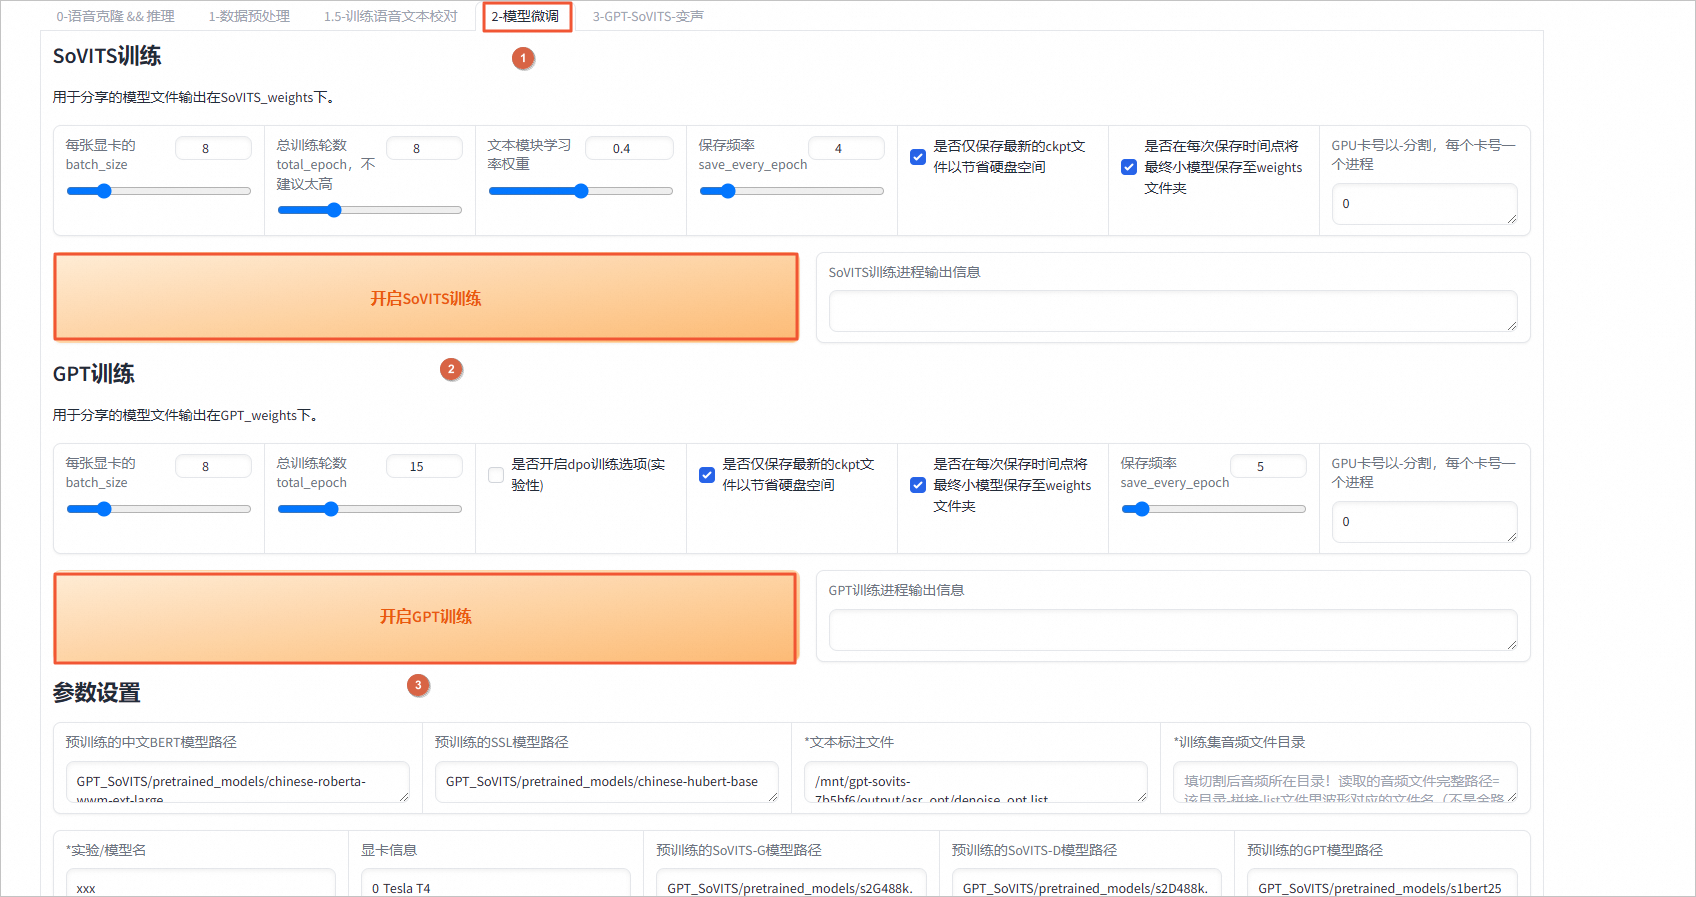
Start training. Click Model Fine-tuning to start SoVITS training and GPT training. The trained models are stored in the `GPT_weights` and `SoVITS_weights` folders in NAS.
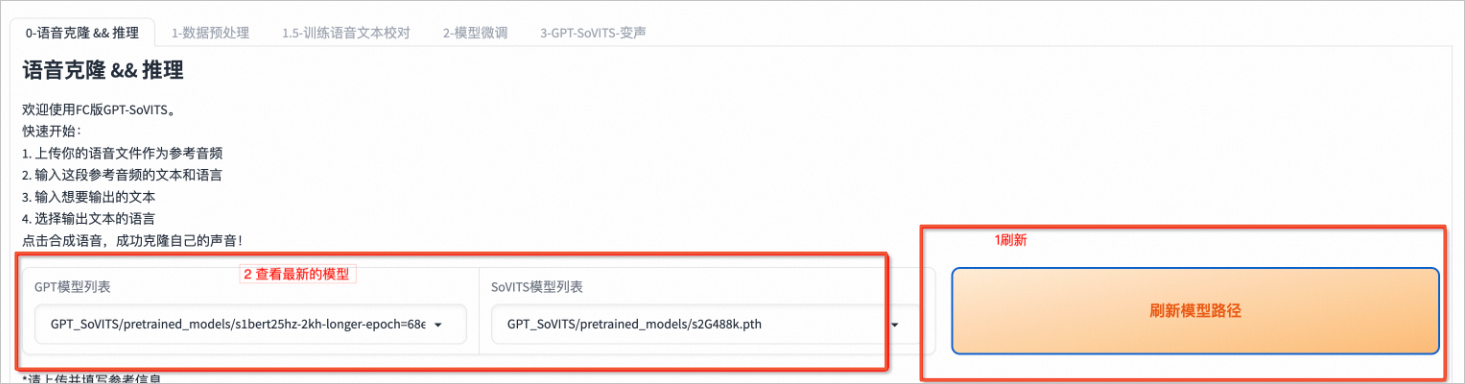
After training is complete, go to the Voice Cloning && Stream Ingest tab. Refresh and select your trained model, then try synthesizing speech.

Clean up resources
Your GPT-Sovits deployment uses Function Compute (FC) and Apsara File Storage NAS. If you no longer need to use GPT-Sovits, you can delete these resources to avoid additional charges. Function Compute is not billed if it is not invoked. However, Apsara File Storage NAS is billed as long as models are stored. Therefore, you must delete the related resources to stop billing. If you plan to use the application long-term, you can ignore this step but should monitor your account for charges.
Delete the FC resources used by GPT-Sovits.
Go to the Function Compute Applications page.
On the Applications page, find the application you deployed. In the Actions column, click Delete. Follow the on-screen instructions to delete the application.

Delete the NAS resources used by the model manager.
Log on to the Apsara File Storage NAS console. On the File System List page, switch to the China (Hangzhou) region. Find the target file system whose name starts with Alibab-Fc. In the Actions column, choose
>Delete.NoteThe Apsara File Storage NAS instance in this experiment is in the China (Hangzhou) region.
In the Delete File System panel, remove the mount target and effective policies, and then click Delete.
 >Delete.