This topic describes real-time inference use cases and shows how to build low-latency, cost-effective real-time inference services with gpu-accelerated instances in idle mode.
Use cases
Real-time inference workload characteristics
In real-time inference scenarios, workloads often exhibit one or more of the following characteristics.
Low latency
Each request requires fast processing, requiring a strict response time (RT). The 90th percentile long-tail latency is typically in the hundreds of milliseconds.
Core business link
Inference tasks are often part of the core business logic, requiring a high success rate and minimal retries. Examples include:
Splash screen ads and homepage product recommendations: Recommendations based on user behavior and preferences must be displayed in real time on the user's device.
Real-time media production: In scenarios like interactive co-streaming, live e-commerce, and ultra-low latency playback, audio and video streams must be transmitted end-to-end with minimal delay. This requires real-time performance for AI-powered video super-resolution and recognition.
Fluctuating traffic
Business traffic often shows clear tidal patterns that are closely tied to end-user activity, resulting in distinct peak and off-peak hours.
Resource utilization
GPU resources are typically planned for peak traffic, which leads to significant waste during off-peak hours. The average resource utilization is often below 30%.
Benefits for real-time inference
gpu-accelerated instances in idle mode
Function Compute provides gpu-accelerated instances in idle mode. You can configure these instances to eliminate cold starts and meet the low-latency demands of real-time inference. For more information, see Instance types and specifications. This feature offers the following benefits:
Quick instance wake-up: Function Compute automatically freezes gpu-accelerated instances based on your real-time workload. When a request arrives for a frozen instance, the platform automatically wakes it up. Note that this wake-up process introduces a brief latency, which varies by model size and workload.
Balanced service quality and cost: gpu-accelerated instances in idle mode are billed at different rates during idle and active periods. For more information, see How is the cost calculated for real-time inference in Function Compute?. Although the total cost is higher than that of on-demand instances, it costs over 50% less than maintaining a long-term, self-managed GPU cluster.
Optimized request scheduling for inference
Function Compute includes a built-in intelligent scheduling mechanism that provides load balancing across multiple gpu-accelerated instances within a function. By using the platform's scheduler, you can evenly distribute inference requests across backend gpu-accelerated instances to improve the overall utilization of your inference cluster.
GPU-accelerated instances in idle mode
After you deploy a GPU function, you can enable gpu-accelerated instances in idle mode to support your real-time inference applications. Based on your workload, Function Compute uses Horizontal Pod Autoscaling (HPA) to manage provisioned instances according to your configured auto scaling policy. Requests are prioritized to these provisioned instances, which eliminates cold starts and ensures low-latency responses.

Cost benefits of idle mode
gpu-accelerated instances in idle mode are billed based on two different unit prices: one for idle GPU usage and one for active GPU usage. Function Compute automatically tracks the instance state and calculates the charges accordingly.
As shown in the following figure, an instance goes through four time windows from T0 to T4 between its creation and destruction. The instance is active during T1 and T3, and is in idle mode during T0, T2, and T4. The total cost for this period is calculated as follows: (T0 + T2 + T4) × Unit price for idle GPU usage + (T1 + T3) × Unit price for active GPU usage. For more information about the unit price for idle GPU usage and the unit price for active GPU usage, see Billing overview.

How idle mode works
Function Compute uses advanced, self-developed technology to implement an instant freeze and fast restoration for gpu-accelerated instances. When a gpu-accelerated instance is not processing requests, Function Compute automatically places it in a frozen state and bills it at the idle unit price. This approach optimizes resource utilization and reduces costs. When a new compute request arrives, the platform quickly wakes up the instance to seamlessly execute the task and automatically bills it at the active unit price.

This process is completely transparent and does not affect the user experience. Function Compute ensures that the accuracy and reliability of the inference service are not compromised, even when an instance is frozen, providing a stable and cost-effective computing environment.

Idle mode wake-up latency
The wake-up time varies depending on the workload. The following table provides the typical wake-up times for different inference workloads.
Workload type | Wake-up time (s) |
OCR/NLP | 0.5 - 1 |
Stable Diffusion | 2 |
LLM | 3 |
Wake-up latency may vary depending on the model size. Actual times will vary.
Usage limits for idle mode
CUDA version
Use CUDA 12.2 or an earlier version.
Image permissions
Run the container image with default root user permissions.
Instance logon
You cannot log on to a gpu-accelerated instance that is in idle mode because the GPU may be frozen.
Graceful instance rotation
Function Compute performs graceful rotation of gpu-accelerated instances in idle mode based on system load. To ensure service quality, add a model warm-up or pre-inference lifecycle hook to your function. This allows new instances to serve inference requests immediately after they are launched. For more information, see Model warm-up.
Model warm-up/Pre-inference
For gpu-accelerated instances in idle mode, use the
initializelifecycle hook in your code for model warm-up or pre-inference to ensure the initial wake-up latency meets your expectations. For more information, see Model warm-up.Provisioned configuration
When you toggle the idle mode switch, the existing provisioned gpu-accelerated instances for the function are gracefully scaled down. The number of provisioned instances temporarily drops to zero until new provisioned instances are created.
Disable the built-in metrics server of the inference framework
To improve the compatibility and performance of GPUs in idle mode, disable the built-in metrics server of your inference framework, such as NVIDIA Triton Inference Server or TorchServe.
Idle mode specifications
gpu-accelerated instances in idle mode currently require a full GPU. For more information about gpu-accelerated instance specifications, see Instance specifications.
Optimized request scheduling for inference
How it works
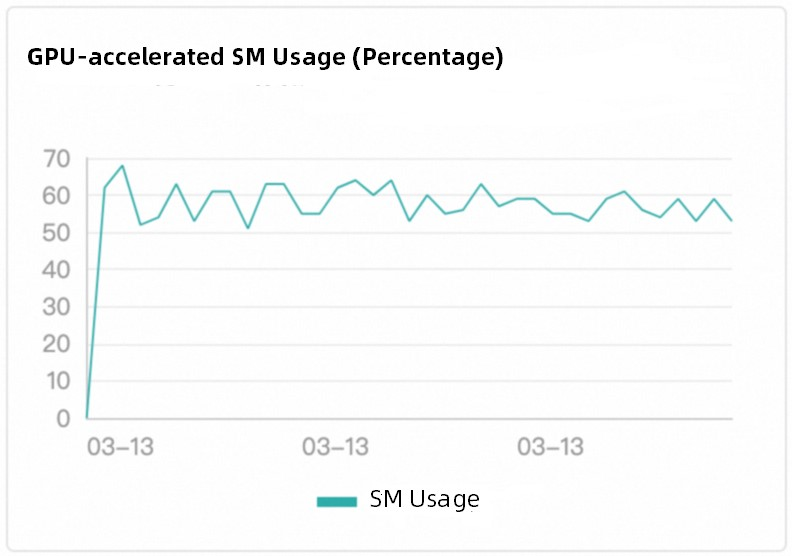
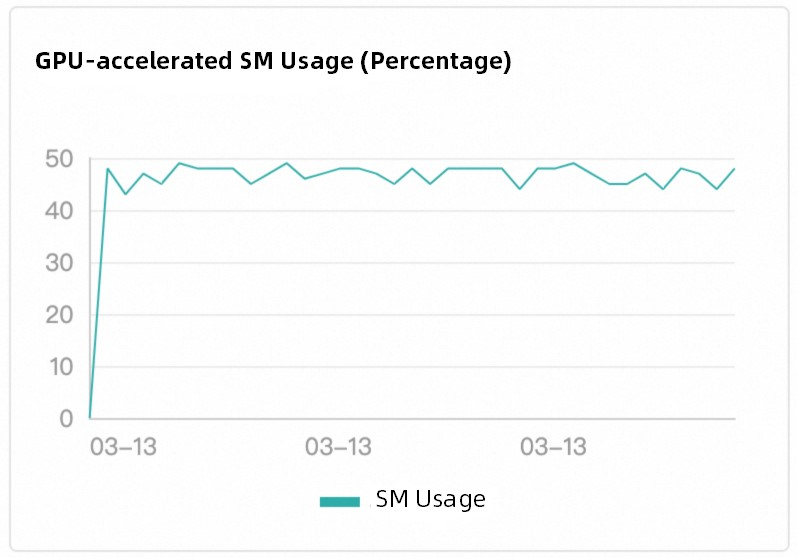
Function Compute uses an intelligent, load-aware scheduling strategy which is significantly more effective than traditional round-robin scheduling. The platform monitors the task execution status of gpu-accelerated instances in real time and immediately assigns new requests to an instance as soon as it becomes idle. This ensures efficient use of GPU resources, prevents idle cycles, and avoids hot spots. It also guarantees that load balancing across gpu-accelerated instances is consistent with GPU compute utilization. The following figure uses the T4 card type as an example.
 |  |
Scheduling results
Function Compute's built-in scheduling logic automatically balances the load across multiple gpu-accelerated instances, so you do not need to manage the logic yourself.
Instance 1 | Instance 2 | Instance 3 |
|
|
|

Container support
For GPU use cases, Function Compute currently supports only deployment with a Custom Container runtime. For more information about Custom Container, see Introduction to custom images.
Custom Container functions require a web server to be included in the image to handle different code paths and to be triggered by events or HTTP requests. This is suitable for multi-path request execution scenarios such as AI training and inference.
Deployment methods
You can deploy your models in Function Compute by using one of the following methods:
Use the Function Compute console. For more information, see Create a function in the console.
Call SDKs. For more information, see API overview.
Use Serverless Devs. For more information, see Common Serverless Devs commands.
For more deployment examples, see start-fc-gpu.
Model warm-up
To prevent long initial request processing times after a model is deployed, Function Compute provides a model warm-up feature. The purpose of model warm-up is to ensure the model is ready to serve traffic immediately after it goes live.
We recommend that you configure the initialize lifecycle hook for your instance to implement model warm-up. Function Compute automatically runs the business logic within the initialize hook after your instance starts to warm up the model service. For more information, see Function instance lifecycle hooks.
In the HTTP server you build, add a
/initializeinvocation path for the POST method and place the model warm-up logic under the/initializepath. Typically, you can warm up the model service by having it perform a simple inference task.The following code provides an example in Python.
def prewarm_inference():
    res = model.inference()

@app.route('/initialize', methods=['POST'])
def initialize():
    request_id = request.headers.get("x-fc-request-id", "")
    print("FC Initialize Start RequestId: " + request_id)

    # Prewarm model and perform naive inference task.
    prewarm_inference()

    print("FC Initialize End RequestId: " + request_id)
    return "Function is initialized, request_id: " + request_id + "\n"
On the function details page, choose , and then click Modify to configure the instance lifecycle hook.


Configure auto scaling for real-time inference
Serverless Devs
Prerequisites
Complete the following operations in the region where your gpu-accelerated instances reside:
Create a Container Registry Enterprise Edition or Personal Edition instance. We recommend that you create an Enterprise Edition instance. For more information, see Push and pull an image by using an Enterprise Edition instance.
Create a namespace and an image repository. For more information, see Build an image by using an Enterprise Edition instance and Build an image by using an Enterprise Edition instance.
1. Deploy a function
Run the following command to clone the project.
git clone https://github.com/devsapp/start-fc-gpu.gitRun the following command to go to the project directory.
cd /root/start-fc-gpu/fc-http-gpu-inference-paddlehub-nlp-porn-detection-lstm/src/The project has the following structure.
.
├── hook
│   └── index.js
└── src
    ├── code
    │   ├── Dockerfile
    │   ├── app.py
    │   ├── hub_home
    │   │   ├── conf
    │   │   ├── modules
    │   │   └── tmp
    │   └── test
    │       └── client.py
    └── s.yaml
Run the following commands to build an image by using Docker and push it to your image repository.
export IMAGE_NAME="registry.cn-shanghai.aliyuncs.com/fc-gpu-demo/paddle-porn-detection:v1" # sudo docker build -f ./code/Dockerfile -t $IMAGE_NAME . # sudo docker push $IMAGE_NAMEImportantBecause the PaddlePaddle framework is large, building the image for the first time takes about 1 hour. Therefore, a public image is provided at a VPC address for you to use directly. When you use the public image, you do not need to run the docker build or docker push commands.
Edit the s.yaml file.
edition: 3.0.0
name: container-demo
access: default
vars:
  region: cn-shanghai
resources:
  gpu-best-practive:
    component: fc3
    props:
      region: ${vars.region}
      description: This is the demo function deployment
      handler: not-used
      timeout: 1200
      memorySize: 8192
      cpu: 2
      gpuMemorySize: 8192
      diskSize: 512
      instanceConcurrency: 1
      runtime: custom-container
      environmentVariables:
        FCGPU_RUNTIME_SHMSIZE: '8589934592'
      customContainerConfig:
        image: >-
          registry.cn-shanghai.aliyuncs.com/serverless_devs/gpu-console-supervising:paddle-porn-detection
        port: 9000
      internetAccess: true
      logConfig:
        enableRequestMetrics: true
        enableInstanceMetrics: true
        logBeginRule: DefaultRegex
        project: z****
        logstore: log****
      functionName: gpu-porn-detection
      gpuConfig:
        gpuMemorySize: 8192
        gpuType: fc.gpu.tesla.1
      triggers:
        - triggerName: httpTrigger
          triggerType: http
          triggerConfig:
            authType: anonymous
            methods:
              - GET
              - POST
Run the following command to deploy the function.
sudo s deploy --skip-push true -t s.yamlAfter the command is successfully run, a URL is returned in the output, such as
https://gpu-poretection-****.cn-shanghai.fcapp.run. Copy this URL to test the function later.
2. Test and monitor
Run the following curl command to invoke the function. Use the URL obtained in the previous step.
curl https://gpu-poretection-gpu-****.cn-shanghai.fcapp.run/invoke -H "Content-Type: text/plain" --data "Nice to meet you"If the following result is returned, the test is successful.
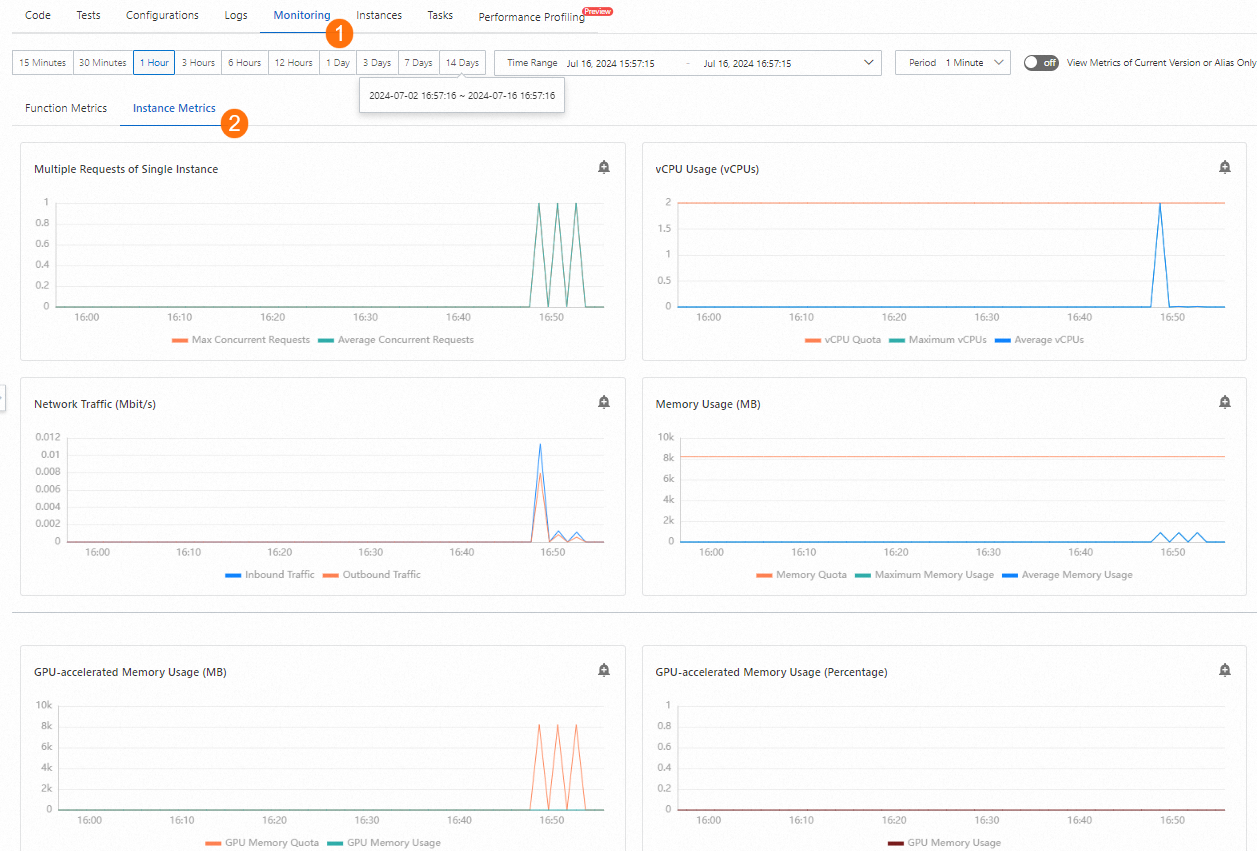
[{"text": "Nice to meet you", "porn_detection_label": 0, "porn_detection_key": "not_porn", "porn_probs": 0.0, "not_porn_probs": 1.0}]%Log on to the Function Compute console. In the left-side navigation pane, choose Functions. Select a region and find the target function. On the function details page, choose to view the changes in GPU-related metrics.
3. Configure an auto scaling policy
In the directory that contains the s.yaml file, create the elastic configuration template provision.json.
The following is an example. The template uses instance concurrency as the tracking metric, with a minimum of 2 instances and a maximum of 30 instances.
{
  "targetTrackingPolicies": [
    {
      "name": "scaling-policy-demo",
      "startTime": "2024-07-01T16:00:00.000Z",
      "endTime": "2024-07-30T16:00:00.000Z",
      "metricType": "ProvisionedConcurrencyUtilization",
      "metricTarget": 0.3,
      "minCapacity": 2,
      "maxCapacity": 30
    }
  ]
}
Run the following command to deploy the auto scaling policy.
sudo s provision put --target 1 --targetTrackingPolicies ./provision.json --qualifier LATEST -t s.yaml -a {access}Run
sudo s provision listto verify the configuration. The following output is returned, where the equal values fortargetandcurrentindicate that the provisioned instances are correctly started and the auto scaling rule is deployed correctly.[2023-05-10 14:49:03] [INFO] [FC] - Getting list provision: gpu-best-practive-service gpu-best-practive: - serviceName: gpu-best-practive-service qualifier: LATEST functionName: gpu-porn-detection resource: 143199913651****#gpu-best-practive-service#LATEST#gpu-porn-detection target: 1 current: 1 scheduledActions: null targetTrackingPolicies: - name: scaling-policy-demo startTime: 2024-07-01T16:00:00.000Z endTime: 2024-07-30T16:00:00.000Z metricType: ProvisionedConcurrencyUtilization metricTarget: 0.3 minCapacity: 2 maxCapacity: 30 currentError: alwaysAllocateCPU: trueAfter the provisioned instances are running, your model is successfully deployed and ready to serve traffic.
Clean up provisioned instances.
Run the following command to disable the auto scaling policy and set the number of provisioned instances to 0.
sudo s provision put --target 0 --qualifier LATEST -t s.yaml -a {access}Run the following command to confirm that the auto scaling policy for the function is disabled.
s provision list -a {access}The following result indicates that the auto scaling policy is disabled.
[2023-05-10 14:54:46] [INFO] [FC] - Getting list provision: gpu-best-practive-service
End of method: provision
Console
Prerequisites
A GPU function is created. For more information, see Create a function that uses a custom image.
Procedure
Log on to the Function Compute console. In the left-side navigation pane, choose Functions. Select a region, find the target function, and enable instance-level metrics for it.
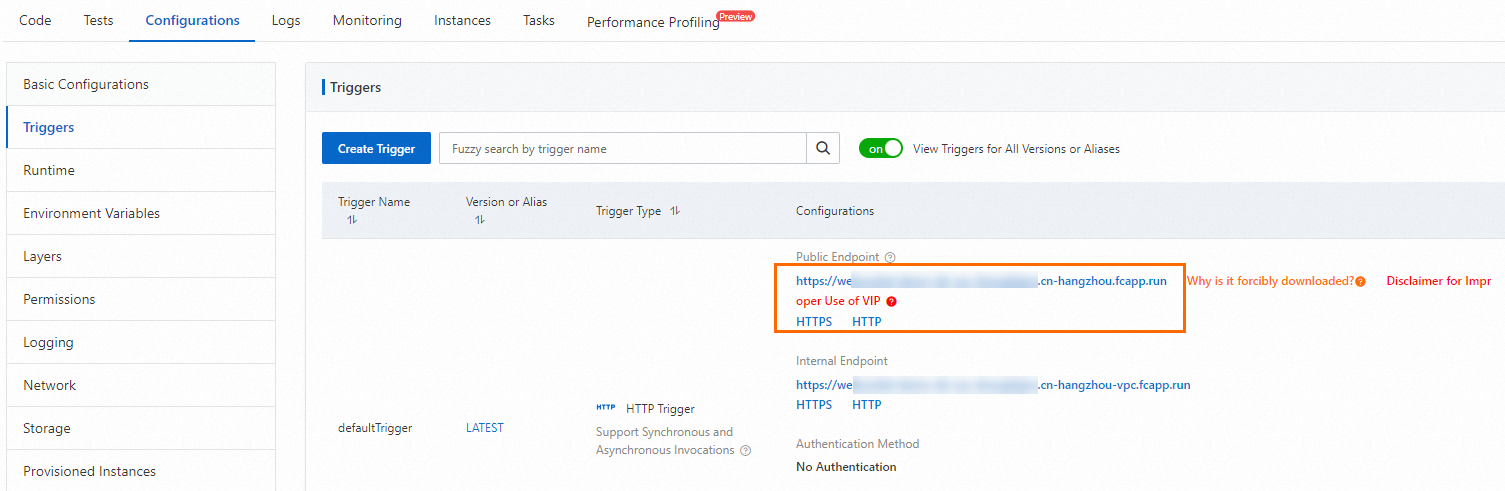
On the function details page, choose to obtain the URL of the HTTP trigger for subsequent tests.
Run the curl command to test the function. Then, on the function details page, choose to view the changes in GPU-related metrics.
curl https://gpu-poretection****.cn-shanghai.fcapp.run/invoke -H "Content-Type: text/plain" --data "Nice to meet you"On the function details page, choose , and then click Create provisioned instance policy to configure an auto scaling policy.
After the configuration is complete, you can choose on the function details page to view the changes in the Provisioned Instances metric.

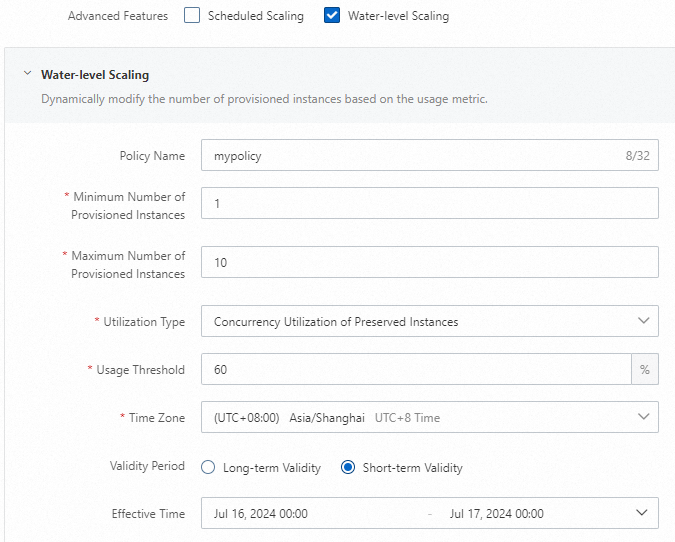
If you no longer need provisioned gpu-accelerated instances, delete them in a timely manner.
FAQ
Cost calculation for real-time inference
For more information about the billing of Function Compute, see Billing overview. The billing for provisioned instances is different from that for on-demand instances. Pay attention to your bill details.
Performance jitters with auto scaling
Consider using a more aggressive auto scaling policy to provision instances in advance. This can help prevent performance degradation caused by sudden bursts of requests.
Delayed instance scale-out
Function Compute collects metrics at one-minute intervals. A scale-out is triggered only after the metric remains above the threshold for a certain period.