Plan resource groups and workspaces in AgentRun to achieve resource isolation and fine-grained access control in a multi-team enterprise scenario.
Applicable scenario: Multiple business teams share a single root account. Each team manages several projects and requires resource isolation between test and production environments, as well as between teams. Developers should only access resources within their own projects.
Architecture diagram:
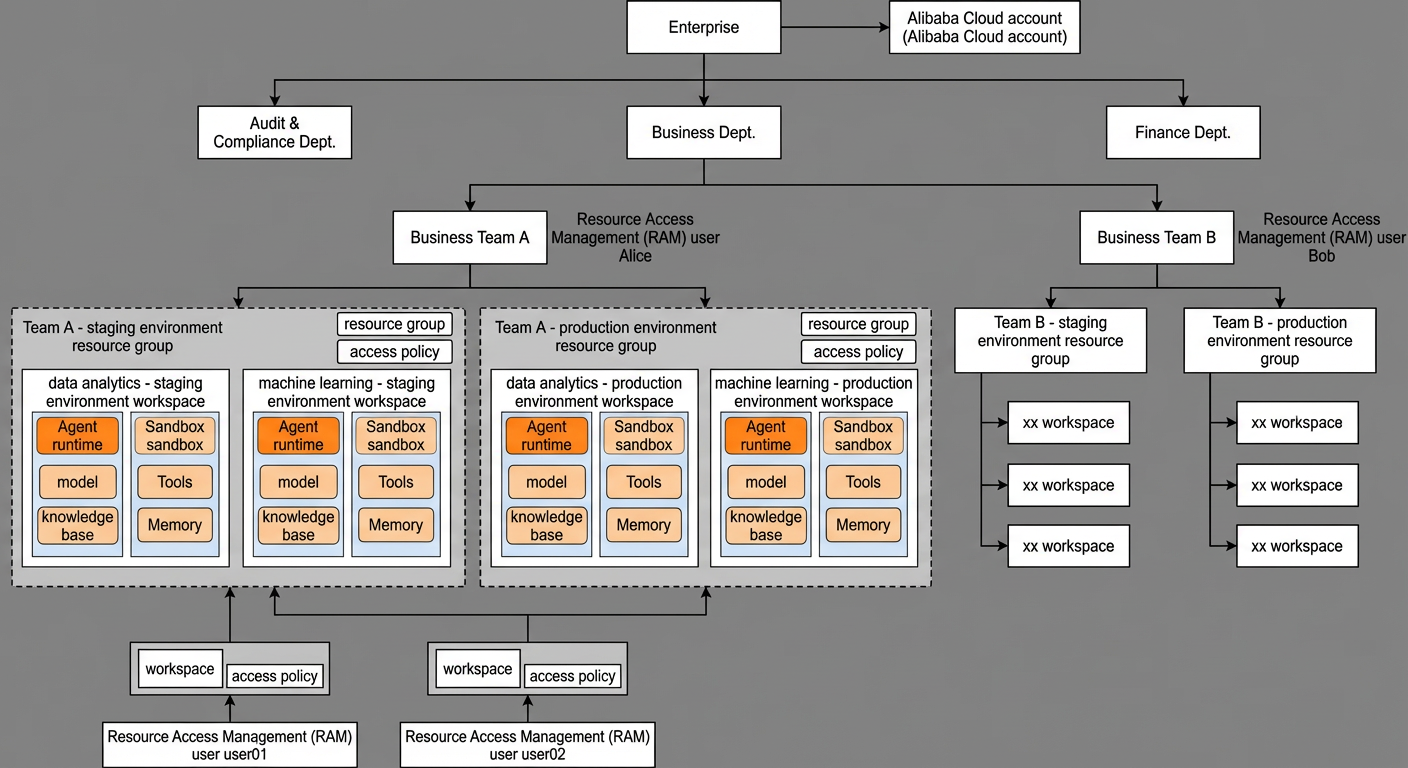
Background
A company has two business teams, Team A and Team B, each responsible for separate business systems. Each system contains several projects, such as data analytics and machine learning, and is deployed in both test and production environments. As the number of AgentRun resources grows, the company faces two challenges:
Clear resource isolation and ownership: Resources for different teams and environments must be completely isolated. It should be easy to identify which business system a resource belongs to.
Fine-grained access control: Developers must only access resources within their own projects. Business system administrators need to manage all resources for their team but must not access the resources of other teams.
Solution design
Design approach
Use a two-layer architecture: resource groups separate resources by business team and environment, while workspaces separate resources by project.
|
Level |
Dimension |
Authorized party |
|
Resource group |
Business team × environment (N teams × M environments = N×M resource groups) |
Business system administrators, who manage their team's resource groups. |
|
Workspace |
Project (associated with the corresponding resource group). |
Developers, who access their project's workspace. |
Account and role planning
This solution uses a single Alibaba Cloud account (root account) and separates permissions across teams by using RAM users.
|
Role |
RAM user |
Permission scope |
|
Root account administrator |
Alibaba Cloud account (root account) |
Full control over all resources. |
|
Team A administrator |
Alice |
All resource groups and workspaces for Team A. |
|
Team B administrator |
Bob |
All resource groups and workspaces for Team B. |
|
Team A data analytics project developer |
user01 |
Resources within the DataAnalysis-Test workspace. |
|
Team A machine learning project developer |
user02 |
Resources within the MachineLearning-Test workspace. |
Resource group and workspace planning
This example creates four resource groups and six workspaces. You can add more workspaces for Team B based on your project needs.
|
Resource group |
Associated workspaces |
Administrator |
|
TeamA-Test environment |
DataAnalysis-Test workspace, MachineLearning-Test workspace |
Alice |
|
TeamA-Production environment |
DataAnalysis-Production workspace, MachineLearning-Production workspace |
Alice |
|
TeamB-Test environment |
TeamB-Project-Test workspace |
Bob |
|
TeamB-Production environment |
TeamB-Project-Production workspace |
Bob |
Procedure
Step 1: Create RAM users
In the RAM console, create RAM users for each business system administrator and developer.
This example creates the following RAM users:
|
RAM user
|
Role
|
|
Alice
|
Business system A administrator
|
|
Bob
|
Business system B administrator
|
|
user01
|
Team A data analytics project developer
|
|
user02
|
Team A machine learning project developer
|
To create a RAM user: Log on to the RAM console. In the left-side navigation pane, choose Identities > Users, and then click Create User. For detailed steps, see Create a RAM user.
Naming recommendation: Name users based on their name or role, such as alice, bob, or dev-team-a-001. This makes it easier to identify them during authorization.
Step 2: Create resource groups
In the Resource Manager console, create resource groups that correspond to your business teams and environments.
This example creates the following four resource groups:
-
TeamA-Test environment
-
TeamA-Production environment
-
TeamB-Test environment
-
TeamB-Production environment
To create a resource group: Log on to the Resource Manager console. In the left-side navigation pane, choose Resource Groups > Create Resource Group. For detailed steps, see What is Resource Manager?.
Naming recommendation: Name resource groups to reflect the team and environment, such as teamA-test and teamA-prod. This makes it easy to identify their purpose in the console.
Step 3: Grant resource group permissions
Use your root account to grant permissions to each business system administrator, ensuring they can only manage the resource groups for their own team.
Example permission scope:
|
RAM user
|
Authorized resource group
|
Granted policy
|
|
Alice
|
TeamA-Test environment, TeamA-Production environment
|
AdministratorAccess
|
|
Bob
|
TeamB-Test environment, TeamB-Production environment
|
AdministratorAccess
|
You can grant permissions in two ways:
-
From the Resource Manager console: Go to the details page of a resource group, select the RAM user, and attach a policy.
-
From the RAM console: Go to the details page of a RAM user, specify the resource group, and attach a policy.
Follow the principle of least privilege. If a team administrator only needs to manage AgentRun resources, we recommend granting fine-grained policies related to AgentRun instead of AdministratorAccess. This example uses AdministratorAccess for simplicity. Adjust the permissions for your production environment as needed.
The following is an example of a custom policy that authorizes only AgentRun operations within a specific resource group:
{
  "Version": "1",
  "Statement": [
    {
      "Effect": "Allow",
      "Action": "agentrun:*",
      "Resource": "*",
      "Condition": {
        "StringEquals": {
          "acs:ResourceGroupId": [
            "rg-xxxx1",
            "rg-xxxx2"
          ]
        }
      }
    }
  ]
}Replace rg-xxxx1 and rg-xxxx2 with the actual IDs of your resource groups, which you can find in the resource group list in the Resource Manager console. The agentrun:* action grants all AgentRun permissions. To further narrow the scope, you can replace it with specific actions, such as agentrun:GetWorkspace and agentrun:ListWorkspaces.
Step 4: Create and bind workspaces
A business system administrator, such as Alice, can now log on to the AgentRun console to create workspaces for each project on her team and bind each workspace to the appropriate resource group.
Alice needs to create the following four workspaces:
|
Workspace name
|
Associated resource group
|
|
DataAnalysis-Test workspace
|
TeamA-Test environment
|
|
MachineLearning-Test workspace
|
TeamA-Test environment
|
|
DataAnalysis-Production workspace
|
TeamA-Production environment
|
|
MachineLearning-Production workspace
|
TeamA-Production environment
|
To create a workspace: Log on to the AgentRun console. In the upper-left corner, click the workspace drop-down menu and select Create workspace. Fill in the name and select the corresponding resource group.
Important: The association between a workspace and a resource group cannot be changed after creation. Plan this relationship carefully before you create the workspace.
Step 5: Grant workspace permissions to developers
Developers need access only to the workspace for their project, which requires layered authorization. The following four sub-steps show this process by granting permissions to user01 for the DataAnalysis-Test workspace.
Grant permissions to list workspaces
The user user01 needs permission to list workspaces within the TeamA-Test environment resource group to select the correct one.
In the RAM console, grant the following permissions to user01, scoped to the TeamA-Test environment resource group:
-
Policy: A policy that includes AgentRun actions.
-
Scope: The
TeamA-Test environmentresource group only.
{
  "Version": "1",
  "Statement": [
    {
      "Effect": "Allow",
      "Action": "agentrun:ListWorkspaces",
      "Resource": "*"
    }
  ]
}
After you complete this step, user01 can see all workspaces in the resource group (DataAnalysis-Test workspace and MachineLearning-Test workspace) but does not yet have permission to manage the resources within them.
Grant permissions for workspace resources
In the AgentRun console, grant user01 permissions to manage resources in the DataAnalysis-Test workspace, which includes the following resource types:
-
Agent runtime
-
Sandbox
-
Model
-
Tool
-
Knowledge base
-
Memory
-
Credential
-
Monitoring dashboard
{
  "Version": "1",
  "Statement": [
    {
      "Effect": "Allow",
      "Action": [
        "agentrun:GetAccessToken",
        "agentrun:GetAgentDiscoveryResult",
        "agentrun:GetAgentRuntime",
        "agentrun:GetAgentRuntimeEndpoint",
        "agentrun:GetApigLLMModel",
        "agentrun:GetBrowser",
        "agentrun:GetBrowserSession",
        "agentrun:GetCodeInterpreter",
        "agentrun:GetCodeInterpreterSession",
        "agentrun:GetCredential",
        "agentrun:GetKnowledgeBase",
        "agentrun:GetMemoryCollection",
        "agentrun:GetModelProxy",
        "agentrun:GetModelService",
        "agentrun:GetSandbox",
        "agentrun:GetTemplate",
        "agentrun:ActivateTemplateMCP",
        "agentrun:CreateAgentRuntime",
        "agentrun:CreateAgentRuntimeEndpoint",
        "agentrun:CreateApigLLMModel",
        "agentrun:CreateBrowser",
        "agentrun:CreateCodeInterpreter",
        "agentrun:CreateCredential",
        "agentrun:CreateKnowledgeBase",
        "agentrun:CreateMemoryCollection",
        "agentrun:CreateModelProxy",
        "agentrun:CreateModelService",
        "agentrun:CreateSandbox",
        "agentrun:CreateTemplate",
        "agentrun:CreateWorkspace",
        "agentrun:DeleteAgentRuntime",
        "agentrun:DeleteAgentRuntimeEndpoint",
        "agentrun:DeleteApigLLMModels",
        "agentrun:DeleteBrowser",
        "agentrun:DeleteCodeInterpreter",
        "agentrun:DeleteCredential",
        "agentrun:DeleteKnowledgeBase",
        "agentrun:DeleteMemoryCollection",
        "agentrun:DeleteModelProxy",
        "agentrun:DeleteModelService",
        "agentrun:DeleteSandbox",
        "agentrun:DeleteTemplate",
        "agentrun:DeregisterExternalService",
        "agentrun:PublishRuntimeVersion",
        "agentrun:RegisterExternalService",
        "agentrun:StartBrowserSession",
        "agentrun:StartCodeInterpreterSession",
        "agentrun:StopSandbox",
        "agentrun:UpdateAgentRuntime",
        "agentrun:UpdateAgentRuntimeEndpoint",
        "agentrun:UpdateApigLLMModel",
        "agentrun:UpdateCredential",
        "agentrun:UpdateKnowledgeBase",
        "agentrun:UpdateMemoryCollection",
        "agentrun:UpdateModelProxy",
        "agentrun:UpdateModelService",
        "agentrun:UpdateTemplate",
        "agentrun:ListAgentRuntimeEndpoints",
        "agentrun:ListAgentRuntimes",
        "agentrun:ListAgentResources",
        "agentrun:ListAgentRuntimeVersions",
        "agentrun:ListApigLLMModels",
        "agentrun:ListBrowsers",
        "agentrun:ListBrowserSessions",
        "agentrun:ListCodeInterpreters",
        "agentrun:ListCodeInterpreterSessions",
        "agentrun:ListCredentials",
        "agentrun:ListKnowledgeBases",
        "agentrun:ListMemoryCollections",
        "agentrun:ListModelProviders",
        "agentrun:ListModelProxies",
        "agentrun:ListModelServices",
        "agentrun:ListSandboxes",
        "agentrun:ListTemplates",
        "agentrun:ListTools",
        "agentrun:GetTool",
        "agentrun:CreateTool",
        "agentrun:DeleteTool",
        "agentrun:UpdateTool"
      ],
      "Resource": "acs:agentrun:*:<your-account-id>:workspaces/DataAnalysis-Test/*"
    }
  ]
}
To add a member: Go to the AgentRun console, navigate to the DataAnalysis-Test workspace, and choose Member Management > Add Member. Select user01 and assign the appropriate role, such as Developer.
After you complete this step, user01 can create, view, and manage the specified resources within the DataAnalysis-Test workspace, but cannot manage any resources in the MachineLearning-Test workspace.
Grant permissions for account-level global resources
Some AgentRun resources are global, meaning they are scoped to the account rather than a specific workspace. These require separate account-level permissions.
A custom domain name is a typical account-level global resource. If user01 needs to configure or view custom domain names, grant the relevant policy at the account level in the RAM console. For the authorization scope, select the entire Alibaba Cloud account.
{
  "Version": "1",
  "Statement": [
    {
      "Effect": "Allow",
      "Action": [
        "agentrun:*CustomDomain*"
      ],
      "Resource": "*"
    }
  ]
}Not all users require this permission. If user01 does not need to manage custom domain names, you can skip this sub-step.
Grant permissions for dependent services
AgentRun resources may depend on other Alibaba Cloud services, such as OSS or FC. The following table lists common permission dependencies.
|
Dependency scenario
|
Required cloud service
|
Recommended policy
|
|
Knowledge base data storage
|
OSS
|
Read and write permissions for a specific OSS bucket.
|
|
Agent runtime underlying compute
|
FC
|
Read-only or invocation permissions for FC.
|
|
Log and monitoring queries
|
SLS
|
Read permissions for a specific SLS Logstore.
|
Follow the principle of least privilege. Grant permissions based on the developer's actual business needs. Use resource-level policies to limit access to specific resources like buckets and Logstores whenever possible.
Step 6: Assign resources to workspaces
After configuring permissions, assign all AgentRun resources to the correct workspace.
New resources: When you create an AgentRun resource, select the target workspace. The resource is automatically assigned to the resource group bound to that workspace.
Existing resources: To assign resources that are not yet in a workspace, use the resource transfer feature.
To assign resources: Go to the management page for the resource in the AgentRun console, find the target resource, select the destination workspace, and confirm the action.
Warning: Moving a resource can affect running tasks. We recommend moving resources during off-peak hours and notifying the relevant developers in advance.
Results
After you complete these steps, each role has the following permissions:
|
Identity |
Visible resource groups |
Accessible workspaces |
Resource operation scope |
|
Alibaba Cloud account (root account) |
All resource groups |
All workspaces |
Unrestricted |
|
Alice |
TeamA-Test environment, TeamA-Production environment |
All workspaces under Team A |
All resources in all workspaces of Team A |
|
Bob |
TeamB-Test environment, TeamB-Production environment |
All workspaces under Team B |
All resources in all workspaces of Team B |
|
user01 |
TeamA-Test environment (list visible) |
DataAnalysis-Test workspace |
All resource types within this workspace |
|
user02 |
TeamA-Test environment (list visible) |
MachineLearning-Test workspace |
All resource types within this workspace |
Bothuser01anduser02can see all workspaces under theTeamA-Test environmentresource group, but each can only manage resources within their authorized workspace. Resources are completely isolated between Team A and Team B, and between the test and production environments.
Common pitfalls
|
Pitfall |
Problem |
Recommended practice |
|
Using a single workspace for all projects. |
This approach prevents project-level permission isolation. Developers can see each other's resources. |
Create a separate workspace for each project. |
|
Granting |
Developers receive permissions beyond their responsibilities, increasing the risk of accidental operations. |
Grant fine-grained, role-based permissions at the workspace level. |
|
Using the same resource group for test and production environments. |
Developers might accidentally modify production resources. |
Create separate resource groups for test and production environments. |
|
Creating workspaces before planning resource groups. |
Because workspace-to-resource-group bindings are permanent, improper planning can result in a structure that cannot be changed. |
Plan your resource groups first, then create workspaces and bind them. |