AHBench is a benchmark test suite built by the ApsaraDB for HBase team on top of Yahoo! Cloud Serving Benchmark (YCSB). It wraps YCSB's test sets, process control, and results aggregation into a single tool that runs end-to-end benchmark tests with minimal configuration.
Prerequisites
Before you begin, make sure you have:
A Linux machine to use as the stress testing client, with at least 16 exclusive CPU cores
Java Development Kit (JDK) 1.8 or later installed
Python 2.7 installed
An ApsaraDB for HBase cluster with enough storage for the test data (at least 20 GB for a quick test, at least 2 TB for a full test)
Usage notes
AHBench uses two tables for testing:
ahbenchtest-readandahbenchtest-write. These tables may be deleted and recreated during the test. Make sure it is safe to delete these tables before running a test.Do not run AHBench against a production environment. The heavy workload may cause the cluster to become unresponsive.
ApsaraDB for HBase clusters run on Elastic Compute Service (ECS) instances. Due to the virtual runtime environment, clusters with the same specification may show 5%–10% performance variance.
How it works
Running a benchmark with AHBench involves five steps:
Download AHBench and upload it to the stress testing client.
Configure the cluster endpoint in
AHBench/conf/hbase-site.xml.Set the runtime environment variables in
AHBench/conf/ahbench-env.properties.(Optional) Tune test parameters such as compression and encoding in
AHBench/conf/ahbench-settings.properties.Run a quick test or a full test and review the CSV output.
Step 1: Download AHBench
Download AHBench v1.0.5, upload the archive to your stress testing client, and decompress it.
Step 2: Configure the cluster endpoint
Edit AHBench/conf/hbase-site.xml and set the ZooKeeper endpoint for your cluster.
For ApsaraDB for HBase Standard Edition, see Use HBase Shell to access an ApsaraDB for HBase Standard Edition instance.
For ApsaraDB for HBase Performance-enhanced Edition, see Use HBaseue Shell to access an ApsaraDB for HBase Performance-enhanced Edition instance.
Step 3: Set runtime environment variables
Open AHBench/conf/ahbench-env.properties and configure the following:
# Specify the JDK installation path.
# Skip this if JDK is already on the system path.
# JAVA_HOME=/usr/java/jdk1.8.0/

# Set the HBase version of the cluster you are testing.
# Use 1 for 1.x clusters, and 2 for 2.x clusters.
HBASE_VERSION=2
Step 4: Configure test parameters (optional)
Open AHBench/conf/ahbench-settings.properties to adjust compression, encoding, thread count, data size, and field size. The defaults work for most use cases.
# Compression algorithm for the test table.
# Valid values: NONE, LZO, ZSTD, SNAPPY, GZ, LZ4
# Not all algorithms are supported on all cluster editions.
ahbench.table.compression=SNAPPY

# Encoding algorithm for the test table.
# Valid values: NONE, DIFF, INDEX
# Not all algorithms are supported on all cluster editions.
ahbench.table.encoding=DIFF
Choosing compression and encoding
Use the following table to pick compression and encoding settings that match your workload and cluster edition:
| Scenario | Compression | Encoding | Notes |
|---|---|---|---|
| Hot data (frequent reads and writes) on Performance-enhanced Edition | ZSTD | INDEX | ZSTD compresses well without sacrificing read/write speed; INDEX reduces key-prefix overhead for random access |
| Cold data (infrequent access) on Performance-enhanced Edition | ZSTD | NONE or DIFF | Higher compression ratio matters more than decode speed for cold data |
| Standard Edition clusters | SNAPPY | DIFF | ZSTD and INDEX are not available on Standard Edition |
Step 5: Run a test
Navigate to the AHBench directory before running any test command.
cd AHBenchQuick test
Loads 10 million entries (at least 20 GB) and runs the benchmark. The test takes approximately 40 minutes, though the actual time varies by cluster.
./fast_testFull test
Loads 2 billion entries (at least 2 TB) and runs a comprehensive benchmark. The test takes approximately 25 hours.
./full_testSkip data loading (full test only)
If you have already loaded data from a previous successful run and want to re-run only the benchmark workload, use --skipload. The benchmark-only run takes approximately 3.5 hours:
./full_test --skipload--skipload after a successful full test run. If the previous run failed during data loading, run the full test without this flag.Analyze test results
After the test completes, AHBench writes the results to a comma-separated values (CSV) file in the current directory. Import this file into Excel, Numbers, or any data analysis tool to compare and visualize the results.
The following image shows sample test results: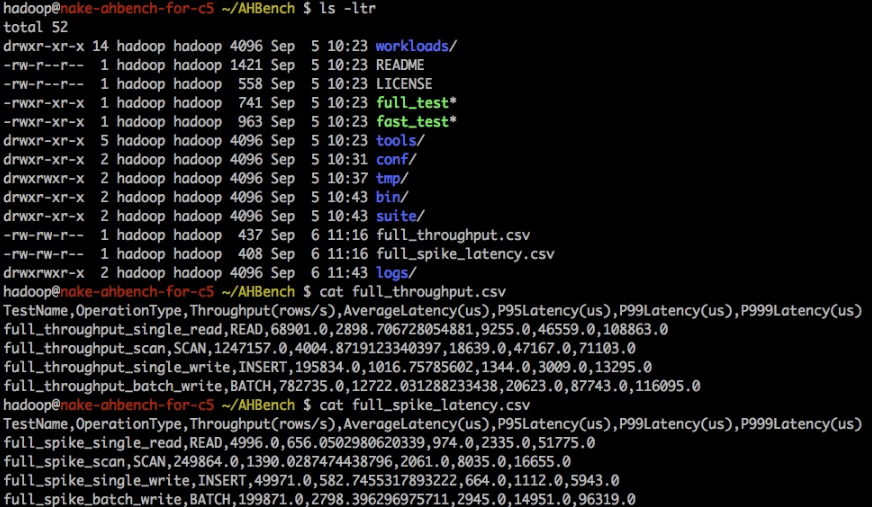
Troubleshooting
If AHBench exits unexpectedly, check the following items in order:
JDK and Python: Confirm
JAVA_HOMEpoints to a valid JDK 1.8+ installation, and that Python 2.7 is installed and on the system path.Cluster endpoint: Confirm the ZooKeeper endpoint in
AHBench/conf/hbase-site.xmlis correct and reachable from the stress testing client.HBase version: Confirm
HBASE_VERSIONinAHBench/conf/ahbench-env.propertiesmatches your cluster's actual version (1 for 1.x, 2 for 2.x).Compression algorithm: Confirm the compression algorithm configured in
ahbench-settings.propertiesis supported by your cluster edition. For example, ZSTD is only available on Performance-enhanced Edition.Cluster health: Check whether the cluster is running as expected.