Table recycle bin
Hologres supports the table recycle bin, a feature that automatically moves tables deleted with the DROP TABLE command to the recycle bin. You can restore these tables to prevent accidental data loss.
Limitations
-
The table recycle bin feature is available only for Hologres instances of V3.1 and later.
-
Tables in the recycle bin still consume memory. Therefore, it is not recommended to enable the recycle bin for tables that have a vector index. For more information, see Work with Proxima Graph indexes.
How it works
The DROP TABLE [CASCADE] and DROP DYNAMIC TABLE [CASCADE] commands automatically move internal tables, partitioned tables (including parent and child tables), and Dynamic Tables to the recycle bin.
Tables in the recycle bin are stored in a separate schema named hg_recyclebin. The table's name, data, properties, and indexes are retained.
-
Tables are not moved to the recycle bin if you run the TRUNCATE or INSERT OVERWRITE command.
-
External tables, views, and materialized views are not supported.
-
If a table has a TTL, the policy remains active in the recycle bin, and the system continues to purge data accordingly.
Enable or disable the recycle bin
-- Enable the table recycle bin for the specified database.
ALTER DATABASE <db_name> SET hg_enable_recyclebin = ON;

-- Disable the table recycle bin for the specified database.
ALTER DATABASE <db_name> SET hg_enable_recyclebin = OFF; -
The table recycle bin feature is enabled by default for new and existing instances of V3.1 and later. Dropped tables are automatically moved to the table recycle bin.
-
After you disable the recycle bin, you can still recover or purge tables already in it. However, tables that you subsequently delete are not moved to the recycle bin.
-
Run this command once per database. Only a superuser of the current instance can run this SQL command.
Recover tables
You can use the following command to recover a deleted table. If a table with the same name already exists, you can specify the table_id (supported in V3.1.18 and later) or id (supported in all versions) to identify the specific table you want to restore.
RECOVER TABLE <table_name>;

-- If another table with the same name exists, specify the table_id to restore the target table (V3.1.18 and later).
RECOVER TABLE <table_name> WITH (table_id = xxxx);

-- General syntax (for all versions)
RECOVER TABLE <table_name> [WITH (id = xxxx)];
Note the following:
-
During recovery
The table's data, properties, and indexes such as the primary key (PK), clustering key, and segment key are restored. If a TTL is set on the table, it remains active, and the system periodically purges data accordingly.
-
Before recovery
-
If a table with the same name already exists in the schema, you must delete or rename it before recovery. Otherwise, the RECOVER command fails. However, if the existing table has a primary key or clustering key, you must move it to a different schema before you run the RECOVER command. For more information, see the Examples section in this topic.
-
If the table's schema is deleted, the recovery operation fails.
-
-
For a partitioned table
-
A restored child table becomes a standard table. You must manually ATTACH it to its parent table.
-
When you recover a parent table, both the parent table and its child tables are restored to their original partitioned structure. You do not need to manually attach the child tables.
-
If dynamic partitioning was enabled on the parent table, it is not automatically re-enabled after recovery. You must enable it manually. For more information, see Manage dynamic partitioning.
-
-
For a Dynamic Table
-
A restored Dynamic Table becomes a standard table. You can query its data, but it no longer refreshes automatically. To restore automatic refreshing, you must recreate the Dynamic Table. For more information, see ALTER DYNAMIC TABLE.
-
Restoring a base table does not recover its dependent Dynamic Table.
-
-
For cascading scenarios
Using the
DROP TABLE ... CASCADEcommand also deletes dependent objects, such as views and materialized views. When you recover the table, only the table itself is restored. Dependent objects like views, materialized views, and Dynamic Tables are not restored.For example, if a Dynamic Table depends on
view1andview1depends ontable1, running theDROP TABLE table1 CASCADEcommand also deletes the Dynamic Table andview1. When you recovertable1, the Dynamic Table andview1are not restored and must be recreated manually. -
Permissions for recovery
You need specific permissions to run the RECOVER command. For more information, see Permissions.
Manage the recycle bin
Supported operations
Tables in the recycle bin support the following operations:
-
RECOVER (recover a table) and PURGE (purge a table).
-
View table details by querying
hologres.hg_recyclebin.
View table details in the recycle bin
You can run the following statement to view the details of tables in the recycle bin:
Table owners can view only their own tables in the recycle bin. A superuser can view all tables in the recycle bin.
SELECT * FROM hologres.hg_recyclebin;The following table describes the parameters in the returned information.
|
Parameter |
Description |
|
table_id |
The unique ID of the table in the recycle bin. This ID is used to identify the table. |
|
schema_name |
The table's original schema. |
|
table_name |
The name of the dropped table. |
|
table_owner |
The owner of the table before it was dropped. |
|
dropby |
The user who dropped the table. |
|
drop_time |
The time when the table was dropped. |
Check storage usage in the recycle bin
-
Use the following syntax to check the storage usage of a table in the recycle bin. The
table_idparameter is optional. If multiple tables have the same schema name and table name, you can specify thetable_idto identify a specific table.-- View the storage size of a table in the recycle bin. SELECT hologres.hg_recyclebin_relation_size('<schema_name.table_name>'[,<table_id>]); -- Use the following syntax to display the storage size with a unit. SELECT PG_SIZE_PRETTY(hologres.hg_recyclebin_relation_size('<schema_name.table_name>'[,<table_id>]));The following code provides an example:
-- Assume that the deleted table is named tbl1 and belongs to the public schema. SELECT hologres.hg_recyclebin_relation_size('public.tbl1'); -- If multiple tables in the recycle bin have the same schema and table name, you must use the table_id to query the storage usage of a specific table. For example: SELECT hologres.hg_recyclebin_relation_size('public.tbl1', 42); -
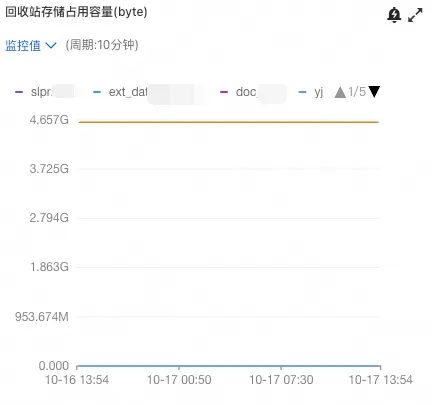
View the storage occupied by the table recycle bin for each database based on monitoring metrics.
Storage monitoring metrics for the table recycle bin are available in Hologres versions V3.1.32, V3.2.12, V4.0.2, and later. You can use these metrics to view the storage usage of the recycle bin in each database.
The following figure shows a sample monitoring graph:
NoteAn instance's total storage includes the storage used by the table recycle bin. If the instance storage increases after you upgrade the instance to V3.1, check whether the increase is caused by the table recycle bin.
Set the recycle bin retention period
By default, tables in the recycle bin are retained for one day before the system permanently purges them. Purged tables cannot be recovered. You can enable or disable the table recycle bin, or modify the retention period based on your business needs by using the following syntax.
-- Change the retention period of tables to 5 days.
ALTER DATABASE <db_name> SET hg_recyclebin_retention_days = 5; -
Tables in the recycle bin are still subject to storage billing.
-
The retention period is measured in days. The minimum value is 1, and the maximum value is 10.
-
Only a superuser can run this statement. The setting takes effect at the database level.
Purge tables from the recycle bin
You can manually purge tables from the recycle bin by using the PURGE command. The commands are as follows:
-- Purge a single table.
PURGE TABLE {table_name};

-- Purge all tables from the recycle bin. This command must be run by a superuser.
CALL hologres.hg_purge_all_tables();-
After the command runs successfully, the table is immediately deleted and cannot be recovered.
-
You can purge only tables, not cascaded Dynamic Tables.
-
Permissions to purge a table: You need specific permissions to run the PURGE command. For more information, see Permissions.
-
After you run PURGE or
hg_purge_all_tables(), the metadata is removed immediately. However, the underlying storage is subject to a delayed deletion mechanism (approximately 2 hours by default), so the actual storage usage does not decrease immediately. This is expected behavior.
Delete a table without the recycle bin
By default, tables deleted with the DROP TABLE or DROP Dynamic Table [CASCADE] command are moved to the recycle bin. You can use the following command to bypass the recycle bin and permanently delete a table.
DROP TABLE <table_name> [CASCADE] FORCE;After you run DROP TABLE ... FORCE, the metadata is removed immediately. However, the underlying storage is subject to a delayed deletion mechanism (approximately 2 hours by default), so the actual storage usage does not decrease immediately. This is expected behavior.
Permissions
Query permissions for the recycle bin
-
A table owner can query only the tables that they deleted, not tables deleted by other users.
-
A superuser can query all tables in the recycle bin.
Permissions for delete, recover, and purge
-
Deleting tables
Only a superuser, a member of the Developer or Admin user group (in the SPM/SLPM permission model), or the table owner (in the Standard PostgreSQL Authorization Model) can run the
DROPcommand to delete a table and move it to the recycle bin. -
Purging tables
Only a superuser, a member of the Developer or Admin user group (in the SPM/SLPM permission model), or the table owner (in the Standard PostgreSQL Authorization Model) can run the
PURGEcommand to purge a table from the recycle bin. -
Recovering tables
Only a superuser, a member of the Developer or Admin user group (in the SPM/SLPM permission model), the table owner (in the Standard PostgreSQL Authorization Model), or the user who deleted the table can run the
RECOVERcommand to restore the table to its original state.
-
In the SPM/SLPM permission models, only users who were members of the Developer or Admin user group before a table was moved to the recycle bin can manage that table. If a user is added to the Developer or Admin user group after the table is moved to the recycle bin, that user cannot manage the table.
-
If you switch from the SPM/SLPM permission model to the Standard PostgreSQL Authorization Model, only a superuser can recover or purge existing tables in the recycle bin.
Special case
If user1 is the owner of schema1 and user2 is the owner of schema1.table2, user1 can delete schema1 and schema1.table2. However, user1 cannot access schema1.table2 because user2 has not granted user1 the required permissions.
-- 1. user1 creates schema1 and grants the CREATE permission on the schema to user2.
CREATE SCHEMA schema1;
GRANT CREATE ON SCHEMA schema1 TO "BASIC$user2";

-- 2. user2 creates schema1.table2 and becomes the table owner.
CREATE TABLE schema1.table2(id INT);

-- user1 can delete schema1 and all objects within it, including table2, but cannot view table2.
SELECT * FROM schema1.table2;
# ERROR:  permission denied for table table2

DROP SCHEMA schema1 CASCADE;
# DROP CASCADES TO TABLE schema1.table2
# DROP SCHEMA
To recover table2, you have two options:
-
user1, as the user who deleted the table, can recover the tables in
schema1. -
user2, as the table owner, can recover the table.
Examples
Delete and recover a table
Example 1: Delete and recover a table
-
Create a standard table and delete it.
CREATE TABLE tbl1 ( id INT NOT NULL) WITH ( orientation = 'column', distribution_key = 'id', clustering_key = 'id', event_time_column = 'id'); INSERT INTO tbl1 SELECT i FROM GENERATE_SERIES(1, 1000000) i; DROP TABLE tbl1; -
Check the recycle bin to confirm that the table has been moved to it.
SELECT * FROM hologres.hg_recyclebin;The following result is returned:
table_id | schema_name | table_name |   table_owner   |    dropby   |   drop_time
---------+-------------+------------+-----------------+-------------+-----------------------
       14| public      | tbl1       | xx_developer  | 1365xxxxxxxx| 2025-04-17 19:23:10+08
(1 row)
Check the table's storage:
SELECT (hologres.hg_recyclebin_relation_size('tbl1')/1024)::text||'KB' AS hg_recyclebin_relation_size;The command returns the storage size of the table:
hg_recyclebin_relation_size ----------------------------- 1336KB (1 row) -
Recover the table.
-- Recover all data and properties of the standard table tbl1, including its primary key and clustering key.
RECOVER TABLE tbl1;
Example 2: Delete and recover a partitioned table
-
Create a partitioned table with the corresponding parent and child tables.
CREATE TABLE tbl2_parent(id INT) PARTITION BY list (id); CREATE TABLE tbl2_child_1 PARTITION OF tbl2_parent FOR VALUES IN (1); CREATE TABLE tbl2_child_2 PARTITION OF tbl2_parent FOR VALUES IN (2); -
Delete one of the child tables and recover it. The recovered child table becomes a standard table and must be manually attached to the original parent table.
-- Delete a child table.
DROP TABLE tbl2_child_1;

-- The child table is moved to the recycle bin.
SELECT * FROM hologres.hg_recyclebin;
The following result is returned:
table_id | schema_name |  table_name  |   table_owner    |   dropby  |       drop_time
----------+-------------+--------------+------------------+-----------+------------------------
       16 | public      | tbl2_child_1 | xx_developer   | 1365xxxxx | 2025-04-17 19:33:30+08
(1 row)
Recover the child table and check its structure. It is now a standard table and is no longer a child table.
RECOVER TABLE tbl2_child_1;
SELECT hg_dump_script('tbl2_child_1');
The following result is returned:
hg_dump_script -------------------------------------------------------------- BEGIN; + + /* + DROP TABLE public.tbl2_child_1; + */ + CREATE TABLE public.tbl2_child_1 ( + id INTEGER + ) WITH ( + orientation = 'column', + storage_format = 'orc', + table_group = 'xxxx_tg_default', + table_storage_mode = 'any', + time_to_live_in_seconds = '3153600000' + ); + + + + COMMENT ON TABLE public.tbl2_child_1 IS NULL; + ALTER TABLE public.tbl2_child_1 OWNER TO "xx_developer"; + + + END; + (1 row) -
Delete the parent table. After recovery, it remains a partitioned table.
-- Delete the parent table.
DROP TABLE tbl2_parent CASCADE;

-- Check the recycle bin. The parent and child tables are both moved to the recycle bin.
SELECT * FROM hologres.hg_recyclebin;
The following result is returned:
table_id | schema_name |  table_name  |   table_owner |      dropby   |       drop_time
---------+-------------+--------------+---------------+---------------+------------------------
      17 | public      | tbl2_child_2 | xx_developer | 1365xxxxxxxx | 2025-04-17 19:41:04+08
      15 | public      | tbl2_parent  | xx_developer | 1365xxxxxxxx | 2025-04-17 19:41:04+08
Recover the parent table.
RECOVER TABLE tbl2_parent;Run the following statement in a psql client to view the DDL of the parent table.
\d+ tbl2_parent;The following result is returned, which shows that its child table is also recovered.
                          Partitioned table "public.tbl2_parent"
 Column |  Type   | Collation | Nullable | Default | Storage | Stats target | Description
--------+---------+-----------+----------+---------+---------+--------------+-------------
 id     | integer |           |          |         | plain   |              |
Partition key: LIST (id)
Partitions: tbl2_child_2 FOR VALUES IN (2)
Example 4: Recover a table with a conflicting name
-
If you delete a table and then create a new table with the same name, recovering the deleted table fails. You must rename the existing table first.
-
Create and delete
tbl6.CREATE TABLE tbl6(id INT); -- Delete the table and move it to the recycle bin. DROP TABLE tbl6; -
Create a new table that is also named
tbl6and try to recover the deleted table.CREATE TABLE tbl6(id INT); RECOVER TABLE tbl6;The following result is returned. The recovery fails because a table with the same name already exists. You must delete or rename the existing table.
ERROR: Table public.tbl6 already exists -
Rename the existing table
tbl6totbl6_renameand then recover the originaltbl6. The recovery now succeeds.ALTER TABLE tbl6 RENAME TO tbl6_rename; RECOVER TABLE tbl6;
-
-
If the existing table with the same name has the same primary key and clustering key as the deleted table, renaming it does not work. You must move the existing table to another schema or delete it before recovering the deleted table.
-
Create a table named
tbl1and delete it.-- Create a table and set a PK and a clustering key. CREATE TABLE tbl1 ( col1 INT, col2 INT, col3 INT, PRIMARY KEY (col1, col2) ) WITH ( clustering_key = 'col1' ); -- Delete the table. DROP TABLE tbl1; -- Create a new table with the same name, PK, and clustering key. CREATE TABLE tbl1 ( col1 INT, col2 INT, col3 INT, PRIMARY KEY (col1, col2) ) WITH ( clustering_key = 'col1' ); -- Check the recycle bin. SELECT * FROM hologres.hg_recyclebin;The following result is returned.
table_id | schema_name | table_name | table_owner | dropby | drop_time ----------+-------------+------------+------------------+------------------+------------------------ 493497 | public | tbl1 | 13659371xxx| 13659371xxx | 2025-04-17 20:11:08+08 -
Attempting to recover the
tbl1table from the recycle bin fails.-- Attempt to recover the dropped table from the recycle bin. The recovery fails. RECOVER TABLE tbl1;The following error message is returned.
ERROR: Table public.tbl1 already exists -
Renaming the
tbl1table and then attempting to recover the original table also fails.-- Rename the existing table. ALTER TABLE tbl1 RENAME TO tbl2; -- The recovery still fails because the existing table has a primary key and clustering key. RECOVER TABLE tbl1;The following error message is returned.
ERROR: relation "tbl1_pkey" already EXISTS IN SCHEMA "public" -
Move the new table to another schema. Then, you can successfully recover the original table.
CREATE SCHEMA test;
ALTER TABLE tbl2 SET SCHEMA test;

-- The recovery is successful.
RECOVER  TABLE tbl1;
-
Delete a table without the recycle bin
-- Delete a standard table without moving it to the recycle bin.
CREATE TABLE tbl1(id INT);
DROP TABLE tbl1 FORCE;
Purge a table from the recycle bin
CREATE TABLE tbl1(id INT);
DROP TABLE tbl1;
-- Forcibly delete the table from the recycle bin.
PURGE TABLE tbl1;