Transitions, visual effects, and filters

更新时间:
复制 MD 格式

Configure transitions, visual effects, and filters by modifying the Timeline parameters in the SubmitMediaProducingJob.

Usage notes

  • Intelligent production supports editing and compositing, effect rendering, and templates for live streams, VOD files, and material files from Object Storage Service (OSS). For more information, see Overview of intelligent production.

  • You can produce a video from one or more videos, audio files, images, and subtitle materials by configuring Timeline parameters and calling the SubmitMediaProducingJob operation.

  • A timeline is created when you add materials and configure effects to create a video. A timeline consists of tracks, materials, and effects. For more information, see Timeline configurations.

  • For more information about how to use the IMS SDK to edit audio and video files, see Get started.

Transitions

Add transitions

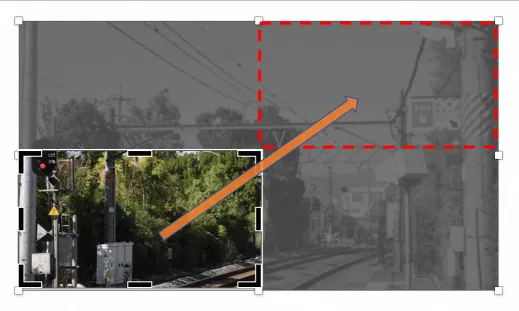
  • Add a wiperight transition between the first and second clips. The transition duration is 1 second by default.

  • Add a perlin transition between the second and third clips with a 2-second duration.

Effect

Timeline example

{
    "VideoTracks": [{
        "VideoTrackClips": [{
            "MediaURL": "https://ice-document-materials.oss-cn-shanghai.aliyuncs.com/test_media",
            "Effects": [{
                "Type": "Transition",
                "SubType": "wiperight"
            }]
        }, {
            "MediaURL": "https://ice-document-materials.oss-cn-shanghai.aliyuncs.com/test_media",
            "Effects": [{
                "Type": "Transition",
                "SubType": "perlin",
                "Duration": 2
            }]
        }, {
            "MediaURL": "https://ice-document-materials.oss-cn-shanghai.aliyuncs.com/test_media/h3.mp4"
        }]
    }]
}

Add random transitions

  • Set SubType to random to apply a randomly selected transition between the first and second clips.

  • Set SubType to wiperight,perlin to randomly apply either wiperight or perlin as the transition between the second and third clips.

Effect

Timeline example

{
    "VideoTracks": [{
        "VideoTrackClips": [{
            "MediaURL": "https://ice-document-materials.oss-cn-shanghai.aliyuncs.com/test_media/h1.mp4",
            "Effects": [{
                "Type": "Transition",
                "SubType": "random"
            }]
        }, {
            "MediaURL": "https://ice-document-materials.oss-cn-shanghai.aliyuncs.com/test_media/h2.mp4",
            "Effects": [{
                "Type": "Transition",
                "SubType": "wiperight,perlin"
            }]
        }, {
            "MediaURL": "http://ice-public-media.oss-cn-shanghai.aliyuncs.com/test_media/h3.mp4"
        }]
    }]
}

Visual effects

Add visual effects to a single clip

Add a horizontal blur effect to the first clip. Place the effect in the clip's Effect array. The effect spans the entire clip duration unless you specify a start and end time.

Effect

Timeline example

{
    "VideoTracks": [{
        "VideoTrackClips": [{
            "MediaURL": "https://ice-document-materials.oss-cn-shanghai.aliyuncs.com/test_media/h1.mp4",
            "Out": 5,
            "Effects": [{
                "Type": "VFX",
                "SubType": "h_blur"
            }]
        },{
            "MediaURL": "https://ice-document-materials.oss-cn-shanghai.aliyuncs.com/test_media/h2.mp4",
            "Out": 5
        }]
    }]
}

Add visual effects to the entire video

Add a horizontal blur effect to the entire video. Place the effect in an independent EffectTracks array. The effect spans the full video duration unless you specify a start and end time.

Effect

Timeline example

{
    "VideoTracks": [{
        "VideoTrackClips": [{
            "MediaURL": "https://ice-document-materials.oss-cn-shanghai.aliyuncs.com/test_media/h1.mp4",
            "Out": 5
        },{
            "MediaURL": "https://ice-document-materials.oss-cn-shanghai.aliyuncs.com/test_media/h2.mp4",
            "Out": 5
        }]
    }],
    "EffectTracks": [{
        "EffectTrackItems": [{
            "Type": "VFX",
            "SubType": "h_blur"
        }]
    }]
}

Add visual effects to part of the video

Set TimelineIn to 3 and TimelineOut to 7 to apply a horizontal blur effect from the 3rd to the 7th second of the video.

Effect

Timeline example

{
    "VideoTracks": [{
        "VideoTrackClips": [{
            "MediaURL": "https://ice-document-materials.oss-cn-shanghai.aliyuncs.com/test_media/h1.mp4",
            "Out": 5
        },{
            "MediaURL": "https://ice-document-materials.oss-cn-shanghai.aliyuncs.com/test_media/h2.mp4",
            "Out": 5
        }]
    }],
    "EffectTracks": [{
        "EffectTrackItems": [{
            "Type": "VFX",
            "SubType": "h_blur",
            "TimelineIn": 3,
            "TimelineOut": 7
        }]
    }]
}

Add random visual effects

  • Set SubType to random to apply a randomly selected visual effect to the first clip.

  • Set SubType to movie,image_in_image to randomly apply either movie or image_in_image as the visual effect on the second clip.

Effect

Timeline example

{
    "VideoTracks": [{
        "VideoTrackClips": [{
            "MediaURL": "http://ice-public-media.oss-cn-shanghai.aliyuncs.com/test_media/h1.mp4",
            "Out": 5,
            "Effects": [{
                "Type": "VFX",
                "SubType": "random"
            }]
        }, {
            "MediaURL": "http://ice-public-media.oss-cn-shanghai.aliyuncs.com/test_media/h2.mp4",
            "Out": 5,
            "Effects": [{
                "Type": "VFX",
                "SubType": "movie,image_in_image"
            }]
        }]
    }]
}

Filters

Add filters to a single clip

Add a gray-orange filter to the first clip. Place the filter in the clip's Effect array. The filter spans the entire clip duration unless you specify a start and end time.

Effect

Timeline example

{
    "VideoTracks": [{
        "VideoTrackClips": [{
            "MediaURL": "https://ice-document-materials.oss-cn-shanghai.aliyuncs.com/test_media/h1.mp4",
            "Out": 5,
            "Effects": [{
                "Type": "Filter",
                "SubType": "m7"
            }]
        },{
            "MediaURL": "https://ice-document-materials.oss-cn-shanghai.aliyuncs.com/test_media/h2.mp4",
            "Out": 5
        }]
    }]
}

Add filters to the entire video

Add a gray-orange filter to the entire video. Place the filter in an independent EffectTracks array. The filter spans the full video duration unless you specify a start and end time.

Effect

Timeline example

{
    "VideoTracks": [{
        "VideoTrackClips": [{
            "MediaURL": "https://ice-document-materials.oss-cn-shanghai.aliyuncs.com/test_media/h1.mp4",
            "Out": 5
        },{
            "MediaURL": "https://ice-document-materials.oss-cn-shanghai.aliyuncs.com/test_media/h2.mp4",
            "Out": 5
        }]
    }],
    "EffectTracks": [{
        "EffectTrackItems": [{
            "Type": "Filter",
            "SubType": "m7"
        }]
    }]
}

Add filters to part of the video

Set TimelineIn to 3 and TimelineOut to 7 to apply a gray-orange filter from the 3rd to the 7th second of the video.

Effect

Timeline example

{
    "VideoTracks": [{
        "VideoTrackClips": [{
            "MediaURL": "https://ice-document-materials.oss-cn-shanghai.aliyuncs.com/test_media/h1.mp4",
            "Out": 5
        },{
            "MediaURL": "https://ice-document-materials.oss-cn-shanghai.aliyuncs.com/test_media/h2.mp4",
            "Out": 5
        }]
    }],
    "EffectTracks": [{
        "EffectTrackItems": [{
            "Type": "Filter",
            "SubType": "m7",
            "TimelineIn": 3,
            "TimelineOut": 7
        }]
    }]
}

Video color grading

Set SubType to color under Filter to adjust video colors.

The following example applies color grading from the 3rd to the 7th second of the video:

  1. Set brightness to -10 to decrease the brightness.

  2. Set contrast to 10 to increase the contrast.

  3. Set saturation to 10 to increase the saturation.

  4. Set dark_corner_ratio to 50 to increase the vignette effect.

Effect

Timeline example

{
    "VideoTracks": [{
        "VideoTrackClips": [{
            "MediaURL": "https://ice-document-materials.oss-cn-shanghai.aliyuncs.com/test_media/h1.mp4",
            "Out": 5
        },{
            "MediaURL": "https://ice-document-materials.oss-cn-shanghai.aliyuncs.com/test_media/h2.mp4",
            "Out": 5
        }]
    }],
    "EffectTracks": [{
        "EffectTrackItems": [{
            "Type": "Filter",
            "SubType": "color",
            "TimelineIn": 3,
            "TimelineOut": 7,
            "ExtParams": "effect=color,brightness=-10,contrast=10,saturation=10,kelvin_temperature=6000,temperature_ratio=0,tint=0,dark_corner_ratio=50"
        }]
    }]
}

Add random filters

Set SubType to random to apply a randomly selected filter to the first clip.

Set SubType to pj2,pj3 to randomly apply either pj2 or pj3 as the filter on the second clip.

Effect

Timeline example

{
    "VideoTracks": [{
        "VideoTrackClips": [{
            "MediaURL": "http://ice-public-media.oss-cn-shanghai.aliyuncs.com/test_media/h1.mp4",
            "Out": 5,
            "Effects": [{
                "Type": "Filter",
                "SubType": "random"
            }]
        }, {
            "MediaURL": "http://ice-public-media.oss-cn-shanghai.aliyuncs.com/test_media/h2.mp4",
            "Out": 5,
            "Effects": [{
                "Type": "Filter",
                "SubType": "pj2,pj3"
            }]
        }]
    }]
}

Ken Burns

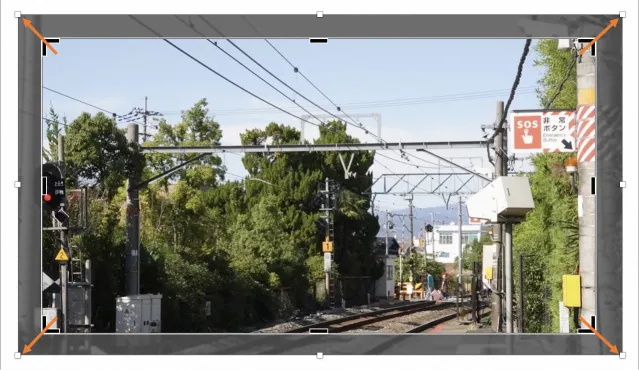
Apply the Ken Burns effect when converting images to videos or creating photo albums.

The following example pans from the lower-left to the upper-right corner of the image.

Effect

Illustration

Timeline example

image

{
    "VideoTracks": [{
        "VideoTrackClips": [{
            "Type": "Image",
            "MediaURL": "https://ice-document-materials.oss-cn-shanghai.aliyuncs.com/test_media/h1.png",
            "Duration": 5,
            "Effects": [{
                "Type": "KenBurns",
                "Start": "0,0.5,0.5,0.5",
                "End": "0.5,0,0.5,0.5"
            }]
        }]
    }]
}

Default effect

Without explicit KenBurns parameters, the default animation depends on input and output orientations:

  1. Same orientation (both landscape or both portrait): slow zoom out.

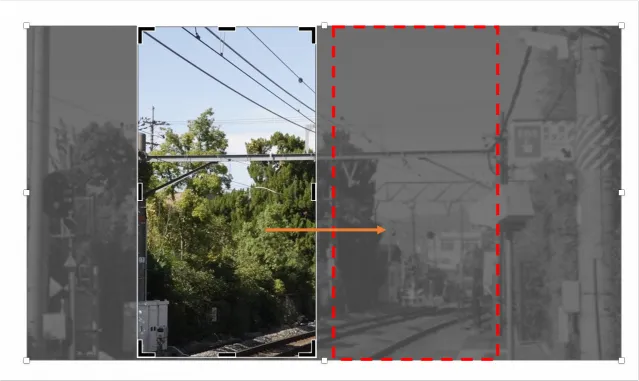
  2. Landscape input to portrait output: slow slide right.

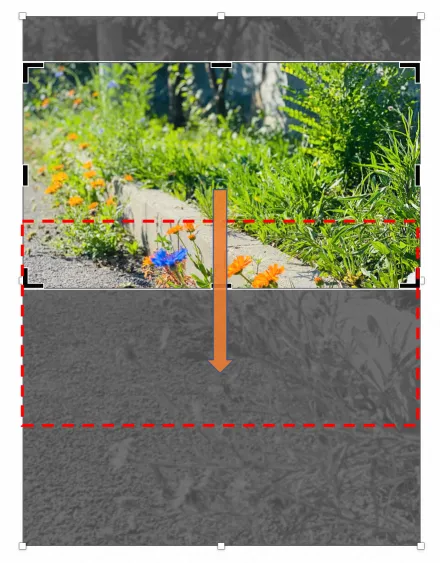
  3. Portrait input to landscape output: slow slide down.

Default effect 1: Slow zoom-out (same orientation)

Effect

Illustration

Timeline example

image

{
    "VideoTracks": [{
        "VideoTrackClips": [{
            "Type": "Image",
            "MediaURL": "https://ice-document-materials.oss-cn-shanghai.aliyuncs.com/test_media/h1.png",
            "Duration": 5,
            "Effects": [{
                "Type": "KenBurns"
            }]
        }]
    }]
}

Default effect 2: Slow slide right (landscape to portrait)

Effect

Illustration

Timeline example

OutputMediaConfig example

image

{
    "VideoTracks": [{
        "VideoTrackClips": [{
            "Type": "Image",
            "MediaURL": "https://ice-document-materials.oss-cn-shanghai.aliyuncs.com/test_media/h1.png",
            "Duration": 5,
            "Effects": [{
                "Type": "KenBurns"
            }]
        }]
    }]
}

Set Width to 1080 and Height to 1920 for portrait output.

{
    "MediaURL": "Specify the OSS URL of the media asset"
    "Width": 1080,
    "Height": 1920
}

Default effect 3: Slow slide down (portrait to landscape)

Effect

Illustration

Timeline example

OutputMediaConfig example

image

{
    "VideoTracks": [{
        "VideoTrackClips": [{
            "Type": "Image",
            "MediaURL": "https://ice-document-materials.oss-cn-shanghai.aliyuncs.com/test_media/v1.jpg",
            "Duration": 5,
            "Effects": [{
                "Type": "KenBurns"
            }]
        }]
    }]
}

Set Width to 1920 and Height to 1080 for landscape output.

{
    "MediaURL": "Specify the OSS URL of the media asset"
    "Width": 1920,
    "Height": 1080
}

Combined example

The following example combines transitions, visual effects, and filters in a single Timeline.

  1. Add a random transition between the first and second clips.

  2. Add a perlin transition between the second and third clips.

  3. Add a visual effect named withcircleflashlight to the first clip.

  4. Add a filter named pl3 to the second clip.

  5. Add a filter named warm to the part between the 11th and 13th seconds of the video.

Effect

Timeline example

{
    "VideoTracks": [{
        "VideoTrackClips": [{
            "MediaURL": "http://ice-public-media.oss-cn-shanghai.aliyuncs.com/test_media/h1.mp4",
            "Out": 6,
            "Effects": [{
                "Type": "Transition",
                "SubType": "random",
                "Duration": 1
            }, {
                "Type": "VFX",
                "SubType": "withcircleflashlight"
            }]
        }, {
            "MediaURL": "http://ice-public-media.oss-cn-shanghai.aliyuncs.com/test_media/h2.mp4",
            "Out": 6,
            "Effects": [{
                "Type": "Transition",
                "SubType": "perlin",
                "Duration": 1
            }, {
                "Type": "Filter",
                "SubType": "pl3"
            }]
        }, {
            "MediaURL": "http://ice-public-media.oss-cn-shanghai.aliyuncs.com/test_media/h3.mp4",
            "Out": 5
        }]
    }],
    "EffectTracks": [{
        "EffectTrackItems": [{
            "Type": "Filter",
            "SubType": "warm",
            "TimelineIn": 11,
            "TimelineOut": 13
        }]
    }]
}

References