Device OTA development
Over-the-Air (OTA) technology lets you remotely update devices. IoT Platform supports OTA firmware updates for devices.
Background
The following figure shows the firmware update process based on the MQTT protocol.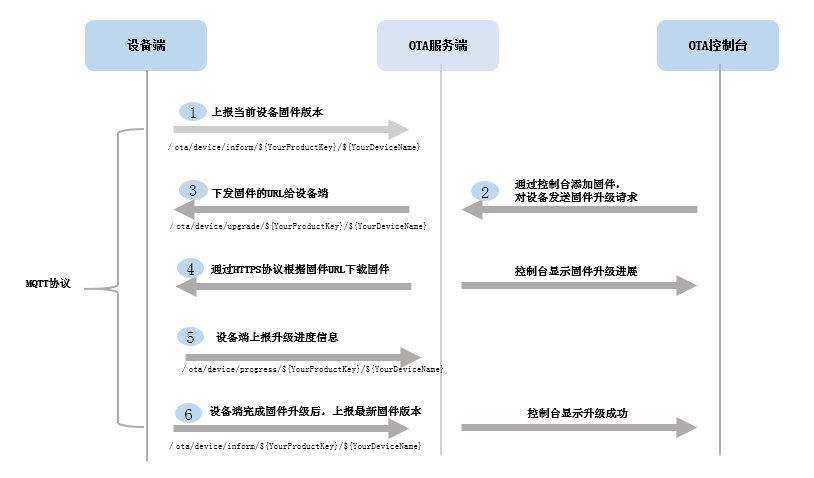
OTA example walkthrough
-
You can use OTA APIs to download firmware to a device. However, you must implement the logic to store and apply the downloaded firmware.
-
Storing the firmware means saving the downloaded firmware to a storage medium, such as flash memory.
-
Applying the firmware, which includes loading the newly downloaded firmware, depends on your specific business requirements, such as requiring a user to click an upgrade button.
For the complete OTA workflow, see OTA Service.
The following examples show how to implement OTA features using the basic API and the advanced API.
OTA example: Basic API
This section uses the src/ota/examples/ota_example_mqtt.c example to demonstrate how to implement OTA features using the basic API.
-
Set the device trituple and initialize the connection for the OTA service.
int main(int argc, char *argv[]) { ... /**< Get device information. */ HAL_SetProductKey(PRODUCT_KEY); HAL_SetDeviceName(DEVICE_NAME); HAL_SetDeviceSecret(DEVICE_SECRET); /**< end*/ _ota_mqtt_client() } -
In the
_ota_mqtt_clientfunction, establish a connection and configure the main OTA logic./* Device AUTH */ if (0 != IOT_SetupConnInfo(g_product_key, g_device_name, g_device_secret, (void **)&pconn_info)) { EXAMPLE_TRACE("AUTH request failed!"); rc = -1; goto do_exit; } /* Initialize MQTT parameter */ memset(&mqtt_params, 0x0, sizeof(mqtt_params)); mqtt_params.port = pconn_info->port; mqtt_params.host = pconn_info->host_name; mqtt_params.client_id = pconn_info->client_id; mqtt_params.username = pconn_info->username; mqtt_params.password = pconn_info->password; mqtt_params.pub_key = pconn_info->pub_key; mqtt_params.request_timeout_ms = 2000; mqtt_params.clean_session = 0; mqtt_params.keepalive_interval_ms = 60000; mqtt_params.read_buf_size = OTA_MQTT_MSGLEN; mqtt_params.write_buf_size = OTA_MQTT_MSGLEN; mqtt_params.handle_event.h_fp = event_handle; mqtt_params.handle_event.pcontext = NULL; /* Construct an MQTT client with the specified parameters. */ pclient = IOT_MQTT_Construct(&mqtt_params); if (NULL == pclient) { EXAMPLE_TRACE("MQTT construct failed"); rc = -1; goto do_exit; } -
In the
_ota_mqtt_clientfunction, initialize OTA. This involves subscribing to the device's firmware update notifications.h_ota = IOT_OTA_Init(PRODUCT_KEY, DEVICE_NAME, pclient); if (NULL == h_ota) { rc = -1; EXAMPLE_TRACE("initialize OTA failed"); goto do_exit; } -
Create a loop to continuously listen for OTA update messages.
    int ota_over = 0;
    do {
        uint32_t firmware_valid;
        EXAMPLE_TRACE("wait ota upgrade command....");

        /* Receive MQTT messages. */
        IOT_MQTT_Yield(pclient, 200);

        /* Check if the received message is a firmware update notification. */
        if (IOT_OTA_IsFetching(h_ota)) {
         /* Download the OTA content and report the download progress. */
         /* Verify the MD5 hash of the firmware. */
        }

        } while (!ota_over);
The firmware update logic can be executed only when the
IOT_OTA_IsFetchingfunction returns 1. This occurs after a firmware update event is pushed from the server. The following steps describe how to push a firmware update event.-
Go to the OTA Service page in the IoT Platform console and click Add New Firmware.
-
Click Create Firmware and then Verify Firmware.
-
Click Batch Upgrade for the new firmware. Select the product that corresponds to the device trituple in examples/ota/ota_mqtt-example.c.
-
From the target version drop-down list, select the current version. Set Upgrade Scope to Directional Upgrade. From the Equipment Scope list, select the device that corresponds to your device trituple, and then click OK.
-
-
Download the OTA content and report the progress.
do { /* Download the OTA firmware. */ len = IOT_OTA_FetchYield(h_ota, buf_ota, OTA_BUF_LEN, 1); if (len > 0) { if (1 != fwrite(buf_ota, len, 1, fp)) { EXAMPLE_TRACE("write data to file failed"); rc = -1; break; } } else { /* Report the download progress. */ IOT_OTA_ReportProgress(h_ota, IOT_OTAP_FETCH_FAILED, NULL); EXAMPLE_TRACE("ota fetch fail"); } /* Get OTA information. */ /* Get the downloaded data size, total file size, MD5 information, and version. */ IOT_OTA_Ioctl(h_ota, IOT_OTAG_FETCHED_SIZE, &size_downloaded, 4); IOT_OTA_Ioctl(h_ota, IOT_OTAG_FILE_SIZE, &size_file, 4); IOT_OTA_Ioctl(h_ota, IOT_OTAG_MD5SUM, md5sum, 33); IOT_OTA_Ioctl(h_ota, IOT_OTAG_VERSION, version, 128); last_percent = percent; percent = (size_downloaded * 100) / size_file; if (percent - last_percent > 0) { /* Report the download progress. */ IOT_OTA_ReportProgress(h_ota, percent, NULL); IOT_OTA_ReportProgress(h_ota, percent, "hello"); } IOT_MQTT_Yield(pclient, 100); /* Check if the download is complete. */ } while (!IOT_OTA_IsFetchFinish(h_ota)); -
Verify the MD5 hash value.
IOT_OTA_Ioctl(h_ota, IOT_OTAG_CHECK_FIRMWARE, &firmware_valid, 4); if (0 == firmware_valid) { EXAMPLE_TRACE("The firmware is invalid"); } else { EXAMPLE_TRACE("The firmware is valid"); } ota_over = 1; -
Call
IOT_OTA_Deinitto release all resources.if (NULL != h_ota) { IOT_OTA_Deinit(h_ota); } if (NULL != pclient) { IOT_MQTT_Destroy(&pclient); } if (NULL != msg_buf) { HAL_Free(msg_buf); } if (NULL != msg_readbuf) { HAL_Free(msg_readbuf); } if (NULL != fp) { fclose(fp); } return rc; -
Store the firmware.
In the
_ota_mqtt_clientfunction, use the following functions to open, write to, and close a file.fp = fopen("ota.bin", "wb+") ... if (1 != fwrite(buf_ota, len, 1, fp)) { EXAMPLE_TRACE("write data to file failed"); rc = -1; break; } ... if (NULL != fp) { fclose(fp); }
OTA example: Advanced API
This section uses the src/dev_model/examples/linkkit_example_solo.c example to demonstrate how to implement OTA features using the advanced API.
-
Initialize the master device, register the Firmware-over-the-air (FOTA) callback, and establish a connection to the cloud.
int res = 0; int domain_type = 0, dynamic_register = 0, post_reply_need = 0; iotx_linkkit_dev_meta_info_t master_meta_info; memset(&g_user_example_ctx, 0, sizeof(user_example_ctx_t)); memset(&master_meta_info, 0, sizeof(iotx_linkkit_dev_meta_info_t)); memcpy(master_meta_info.product_key, PRODUCT_KEY, strlen(PRODUCT_KEY)); memcpy(master_meta_info.product_secret, PRODUCT_SECRET, strlen(PRODUCT_SECRET)); memcpy(master_meta_info.device_name, DEVICE_NAME, strlen(DEVICE_NAME)); memcpy(master_meta_info.device_secret, DEVICE_SECRET, strlen(DEVICE_SECRET)); /* Register Callback */ ... ... IOT_RegisterCallback(ITE_FOTA, user_fota_event_handler); domain_type = IOTX_CLOUD_REGION_SHANGHAI; IOT_Ioctl(IOTX_IOCTL_SET_DOMAIN, (void *)&domain_type); /* Choose Login Method */ dynamic_register = 0; IOT_Ioctl(IOTX_IOCTL_SET_DYNAMIC_REGISTER, (void *)&dynamic_register); /* post reply doesn't need */ post_reply_need = 1;IOT_Ioctl(IOTX_IOCTL_RECV_EVENT_REPLY, (void *)&post_reply_need); /* Create Master Device Resources */ g_user_example_ctx.master_devid = IOT_Linkkit_Open(IOTX_LINKKIT_DEV_TYPE_MASTER, &master_meta_info); if (g_user_example_ctx.master_devid < 0) { EXAMPLE_TRACE("IOT_Linkkit_Open Failed\n"); return -1;} /* Start Connect Aliyun Server */ res = IOT_Linkkit_Connect(g_user_example_ctx.master_devid); if (res < 0) { EXAMPLE_TRACE("IOT_Linkkit_Connect Failed\n"); return -1; } -
Implement the
user_fota_event_handlercallback from the preceding code.This callback is triggered in two scenarios:
-
The device receives a new firmware update notification from the cloud.
-
The device initiates a query for a new firmware update, and the cloud responds with a notification.
After receiving the notification, call
IOT_Linkkit_Queryto download the firmware.int user_fota_event_handler(int type, const char *version){ char buffer[128] = {0}; int buffer_length = 128; /* 0 - new firmware exist, query the new firmware */ if (type == 0) { EXAMPLE_TRACE("New Firmware Version: %s", version); IOT_Linkkit_Query(EXAMPLE_MASTER_DEVID, ITM_MSG_QUERY_FOTA_DATA, (unsigned char *)buffer, buffer_length); } return 0; } -
-
Store the firmware.
You must implement the following three Hardware Abstraction Layer (HAL) interfaces to store the firmware.
/* Called by the SDK before the firmware download starts. */ void HAL_Firmware_Persistence_Start(void); /* Called by the SDK when it receives firmware data. */ int HAL_Firmware_Persistence_Write(char *buffer, uint32_t length); /* Called by the SDK when the firmware download is complete. */ int HAL_Firmware_Persistence_Stop(void); -
Manually query for a new firmware update.
IOT_Linkkit_Query(user_example_ctx->master_devid, ITM_MSG_REQUEST_FOTA_IMAGE,
                      (unsigned char *)("app-1.0.0-20180101.1001"), 30);
OTA support for multiple modules
In addition to device firmware updates, OTA can also download and update software modules on a device. You must create modules in the IoT Platform console.
In the Add New Firmware dialog box, find the Firmware Module field, select Add New Module, and enter a module name, such as mcu.
In your device-side code, you must set the module parameter to match the module name you configured in the console:
char* module = "mcu";
IOT_Ioctl(IOTX_IOCTL_SET_MODULE, (void *)module);
The rest of the process is the same as a standard OTA test. After you deploy the update task from the IoT Platform console, the device generates logs similar to the following. Pay attention to the module field:
[dbg] otamqtt_UpgrageCb(111): topic=/ota/device/upgrade/a1******PjW/foDzDj*******3PDJ9d
[dbg] otamqtt_UpgrageCb(112): len=431, topic_msg={"code":"1000","data":{"size":143360,"module":"mcu","sign":"867f1536fb********a2205436252","version":"111","url":"https://iotx-******ily.oss-cn-shanghai.aliyuncs.com/ota/338ac9db05545dcab9*********52/ck75mi***********5xbgz61vl.tar?Expires=1582951757&OSSAccessKeyId=aS4***********j6Gy&Signature=urw%2F9WAlizQui*************0A%3D","signMethod":"Md5","md5":"867f1536fb*********436252"},"id":1582865357795,"message":"success"}
[dbg] otamqtt_UpgrageCb(129): receive device upgrade
[inf] ofc_Init(47): protocol: https
received state: -0x092C(msg queue size: 0, max size: 50)
received state: -0x092C(msg enqueue w/ message type: 43)
received state: -0x092C(msg dequeue)
received state: -0x0938(alink event type: 43)
received state: -0x0938(new fota information received, 111)
user_fota_module_event_handler.219: New Firmware Version: 111, module: mcu