Integrate the SDK on modules that support MQTT
Scenario description
Link SDK is a device-side software development kit (SDK) from Alibaba Cloud IoT Platform that connects devices to the platform. It handles features such as device authentication and data communication. Integrating Link SDK into a communication module provides the following benefits:
Device manufacturers can connect to Alibaba Cloud IoT Platform by calling the AT commands provided by the module, instead of managing the connection on the microcontroller unit (MCU). This method avoids increasing the resource consumption of the MCU.
Alibaba Cloud lists certified module models, purchase links, and development guides on its certified partners page. This helps device manufacturers and service providers (SPs) purchase certified communication modules to connect to Alibaba Cloud IoT Platform.
The following figure shows how to develop a device using a module with an integrated SDK.

The development flow for device manufacturers is as follows:
Purchase a module that has the Alibaba Cloud Link SDK integrated.
Use the AT commands provided by the module on the MCU to connect to Alibaba Cloud and to send and receive data from Alibaba Cloud IoT Platform.
Deploy cloud services on Alibaba Cloud IoT Platform to manage the device.
Module manufacturers must complete the following tasks on the module:
Integrate Link SDK into the module correctly.
Provide AT commands that the MCU can call to connect to Alibaba Cloud IoT Platform.
Document objective
This topic explains how to integrate Link SDK into a module that already supports the Message Queuing Telemetry Transport (MQTT) protocol. This helps module manufacturers understand the general process of SDK integration. To simplify the process, this topic explains only how to integrate the device signature module of Link SDK. This allows the module to connect to Alibaba Cloud IoT Platform.
Because the module already supports the MQTT protocol, the SDK uses the existing MQTT functional modules on the module. Link SDK provides an API to generate the ClientID, UserName, Password, and other information required to connect to the Alibaba Cloud IoT Platform MQTT broker. The module manufacturer then uses this data to establish a connection with the Alibaba Cloud IoT Platform broker. This allows the module to subscribe to MQTT topics or send data to specified topics.
Create a Basic Edition product in Alibaba Cloud IoT Platform
When you debug the module, you can create a test product and a test device to verify that the SDK is working correctly. To create a device, perform the following steps:
Log on to the Alibaba Cloud IoT Platform console. You must register an Alibaba Cloud account. Registration is free.
Follow the steps in Create a single device to add a test device. You can obtain the device_name and device_secret of the device on the device page.
The following section describes the development process for integrating the SDK on a module.
SDK integration development process
When you integrate the SDK, follow the development process below:

SDK configuration and code extraction
The SDK includes many features. To prevent the SDK from consuming excessive RAM and flash memory, it provides configuration and extraction tools. These tools allow developers to use only the components they need.
Configure the SDK
The following section explains how to configure the required software features.
Run the configuration command
Linux
Go to the root directory of the SDK and run the following command:
make menuconfig
Windows operating system
Run config.bat in the root directory of the SDK.
config.bat
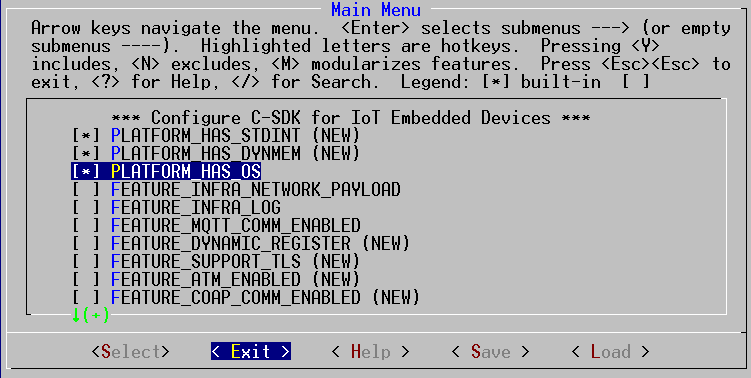
Both methods start the SDK configuration tool. The interface is displayed as follows:
Note:
An asterisk (*) next to a feature option indicates that the feature is enabled. The absence of an asterisk indicates that the feature is disabled.
The table shows the configurable options. The core features of the SDK remain active even if you disable all configurable options.
Press the space bar to select or deselect a feature. Use the up and down arrow keys on the keypad to switch between features.
To learn about an option, use the arrow keys to move the highlight bar to that option and press the 'h' key on your keyboard. A help text appears that explains the option and the effects of enabling or disabling it.
For this scenario:
If the development environment supports stdint.h, enable PLATFORM_HAS_STDINT.
If the development environment supports malloc/free, enable PLATFORM_HAS_DYNMEM.
If the runtime environment has an OS, enable PLATFORM_HAS_OS.
Disable all other options. After you complete the configuration, select the 'Exit' button and save the configuration when prompted.
Extract the SDK code
The following section explains how to extract the SDK code.
Run the extraction command
Linux
Go to the root directory of the SDK and run the following command:
sh ./extract.sh
Windows operating system
You can run config.bat in the root directory of the SDK.
extract.bat
Both methods start the SDK code extraction tool. The tool extracts the required files and places them in the output directory, as shown in the following figure: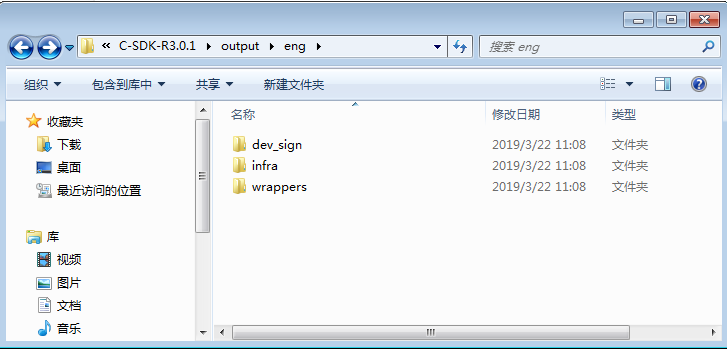
Add SDK files to your project
You can copy the eng folder from the output directory to your project directory. Then, add the code files to your project.
The files to add are in the eng/dev_sign, eng/infra, and eng/wrappers directories. When you compile, you must also specify these directories in the header file search path.
HAL adaptation
None
Integrate Link SDK with your existing MQTT
Generate MQTT ClientID, UserName, and Password
When an MQTT client connects to an MQTT broker, it must specify information such as the ClientID, UserName, and Password. Link SDK provides the IOT_Sign_MQTT() API to generate this data:
int32_t IOT_Sign_MQTT(iotx_mqtt_region_types_t region, iotx_dev_meta_info_t *meta, iotx_sign_mqtt_t *signout)
Note: To use this function, you must include the dev_sign_internal.h header file:
#include "dev_sign_internal.h"
Input parameter descriptions
region
Specifies the Alibaba Cloud IoT Platform site to which you want to connect. The available values are defined in the eng/infra/infra_defs.h file:
typedef enum {
    IOTX_CLOUD_REGION_SHANGHAI,   /* Shanghai */
    IOTX_CLOUD_REGION_SINGAPORE,  /* Singapore */
    IOTX_CLOUD_REGION_JAPAN,      /* Japan */
    IOTX_CLOUD_REGION_USA_WEST,   /* America */
    IOTX_CLOUD_REGION_GERMANY,    /* Germany */
    IOTX_CLOUD_REGION_CUSTOM,     /* Custom setting */
    IOTX_CLOUD_DOMAIN_MAX         /* Maximum number of domain */
} iotx_mqtt_region_types_t;
If the module is sold in China, set this parameter to IOTX_CLOUD_REGION_SHANGHAI.
meta
Specifies the device credentials. The data structure is defined as follows:
typedef struct {
    char product_key[IOTX_PRODUCT_KEY_LEN + 1];
    char product_secret[IOTX_PRODUCT_SECRET_LEN + 1];
    char device_name[IOTX_DEVICE_NAME_LEN + 1];
    char device_secret[IOTX_DEVICE_SECRET_LEN + 1];
} iotx_dev_meta_info_t;
The device manufacturer requests these four variables for each device after defining the product in Alibaba Cloud IoT Platform. In actual product development, these parameters must be passed from the MCU to the module through AT commands.
Response parameter descriptions
signout
This parameter outputs the ClientID, Username, Password, and other information required to connect to the MQTT broker. The data structure is defined as follows:
typedef struct {
    char hostname[DEV_SIGN_HOSTNAME_MAXLEN];
    uint16_t port;
    char clientid[DEV_SIGN_CLIENT_ID_MAXLEN];
    char username[DEV_SIGN_USERNAME_MAXLEN];
    char password[DEV_SIGN_PASSWORD_MAXLEN];
} iotx_sign_mqtt_t;
In this structure, hostname is the domain name of the MQTT broker for the Alibaba Cloud IoT Platform site, and port is the port number of the MQTT broker.
Return value description
The function returns 0 on success and -1 on failure.
Usage example
The eng/examples/dev_sign_example.c file demonstrates how to use the IOT_Sign_MQTT() function. The following snippet shows an example:
#define EXAMPLE_PRODUCT_KEY     "a1X2bEnP82z"
#define EXAMPLE_PRODUCT_SECRET  "7jluWm1zql7bt8qK"
#define EXAMPLE_DEVICE_NAME     "example1"
#define EXAMPLE_DEVICE_SECRET   "ga7XA6KdlEeiPXQPpRbAjOZXwG8ydgSe"

/* Implement this HAL or use "printf" of your own system if you want to print something in the example. */
void HAL_Printf(const char *fmt, ...);

int main(int argc, char *argv[])
{
    iotx_mqtt_region_types_t region = IOTX_CLOUD_REGION_SHANGHAI;
    iotx_dev_meta_info_t meta;
    iotx_sign_mqtt_t sign_mqtt;

    memset(&meta,0,sizeof(iotx_dev_meta_info_t));
    memcpy(meta.product_key,EXAMPLE_PRODUCT_KEY,strlen(EXAMPLE_PRODUCT_KEY));
    memcpy(meta.product_secret,EXAMPLE_PRODUCT_SECRET,strlen(EXAMPLE_PRODUCT_SECRET));
    memcpy(meta.device_name,EXAMPLE_DEVICE_NAME,strlen(EXAMPLE_DEVICE_NAME));
    memcpy(meta.device_secret,EXAMPLE_DEVICE_SECRET,strlen(EXAMPLE_DEVICE_SECRET));

    if (IOT_Sign_MQTT(region,&meta,&sign_mqtt) < 0) {
        return -1;
    }
    ...
}
In this example, the device's product_key, product_secret, device_name, and device_secret use fixed values. In a real product runtime, the MCU must provide these values to the module.
When you debug the module, you must create a product and a test device in Alibaba Cloud IoT Platform. Then, use the product_key, product_secret, device_name, and device_secret that the platform generates for the device.
Upload the module provider code and module model
If you want to submit your module to Alibaba Cloud IoT for certification, you must report your module provider code and module model. This allows Alibaba Cloud IoT Platform to track the number of devices that connect to the platform using a specific module provider and module model.
Before you integrate the SDK, contact Alibaba Cloud to obtain the module provider code and module model. Send an email to linkcertification@list.alibaba-inc.com with the subject 'Module/Chip Model Application'. Note: If you are not a module provider, you do not need to apply for a code.
After the module establishes a connection with Alibaba Cloud IoT Platform, copy and call the following function to report the information. The `pid` parameter is the module provider code, and the `mid` parameter is the model code:
#define PID_STRING_LEN_MAX          32  /* Maximum length of the PID string */
#define MID_STRING_LEN_MAX          32  /* Maximum length of the MID string */


int example_report_pid_mid(void *pclient, const char *product_key, const char *device_name, const char *pid, const char *mid)
{
    int res = 0;
    iotx_mqtt_topic_info_t topic_msg;

    const char topic_frag1[] = "/sys/";
    const char topic_frag2[] = "/thing/deviceinfo/update";
    char topic[sizeof(topic_frag1) + sizeof(topic_frag2) + IOTX_PRODUCT_KEY_LEN + IOTX_DEVICE_NAME_LEN] = {0};

    const char payload_frag1[] = "{\"id\":\"0\",\"version\":\"1.0\",\"params\":[{\"attrKey\":\"SYS_MODULE_ID\",\"attrValue\":\"";
    const char payload_frag2[] = "\",\"domain\":\"SYSTEM\"},{\"attrKey\":\"SYS_PARTNER_ID\",\"attrValue\":\"";
    const char payload_frag3[] = "\",\"domain\":\"SYSTEM\"}],\"method\": \"thing.deviceinfo.update\"}";
    char payload[sizeof(payload_frag1) + sizeof(payload_frag2) + sizeof(payload_frag3) + PID_STRING_LEN_MAX + MID_STRING_LEN_MAX] = {0};

    if (strlen(pid) > PID_STRING_LEN_MAX || strlen(mid) > MID_STRING_LEN_MAX) {
        return -1;
    }

    /* Assemble the MQTT topic string. */
    memcpy(topic, topic_frag1, strlen(topic_frag1));
    memcpy(topic + strlen(topic), product_key, strlen(product_key));
    memcpy(topic + strlen(topic), "/", 1);
    memcpy(topic + strlen(topic), device_name, strlen(device_name));
    memcpy(topic + strlen(topic), topic_frag2, strlen(topic_frag2));

    /* Assemble the MQTT payload string. The payload contains the PID and MID strings. */
    memcpy(payload, payload_frag1, strlen(payload_frag1));
    memcpy(payload + strlen(payload), mid, strlen(mid));
    memcpy(payload + strlen(payload), payload_frag2, strlen(payload_frag2));
    memcpy(payload + strlen(payload), pid, strlen(pid));
    memcpy(payload + strlen(payload), payload_frag3, strlen(payload_frag3));

    topic_msg.qos = IOTX_MQTT_QOS0;
    topic_msg.retain = 0;
    topic_msg.dup = 0;
    topic_msg.payload = (void *)payload;
    topic_msg.payload_len = strlen(payload);

    /* Use the MQTT publish API to send the message that contains the PID and MID.
       Because you are using the module's built-in MQTT feature, replace the following publish function with your actual publish function during integration. */
    res = IOT_MQTT_Publish(pclient, topic, &topic_msg);
    if (res < 0) {
        return -1;
    }

    return 0;
}
Debug
Connect the module to Alibaba Cloud IoT Platform
You must write a function to connect the module to Alibaba Cloud IoT Platform. The MQTT on the module should provide a function to connect to the MQTT broker. In this function, you must input the domain name, port, ClientID, username, and password that are obtained by calling the Link SDK IOT_Sign_MQTT() API.
The following pseudocode is an example of integrating the SDK with mosquitto, an open source MQTT library:
        // Call the signature function to get MQTT username, password, clientID, and other information.
        IOT_Sign_MQTT(region,&meta,&sign_mqtt);

        mosquitto_lib_init();

        // The following code sets the MQTT clientID and cleansession parameters.
        mosq = mosquitto_new(sign_mqtt.clientid,0/*dont clean session*/,NULL);
        if(mosq==NULL){
                printf("Error:Failed creating mosquitto client\n\r");
                return(-1);
        }
        // The following code sets the username and password for the MQTT connection.
        if(0 != mosquitto_username_pw_set(mosq, sign_mqtt.username, sign_mqtt.password)){
                printf("Error:Failed setting username or password\n\r");
                return(-1);
        }

        ...
        // The following code establishes a connection to the MQTT broker. It uses the domain name and port.
        if(mosquitto_connect(mosq, sign_mqtt.hostname, sign_mqtt.port, kaInterval)){
                printf("Error: Failed connecting cloud.\n\r");
                sleep(1);
                return -1;
        }
Note: When you establish an MQTT connection, you must also specify the keepalive interval. The recommended value is 60 seconds. You can also provide an AT command to allow the MCU to dynamically modify this parameter. Alibaba Cloud IoT Platform accepts a keepalive interval between 30 and 1,200 seconds.
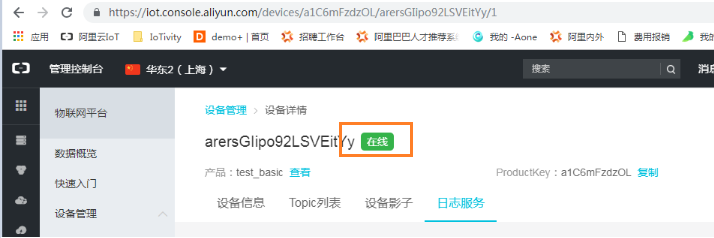
After the module connects to IoT Platform, it remains online if it does not disconnect the MQTT connection. You can find the test device in the Alibaba Cloud IoT Platform console to view its status. The following figure shows the status of an online device:
How to check if the program can send data to IoT Platform
After the module establishes a connection with Alibaba Cloud IoT Platform, you can send a message to the /${productKey}/${deviceName}/get topic to check whether data can be sent to the platform correctly.
Note: The /${productKey}/${deviceName}/get topic has only 'Subscribe' permission by default. In the IoT Platform console, change its permission to 'Publish and Subscribe'. This change prevents the cloud from discarding the message after it is sent. Changing the topic permission to 'Publish and Subscribe' is mainly to ensure that the example program runs without errors.
The following is a reference implementation example:
    int res = 0;
    iotx_mqtt_topic_info_t topic_msg;
    const char *fmt = "/%s/%s/get";
    char *topic = NULL;
    int topic_len = 0;
    char *payload = "hello,world";

    topic_len = strlen(fmt) + strlen(product_key) + strlen(device_name) + 1;
    topic = HAL_Malloc(topic_len);
    if (topic == NULL) {
        HAL_Printf("memory not enough\n");
        return -1;
    }
    memset(topic, 0, topic_len);
    // Generate the topic here.
    HAL_Snprintf(topic, topic_len, fmt, product_key, device_name);

        // The following code generates a message.
    memset(&topic_msg, 0x0, sizeof(iotx_mqtt_topic_info_t));
    topic_msg.qos = IOTX_MQTT_QOS0;
    topic_msg.retain = 0;
    topic_msg.dup = 0;
    topic_msg.payload = (void *)payload;
    topic_msg.payload_len = strlen(payload);

        // The following code sends a message to the specified topic.
        // Replace the sending function below with the MQTT Publish function on your module.
    res = IOT_MQTT_Publish(handle, topic, &topic_msg);
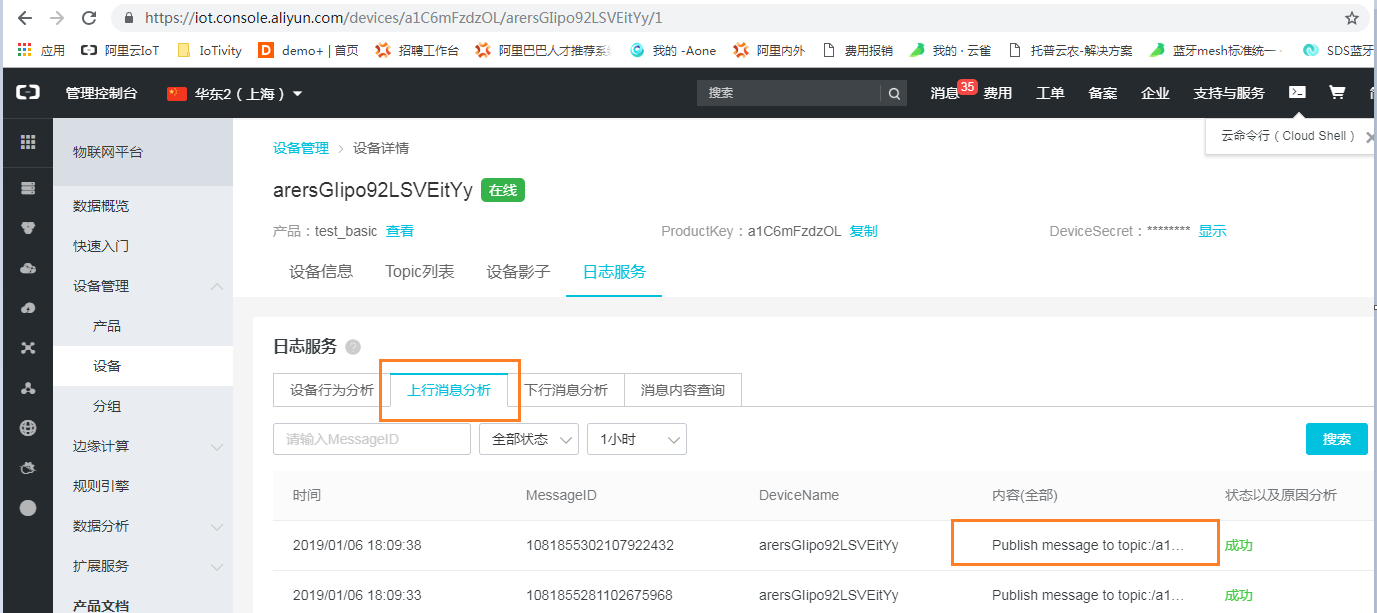
In the IoT Platform console, you can check the Simple Log Service for the specific device to see whether the platform has received the data:
Note:
The log shows the time that the message was received from the device and the topic of the message. It does not show the content of the message.
Alibaba Cloud IoT Platform currently does not support Quality of Service (QoS) 2.
How to check if the program has subscribed to a topic correctly
You can subscribe to the /{productKey}/${deviceName}/get topic. This way, when the device reports data to IoT Platform, the platform sends the data back to the device. This lets you verify that the subscription is working correctly. The following is a pseudocode example:
    int res = 0;
    const char *fmt = "/%s/%s/get";
    char *topic = NULL;
    int topic_len = 0;

    topic_len = strlen(fmt) + strlen(product_key) + strlen(device_name) + 1;
    topic = HAL_Malloc(topic_len);
    if (topic == NULL) {
        HAL_Printf("memory not enough\n");
        return -1;
    }
    // The following code assembles the topic.
    memset(topic, 0, topic_len);
    snprintf(topic, topic_len, fmt, product_key, device_name);

    /* The following code subscribes to the topic and specifies the message handler function.
      Replace the code below with the actual MQTT subscribe function on your module. */
    res = IOT_MQTT_Subscribe(handle, topic, IOTX_MQTT_QOS0, example_message_arrive, NULL);
In the IoT Platform console, you can check whether the platform has sent the data to the device:
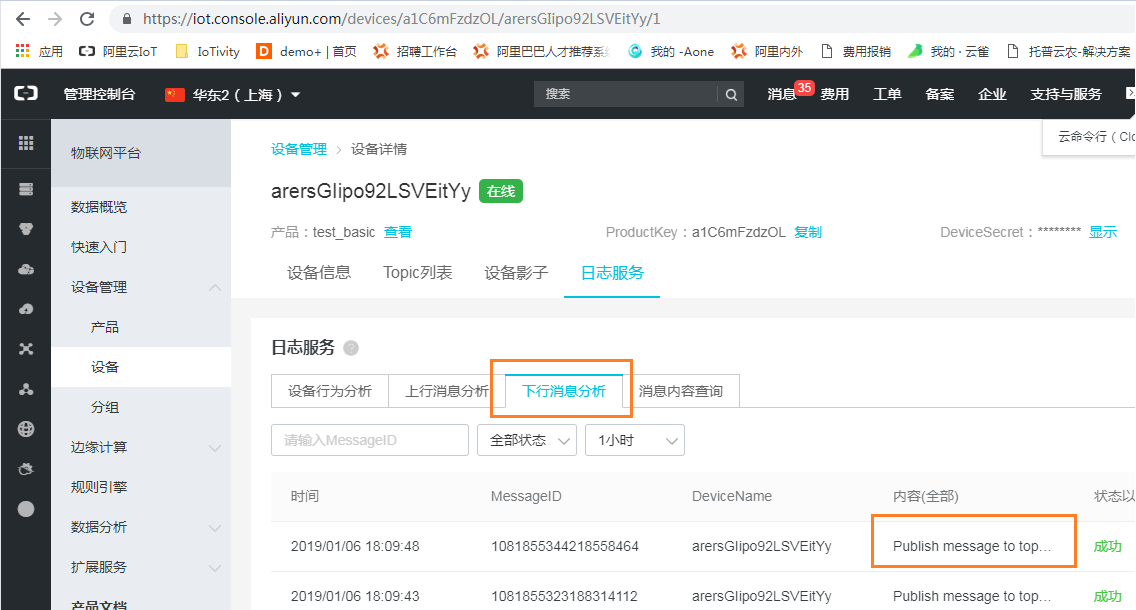
Note:
The log shows the time that the message was sent to the device. It does not show the message content.
You must check on the module to verify that the received data is the same as the data you uploaded. This ensures that data reception is working correctly.
AT command implementation
You also need to provide AT commands for the MCU to call. Because the module already supports MQTT, it should already provide interfaces for MQTT connection configuration, connection initiation, disconnection, subscription, and publishing. After you integrate Link SDK, you can add new AT commands for Alibaba Cloud or modify the existing ones.
The following are recommended AT commands to add:
Command | Description |
Alibaba Cloud device credential settings | Set the device's product_key, product_secret, device_name, and device_secret. |
Alibaba Cloud region settings | Alibaba Cloud IoT provides multiple cloud sites in regions such as China, the United States, and Japan. This allows the MCU to specify the Alibaba Cloud IoT site and port to connect to. |
For the remaining MQTT instructions, you can continue to use the ones from the module vendor.