MCU + TCP-capable module
Scenario: The device hardware consists of a microcontroller unit (MCU) and a communication module. The application logic runs on the MCU. The module supports TCP but not MQTT. The MCU uses AT commands provided by the module to control when the module connects to the cloud service and sends or receives data.
In this example, the sample application, SDK, and TCP module driver consume approximately 11 KB of RAM.
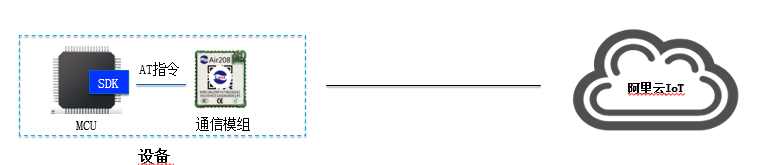
In this scenario, the device manufacturer must integrate and run the Link SDK on the MCU. This allows the Link SDK to connect to Alibaba Cloud IoT Platform through the communication module.
Document objective
This document explains how to port the SDK to the MCU and use it with the communication module to communicate with Alibaba Cloud IoT Platform. To simplify the porting process, this document uses the development of a Basic Edition product on the MCU as a case study. To use other SDK features on the MCU, you must first ensure that the Basic Edition example runs correctly. Then, you can reconfigure the SDK to enable additional features for your product development.
Device-side development process
The device-side development process is shown in the following figure.

SDK configuration and code extraction
The SDK includes various functional modules. You must decide the following:
Which features to use (SDK configuration).
The SDK provides a configuration tool to enable the required features. Each feature's configuration option is named in the format of FEATURE_MQTT_XXX. The following sections describe the available configurable features.
How the SDK exchanges data with the external module.
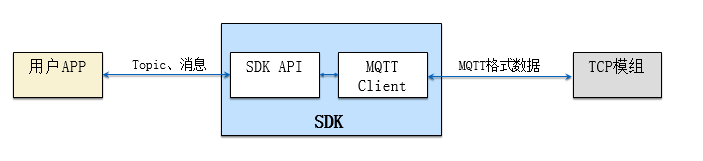
The SDK uses MQTT to communicate with Alibaba Cloud IoT Platform. If the module supports only TCP, you must enable the SDK's built-in MQTT client on the MCU. This client encapsulates user data into MQTT protocol messages and sends them to Alibaba Cloud IoT Platform through the module's TCP layer, as shown in the following figure.
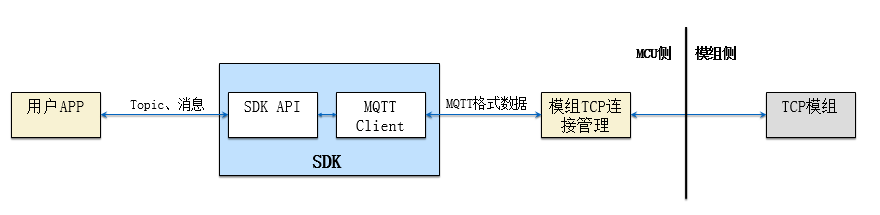
When the MQTT client works with the module, you must implement a TCP connection management module to perform the following functions:
Control the module to establish a TCP connection to Alibaba Cloud IoT Platform and record the TCP connection ID that is returned by the module.
When the MQTT client sends data, transmit the data using the TCP connection ID that is created by the MQTT client.
Receive character stream data from the module and forward only the data from the TCP connection ID that is established by the MQTT client to the MQTT client.
If the MQTT client receives and processes data slower than the module sends data to the MCU, you must buffer the incoming data to prevent data loss.
The relationship between this TCP connection management module and the SDK/TCP module is shown in the following figure.
The Link SDK includes a module for TCP connection management and data buffering called AT TCP. If you have not implemented such a module on the MCU, you can use the AT TCP module that is provided by the SDK.
The MCU typically connects to the module using a Universal Asynchronous Receiver-Transmitter (UART). Therefore, you must write code to initialize the UART and receive data from the module. Because a UART receives data one character at a time, you must also assemble the received characters and determine whether an AT command carries TCP data. Only then can you forward the TCP data to the TCP connection management module. The relationship among this module, the SDK, and the communication module is shown in the following figure.

The Link SDK includes an AT parsing module called AT Parser. If you have not implemented such a module, you can enable the AT Parser module in the Link SDK to reduce your development effort.
SDK-to-module integration structure
The following figure shows possible integration methods between the SDK and a TCP module, along with the related configuration options.
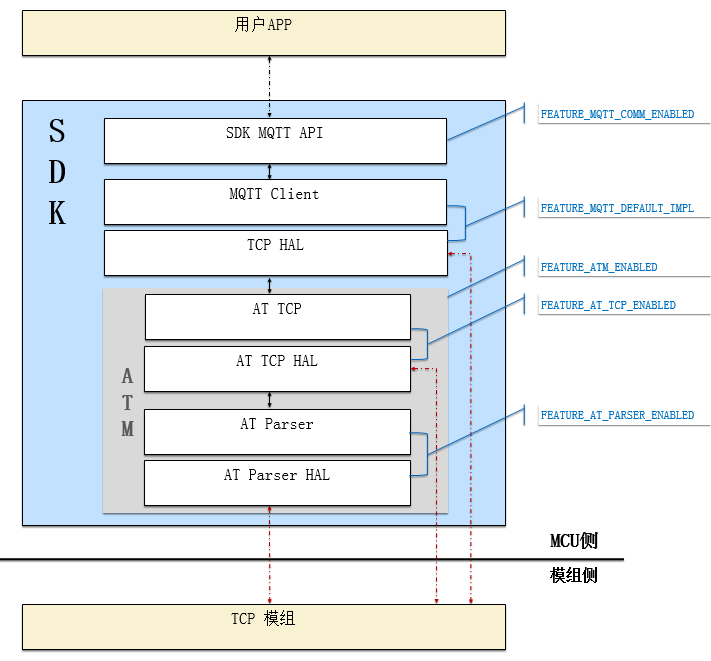
In the figure, the blue configuration options outside the SDK indicate which SDK functional modules are enabled when selected. Each red dashed line represents a possible integration method between the SDK and the module. Hardware Abstraction Layer (HAL) refers to function definitions that are used by the module to interact with external components.
Configuration option | Option | Description |
FEATURE_MQTT_COMM_ENABLED | Required | Whether to provide MQTT APIs |
FEATURE_MQTT_DEFAULT_IMPL | Required | Enables the SDK’s built-in MQTT implementation and provides TCP HAL functions for sending and receiving MQTT data over TCP |
FEATURE_MQTT_ATM_ENABLED | Optional | Whether to enable the ATM module in the SDK |
FEATURE_AT_TCP_ENABLED | Optional | Whether to enable the AT TCP module. When enabled, AT TCP provides a TCP HAL implementation, so you do not need to implement TCP HAL yourself. However, you must implement AT TCP HAL. |
FEATURE_AT_PARSER_ENABLED | Optional | Whether to enable the AT Parser module. When enabled, AT Parser provides an AT TCP HAL implementation, so you do not need to implement AT TCP HAL yourself. However, you must implement AT Parser HAL. |
Configure the SDK
The SDK includes many features. To conserve MCU RAM and flash resources, you must select only the features that your product requires.
Run the configuration command
Linux
Navigate to the SDK root directory and run the following command:
make menuconfig
Windows operating system
Run the config.bat file in the SDK root directory:
config.bat
Enable required SDK features
After you run the preceding command, the feature configuration interface appears. You can press the space bar to select or deselect a feature. You can use the up and down arrow keys on the keypad to navigate between features. To view the help text that explains what an option does and the effect of enabling or disabling it, you can move the highlight to the option and press the h key.
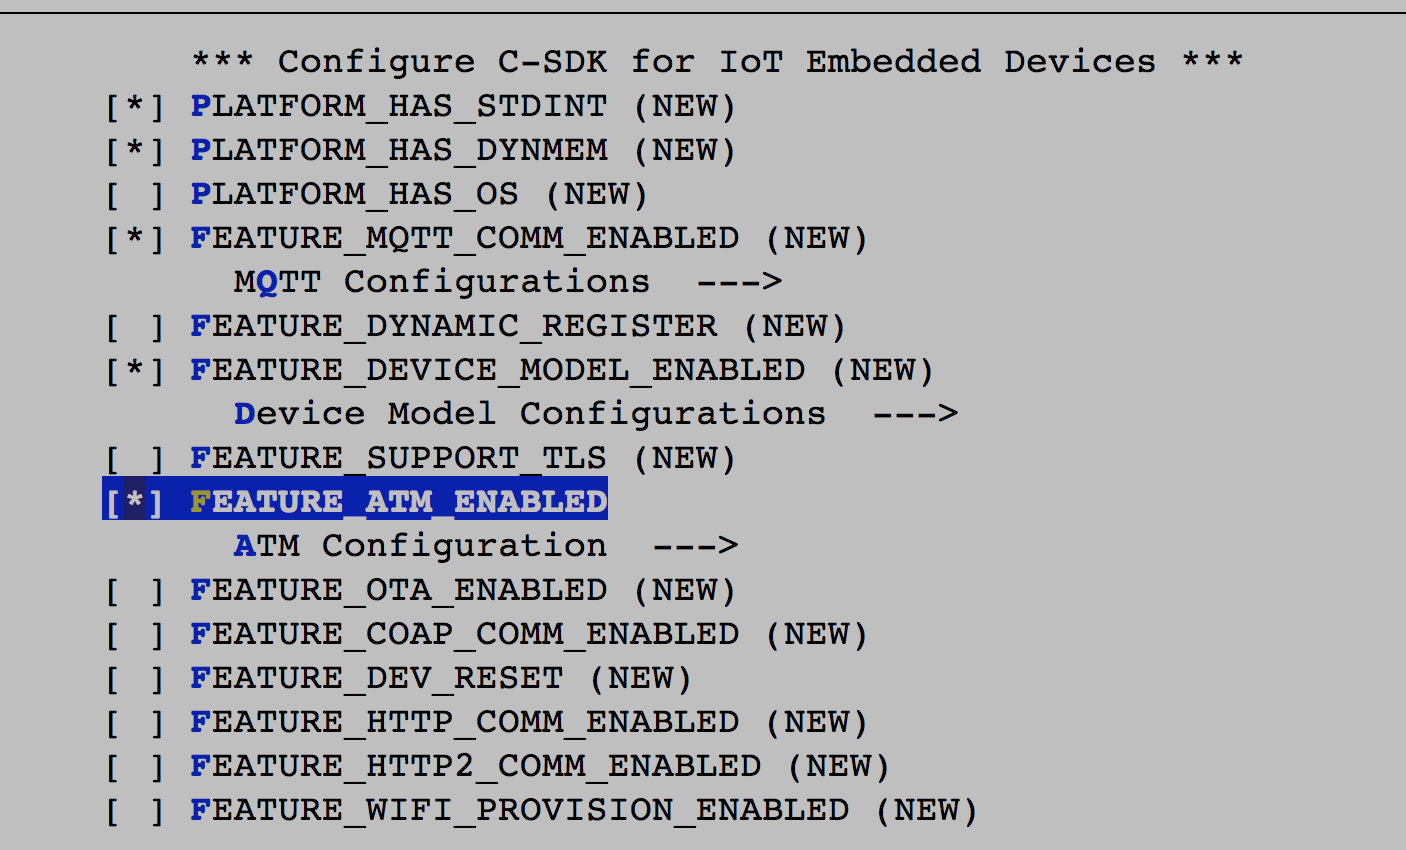
If your compilation environment includes the standard header file <stdint.h>, you can enable this option:
PLATFORM_HAS_STDINT
If your target system runs an embedded operating system, you can enable this option:
PLATFORM_HAS_OS
In this scenario, because the module supports TCP but not MQTT, you must enable the following options:
FEATURE_MQTT_COMM_ENABLED: Use the Alibaba Cloud MQTT API to communicate with the cloud.
FEATURE_MQTT_DEFAULT_IMPL: Use the built-in MQTT client implementation in the Alibaba Cloud SDK. You must implement the TCP connection creation, connection establishment, and data transmission and reception processes.
FEATURE_ATM_ENABLED: Enable this option if you want to use the Alibaba Cloud AT TCP or AT Parser module. When this option is enabled, a configuration option for AT TCP appears.
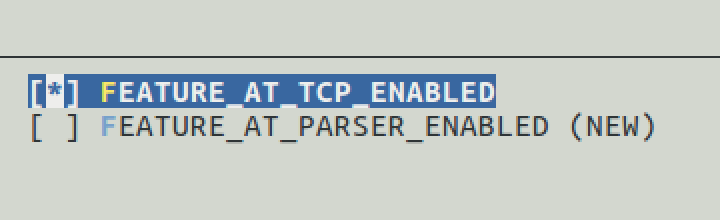
You can choose whether to enable the ATM and AT TCP modules based on your product requirements. If you enable the ATM module but do not have an AT send, receive, and parsing framework, you can use the at_parser framework.
FEATURE_AT_PARSER_ENABLED
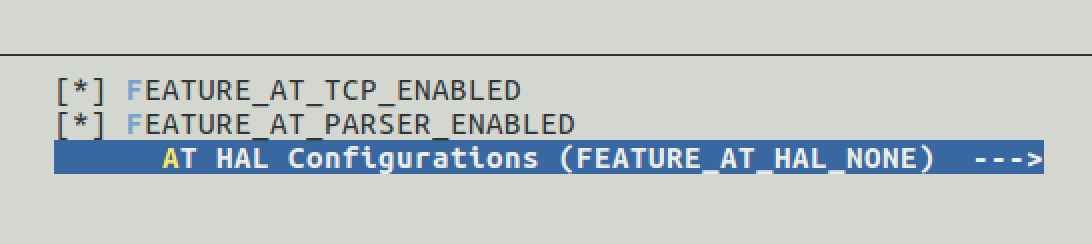
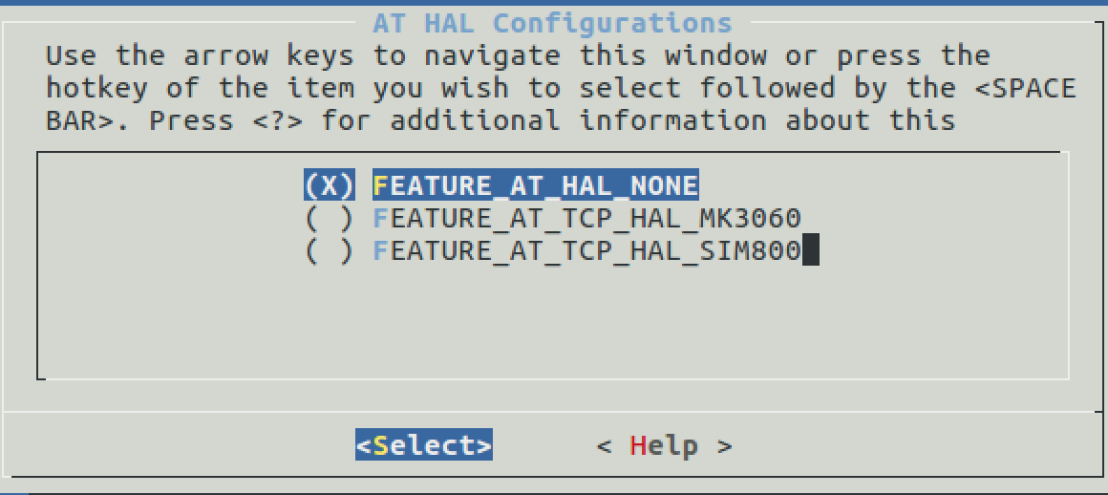
The SDK provides ready-to-use examples that are based on at_parser. If your module is a SIM800 2G module or an MK3060 Wi-Fi module, you can select the specific module model. This ensures that the SDK includes the corresponding HAL implementation in the extracted code. You can skip this step if you do not need these examples.
The following table lists all configuration switches. However, you must always refer to the help text that is displayed when you press the h key for the definitive explanation.
Configuration switch | Description |
PLATFORM_HAS_STDINT | Tells the SDK whether the embedded platform being ported has the standard header file <stdint.h> |
PLATFORM_HAS_OS | Whether the target system runs an operating system |
FEATURE_MQTT_COMM_ENABLED MQTT | Persistent connection feature. When enabled, the SDK provides MQTT network transmission capabilities and interfaces |
FEATURE_MQTT_DEFAULT_IMPL | The SDK’s built-in MQTT client implementation. When enabled, the SDK uses its internal MQTT client |
FEATURE_ASYNC_PROTOCOL_STACK | When using the SDK’s built-in MQTT client, you must implement TCP-related HAL functions with synchronous semantics for send/receive. If your system’s TCP uses asynchronous mechanisms, enable this switch to convert the SDK from synchronous to asynchronous operation |
FEATURE_DYNAMIC_REGISTER | Dynamic registration capability. The device stores only ProductKey, ProductSecret, and a unique device identifier. It uses this feature to obtain a DeviceSecret from IoT Platform |
FEATURE_DEVICE_MODEL_ENABLE | Enables Thing Specification Language model programming interfaces and implementation |
FEATURE_DEVICE_MODEL_GATEWAY | Gateway functionality and corresponding interfaces |
FEATURE_THREAD_COST_INTERNAL | Starts a dedicated thread for packet reception |
FEATURE_SUPPORT_TLS | Standard TLS connection. When enabled, the SDK uses standard TLS 1.2 to securely connect to the server |
FEATURE_SUPPORT_ITLS | Alibaba Cloud iTLS connection. When enabled, the SDK uses Alibaba Cloud’s proprietary iTLS instead of standard TLS for secure connections |
FEATURE_ATM_ENABLED | Must be enabled if your system uses an MCU with an external module and the SDK runs on the MCU. Then configure accordingly |
FEATURE_AT_MQTT_ENABLED | Use this option if the communication module connected to the MCU supports MQTT AT commands |
FEATURE_AT_PARSER_ENABLED | Use this option if you want to use the SDK’s AT send/receive/parsing framework |
FEATURE_AT_MQTT_HAL_ICA | ICA MQTT AT integration example based on at_parser |
FEATURE_AT_MQTT_HAL_SIM800 | SIM800 MQTT integration example based on at_parser |
After you enable the required SDK configurations, save the configurations and exit the SDK configuration tool.
Extract source code for selected features
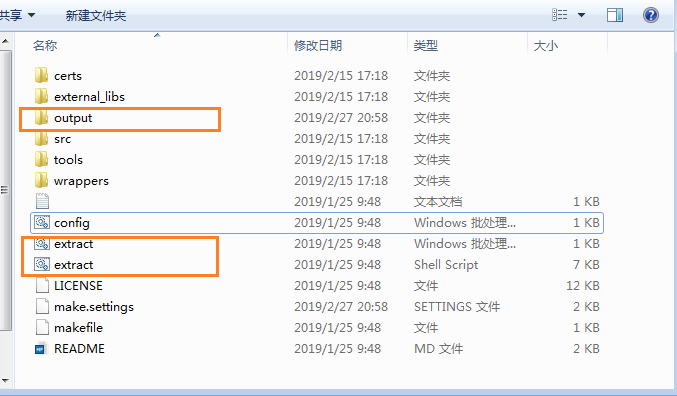
Run the extract.bat file in the SDK root directory. The code for your selected features is placed in the output folder, as shown in the following figure.
Implement HAL integration functions
The Link SDK is designed to run on different operating systems or on MCUs without an OS. Therefore, system-related operations are defined as HAL functions that you must implement. Additionally, because different communication modules support different AT command sets, TCP-related operations on the module are also defined as HAL functions that you must implement.
Because different users enable different SDK features, the required HAL functions vary. You need to implement only the HAL functions in the output/eng/wrappers/wrapper.c file. The following sections describe all possible HAL functions that may appear in the wrapper.c file.
MCU system-related HAL
Required functions
Function name | Description |
HAL_Malloc | Corresponds to malloc() in the standard C library. Allocates a block of available memory of the specified length and returns the starting address |
HAL_Free | Corresponds to free() in the standard C library. Releases the memory pointed to by the input parameter |
HAL_Printf | Corresponds to printf() in the standard C library. Displays formatted text to the terminal based on the input format string |
HAL_Snprintf | Similar to printf(), but outputs the result to a specified buffer instead of the terminal |
HAL_UptimeMs | Returns a uint64_t value representing the number of milliseconds elapsed since the device started |
HAL_SleepMs | Sleeps for the specified number of milliseconds. For example, if the parameter is 10, it sleeps for 10 milliseconds |
For more information about these functions, see the official SDK documentation.
OS-related optional functions
If the MCU does not run an OS, or if the SDK's MQTT API is not called from multiple threads, you do not need to modify the related function implementations in the wrapper.c file. In scenarios where an OS is present and the MQTT API is called from multiple threads in the application, you must implement the following functions:
Function name | Description |
HAL_MutexCreate | Creates a mutex. The return value can be passed to HAL_MutexLock/Unlock |
HAL_MutexDestroy | Destroys a mutex identified by the input parameter |
HAL_MutexLock | Acquires a mutex. If another thread holds the lock, the current thread sleeps until it can acquire the lock |
HAL_MutexUnlock | Releases a mutex. Other threads waiting on this mutex can then acquire it and continue execution |
HAL_SemaphoreCreate | Creates a semaphore. The return value can be passed to HAL_SemaphorePost/Wait |
HAL_SemaphoreDestroy | Destroys a semaphore identified by the input parameter |
HAL_SemaphorePost | Increments the specified counting semaphore, unblocking other waiting threads |
HAL_SemaphoreWait | Waits on and decrements the specified counting semaphore |
HAL_ThreadCreate | Creates a thread based on configuration parameters |
TCP-related HAL
If you do not select the ATM module, you must implement four TCP HAL functions using the module's TCP AT commands. The following table describes these functions. You can also refer to the SDK's SIM800 integration example for implementation guidance.
Function name | Description |
HAL_TCP_Establish | Establishes a TCP connection. Note: The input parameter host is a domain name that must be resolved to an IP address. The return value is the TCP socket number. |
HAL_TCP_Destroy | Closes a TCP connection. The input parameter is the return value from HAL_TCP_Establish. A return value of 0 indicates success. |
HAL_TCP_Write | Sends data over a TCP connection. Note: The function includes a timeout parameter. If the data is not fully sent before the timeout, the function must still return. If the TCP connection is closed, return a negative number less than 0. |
HAL_TCP_Read | Reads data within a specified time and returns it. The input parameter specifies the maximum length of data to receive. If this maximum length is read from the TCP connection, the function can return immediately. |
AT TCP-related HAL
If you choose to use the ATM and AT TCP modules but do not enable the AT Parser module, you must implement the HAL functions that are described in the following table.
Interface name | Description |
HAL_AT_CONN_Init | Initializes the communication module to a working state. |
HAL_AT_CONN_Deinit | Performs deinitialization of the communication module. |
HAL_AT_CONN_Start | Starts a connection on the module. The upper layer passes a pointer to an at_conn_t structure with the following parameters: fd: handle for each connection. type: connection type (e.g., TCP_client), see at_wrapper.h. addr: remote IP or domain name. r_port: remote port number. l_port: local port number. tcp_keep_alive: TCP keep-alive time. |
HAL_AT_CONN_Close | This function closes a connection of the module. The input parameters are described as follows: Closes a connection on the module. Input parameters: fd: socket handle to close. remote_port: remote port number (optional; invalid if less than 0). |
HAL_AT_CONN_Send | This interface sends data through the module. This is a blocking interface and will not return until the module notifies the underlying control module that the data has been sent successfully. The input parameters are described as follows: fd: The handle for the send operation. data: A pointer to the data to be sent. len: The length of the data to be sent. remote_ip[16]: The remote IP address. This is an optional parameter that is ignored if set to NULL. remote_port: The remote port number. This is an optional parameter that is ignored if its value is less than 0. |
HAL_AT_CONN_DomainToIp | Resolves a domain name to an IP address. Note: Even if the domain resolves to multiple IPs, only one IP is returned. Currently, only IPv4 is supported. Input parameters: Domain: domain name. IP: dot-decimal IP string (IPv4 only). |
AT TCP HAL integration example
(1) HAL_AT_CONN_Init
This function initializes HAL layer data. The following code example creates a TCP connection array with the LINK_ID_MAX capacity to map connections that are created on the module. You must also perform the necessary interactions with the module, such as attaching to the network and obtaining an IP address for SIM800 module integration.
typedef struct link_s {
    int fd;
    ....
} link_t;
static link_t g_link[LINK_ID_MAX];
int HAL_AT_CONN_Init(void)
{
    int link;

    memset(g_link, 0, sizeof(g_link));
    for (link = 0; link < LINK_ID_MAX; link++) {
        g_link[link].fd = -1;
    }

    ...
    inited = true;
    return 0;
}
(2) HAL_AT_CONN_Deinit
This function performs deinitialization and releases the resources that are allocated in the HAL_AT_CONN_Init() function. The following example sets the inited variable to false.
int HAL_AT_CONN_Deinit(void)
{
    if (!inited) {
        return 0;
    }
    inited = false;
    return 0;
}
(3) HAL_AT_CONN_Start
This function establishes a TCP connection. The following code example finds an idle TCP connection element in the g_link array, records the connection's address and port information, and sends a dynamically generated AT command to establish the TCP connection. You must modify this function to use the actual AT commands that are provided by your module and handle the response accordingly.
int HAL_AT_CONN_Start(at_conn_t *c)
{
    int link_id;
    for (link_id = 0; link_id < LINK_ID_MAX; link_id++) {
        if (g_link[link_id].fd >= 0) {
            continue;
        } else {
            g_link[link_id].fd = c->fd;
            break;
        }
    }
    ...
    /* Construct AT command */
    snprintf(cmd, START_CMD_LEN, "%s=%d,%s,%s,%d",
             START_CMD, link_id, start_cmd_type_str[c->type],
             c->addr, c->r_port);
    ....
    /* Send AT command */
    at_send_wait_reply(cmd, strlen(cmd), true, out, sizeof(out), NULL);
    LOGD(TAG, "The AT response is: %s", out);
    if (strstr(out, CMD_FAIL_RSP) != NULL) {
        goto err;
    }

    return 0;
err:
    // error handle
}
(4) HAL_AT_CONN_Close
This function closes a TCP connection. The following code example sends a dynamically generated AT command to the module and then removes the mapping between the linkid and fd. In this example, fd_to_linkid() is a function that converts fd to linkid.
int HAL_AT_CONN_Close(int fd, int32_t remote_port)
{
    int link_id;
    char cmd[STOP_CMD_LEN] = {0}, out[64];
    link_id = fd_to_linkid(fd);
    if (link_id < 0 || link_id >= LINK_ID_MAX) {
        LOGE(TAG, "No connection found for fd (%d) in %s", fd, __func__);
        return -1;
    }
    snprintf(cmd, STOP_CMD_LEN - 1, "%s=%d", STOP_CMD, link_id);
    LOGD(TAG, "%s %d - AT cmd to run: %s", __func__, __LINE__, cmd);
    at_send_wait_reply(cmd, strlen(cmd), true, out, sizeof(out), NULL);
    LOGD(TAG, "The AT response is: %s", out);
    if (strstr(out, CMD_FAIL_RSP) != NULL) {
        LOGE(TAG, "%s %d failed", __func__, __LINE__);
        goto err;
    }
    ...
    g_link[link_id].fd = -1;
}
(5) HAL_AT_CONN_Send
This function sends data to the module, primarily by constructing and sending an AT command with the data. The following code example sends data to a specified TCP socket on the module. You must modify the AT command to match your module's actual command set and handle the response accordingly.
int HAL_AT_CONN_Send(int fd,
                     uint8_t *data,
                     uint32_t len,
                     char remote_ip[16],
                     int32_t remote_port,
                     int32_t timeout)
{
    int link_id;
    char cmd[SEND_CMD_LEN] = {0}, out[128] = {0};
    if (!data) {
        return -1;
    }
    link_id = fd_to_linkid(fd);
    if (link_id < 0 || link_id >= LINK_ID_MAX) {
        LOGE(TAG, "No connection found for fd (%d) in %s", fd, __func__);
        return -1;
    }
    /* AT+CIPSEND=id, */
    snprintf(cmd, SEND_CMD_LEN - 1, "%s=%d,", SEND_CMD, link_id);
    /* [remote_port,] */
    if (remote_port >= 0) {
        snprintf(cmd + strlen(cmd), 7, "%d,", remote_port);
    }
    at_send_data_2stage((const char *)cmd, (const char *)data, len, out, sizeof(out));
}
(6) HAL_AT_CONN_DomainToIp
This function performs domain name resolution by sending a dynamically generated query command to the module and parsing the response based on a known format.
int HAL_AT_CONN_DomainToIp(char *domain, char ip[16])
{
    char cmd[DOMAIN_CMD_LEN] = {0}, out[256] = {0}, *head, *end;
    snprintf(cmd, DOMAIN_CMD_LEN - 1, "%s=%s", DOMAIN_CMD, domain);

    /* Send query command */
    at_send_wait_reply(cmd, strlen(cmd), true, out, sizeof(out), NULL);
    LOGD(TAG, "The AT response is: %s", out);
    if (strstr(out, AT_RECV_SUCCESS_POSTFIX) == NULL) {
        LOGE(TAG, "%s %d failed", __func__, __LINE__);
        return -1;
    }
    /* Parse response based on known format */
    ...
}
Call the receive function
After you receive data in the AT HAL layer, you can call the IOT_ATM_Input API (see atm/at_api.h) to deliver the data to the upper layer.
void handle_recv_data()
{
struct at_conn_input param;
...
/* Read data length from AT command */
len = atoi(reader);
if (len > MAX_DATA_LEN) {
LOGE(TAG, "invalid input socket data len %d \r\n", len);
return;
}
/* Allocate receive buffer; alternatively, use a static array */
recvdata = (char *)aos_malloc(len);
if (!recvdata) {
LOGE(TAG, "Error: %s %d out of memory, len is %d. \r\n", __func__, __LINE__, len);
return;
}
/* Read data */
ret = at_read(recvdata, len);
if (ret != len) {
LOGE(TAG, "at read error recv %d want %d!\n", ret, len);
goto err;
}
if (g_link[link_id].fd >= 0) {
param.fd = g_link[link_id].fd;
param.data = recvdata;
param.datalen = len;
param.remote_ip = NULL;
param.remote_port = 0;
/* Deliver data to upper layer */
if (IOT_ATM_Input(¶m) != 0) {
at_conn_hal_err(" %s socket %d get data len %d fail to post to at_conn, drop it\n",
__func__, g_link[link_id].fd, len);
}
}
...
}
The definition of the at_conn_input struct is in the at_wrapper.h file.
struct at_conn_input {
    int        fd;   /* Handle for data delivery */
    void      *data; /* Received data (memory managed by lower layer) */
    uint32_t   datalen; /* Length of received data */
    char      *remote_ip; /* Source IP address (optional; can be NULL; memory managed by lower layer) */
    uint16_t   remote_port; /* Source port (optional; can be 0) */
};
AT Parser-related HAL
If you choose the at_parser framework, you must implement the following four UART HAL functions. For more information about the declarations, see the at_wrapper.h file. You can skip this step if you do not use the at_parser framework.
Interface name | Description |
HAL_AT_Uart_Init | Configures (baud rate, stop bits, etc.) and initializes the UART. |
HAL_AT_Uart_Deinit | Deinitializes the UART. |
HAL_AT_Uart_Send | Sends data to the specified UART port. |
HAL_AT_Uart_Recv | Receives data from the underlying UART buffer. |
Product-related HAL
The following HAL functions retrieve product identity authentication information. You must design how to store device identity information on the device and read it using these HAL functions for the SDK.
Function name | Description |
HAL_GetProductKey | Retrieves the device’s ProductKey, which identifies the product model. |
HAL_GetDeviceName | Retrieves the device’s DeviceName, which uniquely identifies a single device. |
HAL_GetDeviceSecret | Retrieves the device’s DeviceSecret, which is the secret key for a single device. |
Code integration
If your development environment uses a makefile to compile code, you must add the extracted SDK code to your build environment. If you use development tools such as KEIL or IAR, you must add the extracted SDK files to your IDE project.
The following code provides an example of a makefile that is created in the output directory after you copy it to Linux.
Note: The ATM module, AT TCP module, AT Parser module, and SIM800 as the external module were enabled during configuration.
SDK_PWD = $(shell pwd)/eng
SDK_DIRS = $(SDK_PWD)/dev_sign $(SDK_PWD)/atm  $(SDK_PWD)/infra $(SDK_PWD)/mqtt $(SDK_PWD)/wrappers

SDK_SOURCES = $(foreach dir,$(SDK_DIRS),$(wildcard $(dir)/*.c))
SDK_OBJS = $(patsubst %.c,%.o,$(SDK_SOURCES))

SDK_INC_DIRS = $(foreach dir, $(SDK_DIRS),-I$(dir) )

TARGET = testmqtt

all:eng/examples/mqtt_example_at.o $(SDK_OBJS)
  $(CC) -o $(TARGET) $(SDK_OBJS) eng/examples/mqtt_example_at.o

clean:
  rm -rf *.o $(TARGET) $(SDK_OBJS)

%.o:%.c
  $(CC) -c $(SDK_INC_DIRS) $< -o $@
Note:
The preceding makefile is for reference only. Different SDK configurations may result in different directories. You must add all directories except eng/examples to your build system or tool.
If you copy this makefile, you must ensure that the command lines under all/clean/%.o:%.c start with a Tab character, not spaces. This prevents make errors.
Implement product features based on the example
To use MQTT for cloud connectivity, refer to the eng/examples/mqtt_example_at.c file in the extracted folder. You can copy this file into your product project and modify it as needed.
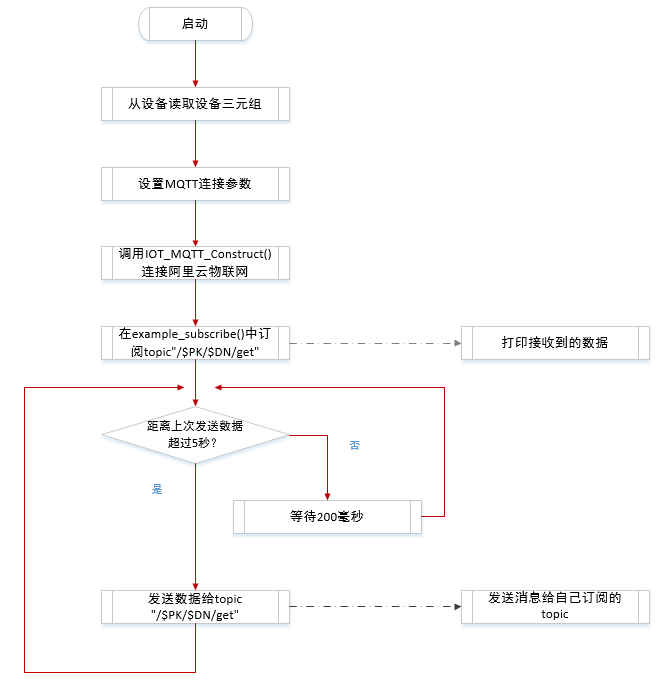
This example connects the device to Alibaba Cloud, subscribes to a specified topic, and sends data to that topic. Messages that are published by the device are sent back to the device by IoT Platform. The general process is shown in the following figure.
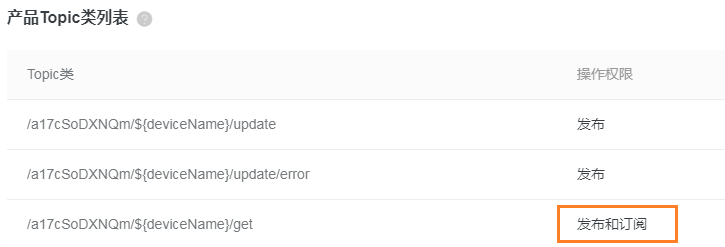
Note: On the cloud side, you must change the topic's default permission from "Subscribe" to "Publish and Subscribe", as shown in the following figure.
Starting from the main() function entry point, the first step is to call the AT module initialization function IOT_ATM_Init() to put the module in a ready state. The second step is to call your HAL functions to retrieve product information.
int main(int argc, char *argv[])
{
    void *      pclient = NULL;
    int         res = 0;
    int         loop_cnt = 0;
    iotx_mqtt_region_types_t    region = IOTX_CLOUD_REGION_SHANGHAI;
    iotx_sign_mqtt_t            sign_mqtt;
    iotx_dev_meta_info_t        meta;
    iotx_mqtt_param_t           mqtt_params;
#ifdef ATM_ENABLED
    if (IOT_ATM_Init() < 0) {
        HAL_Printf("IOT ATM init failed!\n");
        return -1;
    }
#endif
    HAL_Printf("mqtt example\n");
    memset(&meta, 0, sizeof(iotx_dev_meta_info_t));
    HAL_GetProductKey(meta.product_key);
    HAL_GetDeviceName(meta.device_name);
    HAL_GetDeviceSecret(meta.device_secret);
Note:
The three HAL_GetXXX functions retrieve the device certificate (ProductKey, DeviceName, and DeviceSecret). You must determine where to store this information and how to read it from the designated location.
Because DeviceName and DeviceSecret are sensitive, you should encrypt this information before you store it in flash and decrypt it in the HAL functions before you provide it to the SDK. This prevents attackers from reading device credentials directly from flash.
Next, you must specify the MQTT connection parameters. You can modify these parameters as needed.
/* Initialize MQTT parameter */
    memset(&mqtt_params, 0x0, sizeof(mqtt_params));
    mqtt_params.port = sign_mqtt.port;
    mqtt_params.host = sign_mqtt.hostname;
    mqtt_params.client_id = sign_mqtt.clientid;
    mqtt_params.username = sign_mqtt.username;
    mqtt_params.password = sign_mqtt.password;
    mqtt_params.request_timeout_ms = 2000;
    mqtt_params.clean_session = 0;
    mqtt_params.keepalive_interval_ms = 60000;
    mqtt_params.read_buf_size = 1024;
    mqtt_params.write_buf_size = 1024;
    mqtt_params.handle_event.h_fp = example_event_handle;
    mqtt_params.handle_event.pcontext = NULL;
    pclient = IOT_MQTT_Construct(&mqtt_params);
Calling the IOT_MQTT_Construct() function triggers the SDK to connect to the cloud platform. If the return value is not NULL, the connection is successful.
Then, you can call the example_subscribe function to subscribe to a specified topic.
res = example_subscribe(pclient);
The example_subscribe function is as follows.
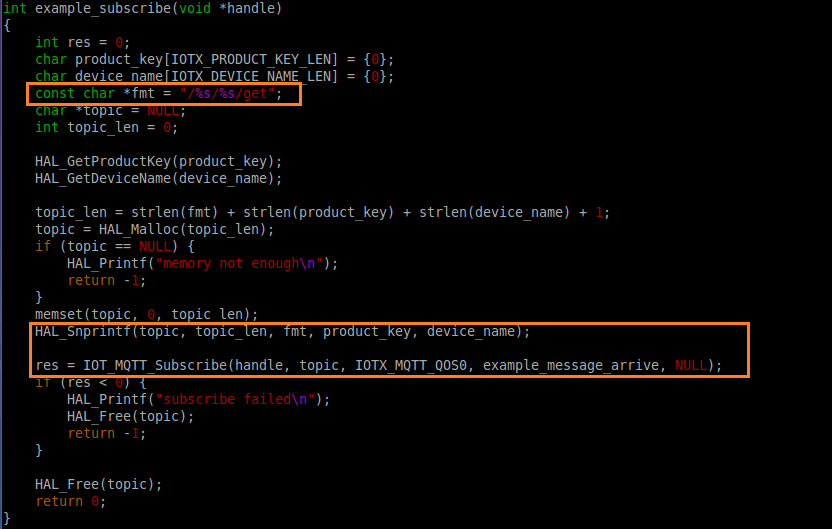
Note:
You should subscribe to topics that are relevant to your product and register appropriate handler functions.
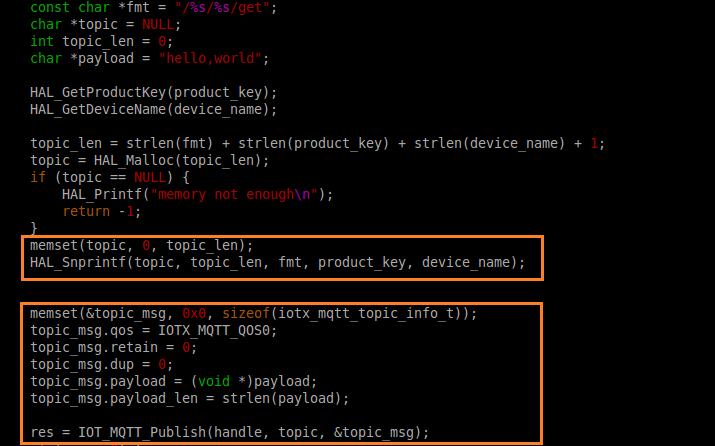
The subscribed topic format must include the product key and device name, as shown in the first orange box in the following figure.
The second box in the following figure shows how to subscribe to a specific topic and its handler function.
The following code demonstrates how to use MQTT to publish business messages to the cloud platform.
 while (1) {
        if (0 == loop_cnt % 20) {
            example_publish(pclient);
        }

        IOT_MQTT_Yield(pclient, 200);

        loop_cnt += 1;
    }
The following code is from the example_publish function body.
Note:
The preceding code periodically sends a fixed message to the cloud. You should upload data to IoT Platform only when it is required for your product functionality.
You can remove the
example_publish(pclient)statement from the main() function to avoid sending unnecessary periodic data to the cloud.The IOT_MQTT_Yield function allows the SDK to receive data from the MQTT broker. The 200-millisecond wait time can be reduced if your application handles large message volumes or requires higher real-time performance.
Feature debugging
The following screenshots are based on the mqtt_example_at.c file.
How to verify the device is connected to Alibaba Cloud
The following output shows the messages that are printed to the serial port using HAL_Printf when you run the example. The information that is highlighted in orange indicates a successful connection to Alibaba Cloud IoT Platform.

How to verify the device successfully sent data to the cloud
Log on to the Alibaba Cloud IoT Platform console, select the specific device, and check whether messages from the device are received, as shown in the following figure.
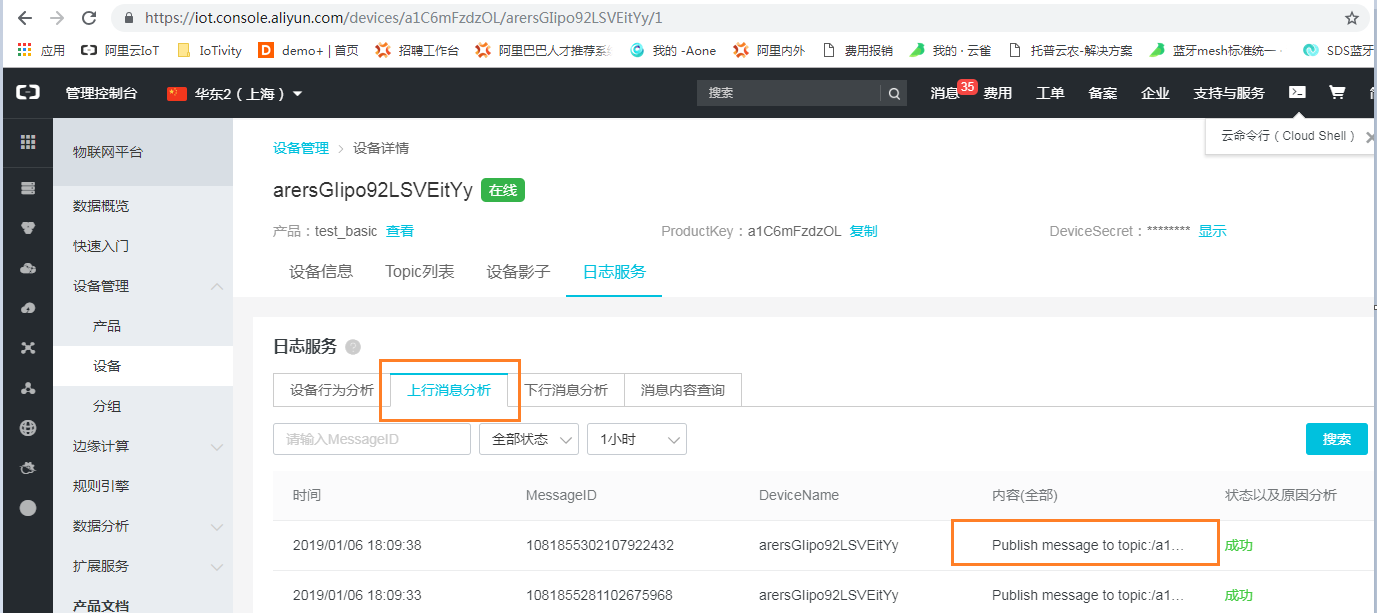
Note: The preceding figure shows only the topic to which the message was sent. The message content is not displayed.
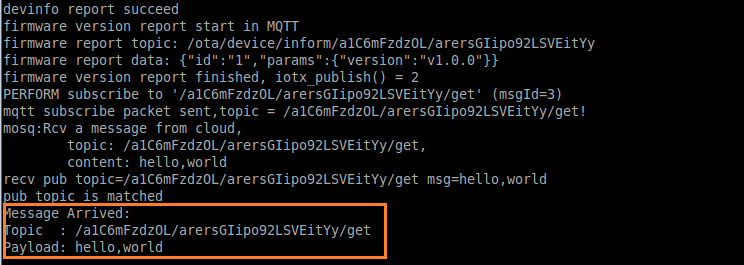
How to verify the device can successfully receive data from the cloud
In the console, you can use Downstream Message Analysis to view messages that are sent by IoT Platform to the device.

You can also check on the device side whether data from the cloud is received. The print output in the example code when data is received from the cloud is shown in the following figure.
At this point, the SDK adaptation development between the MCU and the module is complete. You can now implement your product's business features.