Encrypt and decrypt sensitive data with EVSM
Encryption Service provides reliable encryption and decryption for your application data, helping you protect information and meet data security compliance requirements. This topic describes how to encrypt and decrypt application data by using Encryption Service.
Background
Deployment solution
Cloud HSM provides key generation and management, data encryption, and data decryption capabilities. The entire cryptographic process occurs within Cloud HSM, and the resulting ciphertext is stored in the database, which improves system security. The following figure shows a typical deployment solution for encrypting and decrypting sensitive data in an application system.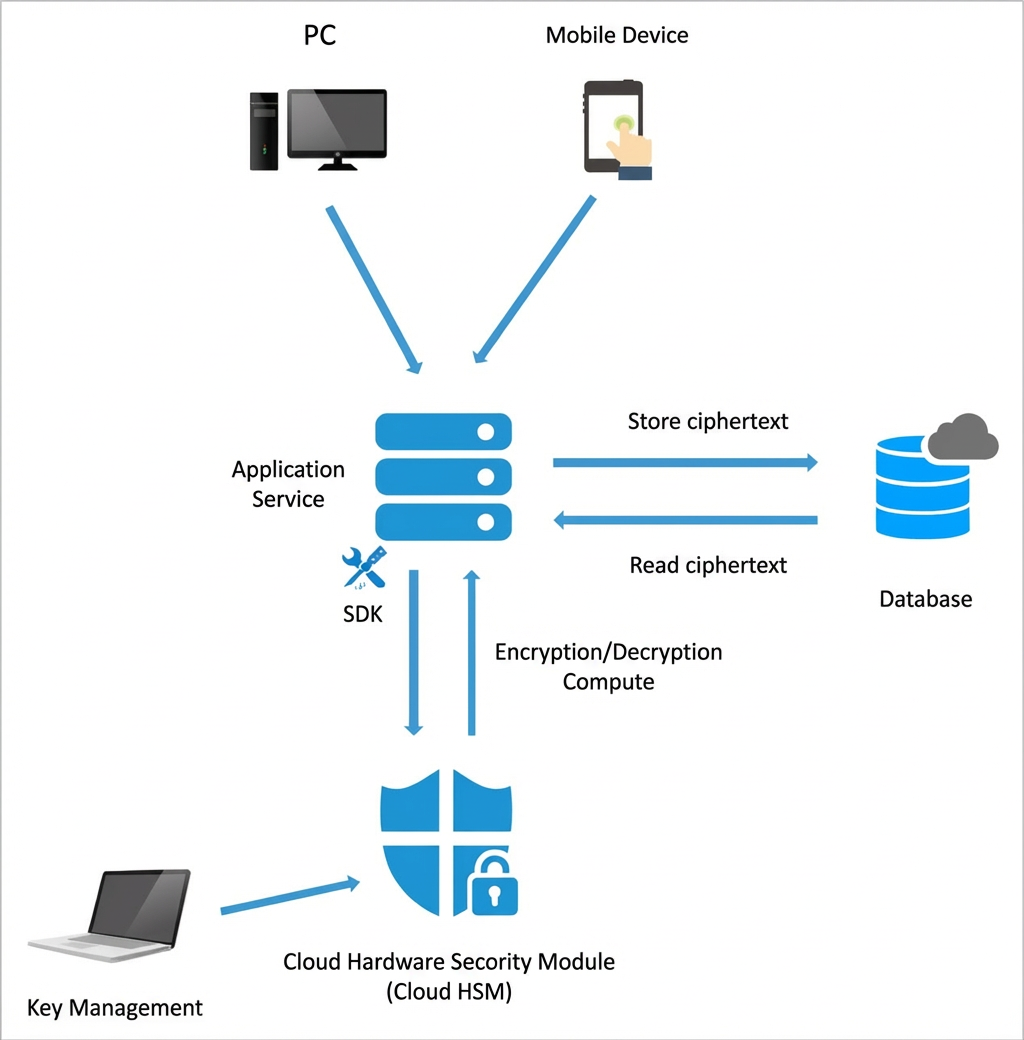
Encryption and decryption workflows
The following figure shows the sequence diagram for sensitive data encryption.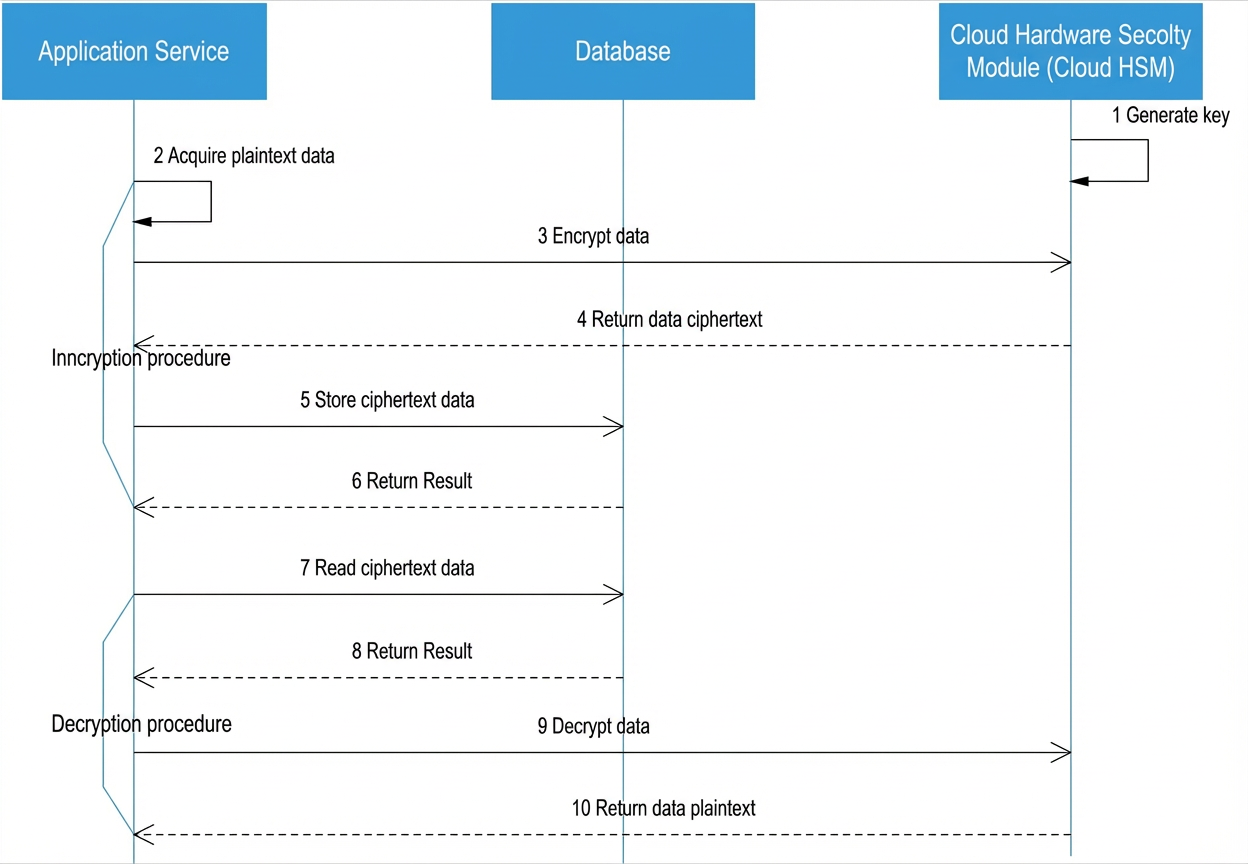
Data encryption workflow
Generate an encryption key by using Encryption Service.
Use the encryption key to encrypt the plaintext data of the application service into application data ciphertext, and return the application data ciphertext to the application service.
The application service stores the ciphertext in the database.
Data decryption workflow
The application system reads the encrypted data from the database and passes the application data ciphertext to Cloud HSM for decryption.
After decrypting the ciphertext, Cloud HSM returns the plaintext data to the application system.
Resources
Before you start the configuration, prepare the following resources:
A database: Used to securely store and read the ciphertext of application data.
An application server: For deploying your business system. The following operating systems are supported:
64-bit Linux
32-bit or 64-bit Windows
EVSM: TASS EVSM, which provides cryptographic services such as encryption and decryption.
Step 1: Configure the HSM client
After you purchase an Encryption Service instance, you must configure the HSM client before you deploy your service to a production environment.
Log on to the HSM Management Console. In the top navigation bar, select the destination region.
Download and install the HSM instance management tool.
On the VSMs page, find the target HSM instance.
In the Specifications column, click EVSM, and then click Download HSM Instance Management Tool.
Unzip the downloaded package and choose one of the following methods to install the HSM instance management tool.
Install the HSM client management tool on a local terminal. After installation, you must use a VPN or physical connection to connect the local terminal to the VPC where the HSM instance resides.
Install the HSM client management tool on an ECS instance that runs Windows. After installation, you must remotely log on to the ECS instance from a local terminal to manage the HSM instance. For more information about how to purchase an ECS instance, see Create an instance by using the wizard.
Use the HSM instance management tool to initialize the HSM instance.
Log on to the HSM instance management tool. For more information, see the "Log On" chapter in the user manual for the HSM instance management tool.
Initialize the HSM instance. For more information, see the "Factory Initialization" or "Quick Initialization" chapter in the user manual for the HSM instance management tool.
Step 2: Initialize the SDK
Initialize the SDK as follows:
hsm=hsmGeneralFinance.getInstance("./cacipher.ini");Step 3: Generate a key
You can also use the HSM management tool to generate a random key. For more information, see the "Symmetric Key Management" chapter in the user manual for the HSM management tool.
Call the following Java interface to generate a work key.
hsm.genWorkKey(keyType,algFlag,keyIndex,keyLable);Interface definition
public String[] genWorkKey(String keyType,
                                    char keyFlag,
                                    int storeKeyIndex,
                                    String storeKeyLabel)
                              throws cn.tass.exceptions.TAException
Request parameters
Parameter | Type | Description |
keyType | String | The key type. You can specify the key type code or key type name. For example, for a ZEK/DEK key, you can enter "00A" or "ZEK/DEK". Valid values:
|
algFlag | char | The flag for the key's ciphertext, encrypted under the local master key (LMK). Valid values:
|
keyIndex | int | The storage index for the key. Valid values: 1 to 2048. |
keyLabel | String | The storage label for the key. The label can contain 0 to 16 ASCII characters. A descriptive label for the key when stored inside Cloud HSM. |
Request example
keyType: 00A
algFlag: R
keyIndex: 1
keyLabel: test
Return value
Index 0: The ciphertext of the key encrypted under the LMK.
Index 1: The key check value.
Throws
cn.tass.exceptions.TAException // Custom interface exception.Step 4: Configure the Java interface
You can configure the Java interface by using a file or a string.
File
Pass the absolute path of the configuration file to the initialization interface.
Example:
[LOGGER]
logsw=error
logPath=./

[HOST1]
hsmModel=SJJ1310
linkNum=-5
host=192.168.19.19
port=8018
timeout=5
ifHeart=yes
File format requirements:
Category
Requirement
Example
Comment
A comment line must start with a number sign (
#). Inline comments are not supported.# The attribute fields in the string format are the same as those in the file format.
Section
A section is enclosed in square brackets (
[and]). Section names and key names are case-insensitive. We recommend that you use uppercase for section names for better readability.[LOGGER]
Configuration item
A configuration item uses the format
Key=Value.linkNum=-5
Configuration content
You can use whitespace characters such as spaces or tabs to align the content.
You can assemble a string in the interface to pass the configuration.
Use curly braces (
{and}) to include all content, and use a semicolon (;) to indicate a new line.
None
Attribute configuration: The basic attribute sections in the configuration file for the Java interface include log attributes, EVSM attributes, and application attributes. The following table describes the fields for log attributes and EVSM attributes.
Attribute Category
Section
Field
Description
Log attributes
[LOGGER]
logsw
The switch for log categories. A separate keyword enables each log type. Valid values:
error: Error logs
debug: Debug logs
logPath
The directory where log files are saved. Make sure the configured directory exists and that the application has write permissions for it.
EVSM attributes
[HOSTn] n is the sequence number of the EVSM in the current configuration file, starting from 1. The Java interface reads the attributes of multiple EVSMs sequentially.
hsmModel
The VSM type identifier, which specifies the EVSM driver. Default: SJJ1310.
linkNum
The number of persistent connections to establish with Cloud HSM. Default: -10. A negative sign (
-) before the number indicates to use only the connection pool. If there is no negative sign, the system prioritizes the connection pool. When prioritizing the connection pool, high business concurrency may cause the Java interface to create short-lived connections to handle requests, which can significantly impact system resources.host
The service IP address of the EVSM host. You can also set this to a domain name.
port
The service port of the EVSM host.
timeout
The timeout period. Unit: seconds. Default: 6.
connTimeout
Specifies the timeout for establishing a network connection between the Java interface and the escape server. If this field is not set, the system uses the value of the timeout parameter.
readTimeout
Specifies the timeout for reading information from the escape server. If this field is not set, the system uses the value of the timeout parameter.
socketProtocol
The communication protocol. Protocols such as TLSv1.2 are supported. Default: TCP.
ifHeart
Enables heartbeat detection from the SDK to the server. Enabled by default.
String
Pass the configuration information as a string to the initialization interface. Example:
// The attribute fields in the string format are the same as those in the file format.
String config=
"{"
+"[LOGGER];"
+"logsw=error;logPath=./;"
+"[HOST1];"
+"hsmModel=SJJ1310;"
+"host=192.168.19.19;"
+"port=8018;"
+"connTimeout=5;"
+"}";
Step 5: Call Java interfaces to encrypt and decrypt data
This section describes how to call Java interfaces to generate a work key and perform general data encryption and decryption.
Interface description
Data encryption
Interface definition
Call the following Java interface to encrypt data.
hsm.generalDataEnc(algType,keyType,sm4SymmKey,disperFactor,sessionType,sessionFactor,padFlag,inData,IV);public byte[] generalDataEnc(int algType,
String keyType,
Object key,
String disperFactor,
int sessionType,
String sessionFactor,
int padFlag,
byte[] inData,
String IV)
throws cn.tass.exceptions.TAExceptionRequest parameters
Parameter | Type | Description |
algType | int | The encryption algorithm mode. Valid values:
|
keyType | String | The type of the source key for data encryption. You can specify the key type name or code. For example, for a ZEK/DEK key, you can enter "00A" or "ZEK/DEK". Valid values:
|
key | Object | The index or ciphertext of the encryption key.
|
disperFactor | String | The concatenated n-level dispersion factors for key dispersion. Each dispersion factor must be 16 bytes. For sensitive data encryption scenarios, set this parameter to an empty string or NULL. |
sessionType | int | The session key generation mode. For sensitive data encryption scenarios, set this parameter to
|
sessionFactor | String | The session key factor. For sensitive data encryption scenarios, set this parameter to an empty string or NULL.
|
padFlag | int | The padding mode identifier. For sensitive data encryption scenarios, set this parameter to 1. Valid values:
|
inData | byte[] | The input plaintext data. |
IV | String | The initialization vector. This parameter is required only when algType is 1 (CBC), 2 (CFB), 3 (OFB), or 4 (CTR). The ECB encryption mode does not require an IV. Set this parameter to an empty string or NULL.
|
Request example
algType: 1
keyType: "00A"
key: symmKey[0] // The ciphertext of the symmetric key for encryption. If you use a key stored in EVSM, pass its index as an int.
disperFactor: null
sessionType: 0
sessionFactor: null
padFlag: 1
inData: // Enter the data content based on your business requirements.
IV: "00000000000000000000000000000000"
Return value
The encrypted ciphertext data.
Exceptions
cn.tass.exceptions.TAException // Thrown if a runtime error occurs.Data decryption
Interface definition
Call the following Java interface to decrypt data.
hsm.generalDataDec(algType,keyType,sm4SymmKey,disperFactor,sessionType,sessionFactor,padFlag,symmEnc,IV);public byte[] generalDataDec(int algType,
String keyType,
Object key,
String disperFactor,
int sessionType,
String sessionFactor,
int padFlag,
byte[] inData,
String IV)
throws cn.tass.exceptions.TAExceptionRequest parameters
Parameter | Type | Description |
algType | int | The decryption algorithm mode. Valid values:
|
keyType | String | The type of the source key for data decryption. You can specify the key type name or code. For example, for a ZEK/DEK key, you can enter "00A" or "ZEK/DEK". Valid values:
|
key | Object | The index or ciphertext of the decryption key.
|
disperFactor | String | The concatenated n-level dispersion factors for key dispersion. Each dispersion factor must be 16 bytes. For sensitive data encryption scenarios, set this parameter to an empty string or NULL. |
sessionType | int | The session key generation mode. For sensitive data encryption scenarios, set this parameter to
|
sessionFactor | String | The session key factor. For sensitive data encryption scenarios, set this parameter to an empty string or NULL.
|
padFlag | int | The padding mode identifier. For sensitive data encryption scenarios, set this parameter to 1. Valid values:
|
inData | byte[] | The input ciphertext data. |
IV | String | The initialization vector. This parameter is required only when algType is 1 (CBC), 2 (CFB), 3 (OFB), or 4 (CTR). The ECB decryption mode does not require an IV. Set this parameter to an empty string or NULL.
|
Request example
algType: 1
keyType: "00A"
key: symmKey[0] // The ciphertext of the symmetric key for decryption. If you use a key stored in EVSM, pass its index as an int.
disperFactor: null
sessionType: 0
sessionFactor: null
padFlag: 1
inData: // Enter the encrypted data.
IV: "00000000000000000000000000000000"
Return value
The decrypted data.
Throws
cn.tass.exceptions.TAException // Thrown if a runtime error occurs.Example
public class SensitiveDataEnc {

    public static void main(String[] args) throws TAException {
        // Initialize the interface by using a configuration file.
        hsmGeneralFinance hsm = hsmGeneralFinance.getInstance("./cacipher.ini");
        // Alternative initialization: Initialize the interface by using a configuration string.
//        String config =
//                "{"
//                        + "[LOGGER];"
//                        + "logsw=error;logPath=./;"
//                        + "[HOST1];"
//                        + "hsmModel=SJJ1310;"
//                        + "host=192.168.19.19;"
//                        + "port=8018;"
//                        + "connTimeout=5;"
//                        + "}";
//
//        hsmGeneralFinance hsm = hsmGeneralFinance.getInstance(config);

        // Test 1: Generate a random key. keyIndex is a variable parameter.
        // If keyIndex is 0, the HSM does not save the generated random symmetric key.
        // If keyIndex is between 1 and 2048, the symmetric key is stored in the HSM. If a key with the same index exists, it will be overwritten.
        int keyIndex = 0;

        switch (keyIndex) {
            case 0:
                // Generate a random SM4 symmetric key.
                String keyType = "00A";
                char algFlag = 'R';
                String keyLable = "sm4Key";
                // Call the interface to generate a random key.
                String[] symmKey = hsm.genWorkKey(keyType, algFlag, keyIndex, keyLable);
                System.out.println("Ciphertext of the symmetric key under LMK: " + symmKey[0]);
                System.out.println("Symmetric key check value: " + symmKey[1]);

                // Test 2.
                String str = "Data to be encrypted";
                // CBC mode.
                int algType = 1;
                // Fixed key type.
                keyType = "00A";
                // Ciphertext of the symmetric key for encryption.
                String sm4SymmKey = symmKey[0];
                // You can also use the index of a key stored in the HSM, which is an int type.
                String disperFactor = null;
                int sessionType = 0;
                String sessionFactor = null;
                // Use ISO/IEC 9797-1 padding method 2 (mandatory 0x80 padding).
                int padFlag = 1;
                byte[] inData = str.getBytes();
                String IV = "00000000000000000000000000000000";
                // Call the data encryption interface.
                byte[] symmEnc = hsm.generalDataEnc(algType, keyType, sm4SymmKey, disperFactor, sessionType, sessionFactor,
                        padFlag, inData, IV);
                System.out.println("Symmetric encryption result as a hex string: " + Forms.byteToHexString(symmEnc)
                        + ". To decrypt, convert the hex string back to a byte[] using 'Forms.hexStringToByte()'.");
                // Call the data decryption interface.
                byte[] symmDec = hsm.generalDataDec(algType, keyType, sm4SymmKey, disperFactor, sessionType, sessionFactor,
                        padFlag, symmEnc, IV);
                System.out.println("Comparison of decrypted result with original data: " + Arrays.equals(symmDec, inData));
                System.out.println("Restored original string: " + new String(symmDec));
                break;
            // This case generates a symmetric key at index 1. If a key already exists at this index, it is overwritten.
            case 1:
                str = "Data to be encrypted";
                // CBC mode.
                algType = 1;
                // Fixed key type.
                keyType = "00A";
                // Ciphertext of the symmetric key for encryption. Use the index of the key stored in the HSM (int type).
                int sm4SymmKeyIndex = 1;
                disperFactor = null;
                sessionType = 0;
                sessionFactor = null;
                // Use ISO/IEC 9797-1 padding method 2 (mandatory 0x80 padding).
                padFlag = 1;
                inData = str.getBytes();
                IV = "00000000000000000000000000000000";
                // Call the data encryption interface.
                symmEnc = hsm.generalDataEnc(algType, keyType, sm4SymmKeyIndex, disperFactor, sessionType, sessionFactor,
                        padFlag, inData, IV);
                System.out.println("Symmetric encryption result as a hex string: " + Forms.byteToHexString(symmEnc)
                        + ". To decrypt, convert the hex string back to a byte[] using 'Forms.hexStringToByte()'.");
                // Call the data decryption interface.
                symmDec = hsm.generalDataDec(algType, keyType, sm4SymmKeyIndex, disperFactor, sessionType, sessionFactor,
                        padFlag, symmEnc, IV);
                System.out.println("Comparison of decrypted result with original data: " + Arrays.equals(symmDec, inData));
                System.out.println("Restored original string: " + new String(symmDec));
                break;
            default:
                break;
        }

    }

}
Step 6: Synchronize application keys
When you deploy an HSM instance, you need to synchronize the application keys and configure the Java interface. The synchronization method differs depending on where the application keys are stored: inside or outside the HSM instance.
Keys stored in the HSM instance
You must back up and export the application keys by their index, and then import the backup keys into other HSM instances by using the key restore function. This completes the key synchronization. The following steps describe how to export an application key from HSM instance A and import it into HSM instance B.
A randomly generated backup key encrypts the application key. You can export the encrypted ciphertext as a file or store it in a UKEY. To synchronize keys, you must insert the UKEY into the device to which you want to synchronize the key.
Back up and export the application key from HSM instance A.
Open the HSM instance management tool and log on to the VSM management system by using the IP address of HSM instance A. For more information, see the "Log On" chapter in the user manual for the HSM instance management tool.
In the top menu bar, click the Key Management tab, and then click Backup and Export.
In the Select Key Type and Index to Export dialog box, select the key type and enter the key index as required, and then click Confirm.
NoteYou can choose to Save to File or Save to UKEY. This example uses Save to File.
Follow the prompts to insert three empty UKEYs one by one and enter their passwords, then click Next.
The HSM instance creates three Key Backup Key (KBK) UKEYs. We recommend that three separate key administrators manage these KBK UKEYs.
Select the file where you want to save the key ciphertext. EVSM exports all application keys and saves them to the file you specified. Click Next.
NoteAfter the key backup is complete, securely store the three KBK UKEYs and the key backup file. They are required for key recovery.
Import and restore the exported application key into HSM instance B.
Open the HSM instance management tool and log on to the VSM management system by using the IP address of HSM instance B.
In the top menu bar, click the Key Management tab, and then choose Restore and Import > Restore Key from File.
NoteWhen restoring the key, you can use any two of the key backup UKEYs to reconstruct the original KBK file.
Follow the prompts to insert any two KBK UKEYs one by one and enter their passwords, then click Next.
Select the key backup file. Wait for the system to complete the application key recovery, and then click Finish.
Keys stored outside the HSM instance
When an external system stores application keys that are protected by LMK encryption, you must also synchronize the domain master key (DMK) of the HSM instance. You can generate DMK component UKEYs through the Original Initialization of the HSM instance.
To back up keys across multiple HSM instances, perform the Original Initialization on the first instance, and then use Restore Initialization on the others to synchronize the keys. The following example shows how to perform an Original Initialization on HSM instance A and a Restore Initialization on HSM instance B.
Original Initialization erases all keys within the HSM instance. If you want to save the data in the HSM, use a UKEY for backup. For more information about the backup operation, see the user manual for the HSM instance management tool.
Perform an Original Initialization on HSM instance A. For more information, see the "Original Initialization" chapter in the user manual for the HSM instance management tool.
Open the HSM instance management tool and log on to the VSM management system by using the IP address of HSM instance A.
In the top menu bar, click the Key Management tab, and then click Original Initialization.
In the warning dialog box, click Next.
Follow the system prompts to create at least two DMK component UKEYs. We recommend that you use a 2-out-of-3 authorization control mechanism and create three authorization UKEYs.
Perform Restore Initialization on HSM instance B (that is, import the DMK).
Open the HSM instance management tool and log on to the VSM management system by using the IP address of HSM instance B.
In the top menu bar, click the Key Management tab, and then click Restore Initialization.
In the warning dialog box, click Next.
In the Restore Initialization - Step 1 dialog box, enter the number of DMK component UKEYs and click Next.
In the Restore Initialization - Step 2 dialog box, insert n component UKEYs one by one, enter their passwords, and click Import Component UKEY. The HSM instance reads the DMK component data from the UKEYs.
After importing the DMK components, click Compose DMK.
After the DMK is composed, confirm the authorization mechanism.
If your other HSM instances share a set of authorization UKEYs, select Synchronize Authorization Information. You only need to insert a valid authorization UKEY, enter its password, and click Finish to complete the restore initialization.
If each of your HSM instances requires an independent authorization UKEY, select Create New Authorization UKEY, choose 1-out-of-1 Authorization Control Mechanism from the authorization mechanism list, and create an authorization UKEY to complete the restore initialization.
In the top menu bar, click the Key Management tab, and then click Obtain DMK Check Value.
NoteWhen you synchronize a DMK to multiple HSM instances, compare their DMK check values to verify that the DMKs match.
On the Key Management tab, click Export DMK Component.
You can export the DMK components to multiple UKEYs. This allows you to reconstruct the same DMK components as the original HSM instance if you lose or damage the original component UKEYs.
ImportantWhen you export DMK components, the key backups in the new DMK component UKEYs are not guaranteed to be identical to the key backups in the original component UKEYs.