dbt Connector
The MaxCompute dbt connector is a dbt-compatible version that Alibaba Cloud MaxCompute contributes to the open source community. It allows users to use dbt (data build tool) to connect to Alibaba Cloud MaxCompute and extend dbt. The MaxCompute adapter supports almost all features provided by dbt Core.
dbt (data build tool) is an open source tool designed for data warehouse development. It uses modular design, version control, and automated workflows to improve the efficiency and quality of developing data transformation and analytics code. dbt turns SQL logic into maintainable data pipelines and is compatible with multiple mainstream cloud data platforms.
Core features
Data transformation as code
Manage ETL processes as code, with support for version control, CI/CD integration, and team collaboration.
Modularity and reusability
Reuse logic through models and macros to reduce repeated development effort.
Data testing and documentation
Built-in data quality checks and automatically generated documentation ensure the reliability and transparency of data pipelines.
Environment isolation
Configure multiple environments, such as development, testing, and production, to protect production data.
Use cases
Multi-cloud data warehouse integration
Large-scale data analytics involves data warehouses on different clouds, which require a unified approach to integration and data transformation.
Engineered data development workflows
Data transformation logic requires continuous iteration, with changes managed through version control and data quality verified through automated testing.
Procedure
Install the plug-in
# we use conda and python 3.9 for this example
conda create --name dbt-maxcompute-example python=3.9
conda activate dbt-maxcompute-example

# current dbt-maxcompute version is 1.9
pip install dbt-core==1.9.4
pip install dbt-maxcompute
Configure parameters
Create and configure the profiles.yml file
In the
.dbtfolder in the user home directory, create a file namedprofiles.yml.Copy and paste the following content into the new
profiles.ymlfile. Make sure to update the values marked for replacement.jaffle_shop: # this needs to match the profile in your dbt_project.yml file target: dev outputs: dev: type: maxcompute project: dbt-example # Replace this with your project name schema: default # Replace this with schema name, e.g. dbt_bilbo endpoint: http://service.cn-shanghai.maxcompute.aliyun.com/api # Replace this with your maxcompute endpoint auth_type: access_key access_key_id: XXX # Replace this with your accessId(ak) access_key_secret: XXX # Replace this with your accessKey(sk)
The following parameters are supported:
Field | Description | Default value |
| Specifies the database connection type. For MaxCompute connections, set this parameter to | "maxcompute" |
| The name of the MaxCompute project. | Required (no default value) |
| The endpoint URL used to connect to MaxCompute. | Required (no default value) |
| The namespace (schema) used by models in MaxCompute. | Required (no default value) |
| The authentication type used to access MaxCompute. | "access_key" |
| The AccessKey ID used for MaxCompute authentication. | Required (no default value) |
| The AccessKey secret used for MaxCompute authentication. | Required (no default value) |
Other authentication types,for example, STS (Security Token Service). For configuration details, see the dbt-maxcompute repository.
Run dbt models
New dbt users can refer to the dbt-maxcompute repository or the official dbt documentation, but additional adaptation is required for MaxCompute.
Features and examples
Standard dbt capabilities
dbt provides the following features to help users write models that reflect core business logic. For more information, see dbt introduction.
Feature | Description |
Generate persistent objects (such as tables or views) | Configure the materialization strategy for each model. A materialization strategy defines how a model is built, for example, as a table or a view. dbt automatically generates the underlying SQL code to persist query results as objects in the data warehouse, such as by creating new tables or updating existing tables. |
Use a code compiler | SQL files can contain Jinja, a lightweight templating language. Jinja in SQL introduces control structures into queries, such as |
Determine the model execution order | Data transformation is often more manageable in stages. dbt provides the |
Generate and manage project documentation | In dbt Cloud, documentation can be generated automatically when a dbt project runs. dbt provides a mechanism to write, version-control, and share model documentation. Descriptions for each model and field can be written in plain text or Markdown. |
Test model data integrity | Tests improve the data integrity of the SQL in each model by asserting the results that models generate. Build, test, and run a project in one step by clicking a button or using the dbt Cloud IDE command bar. |
Manage packages | dbt has a built-in package manager that allows analysts to use and publish dbt code from public or private repositories and allows other users to reference these packages. With package management, teams can share, reuse, and maintain standardized models, macros, and test logic. |
Load seed files | Analysis often requires mapping raw values to more readable values, such as converting country codes to country names, or enriching raw data with static or infrequently changing data. These data sources are called seed files. Save them as CSV files in the project and load them into the data warehouse by running the |
Data snapshots | Records in data sources are often mutable and change over time, which makes it challenging to reconstruct historical values for analysis. dbt provides a snapshot feature that captures the state of raw data at a specific point in time. |
Model
dbt provides multiple features to help developers write SELECT query models that adapt to changing business requirements and improve query efficiency. When dbt run is executed, the model transforms data directly within the data warehouse without moving the data out. dbt also supports languages other than SQL. Starting from v1.3, dbt Core and dbt Cloud support Python models. Python models are suitable for the following scenarios:
Training or deploying data science models, such as machine learning models.
Complex data transformations, such as text processing and graph computing.
Using specific Python libraries, such as the
dateutillibrary for parsing dates.
In modern workflows, the top-level structure in dbt is a project. A project contains:
Project configuration files (
.ymlfiles), which define project metadata and global settings.Model files (
.sqlor.pyfiles), which define data transformation logic.
Project configuration files tell dbt how to build datasets, while models specify the data transformation rules. Models can also reference each other to improve data transformation efficiency. For more information, see Models documentation.
Seed
Seeds are CSV files in a dbt project, typically stored in the seeds directory, that can be loaded into the data warehouse by running the dbt seed command. Seed files can be referenced in downstream models by using the same ref function as models. Because these CSV files are stored in the dbt repository, they can be version-controlled and code-reviewed. Seeds are best suited for static data that rarely changes, such as enumeration values and mapping tables. For more information, see Seeds documentation.
Example
The following example adds a seed file to a dbt project.
Place the CSV file in the
seeds/directory with the.csvfile extension, for example,seeds/country_codes.csv.country_code,country_name US,United States CA,Canada GB,United Kingdom ...Run the
dbt seedcommand to create a new table namedcountry_codesin the target schema of the data warehouse.
Reference the seed file in a model.
models/orders.sql-- This refers to the table created from seeds/country_codes.csv SELECT * FROM {{ ref('country_codes') }}
Source
Sources declare and describe raw data tables in a dbt project. Extract and load tools write data to these tables in the data warehouse. Declaring these tables as sources allows users to:
Use the
source()function to reference source tables in queries and build data lineage between source tables and downstream models.Check whether source data meets expectations by using data tests.
Check source data freshness to determine whether the data is updated in time.
For more information, see Sources documentation.
Procedure
Step 1: Declare a source
Define sources under the sources: key in a .yml file. models/<filename>.yml
version: 2
sources:
  - name: jaffle_shop
    database: raw
    schema: jaffle_shop
    tables:
      - name: orders
      - name: customers

  - name: stripe
    tables:
      - name: payments
By default, the value of schema is the same as name. To use a name that differs from the existing schema, explicitly specify schema.
Step 2: Select data from source tables
After declaring a source, reference it in a model by using the {{ source() }} function:
models/orders.sql
SELECT
  ...
  FROM {{ source('jaffle_shop', 'orders') }}
  LEFT JOIN {{ source('jaffle_shop', 'customers') }} USING (customer_id)
dbt compiles it into the full table name.
SELECT
  ...
  FROM raw.jaffle_shop.orders
  LEFT JOIN raw.jaffle_shop.customers USING (customer_id)
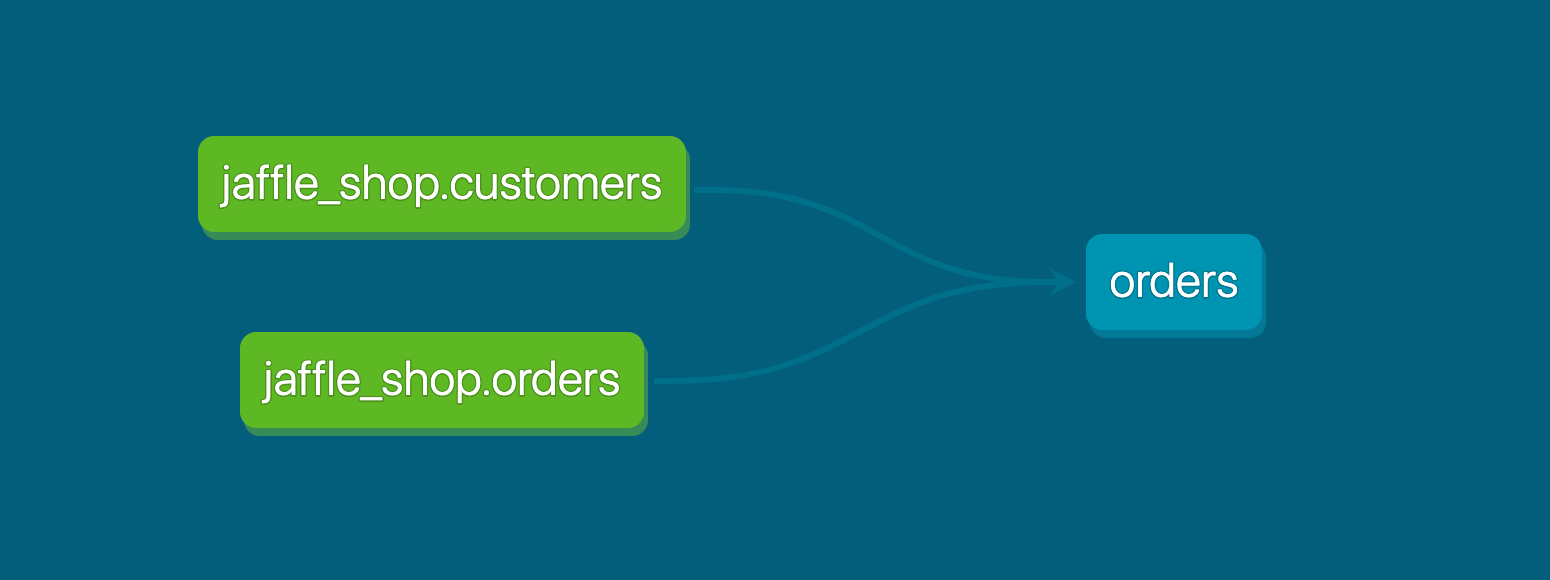
Using the {{ source() }} function creates dependencies between the model and the source tables. The following figure shows the dependency graph between the orders model and the jaffle_shop.customers and jaffle_shop.orders source tables:
Step 3: Test and document sources
Add data tests to sources.
Add descriptions to sources. These descriptions are generated as part of the documentation site.
Properties can be configured in models/<filename>.yml
version: 2

sources:
  - name: jaffle_shop
    description: This is a replica of the Postgres database used by our app
    tables:
      - name: orders
        description: >
          One record per order. Includes cancelled and deleted orders.
        columns:
          - name: id
            description: Primary key of the orders table
            tests:
              - unique
              - not_null
          - name: status
            description: Note that the status can change over time

      - name: ...

  - name: ...
Source data freshness checks
With a small amount of additional configuration, dbt can optionally check the freshness of source table data. This feature helps determine whether data pipelines are healthy and is a key part of defining service-level agreements (SLAs) for a data warehouse.
Step 1: Declare data freshness
In the source configuration file models/<filename>.yml, add freshness and loaded_at_field:
version: 2

sources:
   - name: jaffle_shop
     database: raw
     freshness: # default freshness threshold
       warn_after: {count: 12, period: hour}
       error_after: {count: 24, period: hour}
     loaded_at_field: _etl_loaded_at

     tables:
       - name: orders
         freshness: # stricter time threshold
           warn_after: {count: 6, period: hour}
           error_after: {count: 12, period: hour}

       - name: customers # inherits the parent configuration


       - name: product_skus
         freshness: null # do not check freshness for this table
Step 2: Verify data freshness
Run the dbt source freshness command to check the freshness of source data:
$ dbt source freshnessdbt generates a query based on the freshness configuration:
SELECT
  MAX(_etl_loaded_at) AS max_loaded_at,
  CONVERT_TIMEZONE('UTC', CURRENT_TIMESTAMP()) AS calculated_at
FROM raw.jaffle_shop.orders
If the data does not meet the freshness threshold, a warning or error is triggered.
Snapshots
When a source table overwrites existing field values through updates, the table retains only the current state, and historical states cannot be queried directly. dbt snapshots preserve historical versions of records in source tables to support historical data queries and analysis. For more information, see Snapshots documentation.
dbt snapshots record changes by using Slowly Changing Dimension Type 2 (SCD Type 2). When a record change is detected, the old version is retained and a new version is added. The dbt_valid_from and dbt_valid_to fields identify the validity period of each version.
For example, in the orders table, the status field indicates the order status. Before the order ships, the status is pending:
id | status | updated_at |
1 | pending | 2024-01-01 |
After the order ships, status is updated to shipped, which overwrites the original pending value:
id | status | updated_at |
1 | shipped | 2024-01-02 |
If a snapshot captures both states before and after the update, the snapshot table retains both record versions and their validity periods:
id | status | updated_at | dbt_valid_from | dbt_valid_to |
1 | pending | 2024-01-01 | 2024-01-01 | 2024-01-02 |
1 | shipped | 2024-01-02 | 2024-01-02 | null |
Configure a snapshot
Define the snapshot configuration in a YAML file to tell dbt how to detect record changes. Store the configuration file alongside models or in the snapshots directory.
snapshots:
  - name: orders_snapshot
    relation: source('jaffle_shop', 'orders')  # reference to a source table or model
    description: "Snapshot of order status changes"
    config:
      database: analytics
      schema: snapshots
      alias: your_custom_snapshot
      strategy: timestamp  # strategy type: timestamp or check
      unique_key: id       # unique key column or expression
      check_cols: ["status"]  # configure only for the check strategy
      updated_at: updated_at  # configure only for the timestamp strategy
      dbt_valid_to_current: "to_date('9999-12-31')"  # custom dbt_valid_to value for current records
      snapshot_meta_column_names: {}  # custom names for meta columns
      hard_deletes: ignore  # hard delete handling: ignore, invalidate, or new_record
Configuration parameters:
Parameter | Description | Required | Example |
| Specifies the database where the snapshot is stored | No |
|
| Specifies the schema where the snapshot is stored | No |
|
| The alias of the snapshot table | No |
|
| The snapshot strategy type. Valid values: | Yes |
|
| The unique key column or expression (such as | Yes |
|
| The list of columns to compare under the | Yes ( |
|
| The field that records the last update time under the | Yes ( |
|
| A custom value for the | No |
|
| The method for handling hard deletes (default: | No |
|
Create a snapshot
Create a configuration file: Create a YAML file in the
snapshotsdirectory, such assnapshots/orders_snapshot.yml.Define the snapshot logic: Typically, select data directly from the source table, for example, by preprocessing data with an ephemeral model:
-- models/ephemeral_orders.sql (ephemeral model)
{{ config(materialized='ephemeral') }}
SELECT * FROM {{ source('jaffle_shop', 'orders') }}
Run the snapshot command:
$ dbt snapshot
Running with dbt=1.9.0
15:07:36 | 1 of 1 OK snapshot snapshots.orders_snapshot..........[SELECT 3 in 1.82s]
After the command runs, the snapshot table is created in the specified path (such as analytics.snapshots.orders_snapshot) and contains the following metadata fields:
Metadata field | Description |
| The time from which the snapshot row is valid. |
| The time at which the snapshot row becomes invalid (defaults to |
| The unique identifier of the snapshot row (for internal use). |
| The update time of the source record (for internal use). |
| Whether the record has been deleted (enabled under the |
Macro
Macro properties can be declared in any properties.yml file. However, macro properties cannot be configured in the dbt_project.yml file or through a config() block. For macro paths, see macro-paths.
Example configuration file (macros/<filename>.yml):
version: 2

macros:
  - name: <macro name>
    description: <Markdown description>
    docs:
      show: true | false  # whether to show the macro in the documentation
    meta: {<dictionary>}        # custom metadata (optional)
    arguments:
      - name: <argument name>
        type: <data type string>
        description: <Markdown description>
      - ...  # declare properties of other arguments

  - name: ...  # declare properties of other macros
Docs
dbt docs includes two supported subcommands: generate and serve. For more information, see dbt docs command documentation.
dbt docs generate
This command generates the documentation website for the project through the following steps:
Copies the website
index.htmlfile to thetarget/directory.Compiles the resources in the project so that their compiled code is included in
manifest.json.Runs queries against database metadata to generate the
catalog.jsonfile, which contains metadata about the tables and views produced by the models in the project, such as column information and statistics.
Example:
dbt docs generateParameters:
--select: Limits the nodes included incatalog.json. When this flag is specified, step (3) runs only for the selected nodes, and other nodes are excluded. Step (2) is not affected.dbt docs generate --select +orders--no-compile: Skips recompilation. When this flag is specified,dbt docs generateskips step (2).dbt docs generate --no-compile--empty-catalog: Skips running the database queries that populatecatalog.json. When this flag is specified,dbt docs generateskips step (3).dbt docs generate --empty-catalog--static: Generates a static page for hosting on a cloud storage provider. Thecatalog.jsonandmanifest.jsonfiles are inserted into theindex.htmlfile to produce a single page that can be easily shared by email or through file-sharing apps.dbt docs generate --static
dbt docs serve
This command starts a local web server on port 8080 to serve the documentation and opens the documentation site in the default browser. The web server runs from the target/ directory. Before running dbt docs serve, run dbt docs generate first, because the generate command generates the metadata file that serve depends on: catalog. If the catalog file is missing, an error is returned.
When to use:
Use this command when developing locally with the Cloud CLI or dbt Core. The dbt Cloud IDE does not support this command.
Usage
dbt docs serve [--profiles-dir PROFILES_DIR]
               [--profile PROFILE] [--target TARGET]
               [--host HOST]
               [--port PORT]
               [--no-browser]
Parameters:
--port: Specifies a different port.dbt docs serve --port 8001--host: Specifies a different host address.dbt docs serve --host ""Default host:
Starting from version 1.8.1, the default host is
127.0.0.1.In version 1.8.0 and earlier, the default host is
"".