This topic describes how to use DataWorks Data Integration to migrate data from a Kafka cluster to MaxCompute.
Prerequisites
-
You have activated MaxCompute.
-
You have added a MaxCompute data source. For more information, see Bind a MaxCompute compute engine.
-
You have created a workflow in DataWorks. In this topic, a workspace in basic mode is used as an example. For more information, see Create a workflow.
-
You have set up a Kafka cluster.
Before you migrate data, make sure that your Kafka cluster is running correctly. This topic uses Alibaba Cloud EMR to automatically set up a Kafka cluster. For more information, see Kafka Quick Start.
This topic uses the following EMR Kafka version:
-
EMR version: EMR-3.12.1
-
Cluster type: Kafka
-
Software information: Ganglia 3.7.2, ZooKeeper 3.4.12, Kafka 2.11-1.0.1, and Kafka-Manager 1.3.X.XX
The Kafka cluster uses a VPC in the China (Hangzhou) region. The ECS instances in the primary instance group are configured with a public IP address and a private IP address.
-
Background
Kafka is a distributed publish-subscribe messaging middleware known for its high performance and throughput. It can process millions of messages per second. Kafka is suitable for streaming data processing and is widely used in scenarios such as user behavior tracking and log collection.
A typical Kafka cluster consists of producers, brokers, consumers, and a ZooKeeper cluster. The Kafka cluster uses ZooKeeper to manage cluster configurations and coordinate services.
A topic is a logical concept that categorizes messages in a Kafka cluster. Topics are not stored on physical disks. Instead, messages in a topic are stored in partitions on the disks of the nodes in the cluster. Multiple producers can send messages to a topic, and multiple consumers can pull (consume) messages from it.
When a message is added to a partition, it is assigned an offset, which is a unique ID for the message within that partition. Offsets are numbered starting from 0.
Step 1: Prepare Kafka data
You need to create test data in your Kafka cluster. First, configure the security group of the EMR cluster's header host to allow inbound traffic on TCP ports 22 and 9092. This ensures that you can log on to the header host and that MaxCompute and DataWorks can communicate with it.
-
Log on to the header host of the EMR cluster.
-
Log on to the EMR console.
-
In the top navigation bar, click Cluster Management.
-
Find the target cluster and go to its details page.
-
On the cluster details page, click the host list, find the IP address of the header host, and use an SSH client to connect to the host.
-
-
Create a test topic.
Run the following command to create a test topic named testkafka:
kafka-topics.sh --zookeeper emr-header-1:2181/kafka-1.0.1 --partitions 10 --replication-factor 3 --topic testkafka --create -
Write test data.
Run the following command to simulate a producer that writes data to the testkafka topic. Because Kafka is used for stream processing, you can continuously write data. To ensure a valid test result, write at least 10 messages.
kafka-console-producer.sh --broker-list emr-header-1:9092 --topic testkafkaYou can also open another SSH window and run the following command to simulate a consumer that verifies that the data was written to Kafka successfully. If successful, the data appears in the output.
kafka-console-consumer.sh --bootstrap-server emr-header-1:9092 --topic testkafka --from-beginning
Step 2: Create a target table in DataWorks
Create a target table in DataWorks to receive the data from Kafka.
-
Go to the Data Development page.
-
Log on to the DataWorks console.
-
In the left-side navigation pane, choose .
-
From the drop-down list, select the desired workspace and click Go to Data Studio.
-
-
Right-click a workflow and choose .
-
In the Create Table dialog box, enter a table name and click Create.
Note-
Table names must start with a letter and cannot contain Chinese characters or special characters.
-
If multiple MaxCompute data sources are bound in Data Studio, select the required MaxCompute Engine Instance.
-
On the table editing page, click DDL Statement.
-
In the DDL dialog box, enter the following statement and click Generate Table Schema.
CREATE TABLE testkafka
(
 key             string,
 value           string,
 partition1      string,
 timestamp1      string,
 offset          string,
 t123            string,
 event_id        string,
 tag             string
) ;
Each column corresponds to a built-in field from the DataWorks Data Integration Kafka reader:
-
__key__: the key of the message.
-
__value__: the full content of the message.
-
__partition__: the partition where the message resides.
-
__headers__: the header information of the message.
-
__offset__: the offset of the message.
-
__timestamp__: the timestamp of the message.
You can also customize the column names. For more information, see Kafka Reader.
-
Click Deploy to Production Environment and OK.
Step 3: Synchronize data
-
Create an exclusive resource group for Data Integration.
The public resource group in DataWorks does not fully support the Kafka plugin. You must use an exclusive resource group for Data Integration to synchronize data. For more information, see Use an exclusive resource group for Data Integration.
-
Create a Data Integration node.
-
On the Data Studio page, right-click a workflow and choose .
-
In the Create Node dialog box, enter a Name for the node and click OK.
-
In the top navigation bar, choose
 icon.
icon.In script mode, click
 icon.
icon.-
Configure the script. The following code provides an example.
{
    "type": "job",
    "steps": [
        {
            "stepType": "kafka",
            "parameter": {
                "server": "47.xxx.xxx.xxx:9092",
                "kafkaConfig": {
                    "group.id": "console-consumer-83505"
                },
                "valueType": "ByteArray",
                "column": [
                    "__key__",
                    "__value__",
                    "__partition__",
                    "__timestamp__",
                    "__offset__",
                    "'123'",
                    "event_id",
                    "tag.desc"
                ],
                "topic": "testkafka",
                "keyType": "ByteArray",
                "waitTime": "10",
                "beginOffset": "0",
                "endOffset": "3"
            },
            "name": "Reader",
            "category": "reader"
        },
        {
            "stepType": "odps",
            "parameter": {
                "partition": "",
                "truncate": true,
                "compress": false,
                "datasource": "odps_source",// The name of the MaxCompute data source.
                "column": [
                    "key",
                    "value",
                    "partition1",
                    "timestamp1",
                    "offset",
                    "t123",
                    "event_id",
                    "tag"
                ],
                "emptyAsNull": false,
                "table": "testkafka"
            },
            "name": "Writer",
            "category": "writer"
        }
    ],
    "version": "2.0",
    "order": {
        "hops": [
            {
                "from": "Reader",
                "to": "Writer"
            }
        ]
    },
    "setting": {
        "errorLimit": {
            "record": ""
        },
        "speed": {
            "throttle": false,
            "concurrent": 1
        }
    }
}
You can run the
kafka-consumer-groups.sh --bootstrap-server emr-header-1:9092 --listcommand on the header host to find the consumer group name for thegroup.idparameter.-
Command example
kafka-consumer-groups.sh --bootstrap-server emr-header-1:9092 --list -
Sample output
_emr-client-metrics-handler-group
console-consumer-69493
console-consumer-83505
console-consumer-21030
console-consumer-45322
console-consumer-14773
Using
console-consumer-83505as an example, you can run thekafka-consumer-groups.sh --bootstrap-server emr-header-1:9092 --describe --group console-consumer-83505command on the header host to determine the values of thebeginOffsetandendOffsetparameters.-
Command example:
kafka-consumer-groups.sh --bootstrap-server emr-header-1:9092 --describe --group console-consumer-83505 -
Sample output:
TOPIC                          PARTITION  CURRENT-OFFSET  LOG-END-OFFSET  LAG        CONSUMER-ID                                       HOST                           CLIENT-ID
testkafka                      6          0               0               0          -                                                 -                              -
test                           6          3               3               0          -                                                 -                              -
testkafka                      0          0               0               0          -                                                 -                              -
testkafka                      1          1               1               0          -                                                 -                              -
testkafka                      5          0               0               0          -                                                 -                              -
-
-
Configure the scheduling resource group.
-
In the right-side navigation pane of the node configuration tab, click Properties.
-
In the Resource Group section, set Resource Group for Scheduling to the exclusive resource group for Data Integration that you created.
NoteIf you need to periodically write data from Kafka to MaxCompute, such as hourly, you can use the
beginDateTimeandendDateTimeparameters. Configure the Data Integration task to run every hour with a one-hour data reading window. For more information, see Kafka Reader.
-
Click
 icon to run the code.
You can Runtime Log view the results.
Next steps
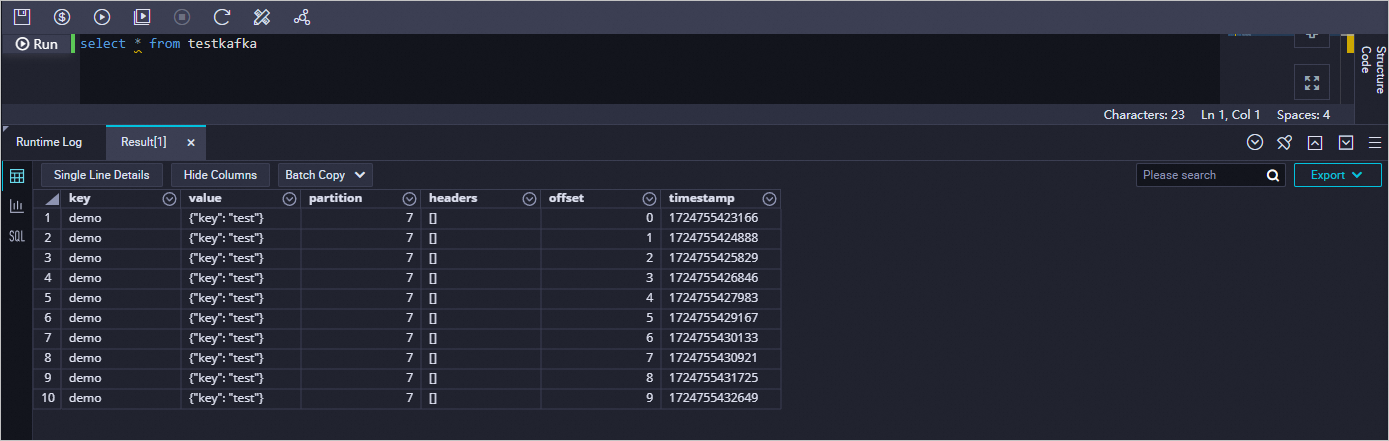
To verify that the data was synchronized, create a task in Data Studio to run an SQL statement against the target table. This topic uses select * from testkafka as an example. Perform the following steps:
-
Go to the Data Development page.
-
Log on to the DataWorks console.
-
In the left-side navigation pane, click Workspace. This takes you to the Workspace list page.
-
In the top navigation bar, switch to the target region. Find your workspace, and in the Actions column, choose .
-
-
In the left-side navigation pane, click the
 (Ad-hoc Query) icon to open the Ad Hoc Query page. Then, click the
  (Create) icon and choose .
 -
In the Create Node dialog box, specify the Path and Name.
-
Click OK.
-
On the configuration tab of the node, enter
select * from testkafka, click the icon, and view the Runtime Log after the task completes.
 icon, and view the Runtime Log after the task completes.