Job Priority
This topic describes the job priority feature in MaxCompute and explains how to enable, set, and view job priorities.
Background
MaxCompute has limited compute resources. During data development, the system must prioritize critical jobs to ensure they obtain the resources they need. For example, if certain data must be ready by 6:00 a.m., the series of jobs—or workflow—that produces that data must be able to claim compute resources ahead of other jobs.
You can meet this requirement by setting job priorities at the project level. Higher-priority jobs are allocated compute resources first. When a high-priority job starts, it can preempt resources from lower-priority jobs.
Priority overview
Every job in MaxCompute has a priority value from 0 to 9. Lower numbers mean higher priority. Higher-priority jobs are allocated compute resources before lower-priority jobs.
When the job priority feature is disabled, the default priority for all jobs in a project is 9. For PAI algorithm jobs, the default priority is 1.
Enable priority
Enable priority at the project level
Only the project owner or a user with the Super_Administrator role can run the following command to enable the priority feature.
setproject odps.instance.priority.enable=true;After you enable the priority feature, all jobs in the project use priority immediately. However, if priorities are set incorrectly, jobs may queue unpredictably.
Before enabling the priority feature, check existing job priorities using Information Schema. Then, as needed, reset any non-9 priorities to 9. Afterward, enable the priority feature.
Enable priority at the quota level
After you enable the priority feature, jobs that run under this quota use priority. This works the same as enabling priority at the project level.
Before enabling priority, ensure you have created a quota template and a quota plan. For more information, see Configure quotas.
Procedure
Log in to the MaxCompute console and select a region in the upper-left corner.
In the left-side navigation pane, choose .
On the Quotas page, click Quota Configuration in the Actions column of the target quota.
On the Quota Configuration page, select the Basic Configurations tab and click Edit Basic Configurations.
Select the Enable Priority checkbox for the target level-2 quota.
NoteWhen the second-level Quota Type is Interactive, the Enable Priority parameter is unavailable by default.
Click OK.
Check job priorities
Job Priority Distribution Statistics
Example command:
SELECT  get_json_object(
            REPLACE(settings, '.', '_')
            ,'$.odps_instance_priority'
        ) AS priority
        ,task_type
        ,COUNT(1) AS cnt
FROM    information_schema.tasks_history
WHERE   ds = '${bizdate}' -- bizdate is the date partition.
GROUP BY get_json_object(
             REPLACE(settings, '.', '_')
             ,'$.odps_instance_priority'
         )
         ,task_type
ORDER BY cnt DESC
LIMIT   100
;
The response is as follows:
+----------+-----------+------------+
| priority | task_type | cnt        |
+----------+-----------+------------+
| 9        | SQL       | 4          |
| NULL     | SQL       | 1          |
| 2        | SQL       | 1          |
+----------+-----------+------------+
This sample shows priorities of NULL, 2, and 9. Identify jobs with priority 2 or NULL. NULL usually means a DDL task, which you can ignore.
Find jobs with priority values other than 9.
Example command:
SELECT inst_id ,owner_name ,task_name ,task_type ,settings FROM information_schema.tasks_history WHERE ds = '${bizdate}' AND get_json_object(REPLACE(settings, '.', '_'), '$.odps_instance_priority') = '${priority}' LIMIT 100 ;bizdate: The date partition, such as 20200517.
priority: A priority value other than 9, such as 2.
The following result is returned:
+---------+------------+-----------+-----------+----------+ | inst_id | owner_name | task_name | task_type | settings | +---------+------------+-----------+-----------+----------+ | 20200517160200907g4jm**** | ALIYUN$odps_dev_****@prod.trusteeship.aliyunid.com | console_query_task_158973132**** | SQL | {"SKYNET_ID": "21000041****", "odps.instance.priority": "2", "SKYNET_ONDUTY": "113058643178****", "user_agent": "JavaSDK Revision:33acd11 Version:0.30.9 JavaVersion:1.8.0_112 CLT(0.30.2 : 9da012b); Linux(/)", "biz_id": "210000416174_20200517_211843317416_210033365461_1_habai_test_1130586431784115_39419845061****", "SKYNET_NODENAME": "test_priority"} | +---------+------------+-----------+-----------+----------+SKYNET_ID: The DataWorks scheduling node ID. If this field is missing, the job was not submitted through DataWorks. Use the owner_name and user_agent fields to identify the source.
SKYNET_ONDUTY: Indicates a periodic job.
Review job priorities.
Jobs submitted through DataWorks: If the job has a baseline, check whether the baseline is reasonable. If not, delete the baseline. For more information, see Baseline management.
Jobs not submitted through DataWorks: Use the query results to find the owner and code. Remove the priority setting from the code to restore the default priority of 9.
Set priority
You can set job priority in the following ways:
Method 1: Run the MaxCompute client, enter your project, and set the job priority.
Use this method for ad hoc queries. Example command:
SET odps.instance.priority=values;
-- values is an integer from 0 to 9.
Method 2: Run the MaxCompute client, enter your project, and pass the SQL statement as a parameter to set the job priority.
Use this method for ad hoc queries. Example command:
bin/odpscmd --config=xxx --project=xxx --instance-priority=x -e "<sql>"Method 3: Set job priority using the Java SDK.
Use this method to build custom priority logic. For more information, see Java SDK overview. Example code:
import com.aliyun.odps.Instance;
import com.aliyun.odps.LogView;
import com.aliyun.odps.Odps;
import com.aliyun.odps.OdpsException;
import com.aliyun.odps.account.Account;
import com.aliyun.odps.account.AliyunAccount;
import com.aliyun.odps.task.SQLTask;
public class OdpsPriorityDemo {
    public static void main(String args[]) throws OdpsException {
     	  // An Alibaba Cloud AccessKey gives full API access and poses a high security risk. We strongly recommend that you create and use a RAM user instead. To create a RAM user, log on to the RAM console.
				// In this example, the AccessKey ID and AccessKey secret are stored in environment variables. You can also store them in a configuration file based on your needs.
				// Never store the AccessKey ID and AccessKey secret in your code. That could expose your credentials.
        Account account = new AliyunAccount(System.getenv("ALIBABA_CLOUD_ACCESS_KEY_ID"),System.getenv("ALIBABA_CLOUD_ACCESS_KEY_SECRET"));
        Odps odps = new Odps(account);
        // Public cloud endpoint.
        String odpsUrl = "http://service.odps.aliyun.com/api";
        odps.setEndpoint(odpsUrl);
        odps.setDefaultProject("xxxxxxxxxx");
        SQLTask task = new SQLTask();
        task.setName("adhoc_sql_task_1");
        task.setQuery("select count(*) from aa;");
     		// 5 is the job priority.
        Instance instance = odps.instances().create(task, 5);
        LogView logView = new LogView(odps);
        // Print the LogView URL to check the instance status. Optional.
        System.out.println(logView.generateLogView(instance, 24));
        // Wait for the instance to complete. Optional.
        instance.waitForSuccess();
    }
}
Method 4: Set job priority using DataWorks baseline management.
Use this method to ensure timely output for a periodic job and its upstream jobs. Baseline management lets you set priorities for all jobs across a data pipeline at once—no need to configure each job separately. For more information about DataWorks baseline management, see Baseline management.
In DataWorks, baseline priorities are 1, 3, 5, 7, or 8. Higher numbers mean higher priority. When you set a MaxCompute job priority through DataWorks baseline management, the MaxCompute job priority equals 9 minus the DataWorks baseline priority.
NoteBy default, ad hoc queries in DataWorks have no baseline. Therefore, the lowest priority for MaxCompute jobs they start is 9.
DataWorks workflows have a default baseline priority of 1. Therefore, the lowest priority for MaxCompute jobs they start is 8.
Method 5: Set job priority directly in a DataWorks node.
Use this method for ad hoc queries. Example command:
set odps.instance.priority=x;
-- x is the priority value.
View priority
In Logview 2.0, go to the Json Summary tab and locate the odps.instance.priority parameter to view the job priority. For more Logview 2.0 operations, see View job execution details using Logview 2.0. 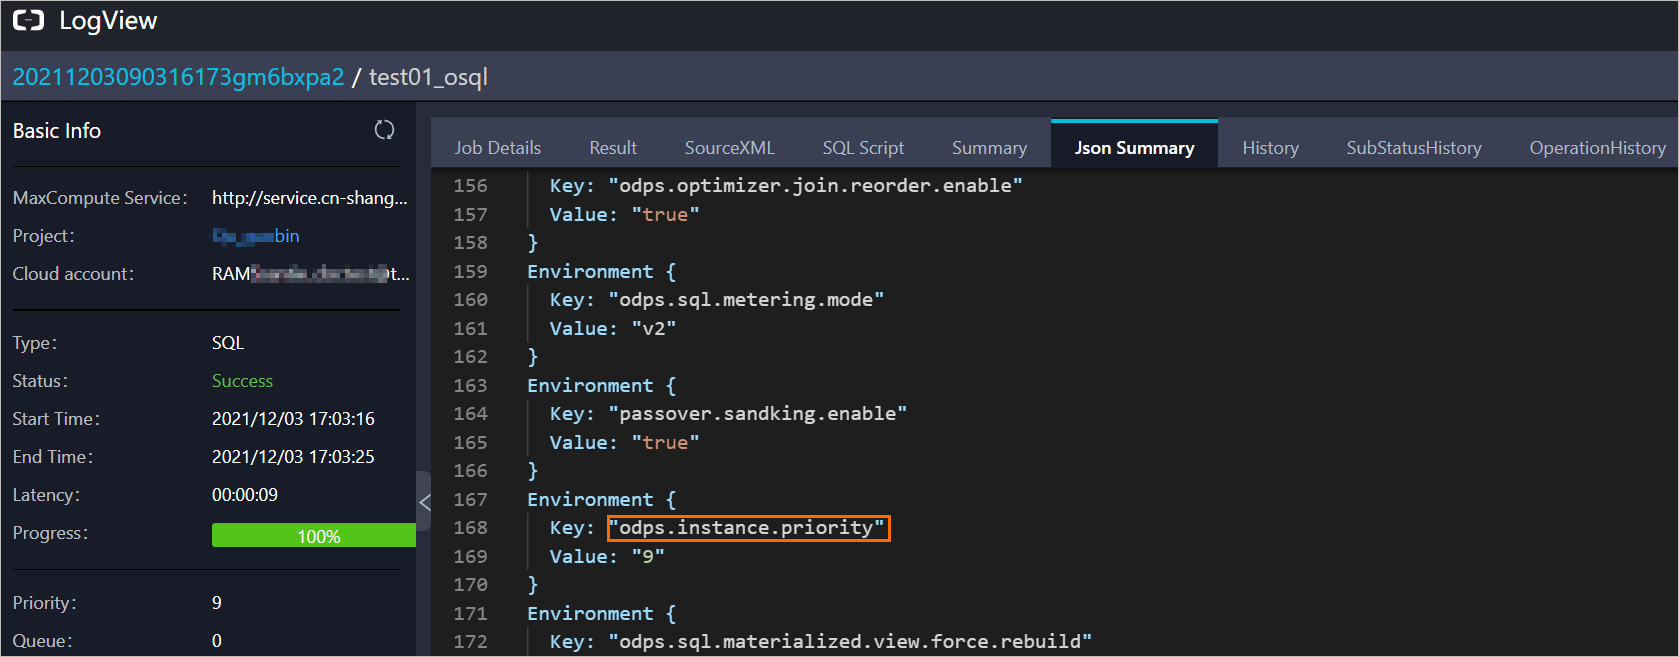
The priority shown in XML on the Logview page is not accurate. For projects where priority is disabled, the system changes any priority value other than 9 to 9 in XML to prevent unfair queuing.