Assistant API Code Interpreter
Large models are not well-suited for precise computing tasks, such as mathematical operations and data visualization. You can use the pre-built Code Interpreter plugin for the Assistant API. This plugin allows the agent to write and run Python programs to solve complex data problems step by step. If the code written by the agent fails to run, it iteratively adjusts the code and attempts different approaches until the code executes successfully.
Quick Start
How it works
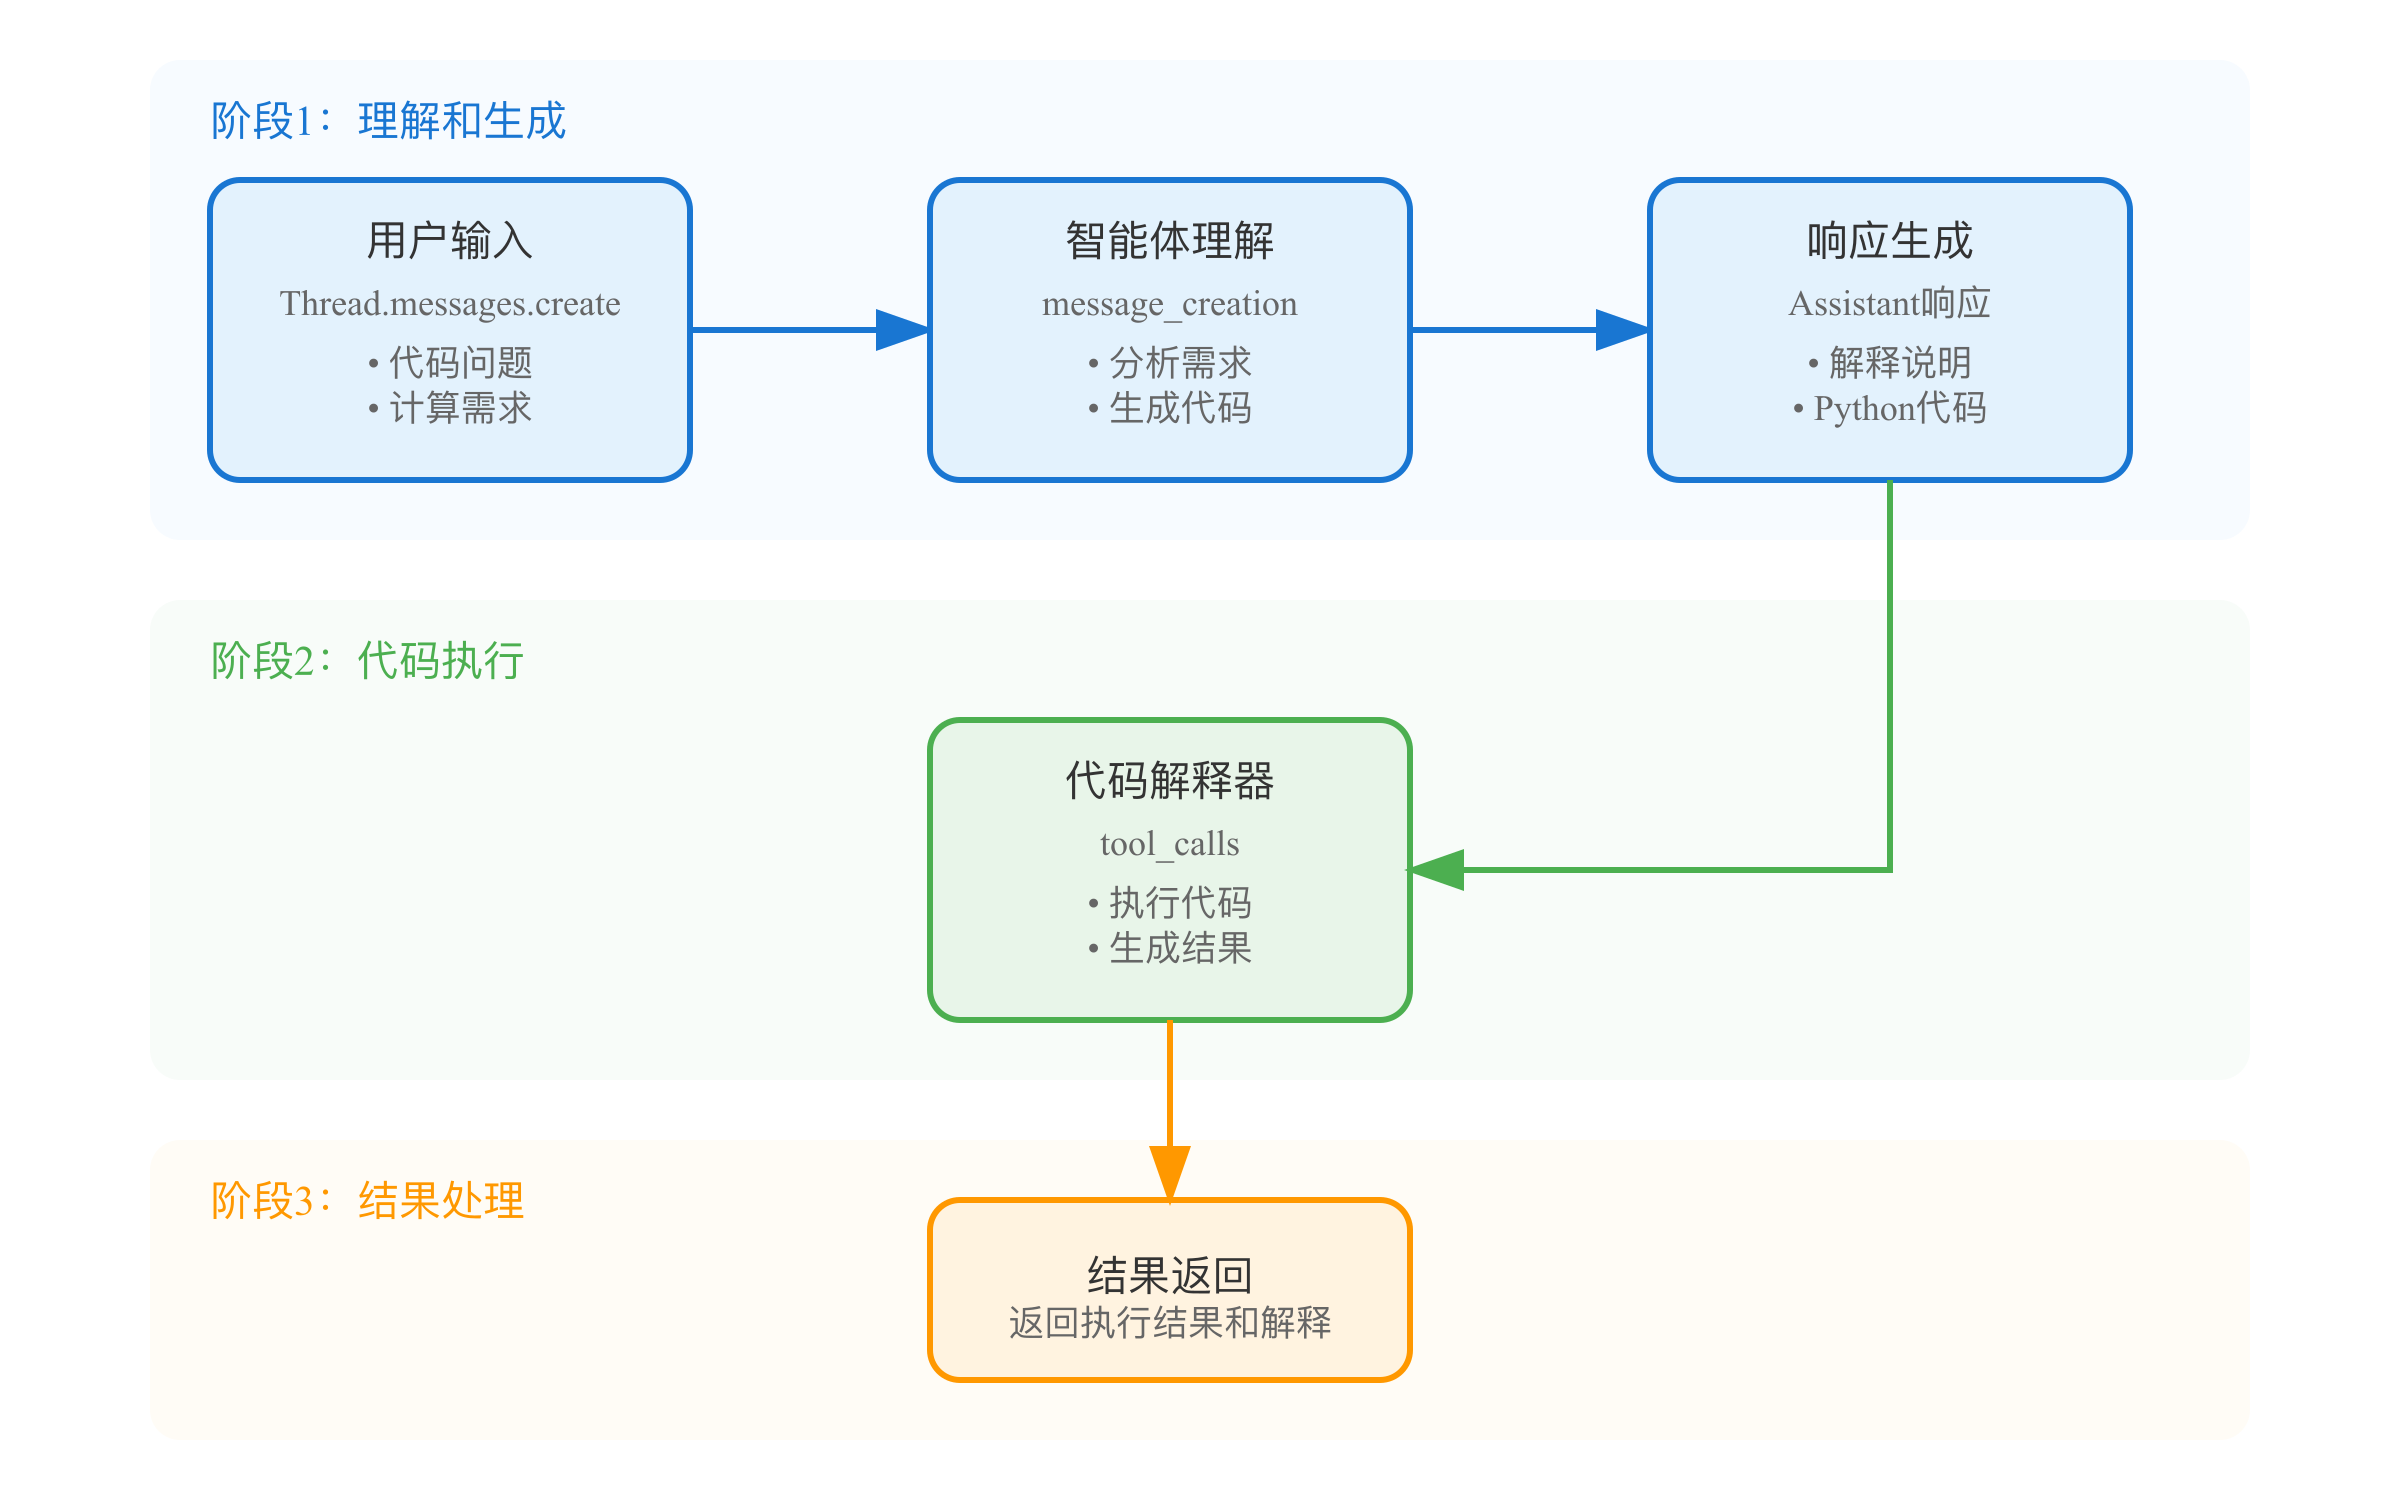
The following figure illustrates the workflow of the Code Interpreter. It shows how the Code Interpreter interacts with other components as an Assistant API tool to generate, execute, and process code.
As shown in the figure, the Code Interpreter completes tasks in the following steps:
- A user provides input, such as code or a question, through the Assistant API.
- The Code Interpreter plugin receives the input, generates Python code, and executes it.
- The execution result is returned to the user through the Assistant API.
Quick configuration
If you are a developer familiar with the Assistant API, you can follow these steps to quickly add the Code Interpreter to an agent application.
- When you create an Assistant object, add the
code_interpretertool. This is the key configuration for enabling the Code Interpreter.
# Quickly enable the Code Interpreter
assistant = dashscope.Assistants.create(
    **kwargs, # **kwargs is used to receive other possible configuration parameters, such as the agent name, model name, and system instructions.
    tools=[{
        'type': 'code_interpreter'  # This is the key configuration to enable the Code Interpreter.
    }]
)
- When retrieving the response from the large model application, you can use the
dashscope.Steps.listmethod to retrieve the running steps and fetch the code execution content and results.
# Process the code execution results
steps = dashscope.Steps.list(thread_id=thread.id, run_id=run.id)

# Process the code content and execution results
for step in steps:
    if step.step_details.type == 'tool_calls':
        for call in step.step_details.tool_calls:
            if call.type == 'code_interpreter':
                # Output the code and execution results
                print("Code:", call.code_interpreter.arguments)
                print("Output:", call.code_interpreter.output)
With these two steps, you can quickly enable the Code Interpreter plugin and process the code execution results. For more detailed feature descriptions, see the following sections.
Scenarios
The Code Interpreter is a pre-built plugin for the Assistant API. It can solve problems in various real-world application scenarios by executing Python code generated by the large model:
Convert between common data formats |
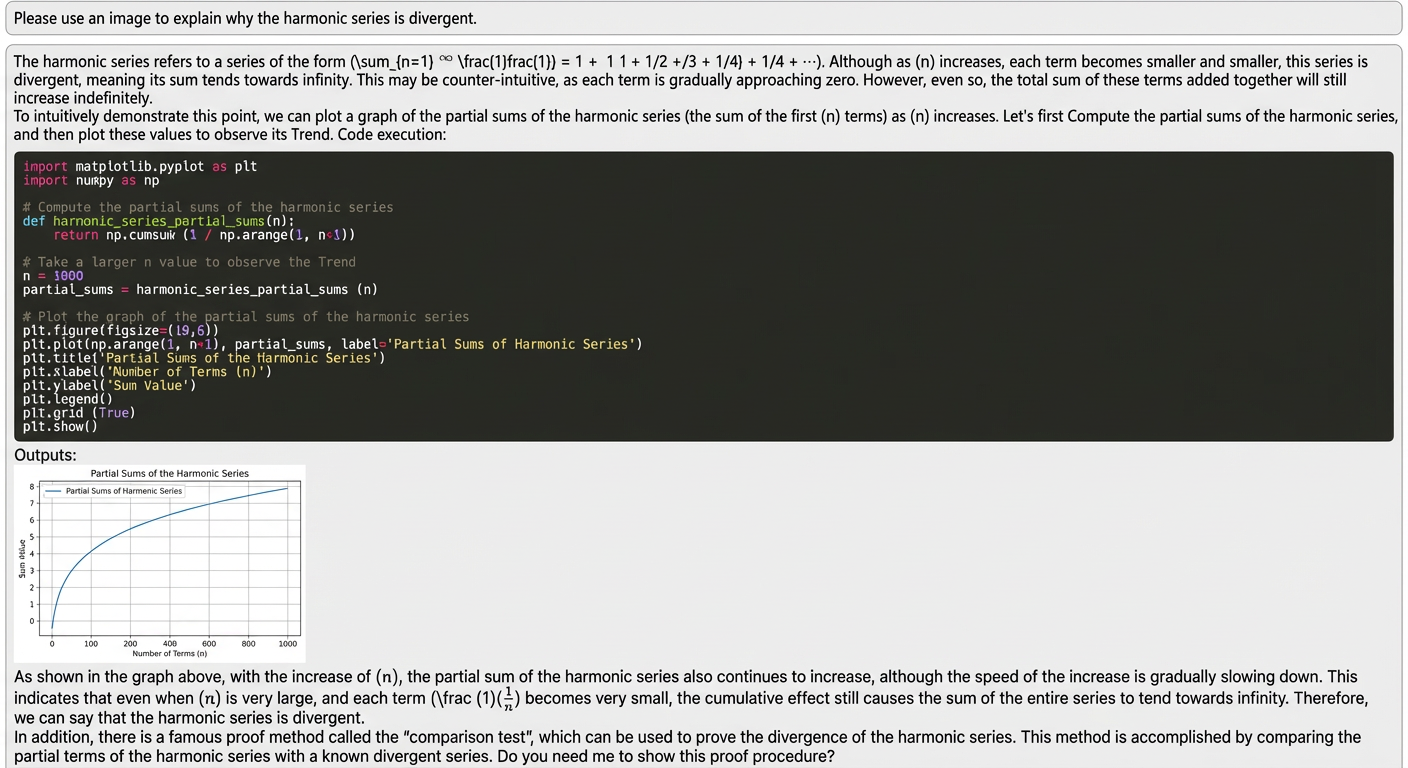
Create rich visualizations with libraries such as matplotlib |
Convert between JSON and CSV for easy data import and export Parse and generate XML, which is suitable for processing configuration files Extract and reorganize Excel data to simplify table processing workflows | Plot line charts to show data trends and fluctuations Analyze variable correlations with scatter charts Use heatmaps to render complex multidimensional data relationships |
|
|
 Format conversion
 Image plotting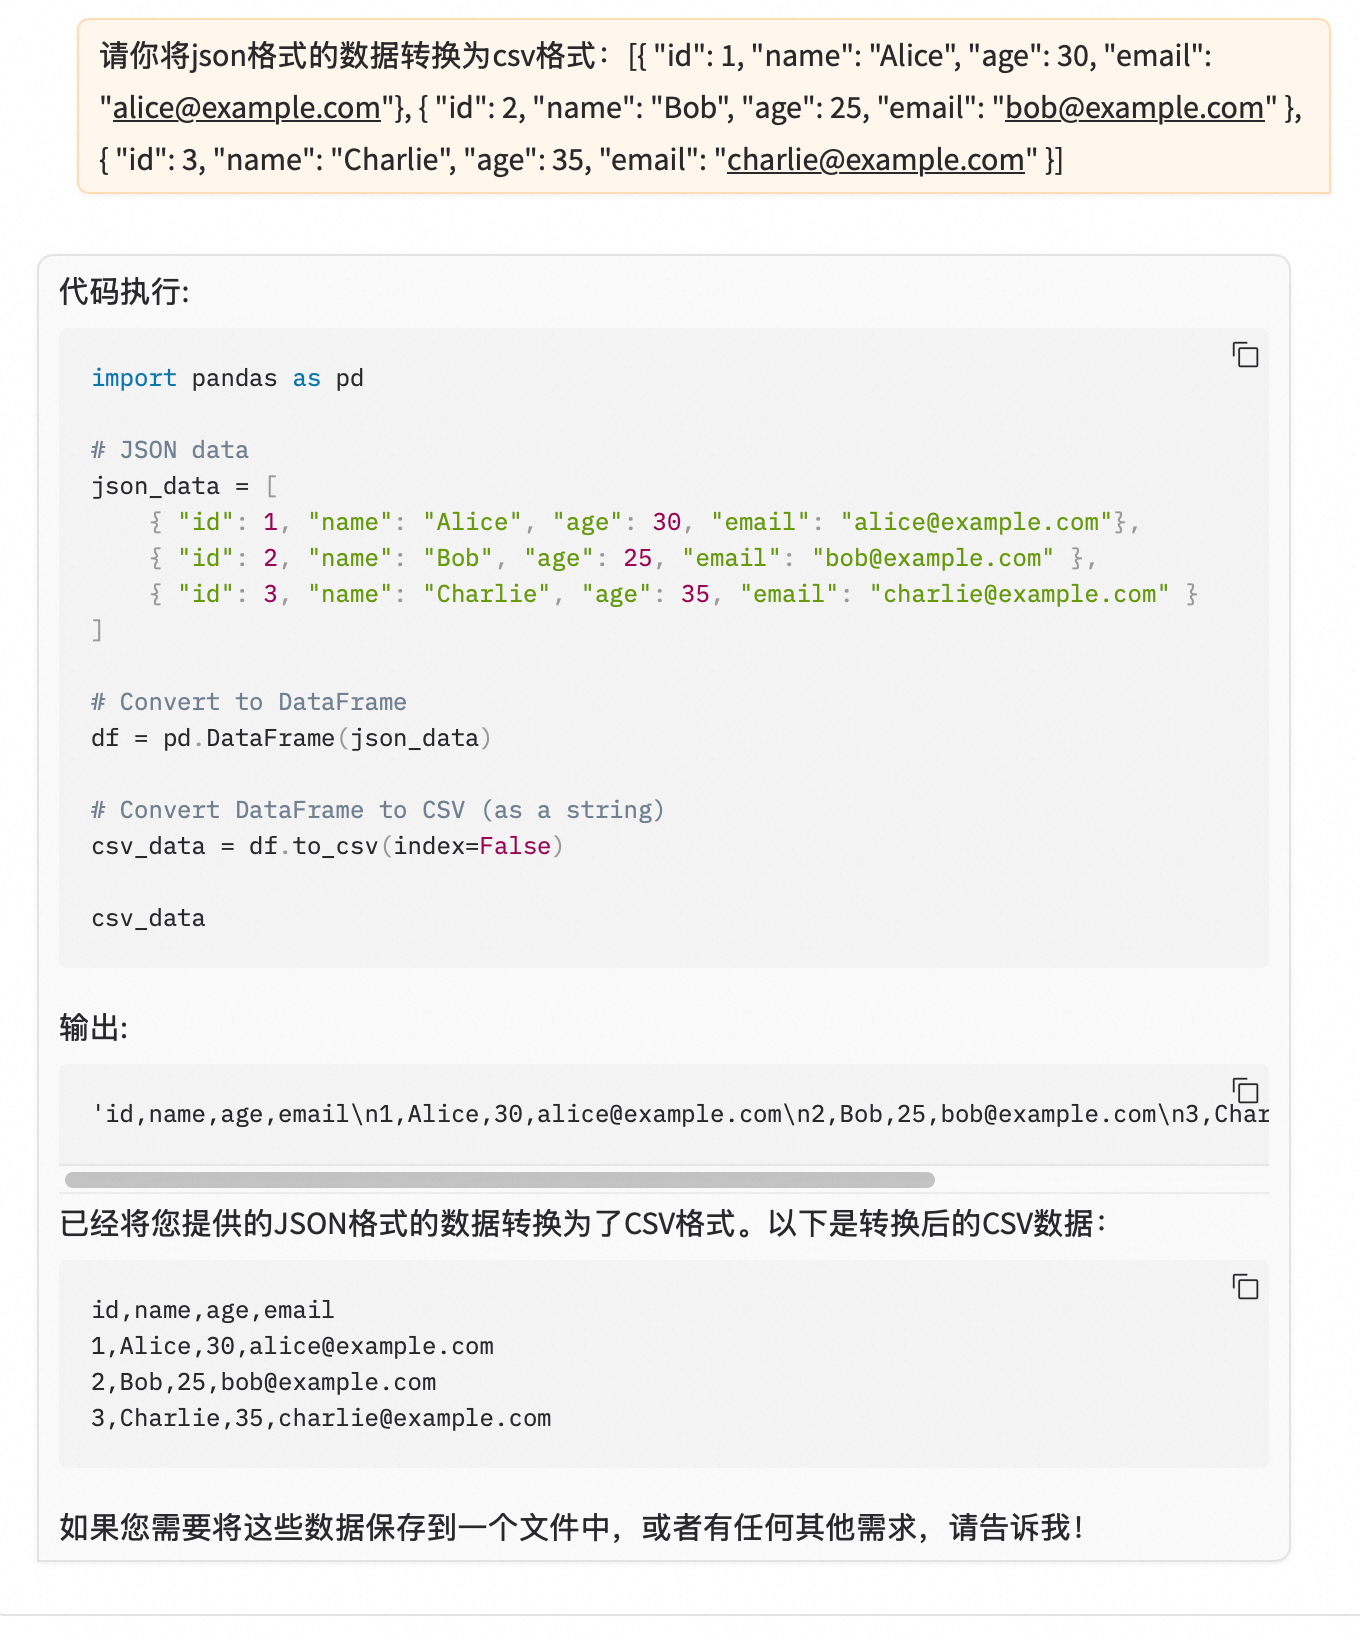
Example: Code teaching assistant
In this example, you will use the Assistant API and Gradio to create a web-based code teaching assistant that helps users edit and execute code.
Prerequisites
-
Python environment: Before you start, ensure that your development environment meets the following conditions:
-
Python 3.10 or later is recommended. You can run the following command to check your Python version:
python3 --version -
The latest version of Pip is installed. You can run the following command to upgrade Pip to the latest version:
pip install --upgrade pip -
The DashScope and Gradio packages are installed. You can run the following command to install the packages:
pip install dashscope==1.20.11 gradio==5.1.0
-
-
Alibaba Cloud Model Studio API key: For Assistant API development, you must obtain and configure an Alibaba Cloud Model Studio API key.
This section describes the important methods used to develop the example scenario. We recommend that you first browse and run the complete code to understand the development process for the entire example. After the code runs, you can access the web-based code teaching assistant at http://127.0.0.1:7860/.
Complete code
"""
Code Interpreter teaching example

This example shows how to use the DashScope Assistant API to create an AI agent with code execution capabilities.
The entire process is divided into five main steps:
1. Create an Assistant - Configure the AI agent's features and behavior
2. Create a Thread - Manage a complete conversation session
3. Send a Message - Add user input to the conversation thread
4. Run the agent - Process user input and generate a response
5. Process Steps - Track and handle the agent's execution process
"""

import dashscope
import gradio as gr
import logging
import asyncio

# Configure logging to track API calls and the execution process
logging.basicConfig(level=logging.INFO)

class CodeTeachingAssistant:
    """
    Code teaching assistant class

    Workflow:
    1. Create an assistant and a conversation thread during initialization
    2. After receiving a user message, add it to the conversation thread
    3. Create a running instance to process the user input
    4. Track each step during the run
    5. Return the processing result
    """
    def __init__(self):
        # Step 1: Create an Assistant instance
        # - model: Select a model that supports the Code Interpreter
        # - tools: Enable the Code Interpreter feature
        # - instructions: Define the Assistant's code of conduct
        self.assistant = dashscope.Assistants.create(
            model='qwen-plus',  # Use a Qwen model that supports code execution
            name='Programming Teaching Assistant',
            instructions='''
                You are a programming teacher responsible for:
                1. Explaining code principles
                2. Providing code examples
                3. Executing code and analyzing results
                Please teach in a way that is easy to understand.
            ''',
            tools=[{'type': 'code_interpreter'}]  # Enable the Code Interpreter
        )

        # Step 2: Create a conversation thread
        # A Thread is used to maintain a complete conversation context
        self.thread = dashscope.Threads.create()

    async def chat(self, message: str):
        """
        Process a user message and return the assistant's reply

        Workflow:
        1. Add the user message to the conversation thread
        2. Create a running instance to process the message
        3. Track each step during the run
        4. Gradually return the processing results
        """
        # Step 3: Send the user message
        # Add the user input to the conversation thread
        dashscope.Messages.create(
            thread_id=self.thread.id,
            role="user",
            content=message
        )

        # Step 4: Create a running instance
        # A Run is responsible for processing user input and generating a response
        run = dashscope.Runs.create(
            thread_id=self.thread.id,
            assistant_id=self.assistant.id
        )

        # This set tracks processed steps to avoid duplicates.
        # processed_steps is a collection used to store the IDs of steps that have already been processed.
        # Each step generates a unique ID during the Assistant's execution process.
        # By recording these IDs, we can ensure that each step is processed only once to avoid duplicate output.
        processed_steps = set()

        # Step 5: Process the running steps
        while True:
            # Get the run status
            run_status = dashscope.Runs.retrieve(
                thread_id=self.thread.id,
                run_id=run.id
            )

            # Get the list of execution steps
            # Steps contains all operations during the Assistant's execution process
            steps = dashscope.Steps.list(
                thread_id=self.thread.id,
                run_id=run.id
            )

            # Process new steps
            if hasattr(steps, 'data'):
                for step in steps.data:
                    # Skip processed steps
                    if step.id not in processed_steps:
                        processed_steps.add(step.id)

                        # Process message creation steps
                        # These steps contain the Assistant's text responses
                        if step.step_details.type == 'message_creation':
                            message_id = step.step_details.message_creation.message_id
                            message = dashscope.Messages.retrieve(
                                thread_id=self.thread.id,
                                message_id=message_id
                            )
                            if hasattr(message, 'content'):
                                yield message.content[0].text.value + "\n"

                        # Process code execution steps
                        # These steps contain the process and results of code execution
                        elif step.step_details.type == 'tool_calls':
                            for tool_call in step.step_details.tool_calls:
                                if tool_call.type == 'code_interpreter':
                                    # Display the executed code
                                    yield f"\nExecuting code:\n{tool_call.code_interpreter.arguments}\n"
                                    # Display the execution result
                                    yield f"\nExecution result:\n{tool_call.code_interpreter.output}\n"

            # Check the run status
            if run_status.status == 'completed':
                break  # Processing completed
            elif run_status.status == 'failed':
                yield "Processing failed. Please try again."
                break  # Processing failed

            # Wait for new steps
            await asyncio.sleep(1)

def create_web_ui():
    """
    Create a web interface

    Use Gradio to build a simple chat interface, including the following:
    - Chat history display
    - Message input box
    - Example questions
    """
    assistant = CodeTeachingAssistant()

    css = """
        .contain { display: flex; flex-direction: column; }
        .gradio-container { height: 100vh !important; }
        #component-0 { height: 100%; }
        #chatbot { flex-grow: 1; overflow: auto;}
    """

    with gr.Blocks(css=css) as demo:
        chatbot = gr.Chatbot(elem_id="chatbot", label="Programming Study")
        msg = gr.Textbox(label="Enter a question or code")

        async def respond(message, history):
            history.append((message, ""))  # Immediately add the user message
            yield "", history  # Clear the input box and display the user message

            # Create a new response entry
            response = ""
            async for chunk in assistant.chat(message):
                response += chunk
                # Update the last message in real time
                history[-1] = (message, response)
                yield "", history  # Keep the input box empty and update the chat history

        msg.submit(respond, [msg, chatbot], [msg, chatbot])

        # Add example questions
        gr.Examples([
            "Write a Python function to calculate the Fibonacci sequence and plot a trend chart for the first 20 numbers",
            "Write a bubble sort algorithm for me and test its effect with random data",
            "Use matplotlib to draw a simple sine wave graph"
        ], inputs=msg)

    return demo

if __name__ == "__main__":
    demo = create_web_ui()
    demo.launch()
Create an agent and a thread
In the Assistant API, you need two core components to start a chat system:
-
Agent (Assistant)
The agent is the core of the chat system and is responsible for understanding and processing user input. When you create an agent, you must configure the following parameters:
model: The model to use for code execution, such as qwen-plus.name: A name for the agent.instructions: The code of conduct that defines the agent's behavior.tools: The tools to enable, such as the Code Interpreter.
-
Thread
A thread manages the complete conversation context to ensure that the conversation is coherent. Each user session corresponds to an independent thread.
These two components are configured in the initialization method of the CodeTeachingAssistant class:
class CodeTeachingAssistant:
    """
    Code teaching assistant interface
    Main responsibilities:
    1. Create an assistant and a conversation thread during initialization
    2. After receiving a user message, add it to the conversation thread
    3. Create a running instance to process the user input
    4. Track each step during the run
    5. Return the processing result
    """
    def __init__(self):
        # Step 1: Create an Assistant instance
        # - model: Select a model that supports the Code Interpreter
        # - tools: Enable the Code Interpreter feature
        # - instructions: Define the Assistant's code of conduct
        self.assistant = dashscope.Assistants.create(
            model='qwen-plus',  # Use a Qwen model that supports code execution
            name='Programming Teaching Assistant',
            instructions='''
                You are a programming teacher responsible for:
                1. Explaining code principles
                2. Providing code examples
                3. Executing code and analyzing results
                Please teach in a way that is easy to understand.
            ''',
            tools=[{'type': 'code_interpreter'}]  # Enable the Code Interpreter
        )
        # Step 2: Create a conversation thread
        # A Thread is used to maintain a complete conversation context
        self.thread = dashscope.Threads.create()
After you create these components, you can reuse them throughout the session without reinitializing them. The agent processes each user request based on the configured instructions and tools, while the thread maintains the continuity of the conversation context.
Process chat messages
In the Assistant API, processing user messages is an asynchronous procedure that requires multiple steps to complete a full chat interaction. The chat method implements this processing flow:
-
Send a user message
First, add the user's input to the conversation thread:
class CodeTeachingAssistant:
    async def chat(self, message: str):
        """
        Process a user message and return the assistant's reply

        Workflow:
        1. Add the user message to the conversation thread
        2. Create a running instance to process the message
        3. Track each step during the run
        4. Gradually return the processing results
        """
        # Step 3: Send the user message
        # Add the user input to the conversation thread
        dashscope.Messages.create(
            thread_id=self.thread.id,
            role="user",
            content=message
        )
-
Create a running instance
Create a running instance to process this message:
async def chat(self, message: str):
        """
        Process a user message and return the assistant's reply

        Workflow:
        1. Add the user message to the conversation thread
        2. Create a running instance to process the message
        3. Track each step during the run
        4. Gradually return the processing results
        """
        # Step 4: Create a running instance
        # A Run is responsible for processing user input and generating a response
        run = dashscope.Runs.create(
            thread_id=self.thread.id,
            assistant_id=self.assistant.id
        )
-
Track and process steps
The system breaks down the agent's running process into two main types of steps:
- Message creation step: This step occurs when the agent generates a text response.
async def chat(self, message: str):
        # These steps contain the Assistant's text responses
        if step.step_details.type == 'message_creation':
            message_id = step.step_details.message_creation.message_id
            message = dashscope.Messages.retrieve(
                thread_id=self.thread.id,
                message_id=message_id
            )
            if hasattr(message, 'content'):
                yield message.content[0].text.value + "\n"
- Tool calling step: This step occurs when the agent executes code.
async def chat(self, message: str):
        # Process code execution steps
        # These steps contain the process and results of code execution
        elif step.step_details.type == 'tool_calls':
            for tool_call in step.step_details.tool_calls:
                if tool_call.type == 'code_interpreter':
                    # Display the executed code
                    yield f"\nExecuting code:\n{tool_call.code_interpreter.arguments}\n"
                    # Display the execution result
                    yield f"\nExecution result:\n{tool_call.code_interpreter.output}\n"
-
Monitor status
The system continuously monitors the run status until processing is completed or fails:
completed: The process completed successfully.failed: The process failed and must be retried.
async def chat(self, message: str):
        # Check the run status
        if run_status.status == 'completed':
            break  # Processing completed
        elif run_status.status == 'failed':
            yield "Processing failed. Please try again."
            break  # Processing failed

        # Wait for new steps
        await asyncio.sleep(1)
Note
- All API calls are asynchronous and require you to handle wait times appropriately.
- Steps are processed sequentially to ensure that messages are displayed in the correct order.
- The error handling mechanism ensures that the program exits gracefully if processing fails.
Create a web interface (Optional)
This example uses the Gradio framework to build the web interface. Gradio is a Python library for building machine learning demos. It lets you:
- Quickly create interactive web interfaces
- Automatically handle asynchronous operations and real-time updates
- Provide built-in chat interface components
The following is an example of using Gradio to build the interface for the code teaching assistant:
def create_web_ui():
    assistant = CodeTeachingAssistant()

    with gr.Blocks() as demo:
        chatbot = gr.Chatbot(label="Programming Study")
        msg = gr.Textbox(label="Enter a question or code")

        # Add example questions
        gr.Examples([
            "Write a Python function to calculate the Fibonacci sequence and plot a trend chart for the first 20 numbers",
            "Write a bubble sort algorithm for me and test its effect with random data",
            "Use matplotlib to draw a simple sine wave graph"
        ], inputs=msg)

        return demo

if __name__ == "__main__":
    demo = create_web_ui()
    demo.launch()  # After startup, access http://127.0.0.1:7860/
This interface provides basic chat features and some example questions to help you get started quickly with the code teaching assistant.
Summary
This example demonstrated how to use the Code Interpreter to create a teaching agent. The Code Interpreter can help users learn programming concepts and execute code. You can extend and customize this agent to meet the needs of different teaching and learning scenarios.
You can also learn about other Assistant API features:
- Tool calling - Retrieval-augmented generation: Enables the agent to retrieve external knowledge.
- Tool calling - Function calling: Enables the agent to automatically call external functions.
FAQ
-
Is there an extra charge for using the Code Interpreter?
Currently, the pre-built Code Interpreter in Alibaba Cloud Model Studio is free for a limited time. In the example in this topic, all "code_interpreter" steps that are generated when the agent runs are not billed at this time.
-
Which Python packages does the Code Interpreter support?
The list of supported Python packages is subject to change. You can ask the example agent for the most up-to-date support information.
-
What are the limitations of the Code Interpreter?
- It can only execute Python code.
- It cannot read from or write to external files.
- It cannot install external packages.
- It cannot access external networks.
- Compute resources and execution duration are limited.
-
How do I process data files?
The Code Interpreter does not currently support the direct processing of data files. We recommend that you convert the data to text format and provide it to the agent as input for processing.
-
How do I handle error messages?
When code execution fails, the agent returns a detailed error message. You can make adjustments based on the information in the error message. If you encounter response delays or timeouts due to network instability, you can try the operation again later.