Fine-tune models in the console
This topic describes how to run model fine-tuning tasks in the console and helps you choose the right fine-tuning method and parameters. Model fine-tuning includes three training methods: Supervised Fine-Tuning (SFT), Continual Pre-Training (CPT), and Direct Preference Optimization (DPO).
ImportantThis topic is applicable only to the China (Beijing) region.
Model fine-tuning process

Step 1: Select a fine-tuning method
Go to the Model Fine-tuning page and click the Create Training Task button.
After entering the Create Training Task page, in the Training Configuration area you can select the Training Method as Efficient Training or Full-parameter Training. The Training Task Summary panel on the right side of the page displays the current task's model, priority, billing method, and other configuration overview in real time.
In the Basic Information section, set the Job Name and Job Priority. Job priority has four levels: L0, L1, L2, and L3, listed from highest to lowest. Priority affects the scheduling order of training jobs. Higher priority means earlier execution.
How to choose between CPT, SFT, and DPO
CPT (Continual Pre-Training) uses large volumes of unlabeled data to improve model performance in specific industries.
In addition to CPT, SFT, and DPO, Model Studio also supports RL (Reinforcement Learning) training. RL optimizes model behavior through reward signals, suitable for scenarios that require continuous improvement through human feedback or automated scoring. For detailed RL training operations, see Reinforcement Learning.
SFT (Supervised Fine-Tuning) uses targeted datasets and training to enhance model performance for specific business scenarios.
DPO (Direct Preference Optimization) uses paired positive and negative samples in its training dataset. By incorporating negative feedback, it reduces hallucinations and optimizes specific bad cases.
The three fine-tuning methods provided by Model Studio are not mutually exclusive but are progressive and complementary.
CPT (optional) → SFT → DPO (optional)
-
CPT (continual pre-training) - Supplements knowledge (General models have broad but shallow knowledge, which may not meet the depth and precision requirements of professional fields)
- Finance model:
Learns financial terms - Medical model:
Memorizes drug pathology - Legal model:
Understands legal articles and precedents
- Finance model:
-
SFT (supervised fine-tuning) - Learns how to perform tasks
- Customer service bot:
Learns customer service procedures - Code assistant:
Learns programming paradigms - Tool calling (Agent):
Learns to use MCP
- Customer service bot:
-
DPO (direct preference optimization) - Performs tasks better
- Safety and responsibility:
Rejects harmful suggestions - Conciseness and effectiveness:
Provides concise answers - Objectivity and neutrality:
Evaluates fairly and objectively
- Safety and responsibility:
SFT training set
SFT ChatML (Chat Markup Language) format training data supports multi-turn conversations and various role settings.
The OpenAI
nameandweightparameters are not supported. All assistant outputs will be trained.
# A single line of training data (in JSON format) has the following typical structure when expanded:
{"messages": [
  {"role": "system", "content": "System input 1"},
  {"role": "user", "content": "User input 1"},
  {"role": "assistant", "content": "Expected model output 1"},
  {"role": "user", "content": "User input 2"},
  {"role": "assistant", "content": "Expected model output 2"}
  ...
]}
For information about the differences between system, user, and assistant, see Overview. Sample training datasets: SFT-ChatML_format_example.jsonl, SFT-ChatML_format_example.xlsx. XLS and XLSX formats support only single-turn conversations.
All assistant lines in a single training data entry support the "loss_weight" parameter, which sets the relative importance of that line during training. (Range: 0.0 to 1.0. A larger value indicates higher importance.)
This parameter is available for invitational preview. To use it, contact your account manager.
 {"role": "assistant", "content": "Expected model output 1", "loss_weight": 1.0},
 {"role": "assistant", "content": "Expected model output 2", "loss_weight": 0.5}
SFT thinking model
The training data supports multi-turn conversations and various role settings, but only the last assistant output can be trained. A single line of training data has the following structure when expanded:
The newline characters
\nbefore and after the think tag must be preserved.
# A single line of training data (in JSON format) has the following typical structure when expanded:
{"messages": [
  {"role": "system", "content": "System input 1"},
  {"role": "user", "content": "User input 1"},
  {"role": "assistant", "content": "Model output 1"}, --Intermediate assistant outputs should not have <think> tags
   ...
  {"role": "user", "content": "User input 2"},
  {"role": "assistant", "content": "<think>\nExpected thinking content 2\n</think>\n\nExpected output 2"} --Thinking content can only be included in the last assistant output.
]}
For information about the differences between system, user, and assistant, see Overview. Sample training dataset: SFT-deep_thinking_content_example.jsonl.
You can also set the model not to output the <think> tag in the training samples. If you use this output method, it is not recommended to enable the thinking mode for calls after the model is trained.
{"role": "assistant", "content": "Expected model output 2"} --Tells the model not to enable thinking
The last assistant line of a single training data entry supports the "loss_weight" parameter, which sets the relative importance of that entry during training. (Range: 0.0 to 1.0. A larger value indicates higher importance.)
This parameter is available for invitational preview. To use it, contact your account manager.
{"role": "assistant", "content": "<think>\nExpected thinking content 2\n</think>\n\nExpected output 2", "loss_weight": 1.0}
SFT visual understanding (Qwen-VL)
The OpenAI
nameandweightparameters are not supported. All assistant outputs will be trained.
For information about the differences between system, user, and assistant, see Overview. Sample ChatML format training data:
To pass a
systemmessage, the correspondingcontentmust use the array format[{"text":"..."}]and not the string format"content":"string".
NoteIf you are training a thinking model, you must also follow the data format requirements for the SFT thinking model.
# A single line of training data (in JSON format) has the following structure when expanded:
{"messages": [
  {"role": "system", "content": [{"text": "System input"}]},
  {"role": "user", "content": [{"text": "User input 1"}, {"image": "image_file_name1.jpg", "resized_width": 200, "resized_height": 200}]},
  {"role": "assistant", "content": [{"text": "Expected model output 1"}]},
  {"role": "user", "content": [{"text": "User input 2"}, {"video": "video_file_name1.mp4", "fps": 3.0, "resized_width": 200, "resized_height": 200, "video_start": 0.0, "video_end": 3.0}]},
  {"role": "assistant", "content": [{"text": "Expected model output 2"}]},
  {"role": "user", "content": [{"text": "User input 2"}, {"video": ["0.jpg", "1.jpg", "2.jpg", "3.jpg"], "sample_fps": 5.0, "resized_width": 200, "resized_height": 200}]},
  {"role": "assistant", "content": [{"text": "Expected model output 2"}]},
  ...
]}
Click here to see more supported parameters
Field | Type | Required | Description |
|---|---|---|---|
Image file | |||
|
| Yes | Image file path |
|
| No | Target image scaling width (pixels) |
|
| No | Target image scaling height (pixels) |
Video file - Video file path mode (supported only by qwen3.5 and later VL models) Sample:AlibabaCloud_VL_Video.zip | |||
|
| Yes | Video file path mode: |
|
| No | Target video scaling width (pixels) |
|
| No | Target video scaling height (pixels) |
|
| No | Input frequency during training. If you set |
|
| No | Video clip start time (seconds) |
|
| No | Video clip end time (seconds) |
Video file - Image frame list mode (supported only by qwen3.5 and later VL models) | |||
|
| Yes | Image frame list mode: |
|
| No | Used to inform the frame rate of the image frames. |
|
| No | Image frame scaling width (pixels) |
|
| No | Image frame scaling height (pixels) |
Suggestions for training object localization:
- Qwen2.5-VL: The training coordinates are absolute values relative to the top-left corner of the scaled image, in pixels.
- Qwen3-VL: The training coordinates are relative, and the coordinate values are scaled to the range of
[0, 999].
ZIP file requirements:
-
Format: ZIP. The maximum size is 2 GB. Folders and file names within the ZIP file must only contain ASCII characters, including letters (a-z, A-Z), numbers (0-9), underscores (_), and hyphens (-).
-
The training text file must be named data.jsonl and located in the root directory of the ZIP file. Ensure that the
data.jsonlfile is at the top level of the ZIP file and not in a subfolder. -
The width and height of a single image must not exceed 1024 pixels, and the size must not exceed 10 MB. The supported formats are
.bmp,.jpeg /.jpg,.png,.tif /.tiff, and.webp. -
Image file names must be unique, even if they are in different folders.
-
ZIP file directory structure:
Single-level directory (recommended)
The image files and the
data.jsonlfile are all located in the root directory of the ZIP file.Trainingdata_vl.zip |--- data.jsonl #Note: Do not wrap in an outer folder |--- image1.png |--- video1.mp4Multi-level directory
-
The data.jsonl file must be in the root directory of the ZIP file.
-
In the data.jsonl file, you only need to specify the image or video filename, not the file path. For example:
Correct example:
image1.jpg. Incorrect example:jpg_folder/image1.jpg. -
Image/video file names must be globally unique within the ZIP file.
Trainingdata_vl.zip |--- data.jsonl #Note: Do not wrap in an outer folder |--- jpg_folder | └── image1.jpg |--- mp4_folder └── video.mp4 -
DPO dataset
DPO ChatML format training data. A single line of training data has the following structure when expanded:
For information about the differences between system, user, and assistant, see Overview. Sample training dataset: DPO_ChatML_format_example.jsonl.
# A single line of training data (in JSON format) has the following typical structure when expanded:
{"messages": [
  {"role": "system", "content": "System input"},
  {"role": "user", "content": "User input 1"},
  {"role": "assistant", "content": "Model output 1"},
  {"role": "user", "content": "User input 2"},
  {"role": "assistant", "content": "Model output 2"},
  {"role": "user", "content": "User input 3"}
 ],
 "chosen":
   {"role": "assistant", "content": "Agreed-upon expected model output 3"},
 "rejected":
   {"role": "assistant", "content": "Rejected expected model output 3"}}
The model takes all content within messages as input. DPO is used to train the model on positive and negative feedback for User input 3.
For deep thinking content, you need to wrap it with <think> tags:
{"role": "assistant", "content": "<think>Expected model thinking content</think>Expected model output"}
The "chosen" module of a single training data entry supports the "loss_weight" parameter, which sets the relative importance of that training data in the training process. (Range: 0.0 to 1.0. A larger value indicates higher importance.)
This parameter is available for invitational preview. To use it, contact your account manager.
 "chosen":
   {"role": "assistant", "content": "Agreed-upon expected model output 3", "loss_weight": 1.0},
CPT training set
CPT plain text format training data. A single line of training data has the following structure when expanded:
{"text":"Text content"}
Sample training dataset: CPT-text_generation_training_set_example.jsonl
For data volume requirements of each training method, see Dataset size requirements.
Alibaba Cloud Model Studio recommends using model fine-tuning in this order: CPT (optional) → SFT → DPO:- First, collect a large volume (at least 10 million tokens) of unlabeled domain-specific data and run CPT continual pre-training to turn the model into an expert in your industry or domain.
- Before launching your application, collect sufficient (1,000+) positive samples for your specific scenario or business—pairs of inputs and expected model outputs—and run SFT.
- After your application launches or enters trial operation, collect sufficient (100+) user feedback (such as likes, dislikes, or direct feedback) or bad cases. Convert this data into a DPO training set and run DPO.
If this is your first time fine-tuning a model, select an official model.
If you are retraining a model due to poor performance, select My Models > the model you want to retrain.
After selecting a model, some models display a Training Modality option (such as text generation or visual understanding). Choose the modality that matches your business scenario. If supported, a Thinking Mode option (such as Instruct or Thinking) also appears. Select as needed.
Full-parameter training vs. efficient training
- Full-parameter training updates all model parameters during learning.
- Efficient training uses Low-Rank Adaptation (LoRA), which decomposes weight matrices and updates only the low-rank components.
Since both methods cost the same, Alibaba Cloud Model Studio recommends using full-parameter training if your model supports it, because it delivers better results and higher cost-effectiveness than efficient training.
Step 2: Configure hyperparameters
Training parameter descriptions:
Not all models support all parameters. Refer to the console for available options.
Parameter Name | Recommended setting | Function of hyperparameters | |
|---|---|---|---|
Batch size (batch_size) | Use default | Batch size determines how many data samples the model processes before updating its parameters. Common values are 16 or 32. The valid range varies by model and training method. Refer to the console. | The parameter configuration panel contains the following training parameters and default values in addition to batch size:
|
Learning rate (learning_rate) | Efficient training: ~1e-4 Full-parameter training: ~1e-5 CPT continual pre-training: ~1e-5 | Controls how strongly the model adjusts its weights. If the learning rate is too high, model parameters change drastically, which may worsen performance. If the learning rate is too low, performance improves little. | |
Epochs (n_epochs) | Data volume < 10,000: 3–5 epochs Data volume > 10,000: 1–2 epochs Adjust based on experimental results | Number of times the model traverses the training data. Adjust based on your experience. More epochs mean longer training time and higher cost. Range: [1, 200]. | |
Evaluation steps (eval_steps) | Use default | How often to evaluate the model during training, measured in training steps. Used to track training accuracy and loss. This parameter controls how frequently Validation Loss and Validation Token Accuracy appear. | |
Learning rate scheduler (lr_scheduler_type) | Use “linear” or “inverse_sqrt”. | Strategy for dynamically adjusting the learning rate during training. For details, see Learning rate scheduler types. | |
Sequence length (max_length) | Set to the maximum value supported by the model | Maximum token length per training sample. If a sample exceeds this length: SFT discards the entire sample. DPO truncates tokens beyond the limit and trains on the shortened sample. For token-to-string conversion, see How to convert between tokens and strings. Range: [500, 32768]. | |
Warmup ratio (warmup_ratio) | Use default | Fraction of total training steps used for learning rate warmup. Warmup starts with a low learning rate and linearly increases to the target value. This limits parameter changes early in training, improving stability. A ratio that is too high acts like a low learning rate, yielding little improvement. A ratio that is too low acts like a high learning rate, potentially degrading performance. Range: [0, 1].
| |
Weight decay (weight_decay) | Use default | L2 regularization strength. L2 regularization helps maintain generalization. Too high a value reduces fine-tuning effectiveness. Range: [0, 0.2]. | |
Efficient training parameters | |||
LoRA alpha (lora_alpha) | Use default | Scaling factor that balances original model weights and LoRA low-rank updates. A higher alpha gives more weight to LoRA updates, making the model rely more on task-specific information. A lower alpha preserves more of the original pre-trained knowledge. | |
LoRA dropout (lora_dropout) | Use default | Dropout rate applied to LoRA low-rank matrices during training. The recommended value improves generalization. Too high a value reduces fine-tuning effectiveness. Range: [0, 0.2]. | |
LoRA rank (lora_rank) | Set to the maximum value supported by the model | Rank of LoRA low-rank matrices. Higher rank yields slightly better results but slower training. | |
Freeze ViT (freeze_vit) | Use default | Freezes parameters of the vision backbone network so they do not update during training. Applies only to Qwen-VL (visual understanding) models. Token-based billing is available only when freeze_vit is set to “true”. | |
NoteSupported parameters vary by training method:
- SFT (efficient training): Supports all parameters above.
- DPO (efficient training): Supports all parameters except “freeze_vit”.
- CPT (continual pre-training): Supports only batch size, learning rate, epochs, evaluation steps, learning rate scheduler, and sequence length. Does not support LoRA parameters, warmup ratio, or weight decay.
Introduction to learning rate scheduling strategies
Learning rate scheduler (lr_scheduler_type) is located in the Hyperparameter Configuration section and appears after you click Show. Eight strategies are available:
-
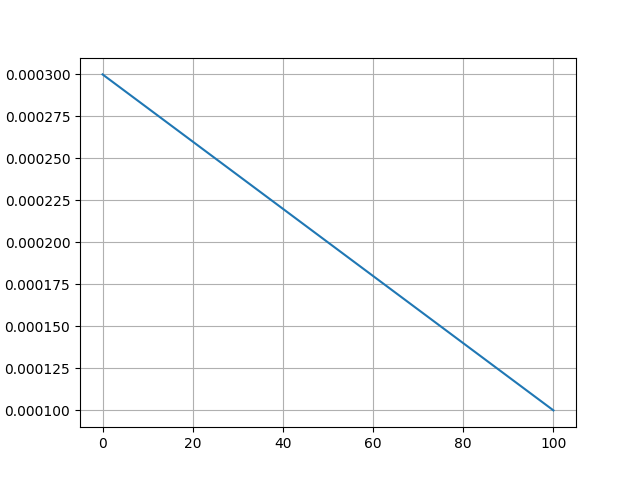
Linear: Learning rate decreases linearly. Use case: short training tasks.
-
Polynomial: Learning rate decreases according to a predefined polynomial function over training steps or epochs, which offers finer-grained control over the decay and suits more complex tasks. But the built-in polynomial coefficient is 1, making the curve and the effect identical to Linear. Not recommended.
-
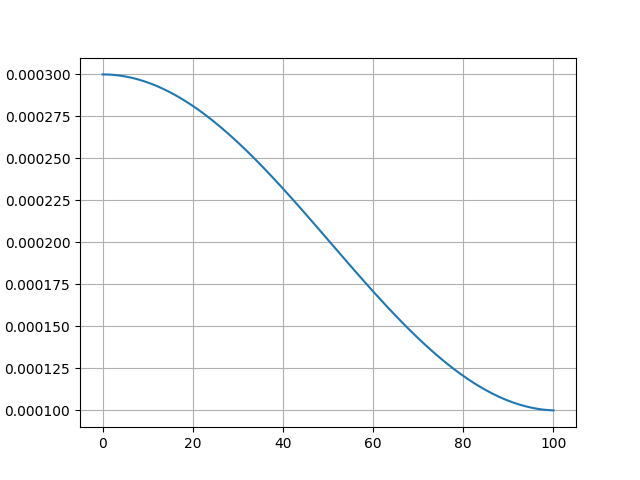
Cosine: Learning rate follows a cosine curve. Use case: long training tasks requiring fine adjustments.
-
Cosine_with_restarts: Learning rate follows a cosine curve, resets to the initial value at the end of each cycle, and starts a new cycle. Use case: escaping local optima to find better global solutions. However, testing shows the learning rate does not actually reset at the bottom of the curve. Not recommended.
-
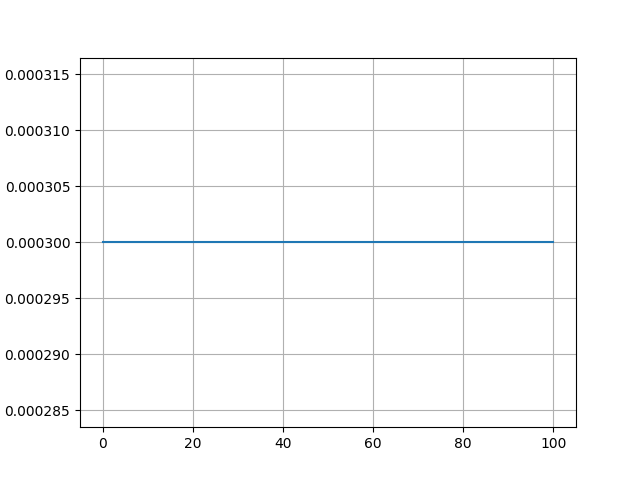
Constant: Learning rate remains unchanged, and warmup ratio has no effect. Use case: initial performance exploration.
-
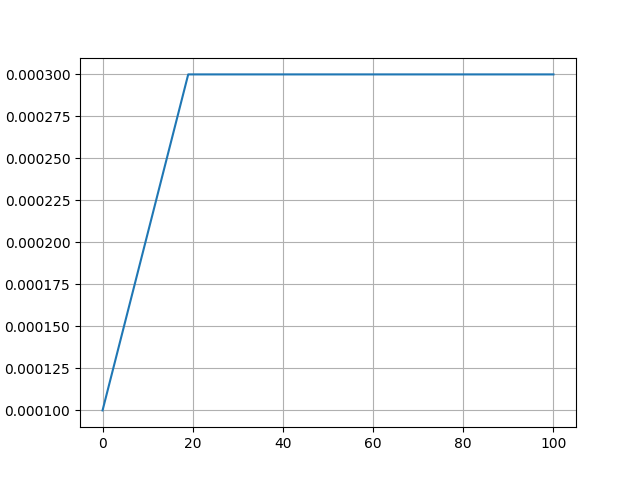
Constant_with_warmup: Learning rate remains constant, but warmup ratio applies. Use case: initial performance exploration.
-
Inverse_sqrt: Learning rate decreases proportionally to the inverse square root of the training step count. Use case: SFT fine-tuning, which balances learning efficiency and convergence well.

-
Reduce_lr_on_plateau: Automatically lowers the learning rate when a monitored metric (validation loss or accuracy) shows no significant improvement over several consecutive epochs. Use case: when the model struggles to improve further, this strategy helps continue optimization.
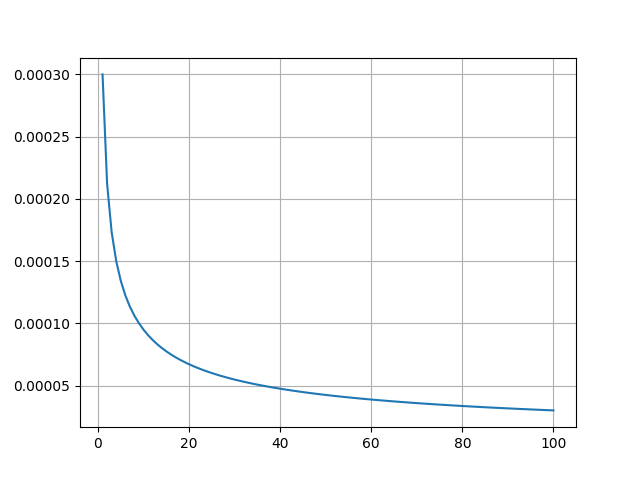
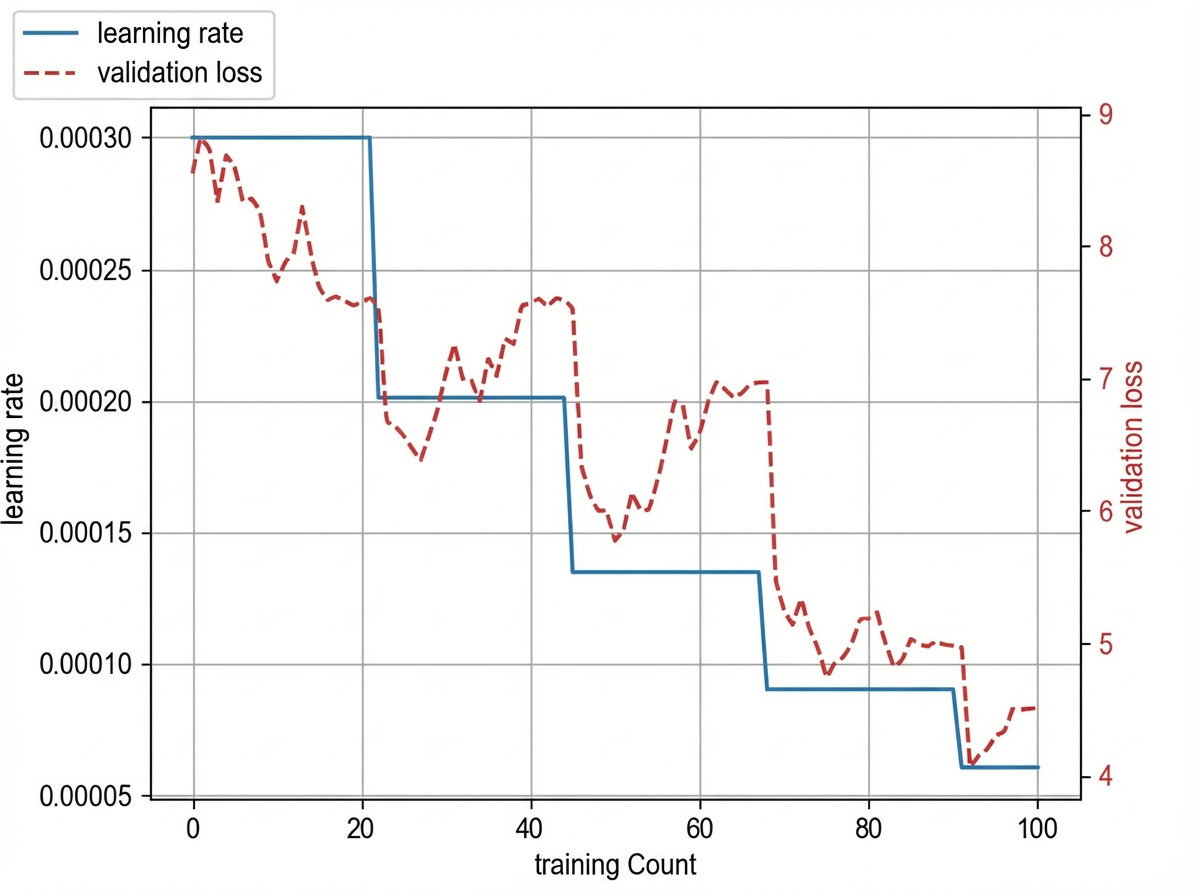
NoteThe learning rate floor and minimum values shown in the graphs are illustrative. Actual values depend on your configuration.
Step 3: Select training data
For dataset construction tips, see Dataset construction tips. To upload fine-tuning datasets, go to the Data Management page.
In the Data Configuration section, configure the following:
- Training set: Supports two methods—Dataset Selection and Dataset Mounting. Dataset Selection uses previously uploaded fine-tuning datasets. Dataset Mounting directly mounts data files from OSS.
- Mixed training: When enabled, you can add an additional mixed training dataset. Mixed training preserves the model’s general capabilities during fine-tuning, preventing it from losing general conversational ability by overfitting to task-specific data. Enable this if you have data from multiple business scenarios.
- Validation set: Supports Auto Split and Dataset Selection. Auto Split randomly selects 10% of the training data as the validation set. You can also upload a separate validation dataset. The validation set evaluates model performance during training, showing Validation Loss and Validation Token Accuracy.
Step 4: Configure training resources
In the Training Resource Configuration section, select a billing method for the training job. The console supports the following three billing methods:
- Token-based billing: Uses shared idle resources. Billed by the number of tokens consumed during training. Training speed depends on resource availability and may involve queuing.
- Training Unit (Prepaid): Pre-purchase training units, billed by unit deduction. Resources are guaranteed with no queuing. Suitable for scenarios with stable training demand. You must first purchase training units through Resource Pool Management (Prepaid).
- Training Unit (Postpaid): Use training unit resources, billed by actual usage on a postpaid basis. Suitable for flexible scenarios where you have training demand but prefer not to pre-purchase.
NoteFor detailed billing information and pricing, see Model fine-tuning overview – Billing.
Step 5: Training output
The following settings apply to SFT, DPO, and CPT training.
NoteAfter model fine-tuning is complete, you can export a parameter snapshot on the Model Studio platform. You can then deploy the model on Model Studio based on this parameter snapshot.
The exported parameter snapshots are saved in cloud storage and cannot be accessed or downloaded.
In the Training Output section, configure the following settings:
- Model Name: Set the name for the output model. After training completes, the final checkpoint is automatically published to My Models under this name.
- Max Snapshots: Use the Up to drop-down list to set how many models the training job exports. Each additional save increases the task duration.
- Checkpoint save interval: Set how often to save checkpoints. Select Calculated by epoch or Calculate by step.
- Model Encryption (Security Upgrade): When enabled, the platform encrypts model files using OSS server-side encryption (SSE-OSS) with fully managed keys. Encryption algorithm: AES256.
Step 6: Train the model
Click Start Training > Confirm the Model Fine-tuning Billing Notice > Training begins.
If you encounter insufficient permissions, see: What to do if you lack permissions for model fine-tuning?
During training, click the Logs button to view real-time training logs. You can also go to the Metrics tab to monitor Training Loss, Validation Loss, or Validation Token Accuracy.
After training completes, check the trend between Training Loss and Validation Loss.
-
If Training Loss decreases while Validation Loss increases, the model is overfitting. Training likely failed or produced poor results. Apply the following optimizations (in order of recommendation) and retrain:
- Use data augmentation to increase data diversity and volume.
- Collect more training data to increase diversity and volume.
- Adjust hyperparameters: reduce epochs, lower learning rate, decrease batch size, increase weight decay, raise LoRA dropout, or increase warmup ratio.
-
If Training Loss shows little change or increases (rare), the model is underfitting. Training failed. Apply the following optimizations (in order of recommendation) and continue training:
- Check data quality and ensure thorough data cleaning.
- Adjust hyperparameters: increase epochs, raise learning rate, increase batch size, decrease weight decay, lower LoRA dropout, or reduce warmup ratio.
-
If neither issue occurs, proceed to the next steps.
Task list and operations
On the Model Fine-tuning page, you can view all training jobs. The list displays the following columns: job name/ID, priority (L0-L3), base model, training method, training status, billing method, output, job duration, and creation time. The top-right corner provides the following buttons:
- Training Cost Records: View cost details for training jobs.
- Resource Pool Management (Prepaid): Manage prepaid training unit resource pools.
- Create Training Task: Create a new training job.
- Reset: Clear filter conditions.
The list supports filtering by priority (selecting a priority displays only tasks of that level). Each row's operation column provides Details, Stop, Logs, and Delete buttons, with availability depending on the job status.
Step 7: Publish the model for deployment
Only SFT fine-tuning supports publishing intermediate model snapshots.
After training completes, the final checkpoint is automatically published to My Models under the name configured in Step 5: Training output.
To publish an intermediate checkpoint, go to the Outputs tab on the training job details page. View the list of saved checkpoints, select your target checkpoint, and click Publish Model.
The Outputs tab shows: Checkpoint ID, save info, publish status, model name, remaining retention time, creation time, and actions.
NoteCheckpoints are retained on the platform for 30 days. After expiration, they are automatically deleted, cannot be recovered, and can no longer be published. Publish required snapshots promptly.
Published models appear on the My Models page and can be deployed.
Step 8: Deploy the model
Go to the My Models page to quickly find supported deployment modes, model ID, and other details. After deployment, evaluate your fine-tuned model. For deployment details, see Model deployment.
Step 9: Evaluate the model
ImportantIf you have multiple business scenarios or used mixed training data, split your evaluation set by scenario and evaluate each scenario separately to verify that fine-tuning meets your requirements.
Use Alibaba Cloud Model Studio’s Model Evaluation feature to assess your custom model’s performance. For details, see Help Center: Model evaluation overview.
FAQ
When should I use model fine-tuning?
-
Although text generation model fine-tuning can achieve excellent results in specific business scenarios, it has the following limitations:
- Time-consuming: This includes creating a large-scale CPT dataset (at least 50 million tokens), building an effective SFT dataset (1,000+ entries), collecting enough bad cases (100+) to build an effective DPO dataset, and the slow speed of model optimization iterations.
- High cost: A fine-tuned model can only be used after deployment, and the model deployment billing is high.
-
Alibaba Cloud Model Studio recommends that you first try using Prompt Engineering or Function Calling to customize your application. Model fine-tuning is usually the "last resort" for improving model performance. This is because:
- In many tasks, a model may initially perform poorly, but applying the correct prompt techniques can improve the results without requiring model fine-tuning.
- Iteratively optimizing prompts and plugins is more agile and cost-effective than model fine-tuning iterations, because fine-tuning may require re-collecting, cleaning, and optimizing data, collecting bad cases, and conducting customer surveys.
- Even if you ultimately decide to perform model fine-tuning, the initial work on prompt engineering and plugin optimization will not be wasted. This preliminary work can be fully reused when building the fine-tuning dataset.
What should I do if I get a permission error during model fine-tuning?
Contact your platform or workspace administrator to verify and grant the following permissions:
-
Your account must have page permissions for Model Fine-tuning – Operation, Model Deployment – Operation, and Model Evaluation – Operation in the workspace where you run fine-tuning jobs.
For details, see: Account permission management. Console link: Model Studio – Account Management .
-
The workspace where you run fine-tuning jobs must have Model Training (fine-tuning) permissions for the specific model.
For details, see: Grant sub-workspaces model invocation, training, and deployment permissions. Console link: Model Studio – Workspace Management .
On the Model List page in Business Space Management, confirm that the Model Training column of the target model (e.g., Qwen3-8B) shows Authorized status.
What should I do if evaluation results are poor after fine-tuning?
- If using manual evaluation, verify that your evaluation criteria match your business or scenario.
- Collect test cases with poor evaluation results, analyze why they failed, and adjust your training dataset accordingly. Then iterate on fine-tuning.
- Generate DPO examples from poorly evaluated cases and run DPO training.
How are model fine-tuning, deployment, and evaluation billed?
Model fine-tuning is billed by the number of tokens consumed during training. Deployed models incur only deployment fees, not invocation fees. Model evaluation is free. For details, see Model training and deployment billing.
Can I download a model fine-tuned on Alibaba Cloud Model Studio for local deployment?
Models fine-tuned on Alibaba Cloud Model Studio cannot be exported. They can only be tested and invoked after deployment on Model Studio.
What should I do if model fine-tuning fails due to insufficient training data?
If fine-tuning fails because of insufficient data, try adjusting the Sequence Length (max_length) parameter.
ExplanationSequence length sets the maximum token length per training sample. In SFT (Supervised Fine-Tuning), samples exceeding this length are discarded. If sequence length is too large, many samples may be discarded, leaving insufficient data for training and causing failure.
Solution- When creating a training job, click Show in the Hyperparameter Configuration section and find max_length (Sequence Length).
- Reduce sequence length (for example, to 8192) so more samples meet the length requirement and participate in training.
- Resubmit the training job.
NoteOn the model fine-tuning job list, click Logs next to the failed job to see the exact failure reason.
What should I do if the fine-tuned model still responds with the base model identity in the Experience Center?
Identity settings take effect only through the system prompt. If you do not pass in the system prompt used during fine-tuning, the model may still respond with the base model identity.
To verify your fine-tuned identity settings, use one of the following methods:
-
Method 1: Call the model through the API and include the
systemparameter in the request to pass in the system prompt. -
Method 2: Test in the Experience Center of the Model Studio console:
- In the left-side navigation pane, choose Experience Center > Text Model.
- Click the model name and select your fine-tuned model.
- Click Model Debugging in the upper-right corner and enter the identity settings in the System Prompt field of the panel that opens.
- Send a test question in the dialog box and confirm that the model answers with the fine-tuned identity.