Intelligent summary frontend application example
This topic describes how to use the open source JavaScript SDK to quickly build an intelligent summary frontend demo application.
Important notes
- API key security: Do not hard-code your API key or commit it to a code repository. Manage your API key using an environment variable.
- Browser permissions: The real-time recording feature requires users to grant microphone permissions in the browser.
- Network requirements: The project needs to access the Alibaba Cloud Model Studio service. Ensure your network connection is stable.
- Important: The dependency packages in this project are not published to the public npm repository. To perform custom development or publish the packages, rename them yourself.
Features
This SDK includes the following core features for building an intelligent summary application:
Feature | Description |
|---|---|
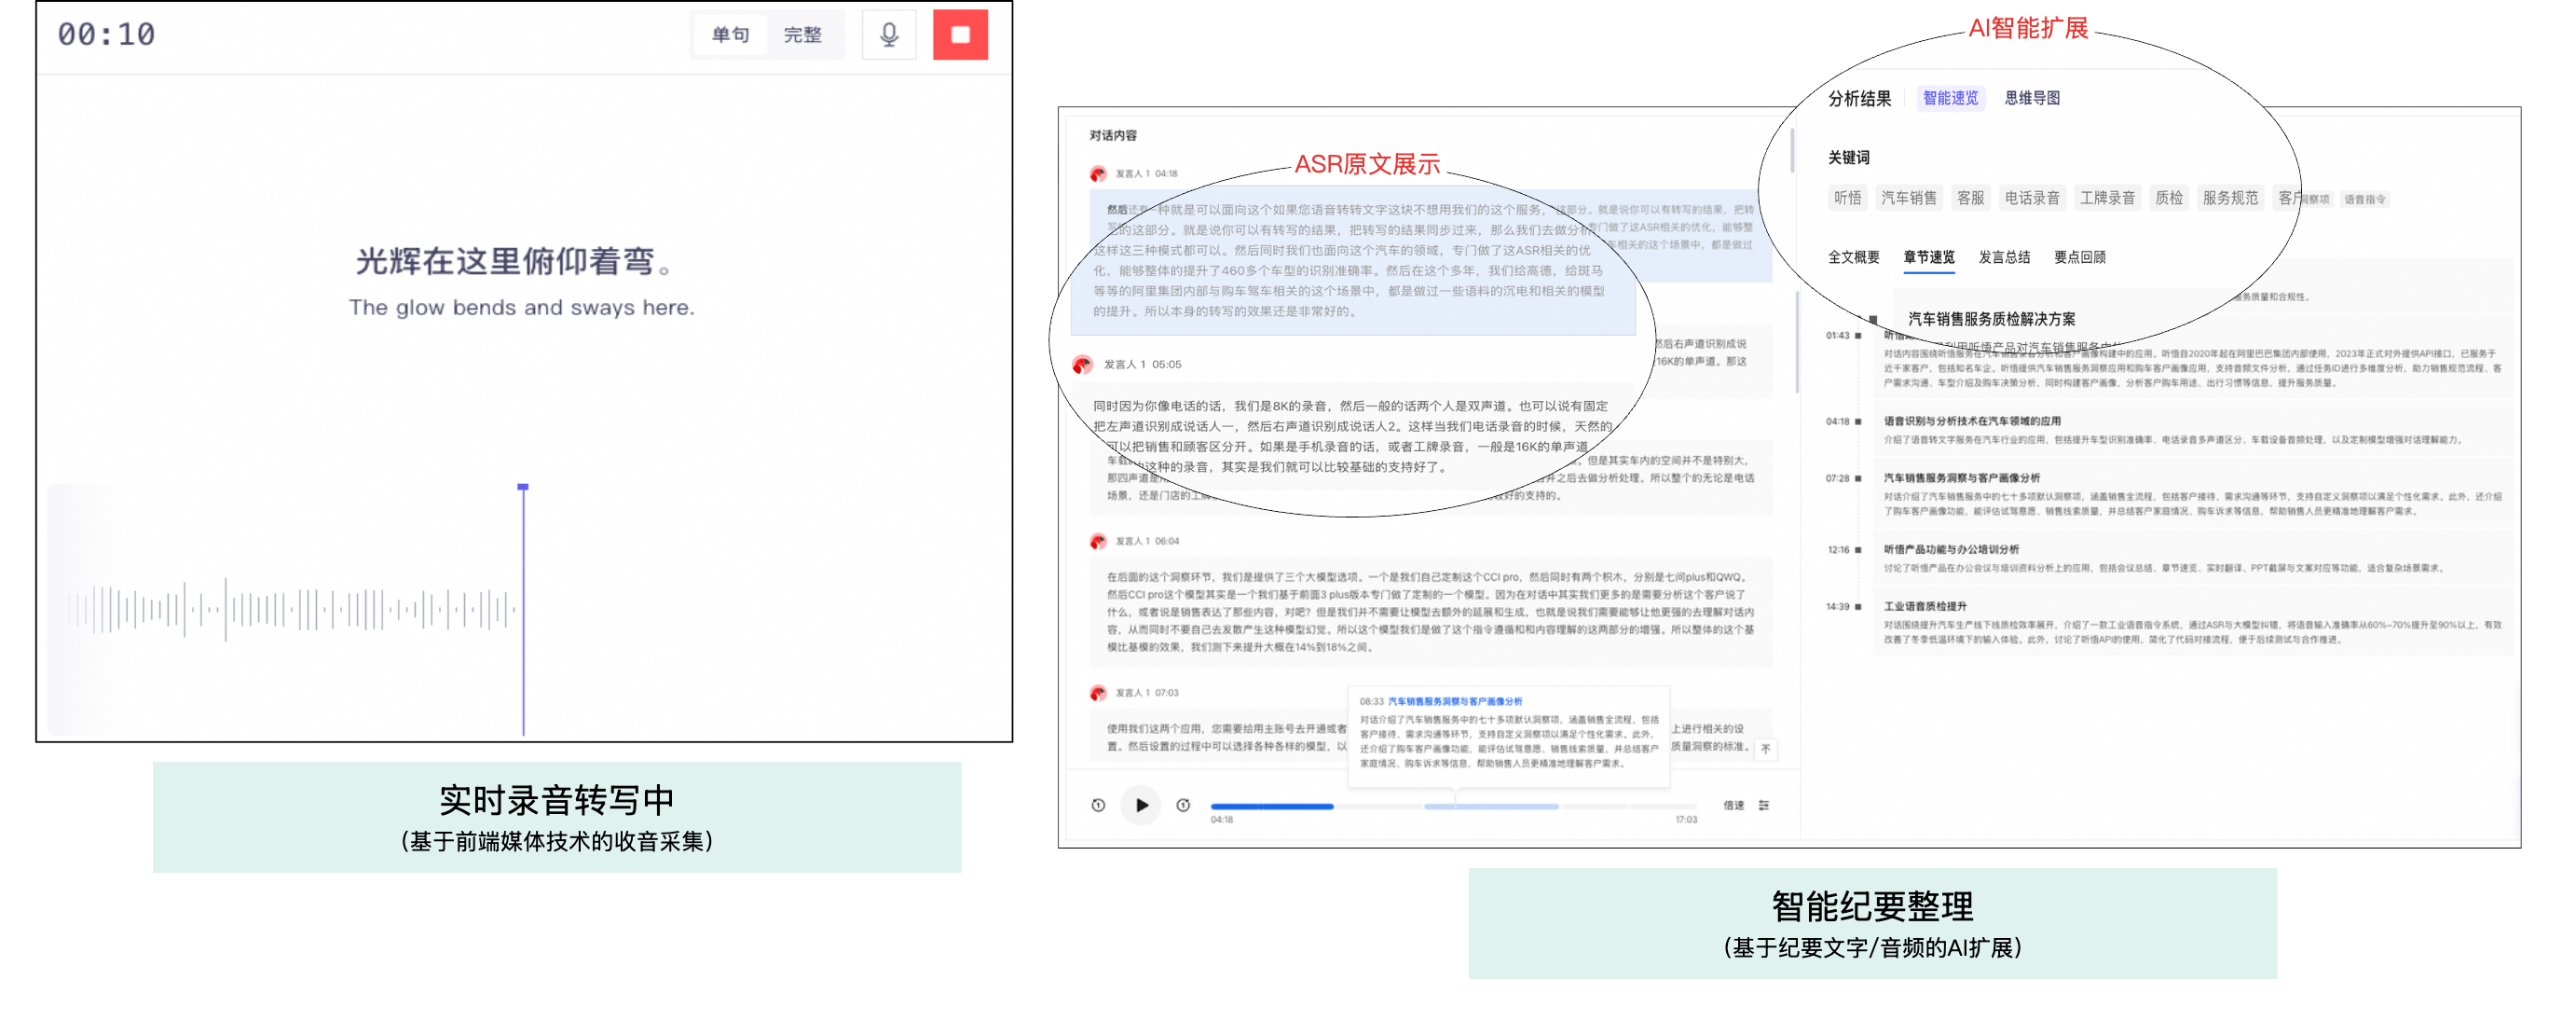
Audio and video file processing | Supports uploading audio and video files to perform speech-to-text transcription, speaker diarization, and generate intelligent summaries, including summaries and chapter overviews. |
Real-time recording | Supports real-time audio capture from a microphone for real-time speech recognition and translation. A complete intelligent summary is generated after the session ends. |
Meeting Minutes | Supports secondary AI analysis on completed tasks, such as summary optimization and Q&A pair extraction. |
Click the link above to experience all features, or view the screenshot below to see the core features.
Intelligent summary web interface example :
Quick Start
1. Prerequisites
Before you begin, make sure you have completed the following preparations:
Step | Instructions | Obtain the address |
1 | Register an Alibaba Cloud account | |
2 | Activate the Model Studio service | |
3 | Obtain an API key | |
4 | Create an application and obtain an App ID |
- Log on to the Alibaba Cloud Model Studio console.
- In the navigation pane on the left, choose API key.
- Click Create New API Key.
- You can copy the generated API key.
-
Log on to the Alibaba Cloud Model Studio console.
-
Click Create Application to generate your application.
-
You can find and copy the App ID from the application card.

2. Project configuration and startup
Follow these steps to start the project:
Environment requirements
- Node.js: Version 18.0.0 or later
- Package manager: npm
Startup steps
- Download the project: You can download the offline file to obtain the project code.
Offline file: tingwu-web.zip
- Install dependencies
cd tingwu-web
npm install
-
Configure the API key (Important!)
You can edit the
.envfile and replace the placeholders (xxxxx) with your actual values. Ensure you add the.envfile to your project's.gitignorefile to prevent key leakage.
#TODO: Replace with your API_KEY and APP_ID
REACT_APP_API_KEY=xxxxx
REACT_APP_APP_ID=xxxxx
- Start the development server
npm run start
-
View the result
You can open http://localhost:3000 in your browser.
The project automatically opens and displays the frontend interface in your browser.
API usage guide
Feature usage examples
Note: This SDK does not handle file uploads. You must upload files to your own server or OSS and then provide the public access URL of the file to the SDK.
Audio and video file upload
Feature: Upload audio or video files for automatic speech recognition and content transcription.
Usage notes:
- Supports single-channel or dual-channel audio files in MP3, WAV, M4A, WMA, AAC, OGG, AMR, FLAC, or AIFF format. Supports video files in MP4, WMV, M4V, FLV, RMVB, DAT, MOV, MKV, WEBM, AVI, MPEG, 3GP, or OGG format.
- The file size cannot exceed 6 GB.
- The audio duration cannot exceed 6 hours.
- Supported audio sampling rates are 8 kHz, 16 kHz, 24 kHz, and 48 kHz.
Procedure:
- Click the Select File button to select a local audio or video file.
- You can upload the file to your own business server or OSS.
- You can call the
createTaskAPI to create a task. You can replace theappIdin the code with your actual value and customize theparametersandanalysisparameters as needed. - You can call the
getTaskAPI to query the task parsing status. ThedataIdparameter is the return value from thecreateTaskAPI call in the previous step.
Code example:
const { output, code } = await createTaskAPI({
input: {
 task: "createTask",
 type: "offline",
 fileUrl, // The URL of the file after uploading it to your business OSS or server
 appId: "Your APP_ID",
},
parameters: {
 transcription: {
   diarizationEnabled: true,
   diarizationSpeakerCount: 0,
   translationEnabled: false,
 },
 analysis: {},
},
});
Real-time recording
Feature: Perform real-time speech recognition for live transcription.
Usage notes:
- Supported input formats: PCM (uncompressed PCM or WAV), OPUS, SPEEX, MP3, and AAC. The audio bit depth must be 16-bit and the sound channel must be mono.
- Supported audio sampling rates: 16000 Hz and 8000 Hz.
- Maximum duration for a single recording: 24 hours.
-
Before you start recording, verify that the browser's microphone permission is enabled.
-
You can call the
createTaskAPI to create a real-time task. You can replace theappIdand configure the parameters as needed.Code example:
const requestParams = {
input: {
 task: "createTask",
 type: "realtime",
 format: "pcm",
 sampleRate: 16000,
 appId: "Your APP_ID",
},
parameters: {
 transcription: {
   model: language,
   diarizationEnabled: true,
   diarizationSpeakerCount: 0,
   translationTargetLang: "zh",
   translationEnabled: true,
 },
 analysis: {},
},
};
-
You can establish a WebSocket connection. This example includes a heartbeat and a reconnection mechanism, with up to 3 retries.
-
There are two methods to obtain the WebSocket Secure (WSS) URL: First, the server-side returns the complete URL. Second, the frontend constructs the URL, and the server-side returns a temporary token. This example uses the second method. Because the temporary token has a short validity period, you must obtain a new one for each reconnection attempt.
-
You can call the
getTaskAPI to query the task parsing status. ThedataIdparameter is the return value from thecreateTaskAPI call.
Get and display results
Intelligent summary content
Feature: View the complete transcription results, summaries, Q&A pairs, mind maps, and other AI-analyzed content.
Content includes:
- Transcribed text: The complete speech-to-text result.
- Speaker diarization: Differentiates the speech of different speakers.
- Intelligent summary: Automatically generates a summary of the meeting content.
- Q&A review: Extracts key questions and answers.
- Chapter overview: Browse the summary by time or content segments.
- Translation: Supports multi-language translation. This feature must be enabled when the task is created.
Developer reference
System architecture
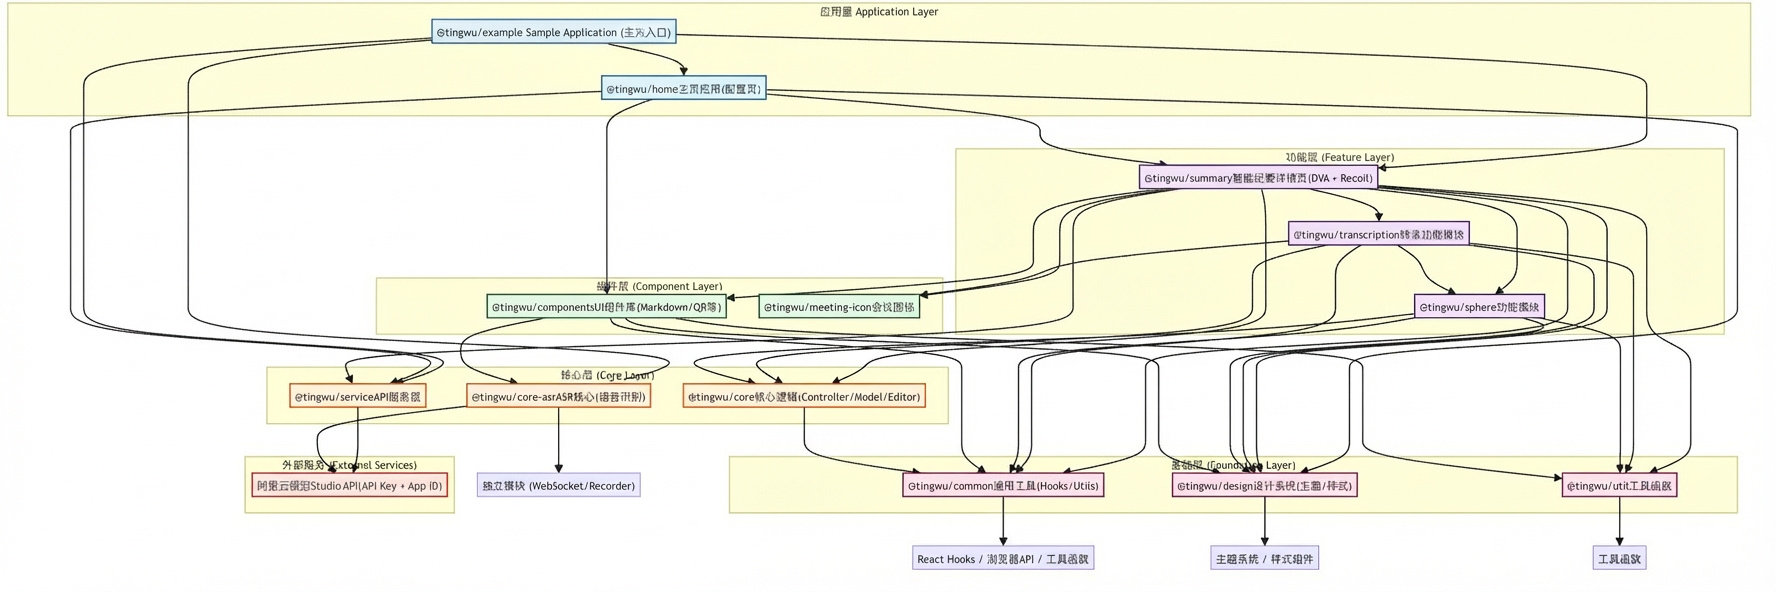
- For more information, see the project file at
./tingwu-web/docs/ARCHITECTURE.md.
Project structure
tingwu-web/
├── packages/
│   ├── tingwu-example/     # Example application (main startup entry)
│   ├── tingwu/service/     # API service layer
│   ├── tingwu-components/  # Component library
│   ├── tingwu/core/       # Core logic
│   ├── tingwu/summary/       # Tingwu intelligent summary details page
│   ├── tingwu/home/       # Configuration page to enable intelligent summary
│   └── ...                # Other packages
Main commands
npm run start: Starts the development server.npm run build: Builds the production version.npm run lint: Runs code linting.npm run test: Runs tests.
Important notes
- API key security: Do not hard-code your API key or commit it to a code repository. Manage your API key using an environment variable.
- Browser permissions: The real-time recording feature requires users to grant microphone permissions in the browser.
- Network requirements: The project needs to access the Alibaba Cloud Model Studio service. Ensure your network connection is stable.