Configure custom authentication and authorization
A cloud-native gateway can use a custom authentication service to centralize access control. This eliminates the need to implement authentication and authorization in each backend service. This topic describes how to configure user-created authentication and authorization for a cloud-native gateway.
Background
Servers typically protect APIs by validating credentials, known as tokens, sent in client requests. The format of a token is not strictly defined and usually depends on specific business requirements.
-
If the token is a JSON Web Token (JWT), its signature can be verified with a public key without contacting a centralized authentication service.
-
If the token uses a custom format, the server must call a centralized authentication service to validate it.
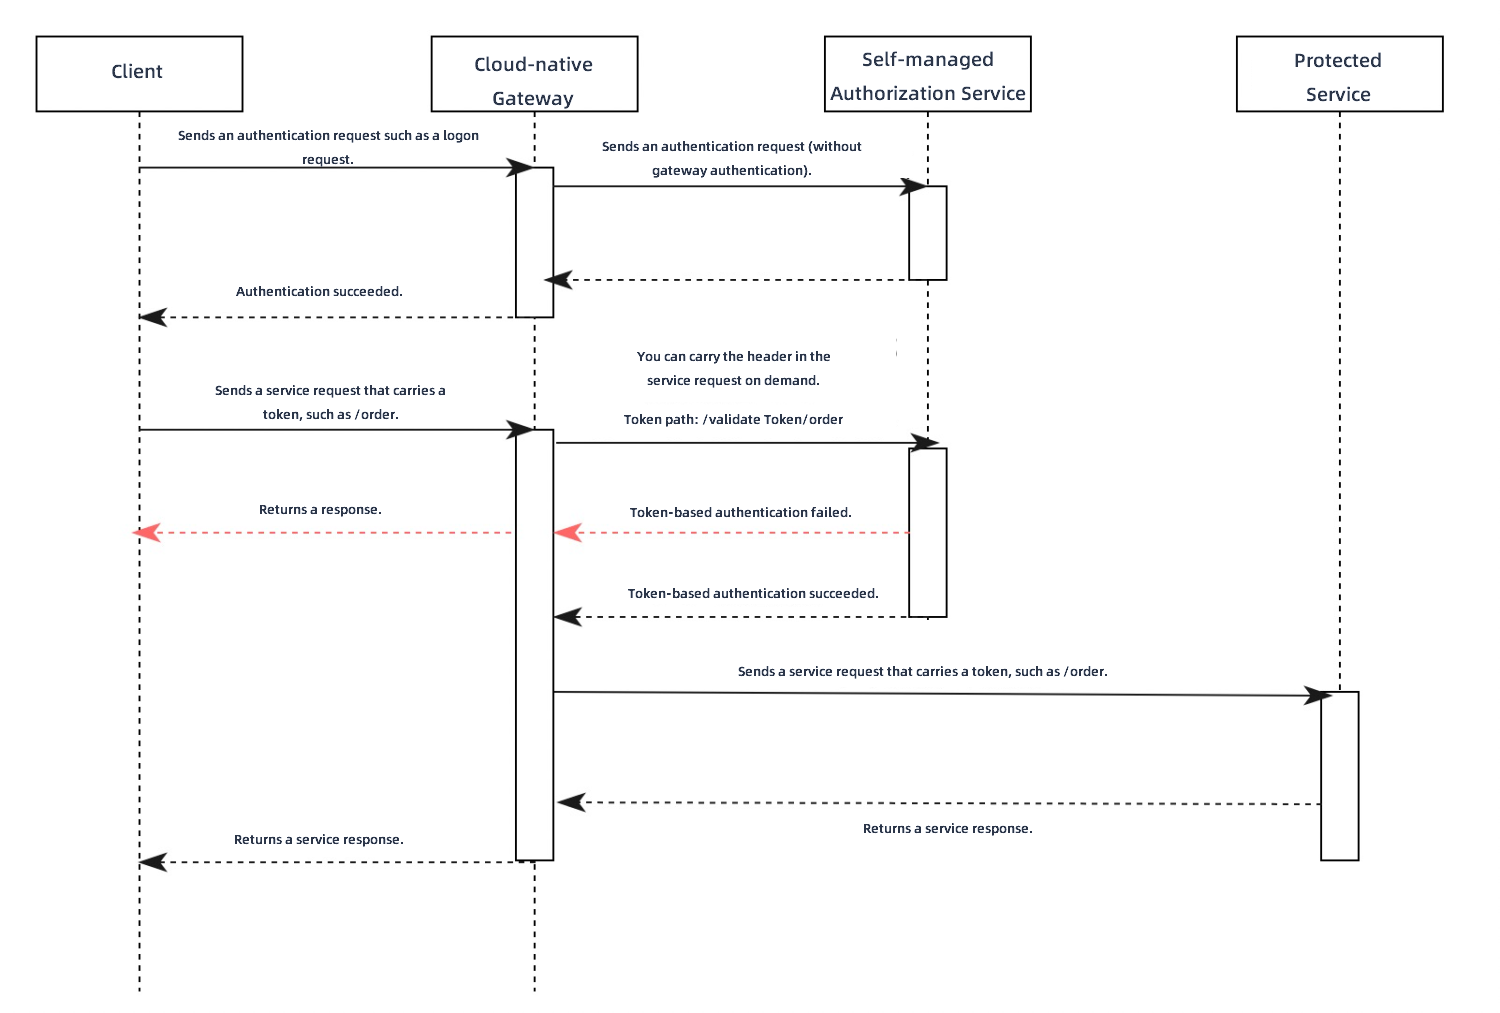
The following example shows the request flow when a cloud-native gateway is connected to a user-created authentication service.
-
A client sends an authentication request, such as a login attempt, to the gateway.
-
The gateway forwards the authentication request directly to the authentication service.
-
The authentication service validates the credentials, such as a username and password, from the request. If the credentials are valid, the service returns a token to the gateway, which then forwards it to the client.
-
The client sends a business request to the gateway, such as placing an order at /order. The request includes the token from the previous step.
-
The gateway extracts the path (including query parameters), HTTP method, and token from the original business request to construct a new authorization request, which it sends to the user-created authentication service. You must configure the HTTP header that contains the token on the MSE console. You can also enable the option to include the original request body in the authorization request.
For example, if the authentication API of your user-created authentication service is /validateToken, the gateway combines the authentication API path and the original business request path to form the new authorization path: /validateToken/order.
-
When the authentication service receives the authorization request, it validates the token and can also perform authorization based on the original request's path.
-
Your authentication service can use different HTTP status codes to indicate the authentication and authorization result.
-
An HTTP status code of 200 indicates the token is valid and authorized. The gateway then forwards the original business request to the protected backend service. After receiving the business response, the gateway relays it to the client.
-
If the authentication service returns an HTTP status code of 401 or 403, it indicates that the token is invalid or unauthorized. The gateway immediately returns the response from the authentication service to the client, and the original request fails.
-
-
If your authentication service always returns an HTTP status code of 200, use the built-in HTTP header
x-mse-external-authz-check-result.-
If the value of the
x-mse-external-authz-check-resultheader in the response from the authentication service istrue, it indicates the token is valid and authorized. The gateway then forwards the original business request to the protected backend service and relays the backend service's response to the client. -
If the value of the
x-mse-external-authz-check-resultheader isfalse, it indicates that the token is invalid or unauthorized. The gateway immediately returns the response from the authentication service to the client, and the original request fails.
-
-
Create a custom authentication rule
-
Log on to the MSE console.
-
In the left-side navigation pane, choose Cloud-native Gateway > Gateways. In the top navigation bar, select a region.
-
On the Gateways page, click the name of the target gateway.
-
In the left-side navigation pane, choose Security Management > Global Authentication.
-
On the global authentication page, click create authentication. In the Create authentication panel, configure the gateway authentication parameters and then click OK.
Parameter
Description
Authentication name
Enter a custom name for the authentication rule.
Authentication type
Select user-created authentication.
Authentication service
Select the backend service for authentication. You can add services in the service management section. For more information, see Add a service.
Note-
Only services that use the HTTP protocol are supported. Other protocols such as Dubbo are not supported.
-
By default, the gateway uses the first port of a Kubernetes service. To use a different port, create another Kubernetes service in Container Service for Kubernetes (ACK) that exposes only the desired port.
Authentication API
Specify the path of the authentication service's API. The API path must support prefix matching.
For example, if your authentication service is built on Spring MVC and the authentication API is /check, configure it to handle requests for /check/ and its subpaths:
@RequestMapping("/check/")
public ResponseEntity<RestResult<String>> check(){}
Token location
Specify the request header that contains the token. Common headers include
AuthorizationandCookie. You can select a header from the drop-down list or use manual input to specify the header name.Allowed headers in authentication request
Specify the names of any client request headers that should be passed to the authentication service.
NoteThe Host, Method, Path, and Content-Length headers are included by default and do not need to be added manually.
Allowed headers from authentication response
Specify the names of any authentication response headers that should be added to the original request before it is sent to the backend service.
NoteIf the client request already contains a header with the same name, its value is overwritten.
Allow body in authentication request
Select this option to include the original request's body in the authentication request.
Maximum body bytes specifies the maximum size of the request body, in bytes, that can be sent in the authentication request.
Timeout
The maximum time, in seconds, to wait for a response from the authentication service. Default: 10.
Mode
Specifies the failure handling mode.
loose modeandstrict modeare supported. We recommend usingloose mode.-
loose mode: The gateway allows client requests if the authentication service is unavailable (fails to connect or returns a 5xx error).
-
strict mode: The gateway rejects client requests if the authentication service is unavailable.
Simple rule
To the right of Grant, click simple rule. This mode supports whitelist mode and blacklist mode.
-
whitelist mode: Requests matching the specified hosts and paths bypass authentication. All other requests require it.
-
blacklist mode: Only requests matching the specified hosts and paths require authentication. All other requests bypass it.
Click + Rule condition to set the request domain name, path, and request header.
-
Domain name: The requested domain name (host).
-
Path: The requested API path.
-
Path match condition: The path supports exact match, prefix match, and regular expression match.
-
Exact match: Enter the complete path, for example, /app/v1/order.
-
Prefix match: Enter a path prefix ending with an asterisk (*). For example, to match all requests that start with /app, set the value to /app/*.
-
Regular expression match: The regular expression must follow the RE2 syntax. For more information, see RE2 syntax.
Case sensitive: If this option is selected, path matching is case-sensitive.
-
-
Request header: The header information of the request. Headers are combined with a logical AND. Click + Request Header to configure multiple headers.
-
Header key: The name of the header field.
-
Condition: The supported matching conditions for headers.
-
Equal To: The value of the specified header key in the request is equal to the input value.
-
Not Equal To: The value of the specified header key is not equal to the input value.
-
Exists: The request contains the specified header key.
-
Does Not Exist: The request does not contain the specified header key.
-
Contains: The value of the specified header key contains the input value.
-
Does Not Contain: The value of the specified header key does not contain the input value.
-
Prefix: The value of the specified header key starts with the input value.
-
Suffix: The value of the specified header key ends with the input value.
-
Regex: The value of the specified header key matches the input regular expression. The regular expression must follow the RE2 syntax. For more information, see RE2 syntax.
-
-
Value: The value of the header field.
-
Complex rule
To the right of Grant, click complex rule.
This mode lets you configure authorization rules with combined AND/OR/NOT logic, using the Envoy
permission data structurein YAML. Authentication is required only for requests that match these conditions; all other requests bypass authentication.Note-
For a complete description of the fields in the permission data structure, see the official Envoy documentation.
-
For configuration examples, see Complex rule examples.
You are returned to the global authentication page. If the new gateway authentication rule appears in the list, the rule is created.
-
View and manage authentication rules
-
Log on to the MSE console.
-
In the left-side navigation pane, choose Cloud-native Gateway > Gateways. In the top navigation bar, select a region.
-
On the Gateways page, click the name of the target gateway.
-
In the left-side navigation pane, choose Security Management > Global Authentication.
-
On the global authentication page, find the target authentication rule and click Details in the Actions column. You can view the Basic Information and Authentication Configuration of the current service, and view and manage its Authorization Information.
The Authentication configuration section displays fields such as authentication service, authentication API, token location, timeout, mode, allow body in authentication request, allowed headers in authentication request, and allowed headers from authentication response. The Authorization information section is in whitelist mode. Rule conditions are combined with a logical OR, while matching items within a rule are combined with a logical AND. The authorization rule table includes the Request domain name, Request path match items, Case sensitive, Request header match items, and Actions columns.
In the Authorization Information section, click Create authorization info. In the dialog box that appears, enter a Request domain name and a Request path, select a Match mode, and then click OK to add the authorization rule.
Related operations
You can also perform the following operations to manage authentication and authorization rules:
-
Enable a rule: On the Global Authentication page, find the target rule and click Enable in the Actions column to activate it.
-
Disable a rule: On the Global Authentication page, find the target rule and click Close in the Actions column to deactivate it.
-
Edit a rule: On the Global Authentication page, find the target rule and click Edit in the Actions column to modify its configuration.
-
Delete a rule: On the Global Authentication page, find the target rule and click Delete in the Actions column to remove it.
You must disable a rule before you can delete it.
Complex rule examples
Match domain names with regular expressions
In this example, authentication logic is executed only for requests to the exampleA.com and exampleB.com domains that have a matching path prefix. Note that the regular expression configured in the regex field requires a full match, not a partial match.
For example, a request to test.exampleA.com does not match the condition and bypasses authentication.
-
The regular expression must follow the RE2 syntax. For more information, see RE2 syntax.
-
For a complete description of the fields in the permission data structure, see the official Envoy documentation.
permissions:
# and_rules specifies that authentication is performed when all the following rules are met.
- and_rules:
    rules:
      - url_path:
          # Prefix match for the path.
          path:
            prefix: /
      - header:
          # Regular expression match.
          safe_regex_match:
            regex: "(exampleA\\.com|exampleB\\.com)"
          # HTTP pseudo-header is supported. You can use the ":authority" header to obtain the domain name.
          name: ":authority"
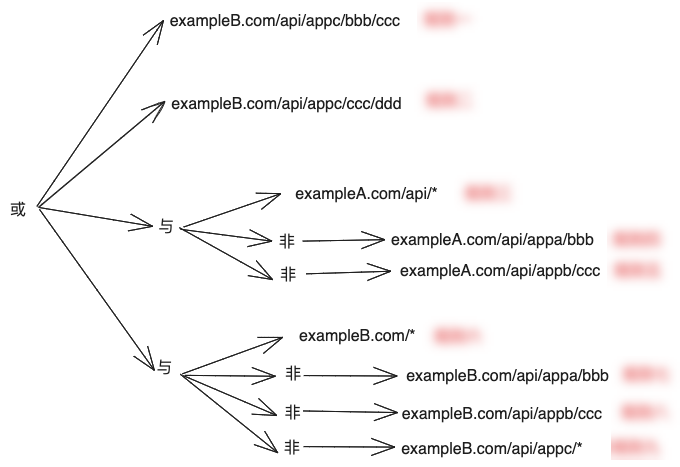
Combine AND, OR, and NOT conditions
This example meets the following conditions:
-
Requests starting with the
exampleA.com/apiprefix require authentication, except for:-
exampleA.com/api/appa/bbb, which does not require authentication. -
exampleA.com/api/appb/ccc, which does not require authentication.
-
-
All requests under
exampleB.comrequire authentication, except for:-
exampleB.com/api/appa/bbb, which does not require authentication. -
exampleB.com/api/appb/ccc, which does not require authentication. -
Requests starting with the
exampleB.com/api/appcprefix do not require authentication, except for:-
exampleB.com/api/appc/bbb/ccc, which requires authentication. -
exampleB.com/api/appc/ccc/ddd, which requires authentication.
-
-
The following figure summarizes this logic.
The corresponding YAML configuration is as follows:
permissions:
# or_rules specifies that authentication is performed if any of the following rules are met.
- or_rules:
    rules:
      # and_rules specifies that this rule is met only when all the following sub-rules are met.
      # Rule 1
      - and_rules:
          rules:
            - url_path:
                path:
                  exact: /api/appc/bbb/ccc
            - header:
                exact_match: "exampleB.com"
                name: ":authority"
      # Rule 2
      - and_rules:
          rules:
            - url_path:
                path:
                  exact: /api/appc/ccc/ddd
            - header:
                exact_match: "exampleB.com"
                name: ":authority"
      - and_rules:
          rules:
            # Rule 3
            - url_path:
                path:
                  prefix: /api/
            # not_rule specifies that this rule is met only when the following configuration is not met.
            # Rule 4
            - not_rule:
                url_path:
                  path:
                    exact: /api/appa/bbb
            # Rule 5
            - not_rule:
                url_path:
                  path:
                    exact: /api/appb/ccc
            - header:
                exact_match: "exampleA.com"
                name: ":authority"
      - and_rules:
          rules:
            # Rule 6
            - url_path:
                path:
                  prefix: /
            # not_rule specifies that this rule is met only when the following configuration is not met.
            # Rule 7
            - not_rule:
                url_path:
                  path:
                    exact: /api/appa/bbb
            # Rule 8
            - not_rule:
                url_path:
                  path:
                    exact: /api/appb/ccc
            # Rule 9
            - not_rule:
                url_path:
                  path:
                    prefix: /api/appc/
            - header:
                exact_match: "exampleB.com"
                name: ":authority"