Configure JWT authentication
A JSON Web Token (JWT) is a standard for securely sending information between a client and a server. This information is encoded as a JSON object and can be trusted because it is digitally signed. A JWT can be signed using algorithms like HMAC, or with a public/private key pair like RSA or ECDSA. You can use JWT authentication in a cloud-native gateway to verify identities and control access to your services.
Prerequisites
-
You have a basic understanding of the JWT standard. For more information, see Introduction to JSON Web Tokens.
-
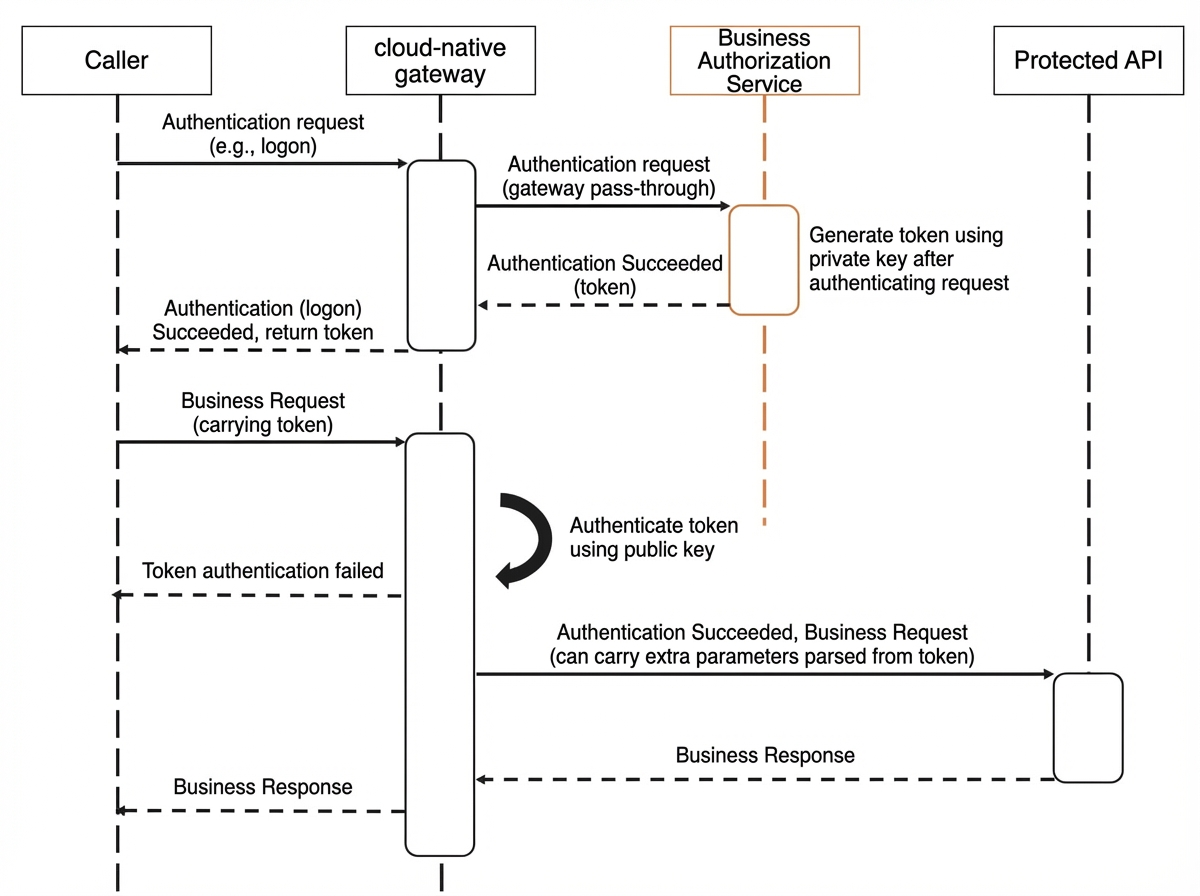
You understand the integration methods that the cloud-native gateway supports: issuing your own token and configuring a public key in the gateway to verify the request signature.
-
Prepare the private key and public key used for generating and validating tokens. The private key is used by your authorization service to sign JWTs. The public key is configured in the cloud-native gateway to verify the signature of a token in a request.
Background information
The cloud-native gateway provides a comprehensive security solution. The JWT authentication feature allows you to authorize access to your APIs based on JSON Web Tokens. This gives you fine-grained control over your security settings.
Token-based authentication
When you expose APIs through a cloud-native gateway, you need a way to identify the requester and verify their permission to access the requested resource. A token is a credential used for this authentication. With token-based authentication, your application does not need to store user authentication or session information on the server. This enables stateless, distributed web applications and simplifies scaling.
Supported integration methods
Create authentication
-
Log on to the MSE console.
-
In the left-side navigation pane, choose Cloud-native Gateway > Gateways. In the top navigation bar, select a region.
-
On the Gateways page, click the ID of the gateway.
-
In the left-side navigation pane, choose Security Management > Global Authentication.
-
On the Global Authentication page, click Create Authentication in the upper-left corner. Configure the parameters, and then click OK.
Parameter
Description
Authentication Name
A custom name for the authentication rule.
Authentication Type
The type of authentication. JWT is selected by default.
Issuer
The principal that issued the JWT, which corresponds to the
iss(issuer) claim in the token.Sub
The principal that is the subject of the JWT, which corresponds to the
sub(subject) claim in the token.JWKS
The JSON Web Key Set (JWKS) that contains the public key used to verify the JWT signature. The format must be a valid JWKS object. For example:
{
    "keys":[
         {
        "e":"AQAB",
        "kid":"DHFbpoIUqrY8t2zpA2qXfCmr5VO5ZEr4RzHU_-envvQ",
        "kty":"RSA",
        "n":"xAE7eB6qugXyCAG3yhh7pkDkT65pHymX-
P7KfIupjf59vsdo91bSP9C8H07pSAGQO1MV_xFj9VswgsCg4R6otmg5PV2
He95lZdHtOcU5DXIg_pbhLdKXbi66Gl
VeK6ABZOUW3WYtnNHD-91gVuoeJT_DwtGGcp4ignkgXfkiEm4sw-
4sfb4qdt5oLbyVpmW6x9cfa7vs2WTfURiCrBoUqgBo_-4WTiULmmHSG
ZHOjzwa8WtrtOQGsAFjIbno85jp6MnGGGZ
PYZbDAa_b3y5u-YpW7ypZrvD8BgtKVjgtQgZhLAGezMt0ua3D
RrWnKqTZ0BJ_EyxOGuHJrLsn00fnMQ"
          }
       ]
}
JWT Token
Configure how the token is extracted from the incoming request.
-
Type: The location of the token in the request. The default value is Header.
-
Key: The name of the header or query parameter that contains the token.
-
Prefix: A string that is prefixed to the token. By default, the gateway expects the token to be in the
Authorizationheader with theBearerprefix. For example:Authorization: Bearer token. -
Enable Passthrough: Specifies whether to pass the token to the backend service. If you select this option, the original token header or parameter is forwarded.
Authorization
The authorization mode. Both Whitelist and Blacklist modes are supported.
-
Whitelist: Requests to hosts and paths that you specify in the whitelist can bypass authentication. All other requests require authentication.
-
Blacklist: Requests to hosts and paths that you specify in the blacklist require authentication. All other requests can bypass authentication.
Click + Rule Condition to configure the request domain name and request path.
-
Request Domain Name: The request domain name (host).
-
Request Path: The request path.
-
View authentication details
-
Log on to the MSE console.
-
In the left-side navigation pane, choose Cloud-native Gateway > Gateways. In the top navigation bar, select a region.
-
On the Gateways page, click the ID of the gateway.
-
In the left-side navigation pane, choose Security Management > Global Authentication.
-
On the Global Authentication page, find the target authentication rule and click Details in the Actions column. The details page shows the rule's Basic Information and Authentication Configuration. You can also manage its Authorization Information.
The Authentication Configuration section displays fields such as Issuer, Sub, Type (for example, Header), Prefix (for example, Bearer), the Enable Passthrough switch, Key (for example, Authorization), and JWKS. The Authorization Information section allows you to switch the authorization mode and displays a table of existing authorization rules with their Request Domain Name and Request Path.
In the Authorization Information section, click Add Authorization Information. In the dialog box that appears, enter the Request Domain Name and Request Path to add a new authorization rule.
Verify the result
Return to the Global Authentication page. If the new authentication rule appears in the list, it has been created successfully.
Related operations
You can also perform the following operations to manage your authentication rules:
-
Enable an authentication rule: On the Global Authentication page, find the target rule and click Enable in the Actions column. This activates the rule.
-
Disable an authentication rule: On the Global Authentication page, find the target rule and click Close in the Actions column. This deactivates the rule.
-
Edit an authentication rule: On the Global Authentication page, find the target rule and click Edit in the Actions column to modify its configuration.
-
Delete an authentication rule: On the Global Authentication page, find the target rule and click Delete in the Actions column to permanently remove it.
You must disable an authentication rule before you can delete it.
Related documents
To learn about other authentication mechanisms, see Global Authentication.