Custom table templates
Features
Custom table templates are a custom product designed for single-page, fixed-layout, bordered tables and forms. You can use a drag-and-drop interface to configure reference fields, recognition fields, and table headers on a single sample image. This lets you extract structured data from documents with the same layout without data annotation or model training. After configuration and optimization, the template recognition accuracy can exceed 85%.
The Toolbox also provides classifier and field type management tools. These tools support automatic classification, routing, and high-precision recognition of data with different layouts through a single API.
Advantages
Low cost. You can build a template with just one sample image. No data annotation is required.
Easy to use. You can define a template using the drag-and-drop visual configuration. No custom development is needed.
High efficiency. You can configure a template in 3 to 5 minutes.
Scenarios
Few-shot cold start: This feature is suitable for scenarios with a small number of data samples (fewer than 20) that require fast online validation.
Fixed data layout: This feature is suitable for list-type and key-value (KV) type bordered tables with a fixed layout. The style, elements, and table headers must remain unchanged. However, the cell height can be adjusted and rows can be added. Examples include insurance claims processing for medical bills and health check reports, bank transfers, annual report audits, and business data structuring.
Table templates support both key-value and list-type table data, along with the recognition of fields outside the table borders.
The minimum recognition granularity for fields within a table is a single cell. Recognition of areas smaller than a cell is not supported.
Recognition of tables or fields that span multiple pages is not supported.
For key-value type tables, you can adjust the cell height. Adding, splitting, or deleting cells is not supported.
For list-type tables, the table header area must remain unchanged. The number of rows in the recognition area can change. Merged cells are not supported.
Related links
OCR Document Automl: Console
Custom table template developer guide: Online debugging, API reference, and SDK documentation
User guide
Watch the following demo to learn how to create a custom table template:
The following figure shows the process of creating a custom table template. You can complete the process in four steps.
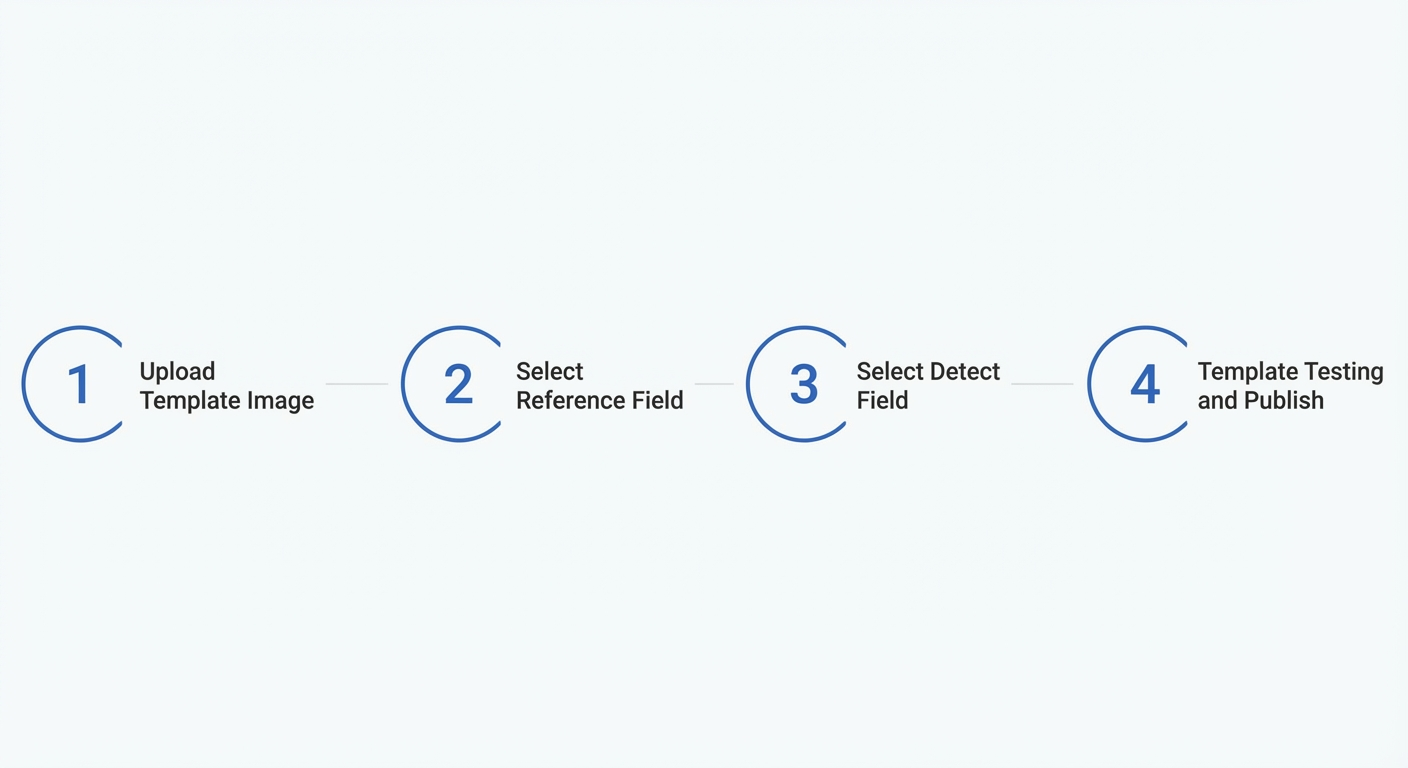
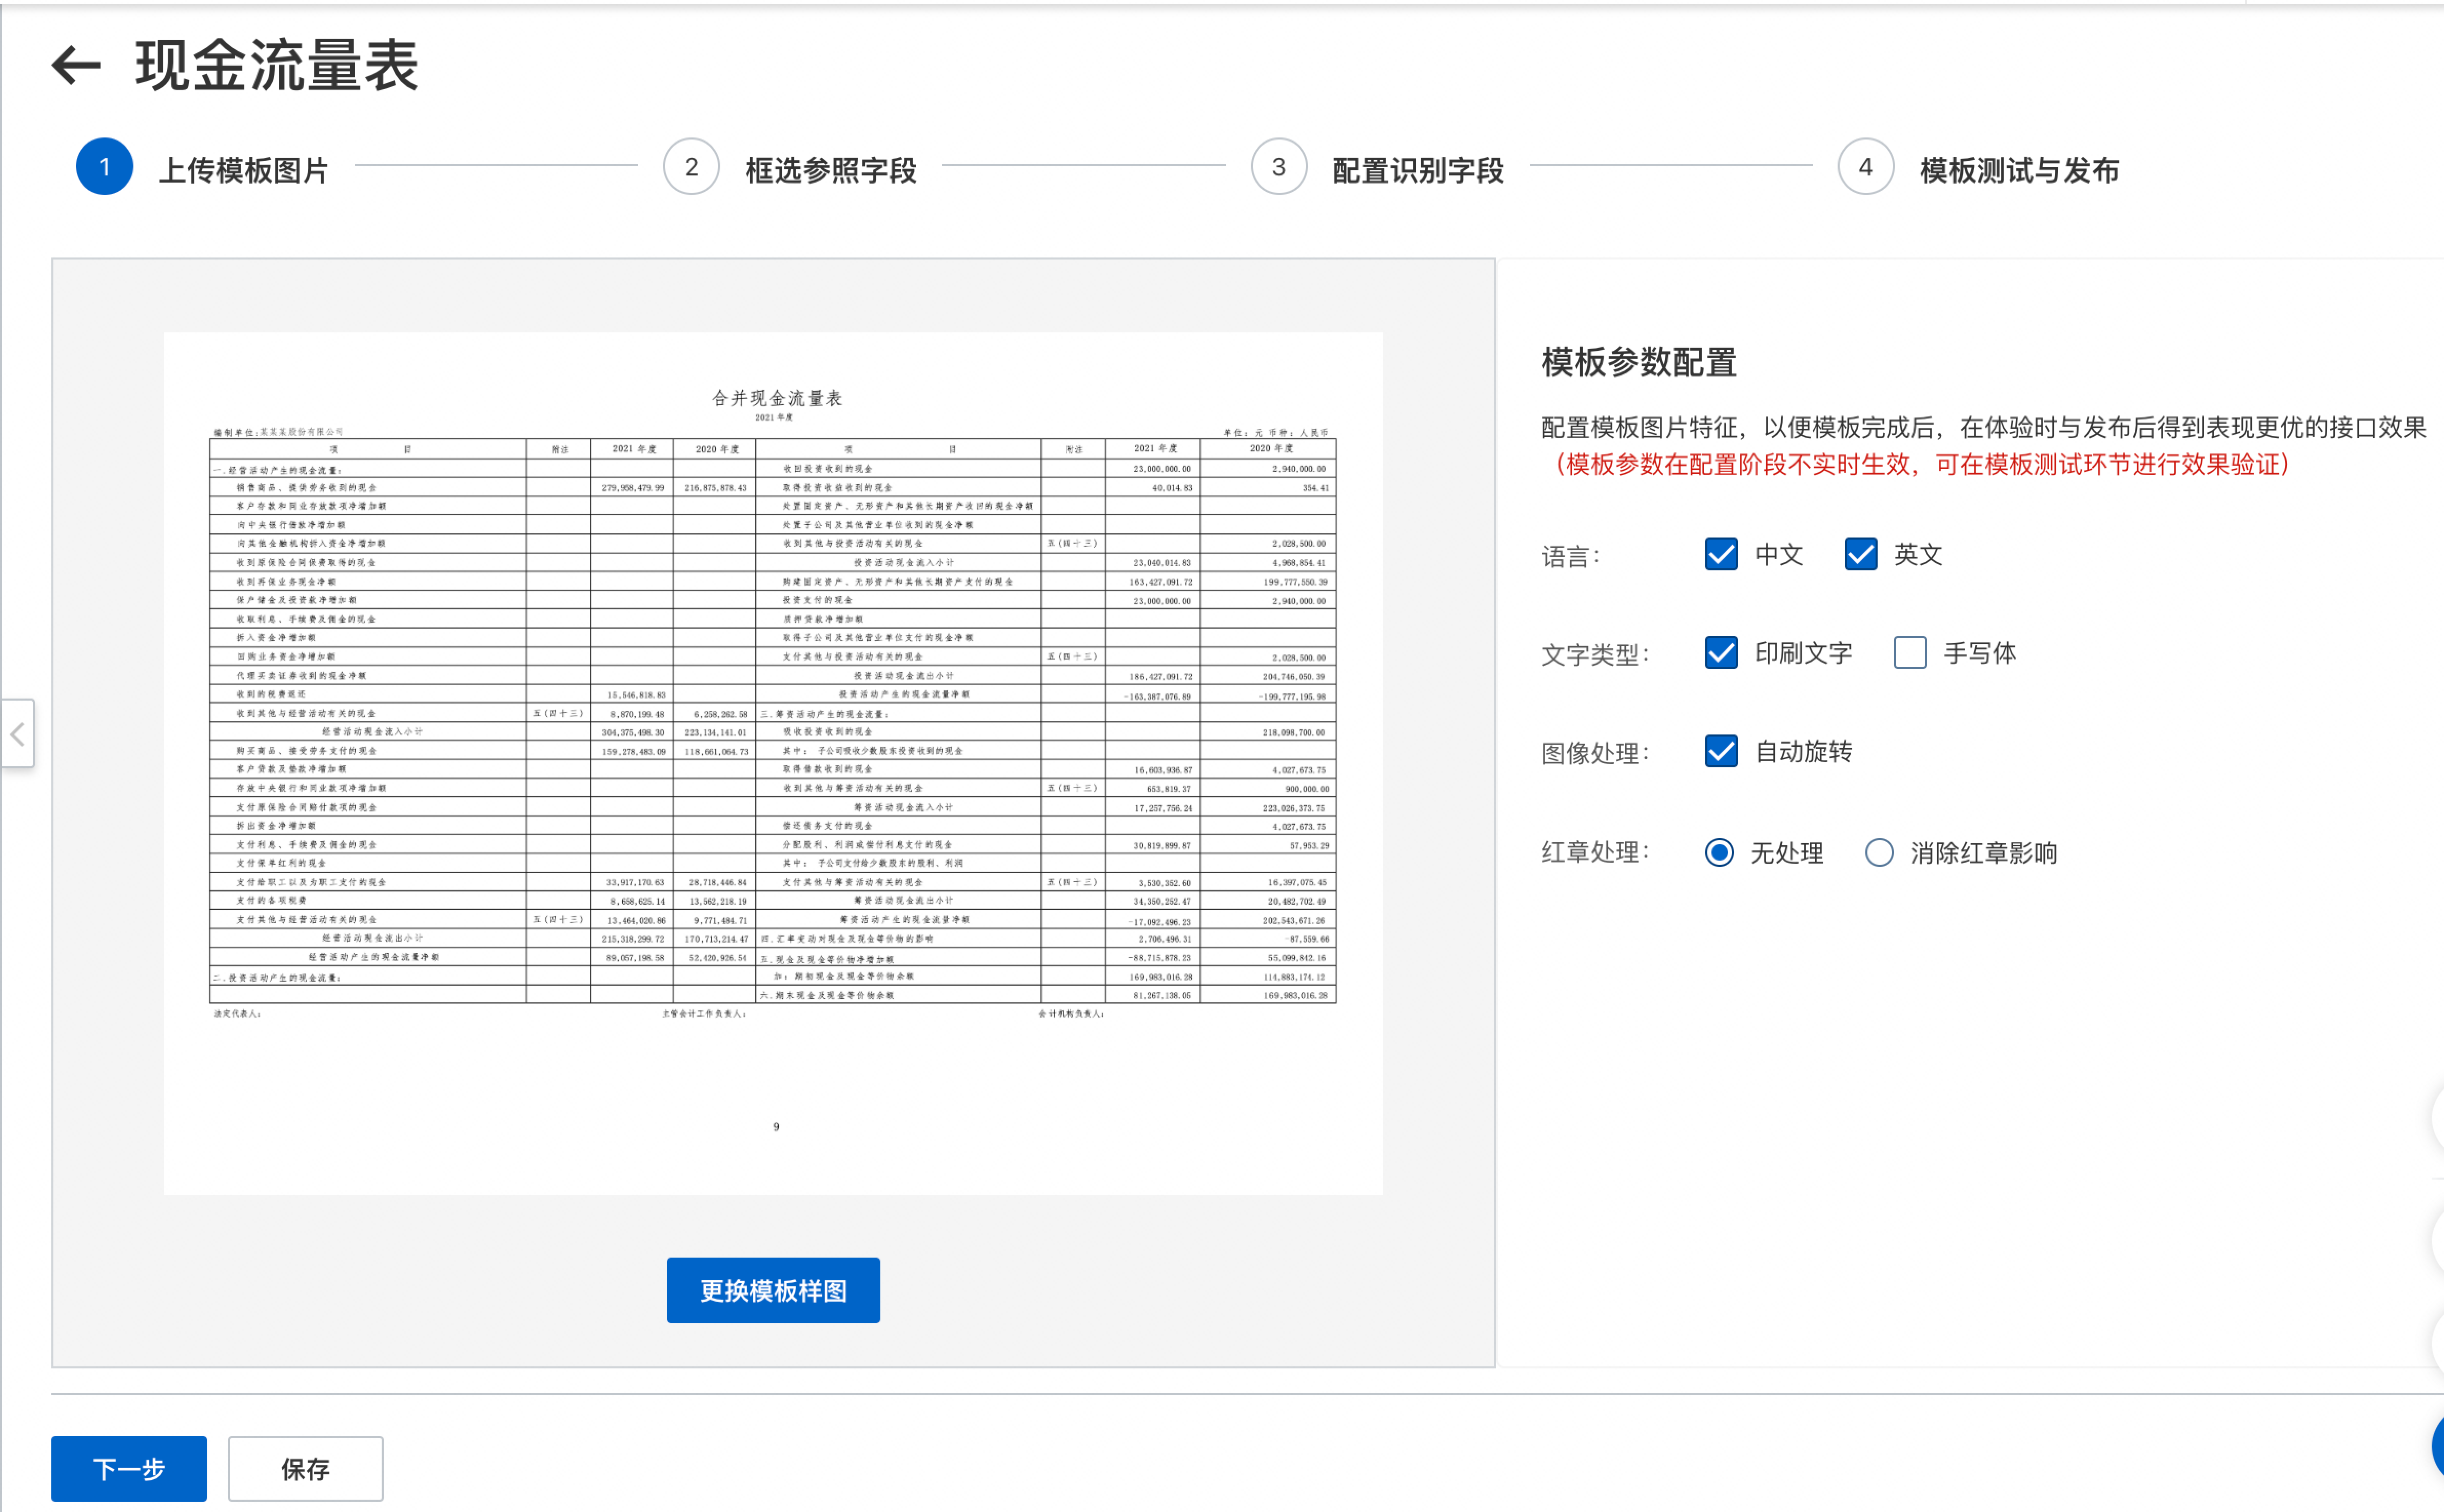
Step 1: Upload a template image
After you create a custom table template project, go to the project details page to create a template. On the Upload template image page, click the Upload file button to upload a clear, unrotated template image and configure the parameters based on your data's features.
Step 2: Select reference fields
Go to the Select Reference Fields interface. In the toolbar on the left, select the Box selection button. Draw a box around text or table cells, such as table headers, that have fixed content and positions on the template.
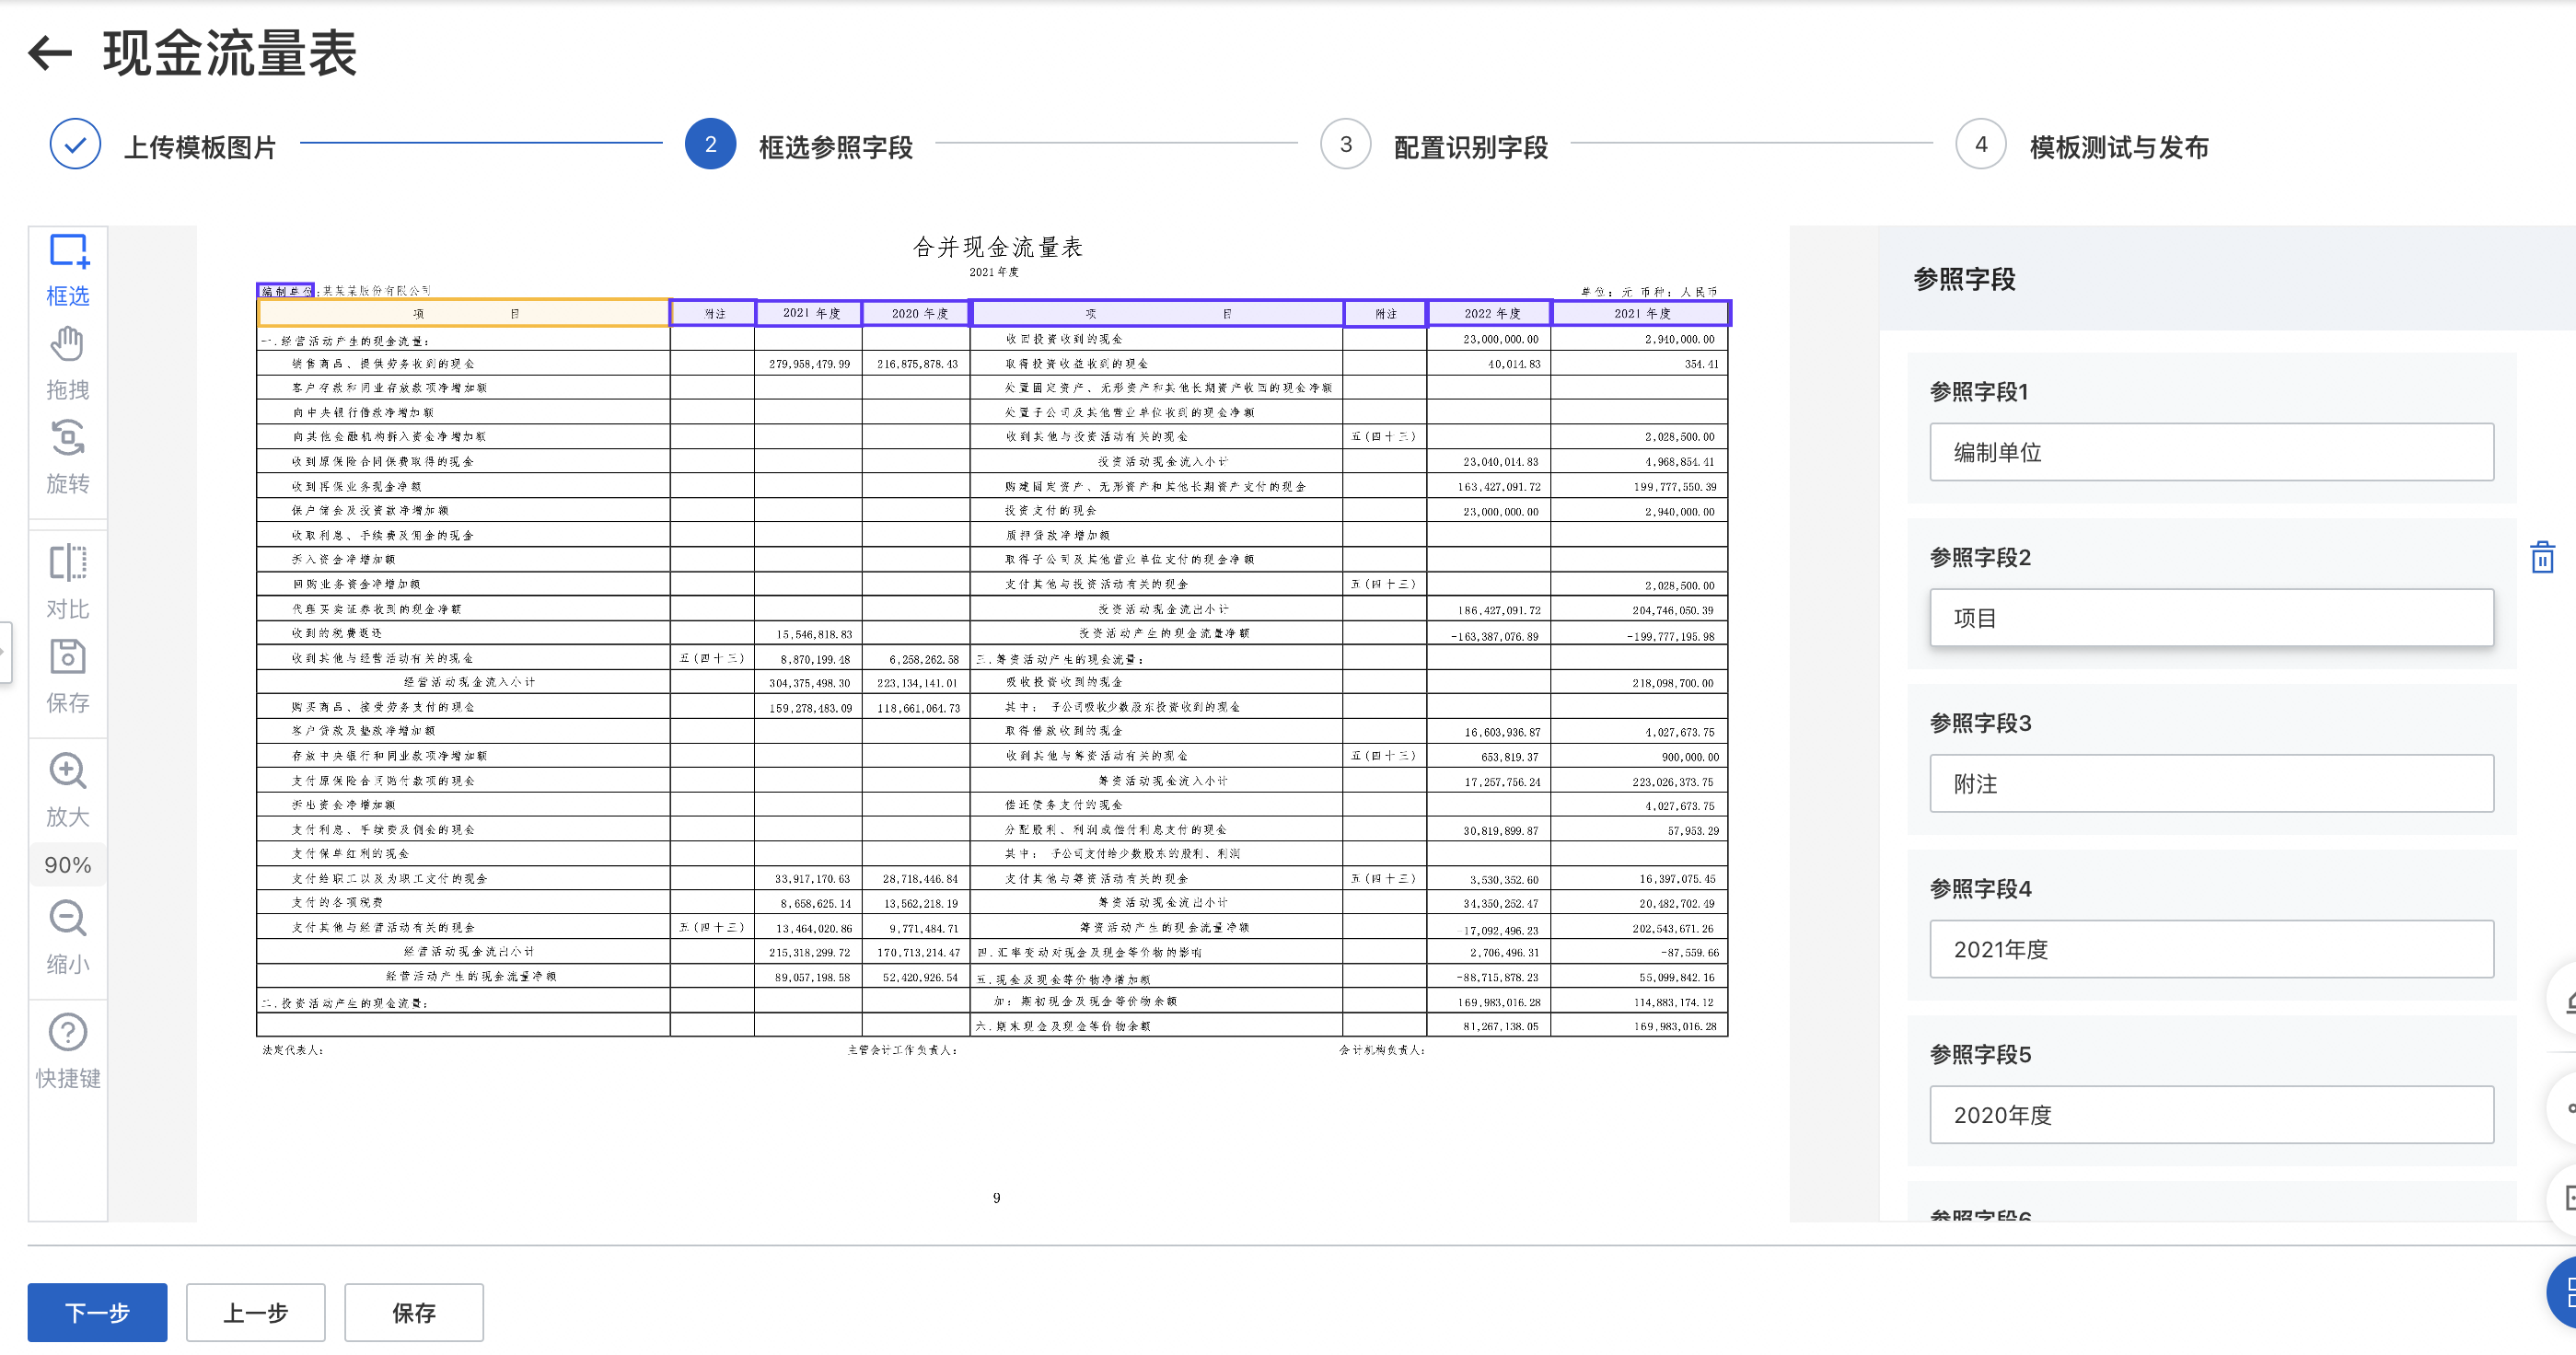
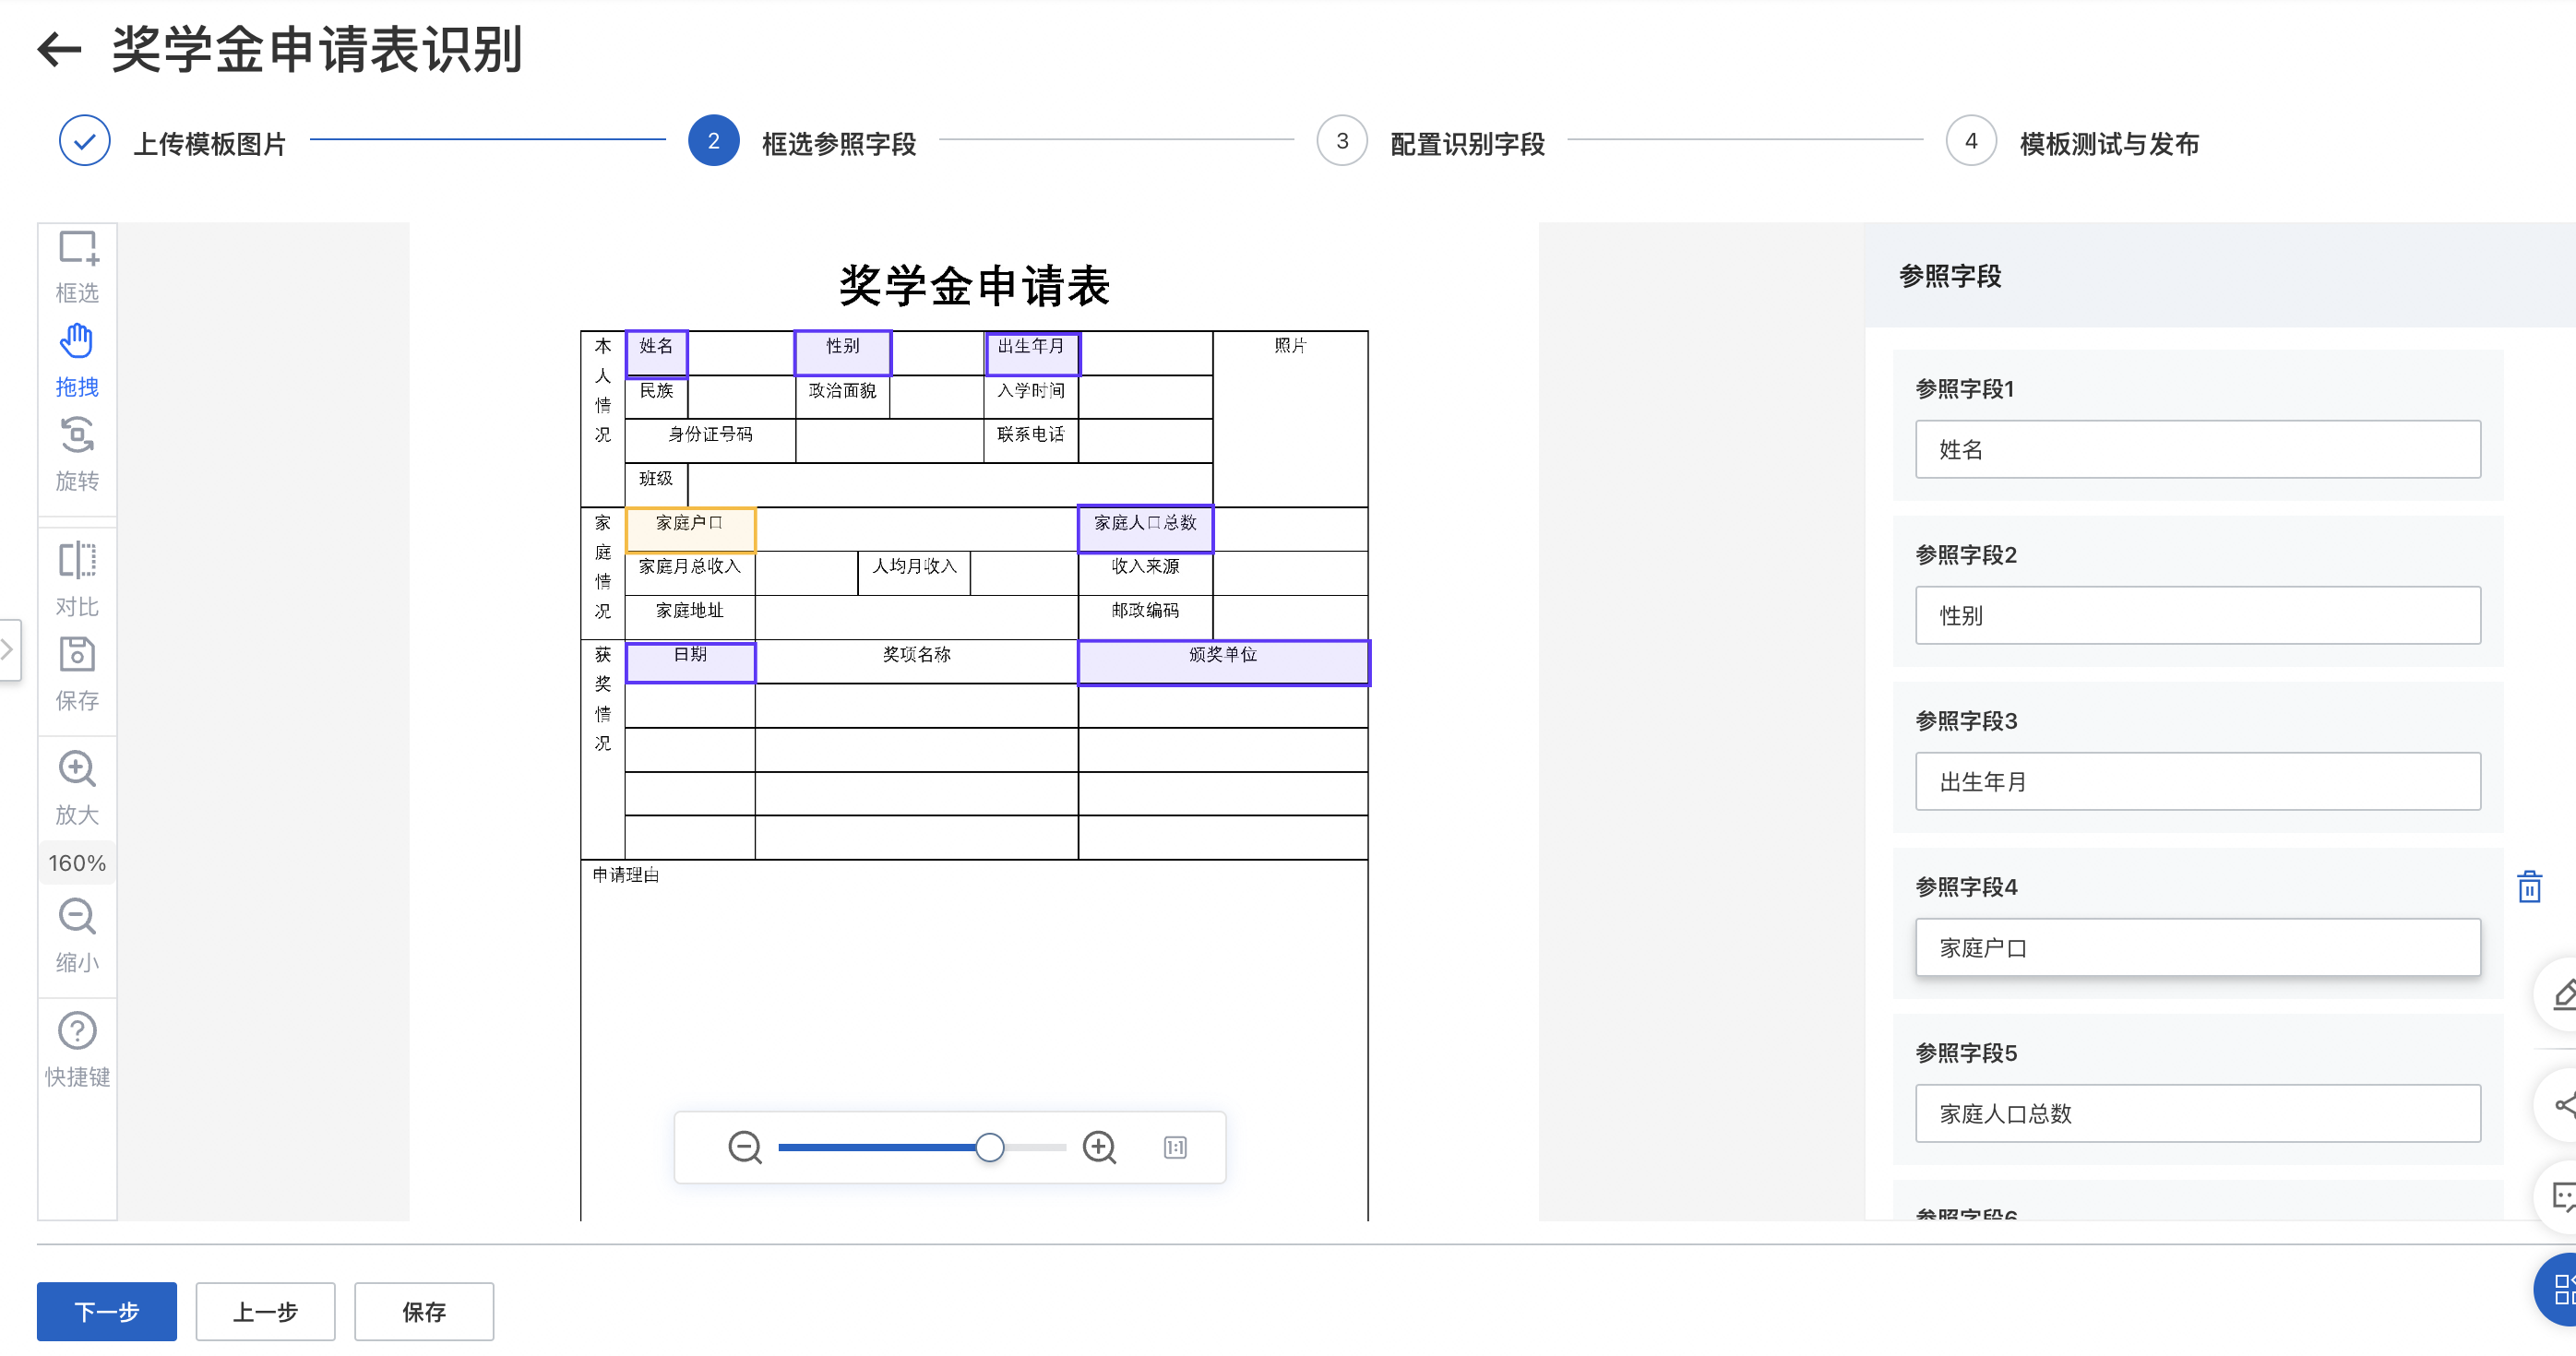
Reference field: A reference field is a field that is fixed in content and relative position on all documents with the same layout. We recommend that you select reference fields that are distributed around the edges of the page. Within a table, the selection granularity is a single cell. The choice of reference fields also affects performance if you use a joint classifier.
Step 3: Configure recognition fields
Go to the recognition field configuration interface. In the left-side toolbar, click the Box selection button. Draw a box around the fields and tables to recognize on the template image. For list-type tables, define the header fields and recognition column fields separately. Click the input box for a header field, enter the corresponding column name, and verify the header value. You can also enter the field name, verify the value, and select the appropriate field type and advanced configuration to improve recognition accuracy.
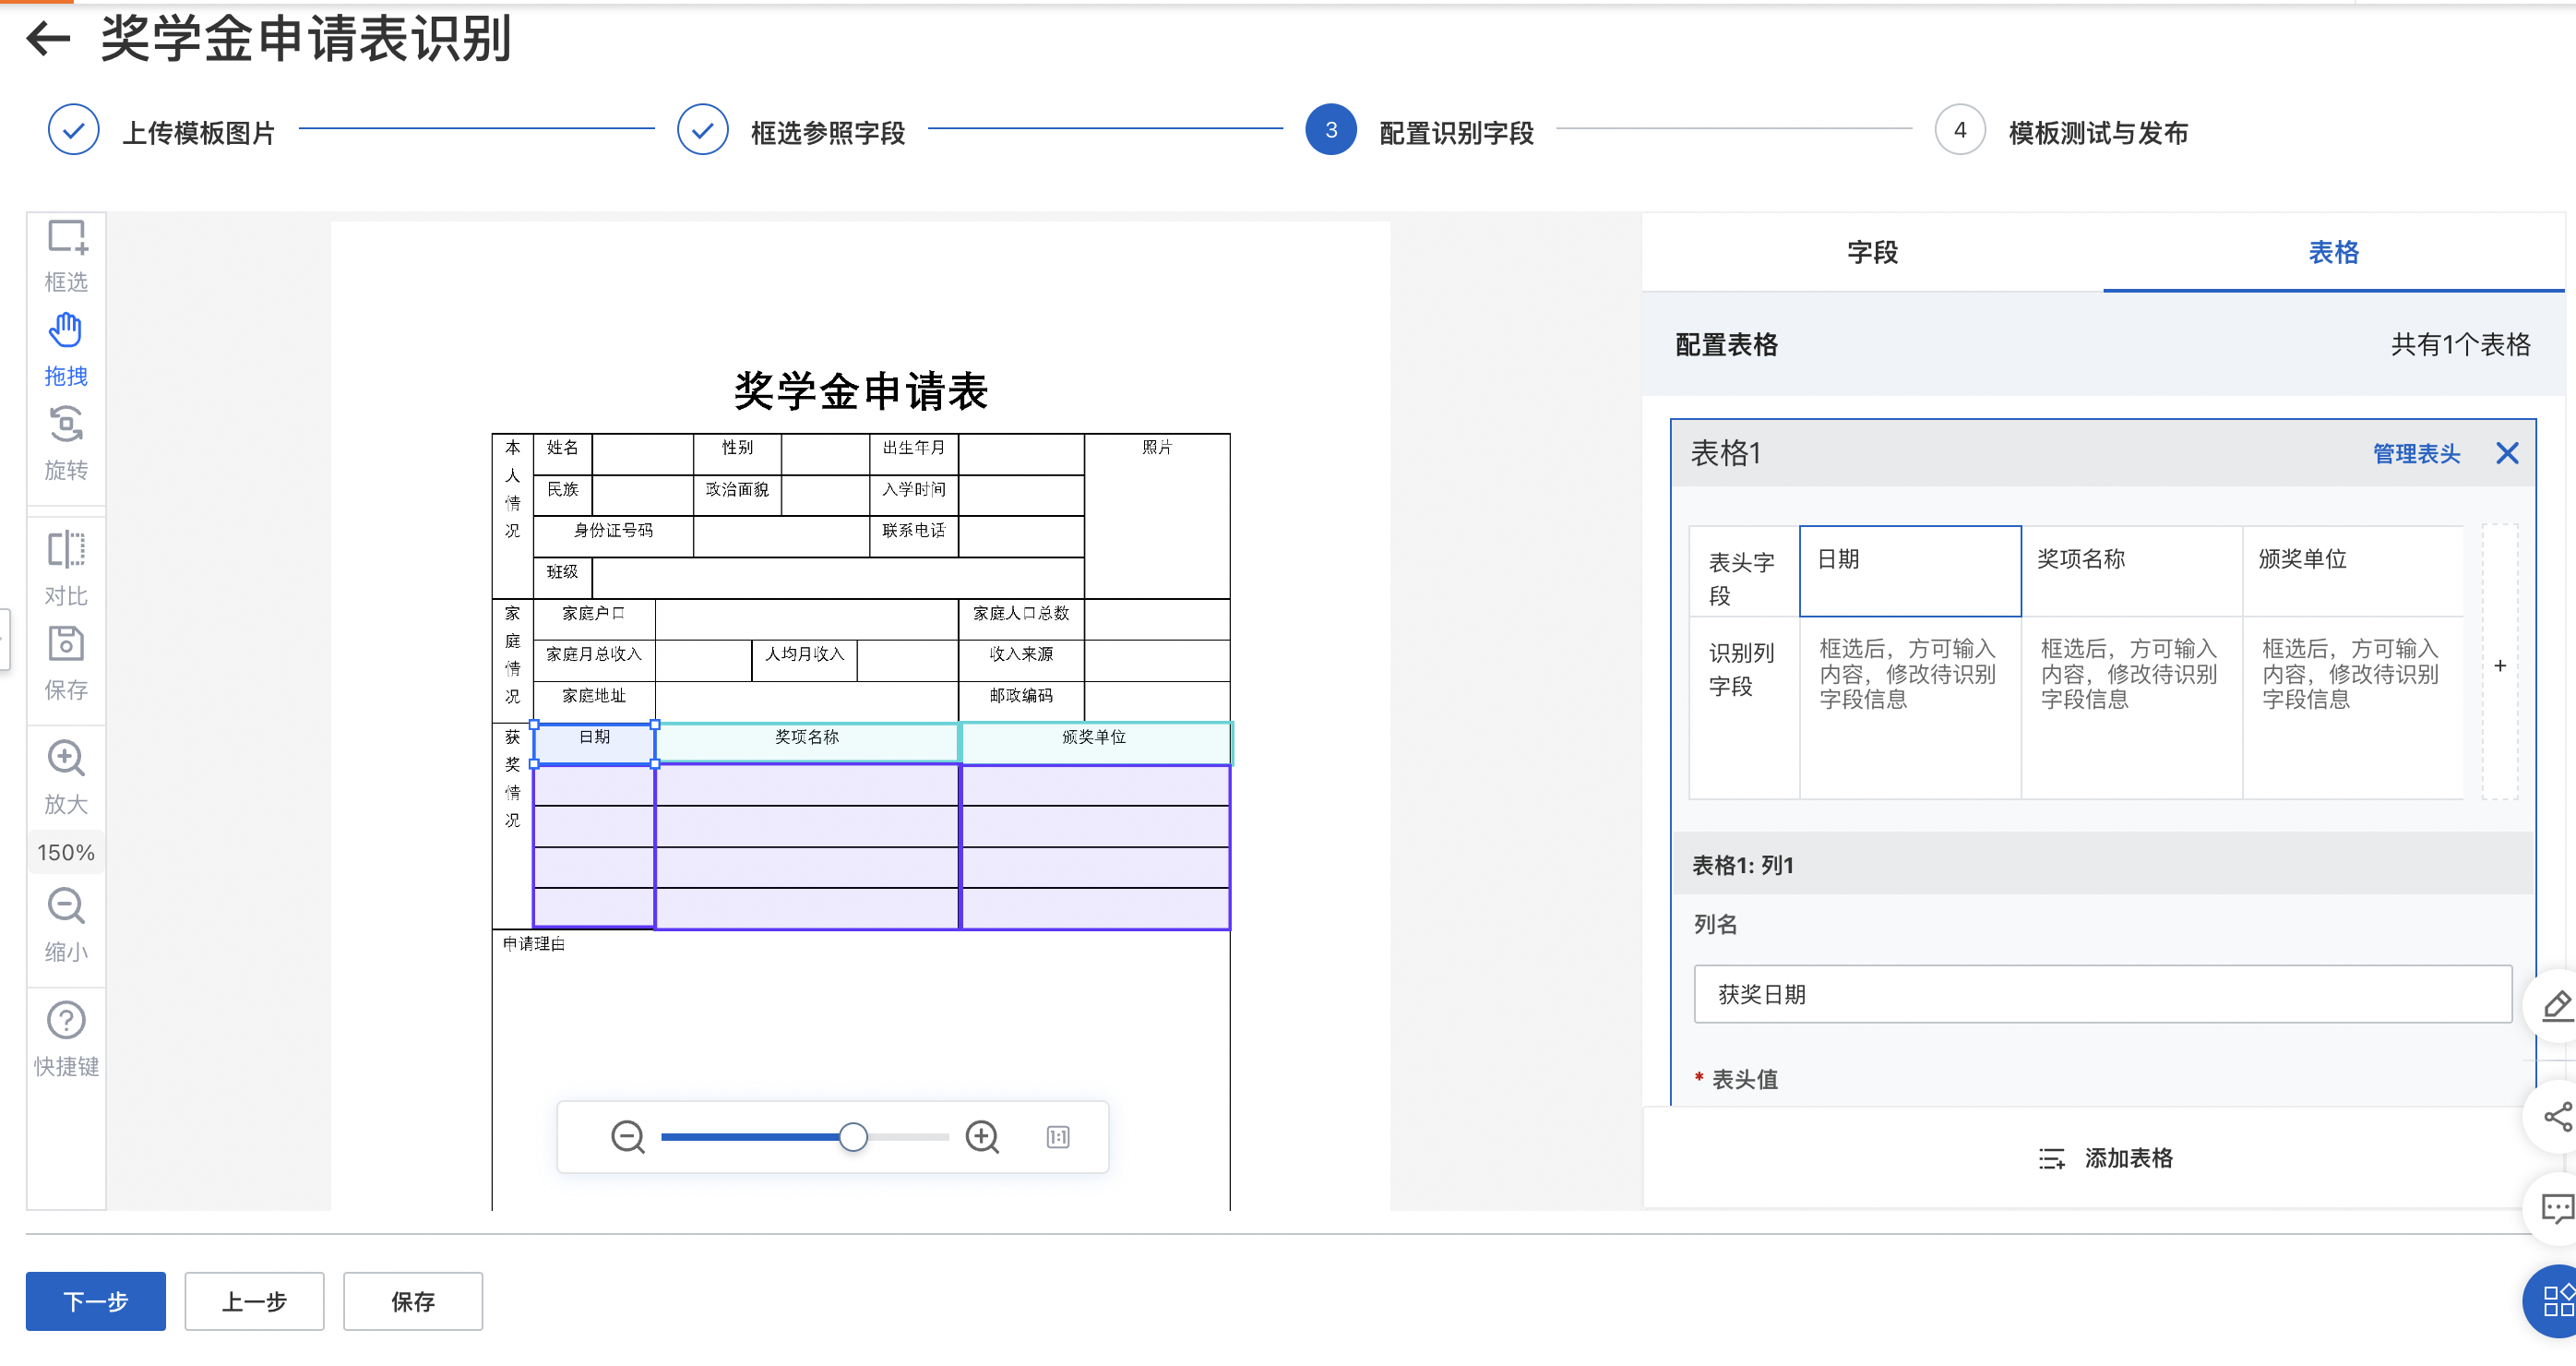
Recognition field: A recognition field is a cell in the image that needs to be recognized. This is the information that you want to use in your business and is used to output structured results. Each recognition field has required options, such as field name, value, and field type. Each table has required options, such as header fields, recognition column fields, column name, header value, and field type. The advanced configuration is an optional setting.
Field name: The external name of the recognition field. This is the corresponding name in the API operation and must be globally unique.
Value: The content of the recognition field. After you draw a box, the content is automatically recognized and filled in. If you have post-processing requirements for specific fields, such as date normalization, extracting only numbers from amounts, or replacing symbols with regular expressions, you can use field types and advanced configurations. These settings take effect when the API is called.
Column name: The external name of a column in a list-type table, which is the corresponding name in the API operation. Click a header field to set it. The column name must be globally unique.
Header value: The content of the recognition field. After you draw a box, the content is automatically recognized and filled in. If you have post-processing requirements for specific fields, such as date normalization, extracting only numbers from amounts, or replacing symbols with regular expressions, you can use field types and advanced configurations. These settings take effect when the API is called.
Step 4: Test and publish the template
After you select all reference and recognition fields, you can test and publish the template. Click Upload file to upload an image with the same layout to test the template's performance. If you are satisfied with the results, you can publish the template and start making API calls.
Template optimization suggestions
-
What should I do if the test result shows that the image does not match the template?
Confirm that the uploaded test image has the same layout as the template image.
Adjust the selection area of the reference fields or choose different reference fields to improve the template matching accuracy.
-
What should I do if the recognition result is incomplete?
Adjust the selection area for the recognition field. The box should cover the largest possible area where the text of the field might appear to resolve this issue.
Check whether the table borders in the test image are complete.
Check the selected field type. For example, if a number is recognized as a letter, you can adjust the field type for that recognition field.
Check the advanced configuration for the field.
-
What should I do if a recognition field is incorrect in the test results?
Check the selected field type. For example, changing the type from regular to number can lead to more accurate field recognition.
Check whether the selection box for the recognition field aligns with the table cell area.
Check the advanced configuration for the field.
-
What should I do if the selection box is offset in the test results?
Check whether the selection of reference or recognition fields meets the requirements.
Check whether the template image meets the requirements.
Template management
After the template is published, you can click the project details to go to the project overview. On the project overview page, you can view basic template information, template details, and call data. Published templates can be used through API calls and online use.
Note:
You must activate the custom table template service before you can make calls to a published template. Call data is available on the details dashboard. Both API calls and online use are billed. For more information about product billing, see the Billing overview document.
After a template is published, you can use the service through online use or API calls.