Table Information Extraction
Overview
-
Table Information Extraction is a deep learning-based task for creating self-learning models that extract information. It is highly effective for data with relatively fixed layouts, such as tables and forms.
-
A model tuned on a training set of over 100 high-quality, annotated samples can achieve an accuracy of over 95%.
-
The Toolbox also provides a Classifier Management tool and a Field Type Management tool, allowing users to perform automatic classification, routing, and high-precision recognition of different data types through a single interface.
Benefits
-
High accuracy: Built on powerful Alibaba Cloud pre-trained models, a fine-tuned model can achieve over 95% recognition accuracy, even with varied layouts.
-
Few-shot learning: You can train and iterate on the model with a small amount of labeled data, and it will generalize well to unseen data.
-
Low barrier to entry: No code required. The service is ready to use out-of-the-box and features an intuitive interface for configuring custom rules.
-
High efficiency: Smart pre-annotation and collaborative annotation features significantly reduce data labeling time.
Use cases
-
Supports both list-based tables and key-value (KV) tables. It is ideal for images or single-page PDF files that require structured information extraction, and works with ruled, semi-bordered, and borderless tables that have a limited number of layout variations.
-
This service is suitable for scenarios that require continuous model optimization with large datasets.
Related links
-
OCR Self-learning: console portal
-
Table Information Extraction model task development guide: Online debugging, API reference, SDK documentation
Procedure
Watch the "Table Information Extraction Onboarding" video for a tutorial:
The workflow for creating a Table Information Extraction task is shown in the figure below. You need at least 20 training samples to start model training.
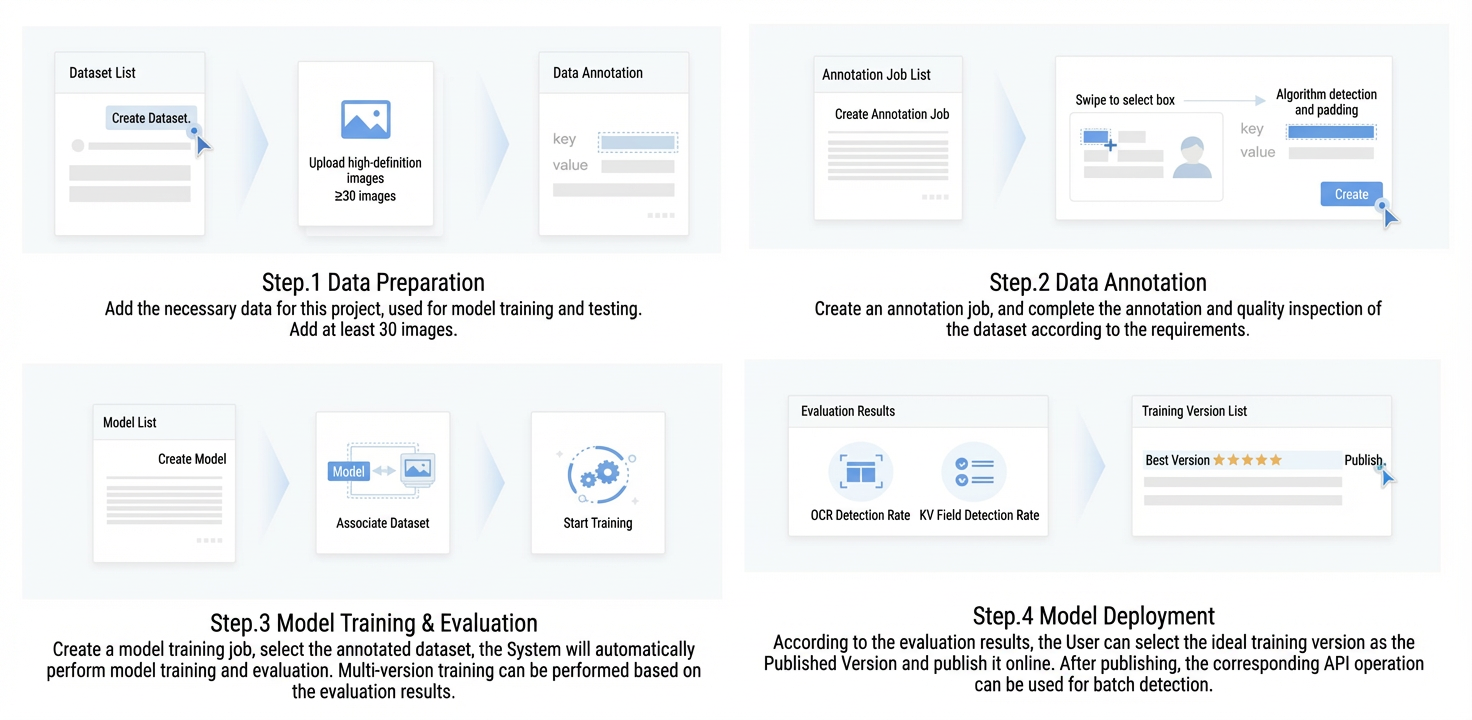
Step 1: Prepare data
In your Table Information Extraction project, go to Data Center > Dataset to upload and manage data for your model tasks. Click Add Dataset, enter a Dataset Name, and upload your relevant business data in table format.
A custom Table Information Extraction model requires at least 20 training data samples to achieve good recognition and extraction performance.
Step 2: Annotate data
Data Annotation involves three main stages: creating an annotation task, annotating the data, and quality inspection.
Create an annotation task
On the Data Center > Annotation Task page, click Create Annotation Task. On the creation page, enter a Task Name and select a dataset to annotate or upload data from your local machine under Upload Data. After you are finished, proceed to Item Settings.
pre-annotation: If you enable OCR pre-annotation, the system automatically recognizes the text within a box after you draw it, improving annotation efficiency.
Item Library: For this task, you can select existing items from the Item Library. This helps you reuse annotation items across different tasks, which saves time and reduces configuration errors.
Field Name: This is the external name of the recognition field and corresponds to the field name in the API. Field names must be globally unique.
Field Type: Defines the attribute of a field. Choosing the correct field type can improve the end-to-end recognition performance. You can select from general field types or add your own custom ones. If no post-processing is needed, select a general field type.
Annotate
Go to the Data Center > Annotation Task page, select your newly created annotation task, and click Annotate. This opens the Data Annotation interface. Use the Box Selection tool from the toolbar to either Select Item or Create Table. After you have annotated all fields on all images, click Submit Task to complete this stage.
The quality of your annotated data, including both the text content and its location, directly affects the model training performance and evaluation metrics.
You can skip any images that are corrupted or cannot be annotated.
Quality inspection: Go to the Data Center > Annotation Task page, select a completed task, and click quality check to enter the quality inspection interface. You need to verify that all images and their fields are annotated correctly. If there are errors, you can make changes or click reject. If everything is correct, click Submit to complete the quality inspection.
The top of the quality inspection interface shows the review progress (for example, "Checking 1/5"), the number of errors, and the accuracy rate. The right-side panel displays specific error reasons, such as Not filled. You can click Mark as Corrected to resolve an issue. The bottom of the interface provides Annotation History, Cancel Error Mark, and Next Item buttons to help you process each item.
Step 3: Train and evaluate the model
Go to the Model Center and click Create Model. Select the annotated datasets for your training and test sets, and fill in the basic information. After you create the model, model training starts automatically.
Training set: This is the data source used to train the model. You can only use annotated and quality-inspected datasets as a training set, and a dataset selected as a test set cannot also be used as a training set. We recommend using at least 20 valid data samples for model training.
Test set: This is the data source used to test the model. You can only use annotated and quality-inspected datasets as a test set, and a dataset selected as a training set cannot also be used as a test set.
If you enable this option, the system automatically reserves 1/10 of the training set for testing, so you do not need to provide a separate test set. Any manually uploaded test set will be ignored.
In the Table tab on the right side of the model training configuration page, you can view the configured table records. Each record shows the table name and the field type for each column, such as General or Alphanumeric. You can use the edit or delete actions to adjust the table configuration.
The model training fee and estimated duration vary based on the task type and data volume. The exact values are displayed on the interface. For more information, see OCR Self-learning billing.
Training duration: The time required for training depends on several factors, including data volume, annotation quality, and machine resources. For example, on a V100 machine, training on 20 images takes about 1 hour, while 200 images take about 2 hours.
After the model is created, you can view its basic information on the Model Details page, including version number, model ID, pre-trained model name, and the number of valid samples in the training and test sets. In the Field Information section, you can see a table preview on the left. On the right, use the Field and Table tabs to view the field type configuration for each column, such as 'General' and 'Alphanumeric'.
After model training is complete, the top of the Model Version page displays the training duration, start and end times, status, and Service Parameter Configuration. This configuration includes inference hardware, inference time, maximum training duration, and compute specification.
Algorithm evaluation metrics: Metrics are provided for three dimensions: overall, field, and table.
Overall metrics
-
Accuracy: The average accuracy of the algorithm model, not corrected by post-processing rules. It is the ratio of correctly predicted bounding boxes (content and position) to the total number of bounding boxes in the test set.
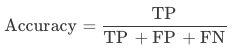
-
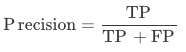
Precision: The average precision of the algorithm model, not corrected by post-processing rules. It is the ratio of true positives to all positive predictions. In other words, it measures what proportion of the fields identified by the model match the ground truth annotation (content and position).
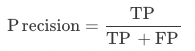
-
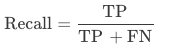
Recall: The average recall of the algorithm model, not corrected by post-processing rules. It is the ratio of true positives to all actual positives in the data. In other words, it measures what proportion of the ground truth annotation boxes (content and position) in the test set were correctly identified.
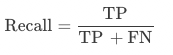
Field metrics
-
Precision: The per-field precision of the algorithm model, not corrected by post-processing rules. For a specific field, this is the probability that a positive prediction is a true positive. It measures the proportion of identified instances of this field that match the ground truth annotation (content and position).
-
Recall: The per-field recall of the algorithm model, not corrected by post-processing rules. For a specific field, this is the probability that an actual positive is correctly identified. It measures the proportion of all ground truth annotations for this field that were correctly identified (content and position).

-
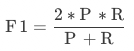
F1-score: A comprehensive evaluation metric (F1-score). It is the harmonic mean of precision and recall and is often used to evaluate the performance of classification models.
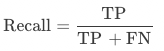
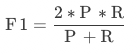
Table metrics
-
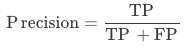
Precision: The per-field-type precision for tables, not corrected by post-processing rules. This measures the proportion of correctly predicted fields of a certain type within a table compared to all predicted instances of that field type (content and position).
-
Recall: The per-field-type recall for tables, not corrected by post-processing rules. This measures the proportion of correctly identified fields of a certain type within a table compared to all actual instances of that field type (content and position).
-
F1-score: A comprehensive evaluation metric (F1-score). It is the harmonic mean of precision and recall and is often used to evaluate the performance of classification models.
Step 4: Deploy the model
After model training is complete, go to Model Center > Model Details and click the deploy button to deploy the model. Deployment takes some time. Once successful, you can test the model's performance visually using the online experience or call the service directly via its API.
After you publish and deploy the model service, you can refer to the API reference documentation to use the service. You can also go to the Try Online interface to test the model's performance.
As of August 23, 2023, OCR Self-learning is fully commercialized. Model training is billed by duration, and model inference is billed by the number of calls. For details, see OCR Self-learning billing.
Item library
In the Item Settings stage, the Item Library lets you pre-define and reuse annotation items across multiple tasks. This reduces manual effort and configuration errors.
Modifying the Item Library does not affect any annotation tasks or models that have already been created.