This guide walks you through the end-to-end setup of an OpenSearch Vector Search Edition instance: from purchasing an instance to running your first vector query.
Prerequisites
Before you begin, ensure that you have:
Purchased an OpenSearch Vector Search Edition instance. For details, see Purchase an OpenSearch Vector Search Edition instance
Prepared a data source: MaxCompute, API, or Object Storage Service (OSS)
How it works
After purchase, your instance enters the Pending Configuration state. The system automatically deploys an empty instance based on the number and specifications of Query Result Searcher (QRS) workers and Searcher workers you selected. The instance is not ready for search queries until you complete the following steps:
Configure a table
Add a data source
Configure fields
Configure the index schema
Confirm creation and trigger reindexing
Configure an instance
Step 1: Configure the basic table information
On the instance details page, click Table Management in the left-side pane.
Click Add Table.
In the Basic Table Information step of the Create wizard, configure the following parameters, then click Next.

| Parameter | Description |
|---|---|
| Table Name | A custom name for the table. |
| Data Shards | The number of data shards in the table. If you create multiple index tables in an instance, all tables must have the same shard count—or at least one table must have one shard and all others must share the same count. |
| Number of Resources for Data Updates | The number of resources used for data updates. Each instance includes a free quota of two resources per data source. Each resource provides 4 CPU cores and 8 GB of memory. Resources beyond the free quota are charged. For pricing details, see Billing overview of OpenSearch Vector Search Edition. |
| Scenario Template | The template used to create the table. Options: Common Template, Vector: Image Search, and Vector: Semantic Search for Text. |
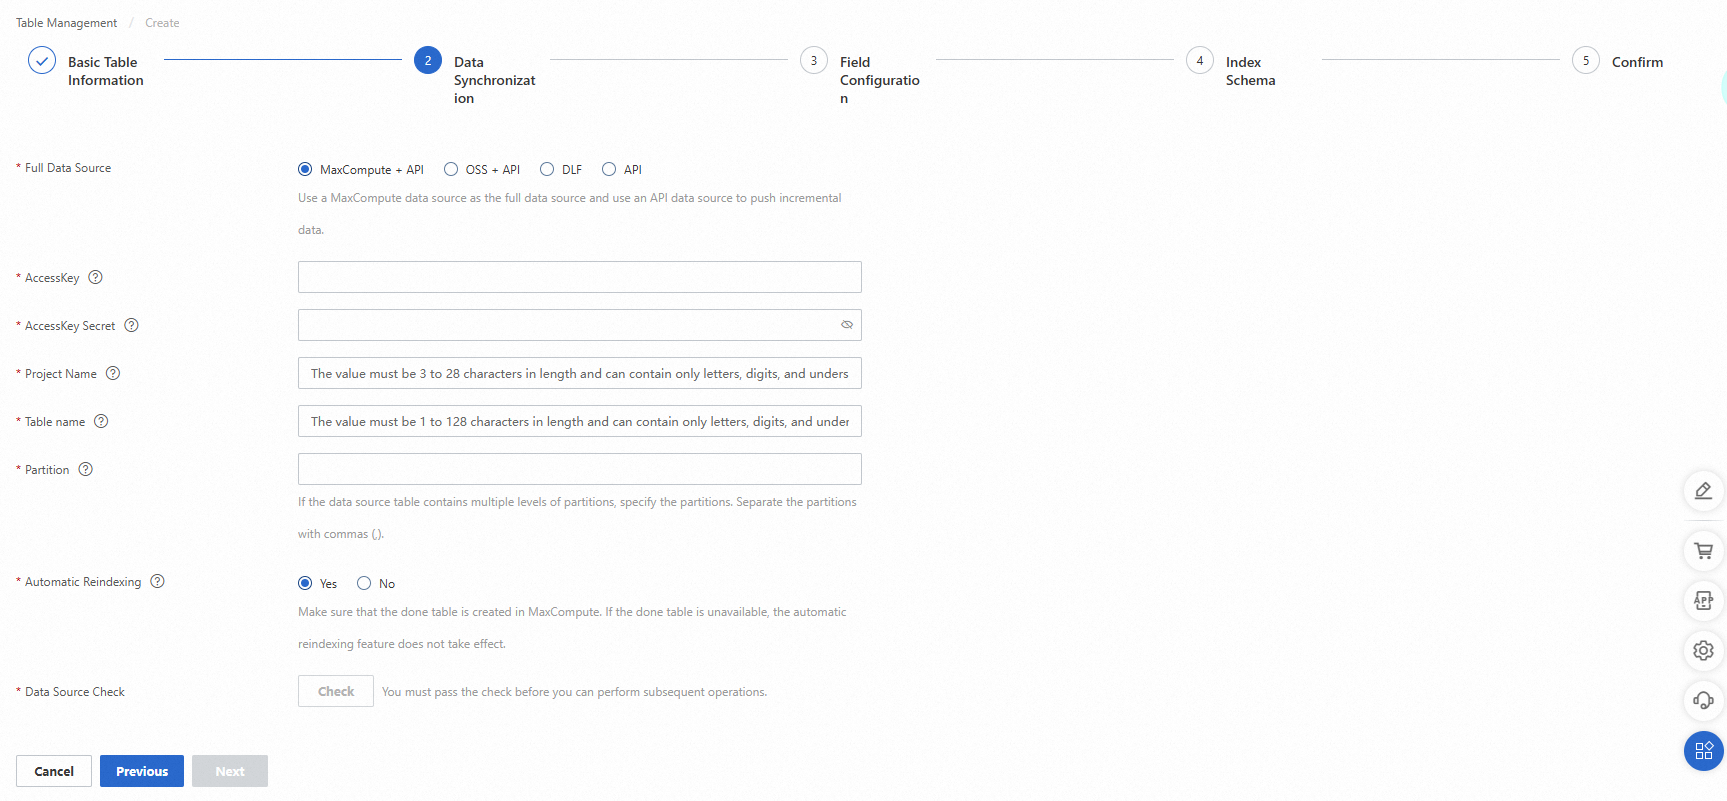
Step 2: Add a data source
In the Data Synchronization step, add a data source. OpenSearch supports MaxCompute, API, and OSS data sources.
The following example uses MaxCompute + API as the Full Data Source:
Configure the Project, AccessKey, AccessKey Secret, Table, and Partition Key parameters.
Set Automatic Reindexing to Yes or No.
Click Check. If the check passes, click Next.
For detailed setup instructions by data source type:
Step 3: Configure fields
OpenSearch automatically provides preset fields based on the Scenario Template you selected and imports all fields from your data source.
In the Field Configuration step, configure at least two required fields: a primary key field and a vector field.
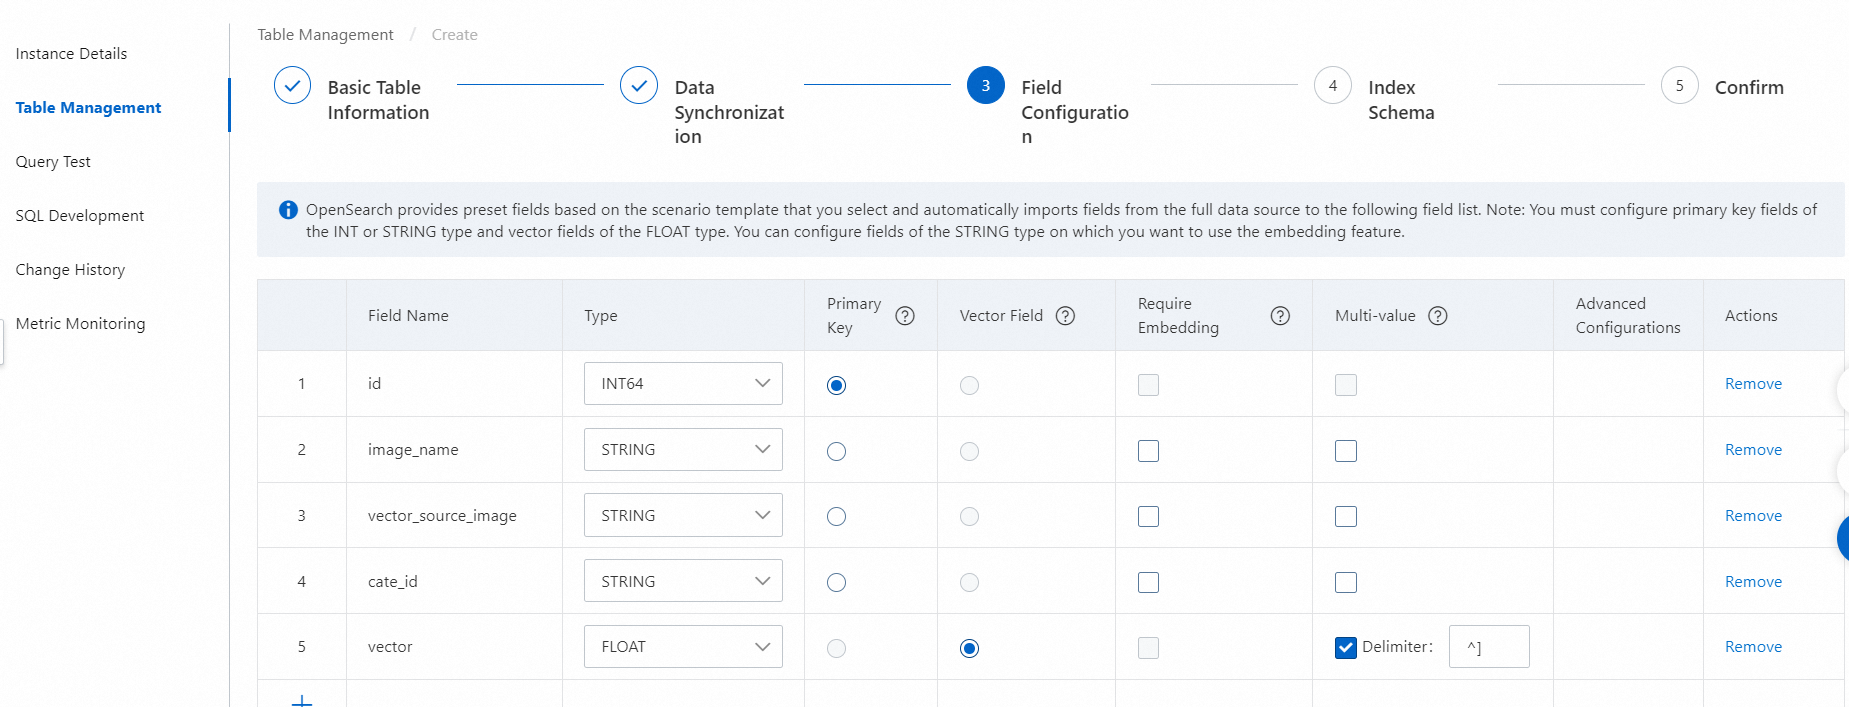
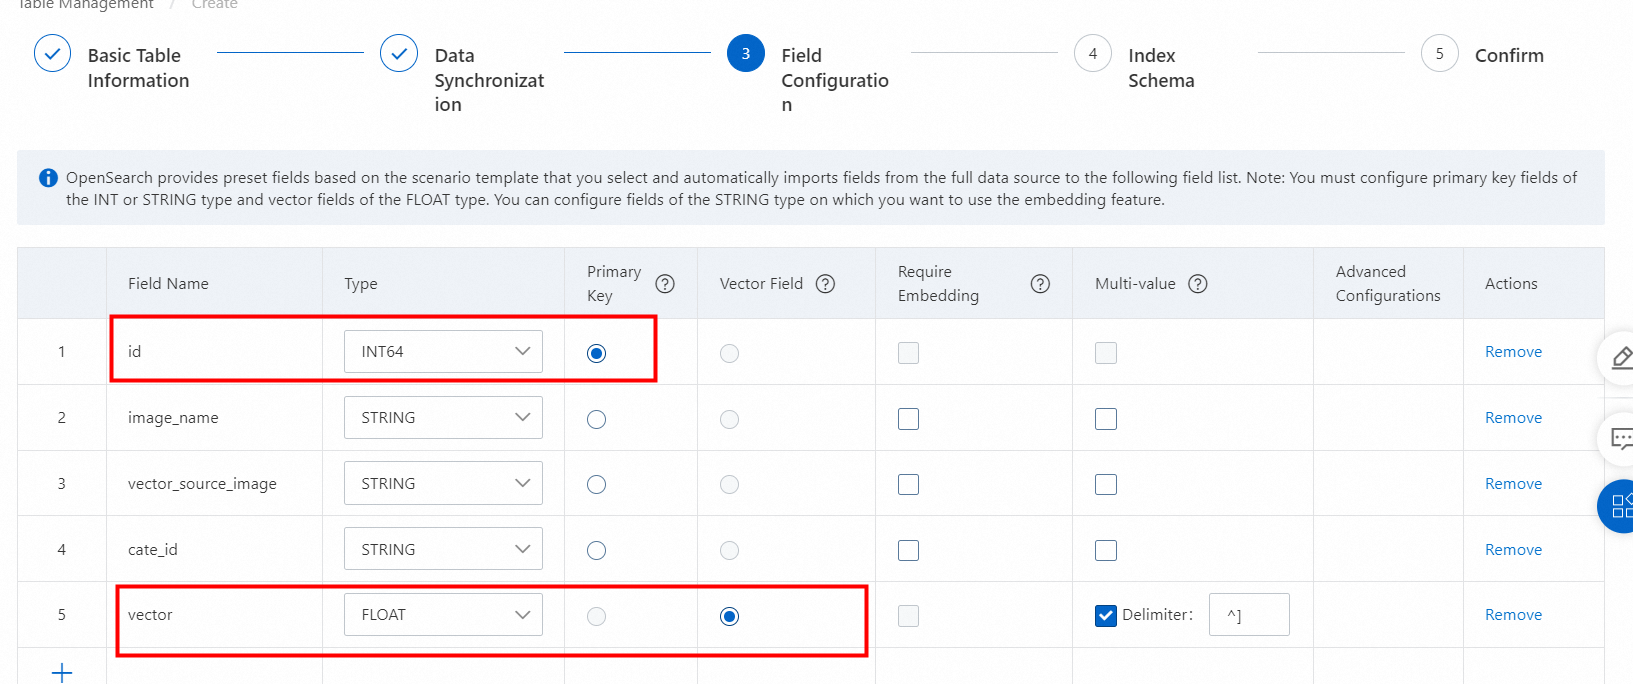
Field requirements:
Primary key field: Set Type to INT or STRING and select the option in the Primary Key column.
Vector field: Set Type to FLOAT and select the checkbox in the Vector Field column. The vector field is a multi-value field by default, with values separated by HA3 delimiters (
^], encoded as\x1Din UTF format). Custom delimiters are supported.Category field (optional): Add a category field between the primary key field and the vector field to build a vector index organized by category.
When configuring a vector index, specify fields in this order: primary key field → namespace field (optional) → vector field.
The namespace field type is constrained by engine version. For engine version
vector_service_1.0.2 or earlier, the namespace field cannot be of the STRING type. For later versions, no type restriction applies.
Step 4: Configure the index schema
OpenSearch automatically creates indexes for the primary key field and vector field, using the field names as index names.
In the Index Schema step, configure the vector index:
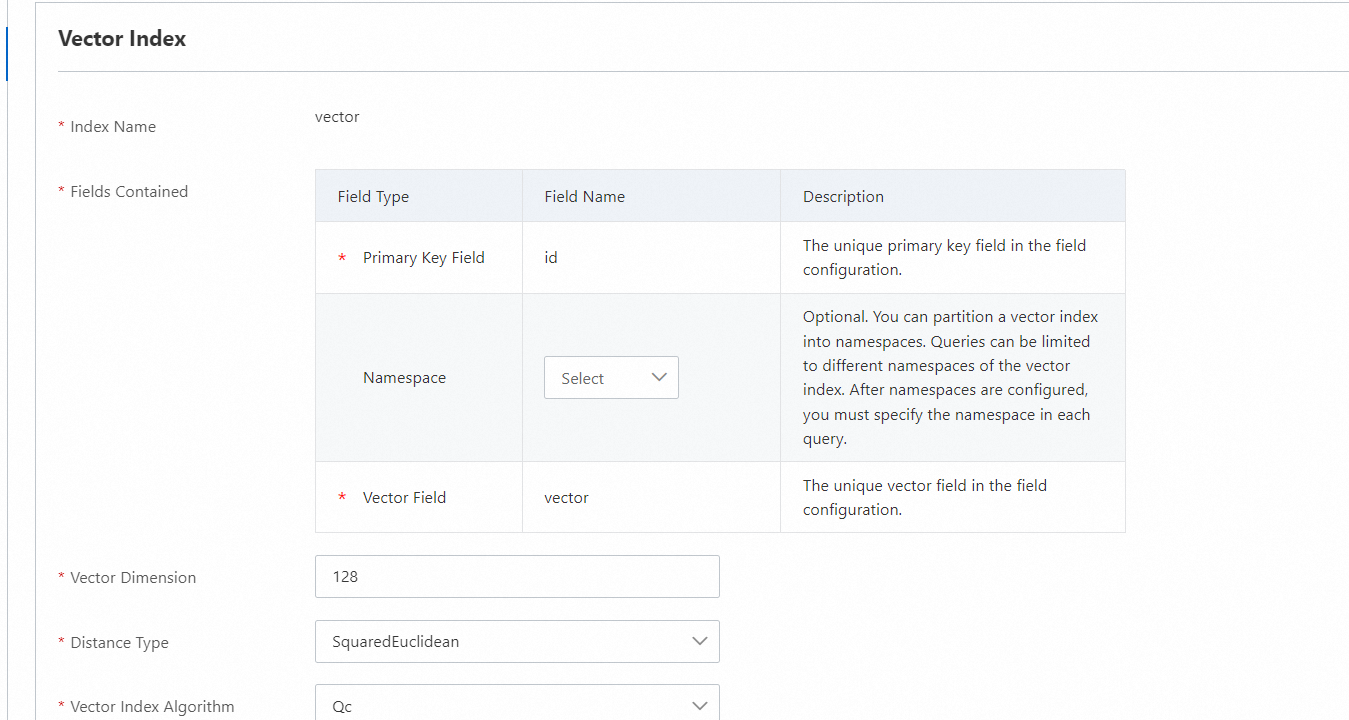
The Fields Contained parameter supports only three fixed fields and cannot be extended.
Separately configure the advanced configurations for the vector index. For details, see Common configurations of vector indexes.
If you have no special requirements, click Next to proceed with the auto-configured defaults.
Step 5: Confirm creation
In the Confirm step, review your configuration and click Confirm.
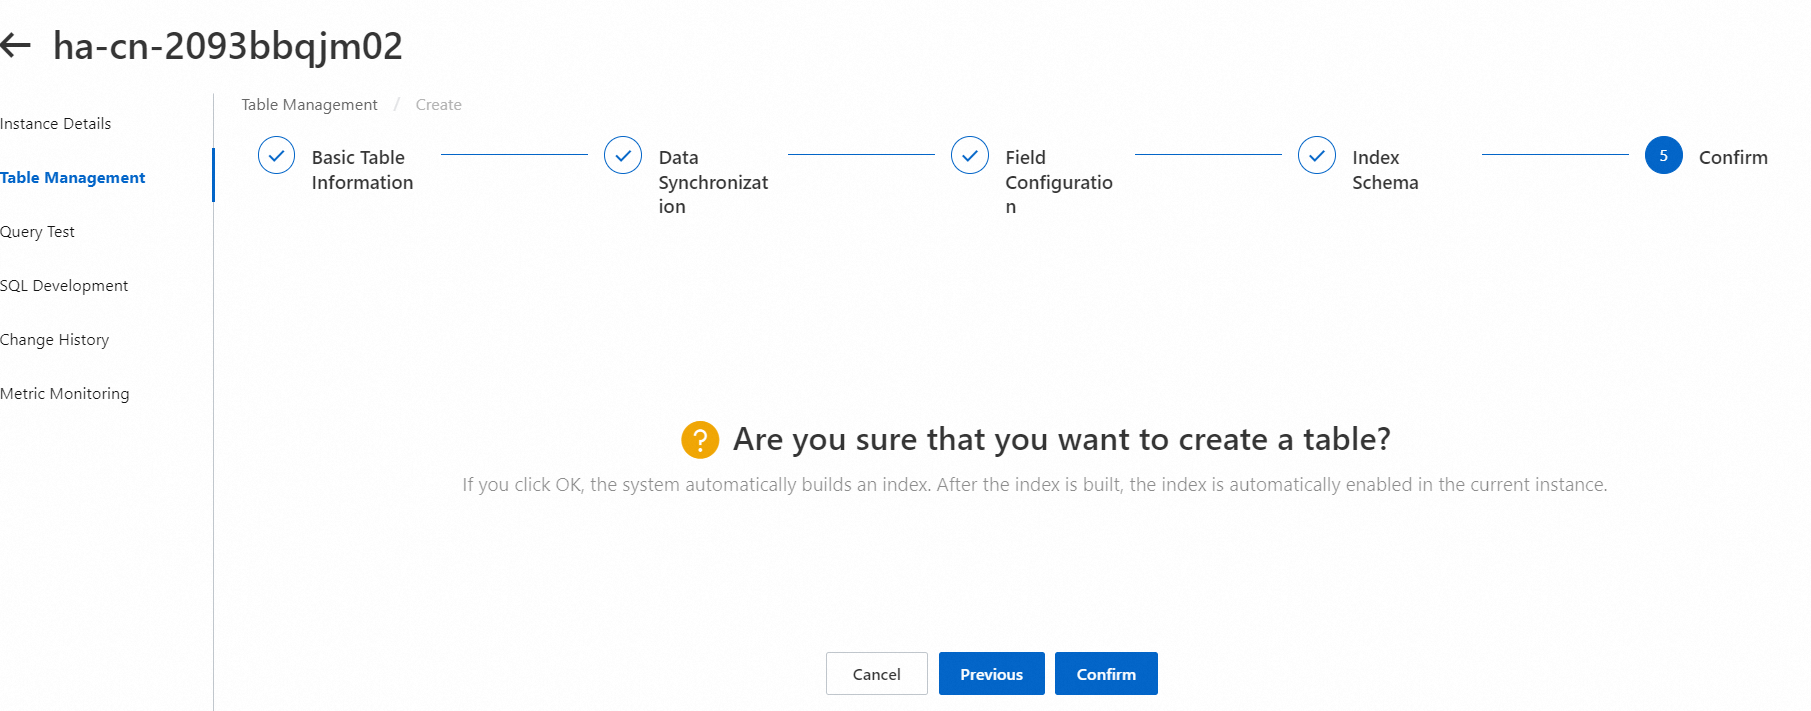

Step 6: Verify progress in change history
In the left-side pane, click Change History. On the Data Source Changes tab, you can track all finite-state machines (FSMs) associated with table creation, index creation, and full-data reindexing.
When all FSMs reach the completed state, the search engine is ready and you can run query tests.
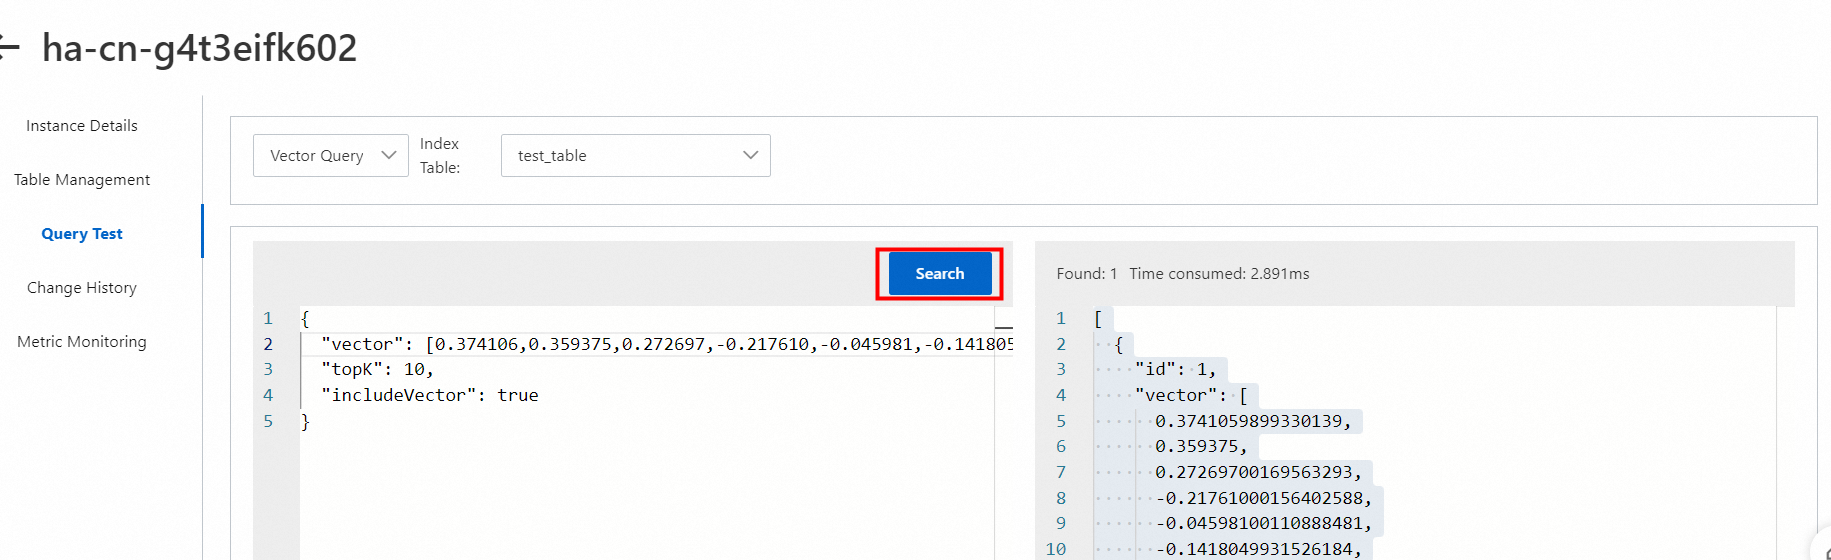
Step 7: Run a query test
To test your instance, send a vector query. In production, vectors are typically generated by embedding models from text or image inputs. The sample below uses a pre-computed 128-dimensional float vector.
Use the following sample query:
{
  "vector": [0.0019676427,0.005902928,0.021644069,0.21644068,0.12199384,0.043288138,0.007870571,0.0,0.08460863,0.041320495,0.043288138,0.035417568,0.011805856,0.055093993,0.12592913,0.017708784,0.021644069,0.0019676427,0.0,0.0,0.0019676427,0.078705706,0.1987319,0.041320495,0.039352853,0.0039352854,0.007870571,0.0039352854,0.0039352854,0.017708784,0.035417568,0.06886749,0.0019676427,0.0019676427,0.013773498,0.049191065,0.2125054,0.22824654,0.123961486,0.0039352854,0.0,0.0,0.021644069,0.14560555,0.078705706,0.1987319,0.22824654,0.005902928,0.064932205,0.0019676427,0.0019676427,0.021644069,0.027546996,0.035417568,0.22824654,0.22824654,0.1337997,0.023611711,0.009838213,0.007870571,0.0039352854,0.0039352854,0.017708784,0.20069954,0.033449925,0.005902928,0.019676426,0.035417568,0.015741142,0.029514639,0.13183205,0.123961486,0.029514639,0.0,0.027546996,0.22824654,0.15741141,0.0,0.0039352854,0.043288138,0.18889369,0.072802775,0.055093993,0.17315255,0.08460863,0.0019676427,0.007870571,0.035417568,0.22824654,0.10034977,0.009838213,0.021644069,0.062964566,0.027546996,0.015741142,0.04525578,0.086576276,0.033449925,0.023611711,0.017708784,0.0,0.0,0.03738521,0.072802775,0.16724962,0.035417568,0.031482283,0.20463483,0.043288138,0.011805856,0.0039352854,0.051158708,0.023611711,0.11412327,0.13183205,0.16134669,0.049191065,0.023611711,0.0039352854,0.0039352854,0.049191065,0.035417568,0.015741142,0.0039352854,0.03738521,0.08264099,0.094446845,0.021644069],
  "topK": 10,
  "includeVector": true
}| Field | Description |
|---|---|
vector |
The query vector. |
topK |
The number of top results to return. |
includeVector |
Whether to include vector data in the results. |
For more information about the query syntax, see the Query syntax reference section below.
Query syntax reference
What's next
Query data with the SDK: Run vector-based or primary key-based queries programmatically. See Query data.
Update data with the SDK: Upload or delete documents via the SDK. See Update Data.