Synchronize OpenLake-DLF data to Alibaba Cloud ES
To perform vector retrieval or build retrieval-augmented generation (RAG) applications in Elasticsearch (ES) with multimodal data from Data Lake Formation (DLF), you can use the multimodal data processing and synchronization feature. This feature offers a simple solution for data ingestion and processing. It automatically extracts text and image data from DLF, uses AI models to create vector embeddings, and synchronizes the structured results to ES. This process simplifies building AI applications, such as multimodal search and RAG.
Scope
Instance version: This feature is supported on Alibaba Cloud Elasticsearch 8.15 and later.
Region: The DLF and ES instances must be in the same region.
Synchronization mechanism
The sync task uses a full and incremental synchronization mechanism. After the task starts, it automatically reads Paimon format data from the source DLF table. It applies data transformation rules to create vector embeddings for text and images and converts the data to the ES index format. This process accelerates data retrieval from the data lake using ES.
Billing
The data synchronization task is free of charge. However, you are charged for the node storage space that is used after the data is synchronized to ES. Go to the Expenses and Costs center to view your billing details.
AI model call fees: The AI Search Open Platform provides the service for calling AI models during data transformation, such as text and image vectorization. You are billed based on the actual number of model calls. No charges are incurred if you do not use the service.
Create and configure a sync task
The following steps guide you through the process of creating a task and starting the synchronization.
Go to the sync task creation page
This step navigates you to the feature's entry point.
Log on to the Elasticsearch console. In the top menu bar, switch to the destination region.
Find the target instance and click its Cluster ID to go to the Basic Information page.
In the navigation pane, click .
In the Multimodal Data Processing Service section, select the Workspace Name of Model Service and click Initialize Model. When the initialization is complete, click Get Started.
Workspace Name of Model Service: An existing space in the AI Search Open Platform. `default` is the default space. Other spaces, if any, are created by users.
Initialize Model: Initialization makes the models in the selected space active.
On the sync task list page, click Create.
Configure basic information
In this step, you can configure the task name and establish a connection to the DLF data source. Configure the parameters in the Basic Information Configuration section.
Parameter
Description and suggestion
Task ID/Name
The name of the sync task. The name should be easy to identify.
API Key
You must create an API key in the AI Search Open Platform.
Data Source
Select Data Lake Formation (DLF).
Table Type
Data tables in the Paimon format are supported.
Data Catalog
Enter the information as needed.
Database
Data Table
RAM Role
Grant ES the AI Search Open Platform Default Role.
When you perform this operation, a service-linked role is automatically created to enable the feature.
Role name: AliyunServiceRoleForSearchPlat
Access policy: AliyunServiceRolePolicyForSearchPlat
Description: Allows the AI Search Open Platform service to access your resources.After you complete the configuration, click Next.

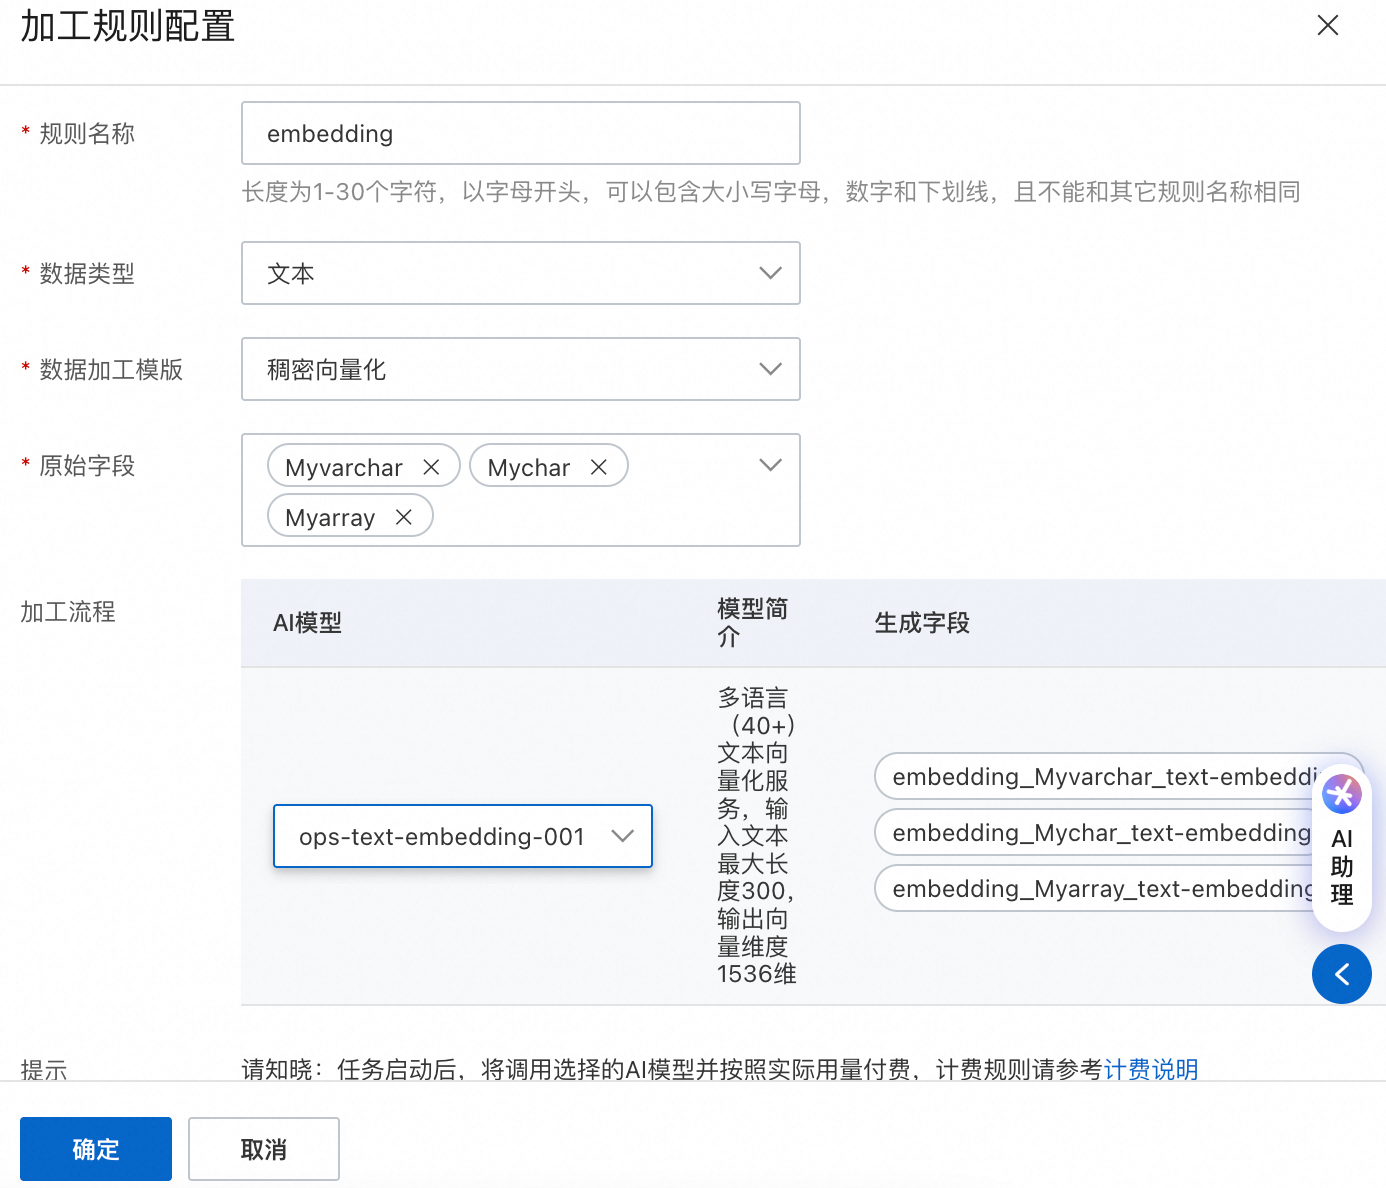
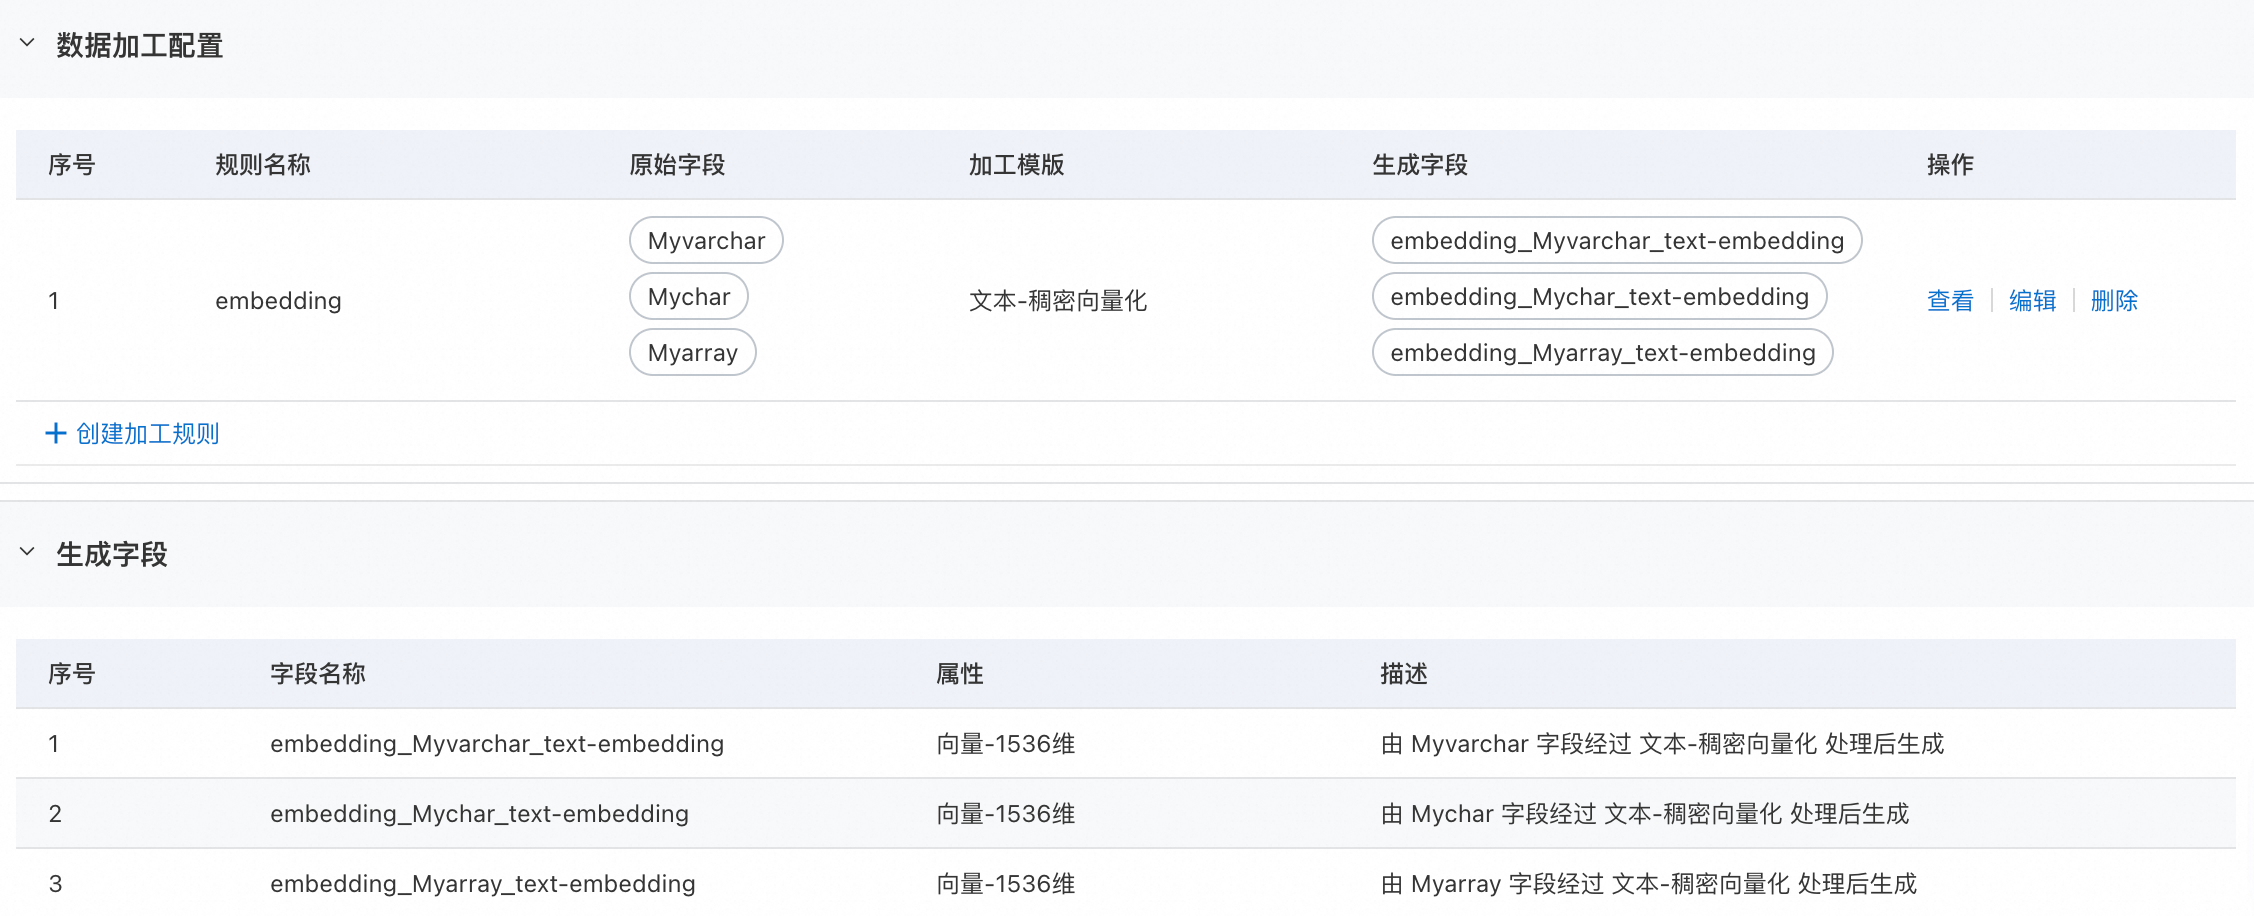
Configure data transformation
In the Original Field area, select the fields to synchronize to ES.
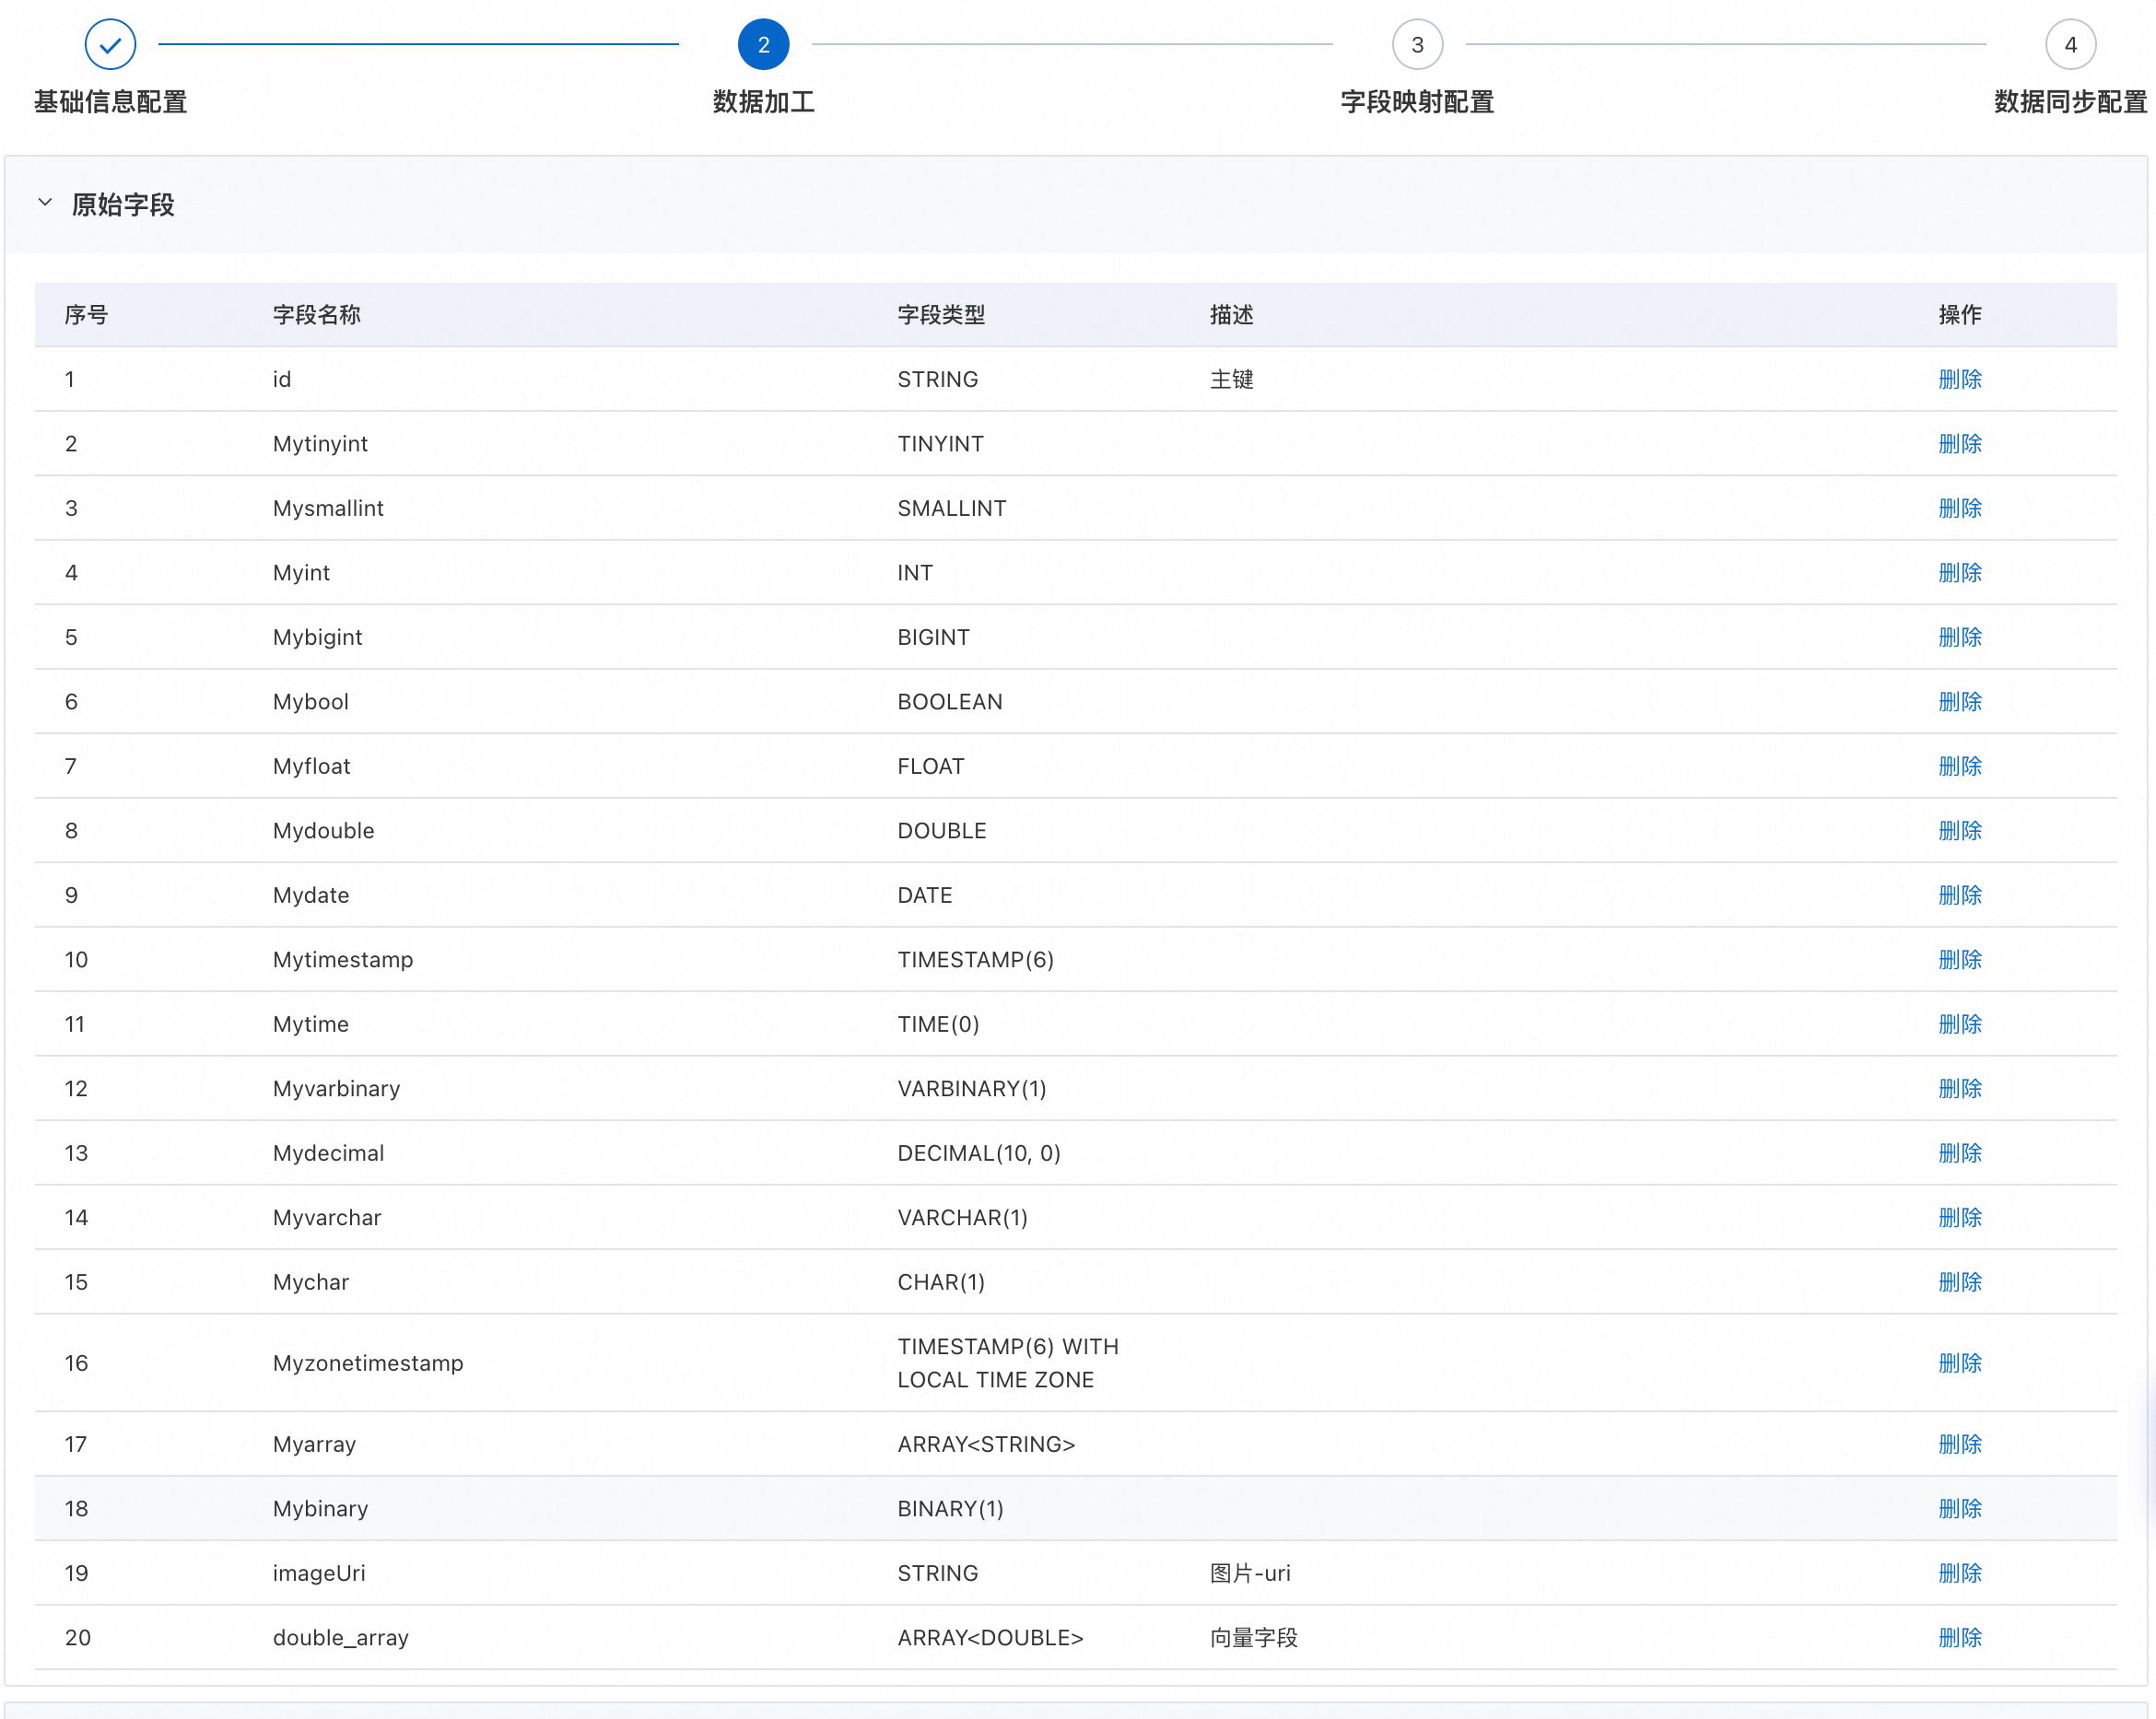
In the Data Processing Configurations area, select fields and configure transformation rules. For example, you can specify vector models for text and image fields. The system automatically generates vector data and synchronizes it to ES.
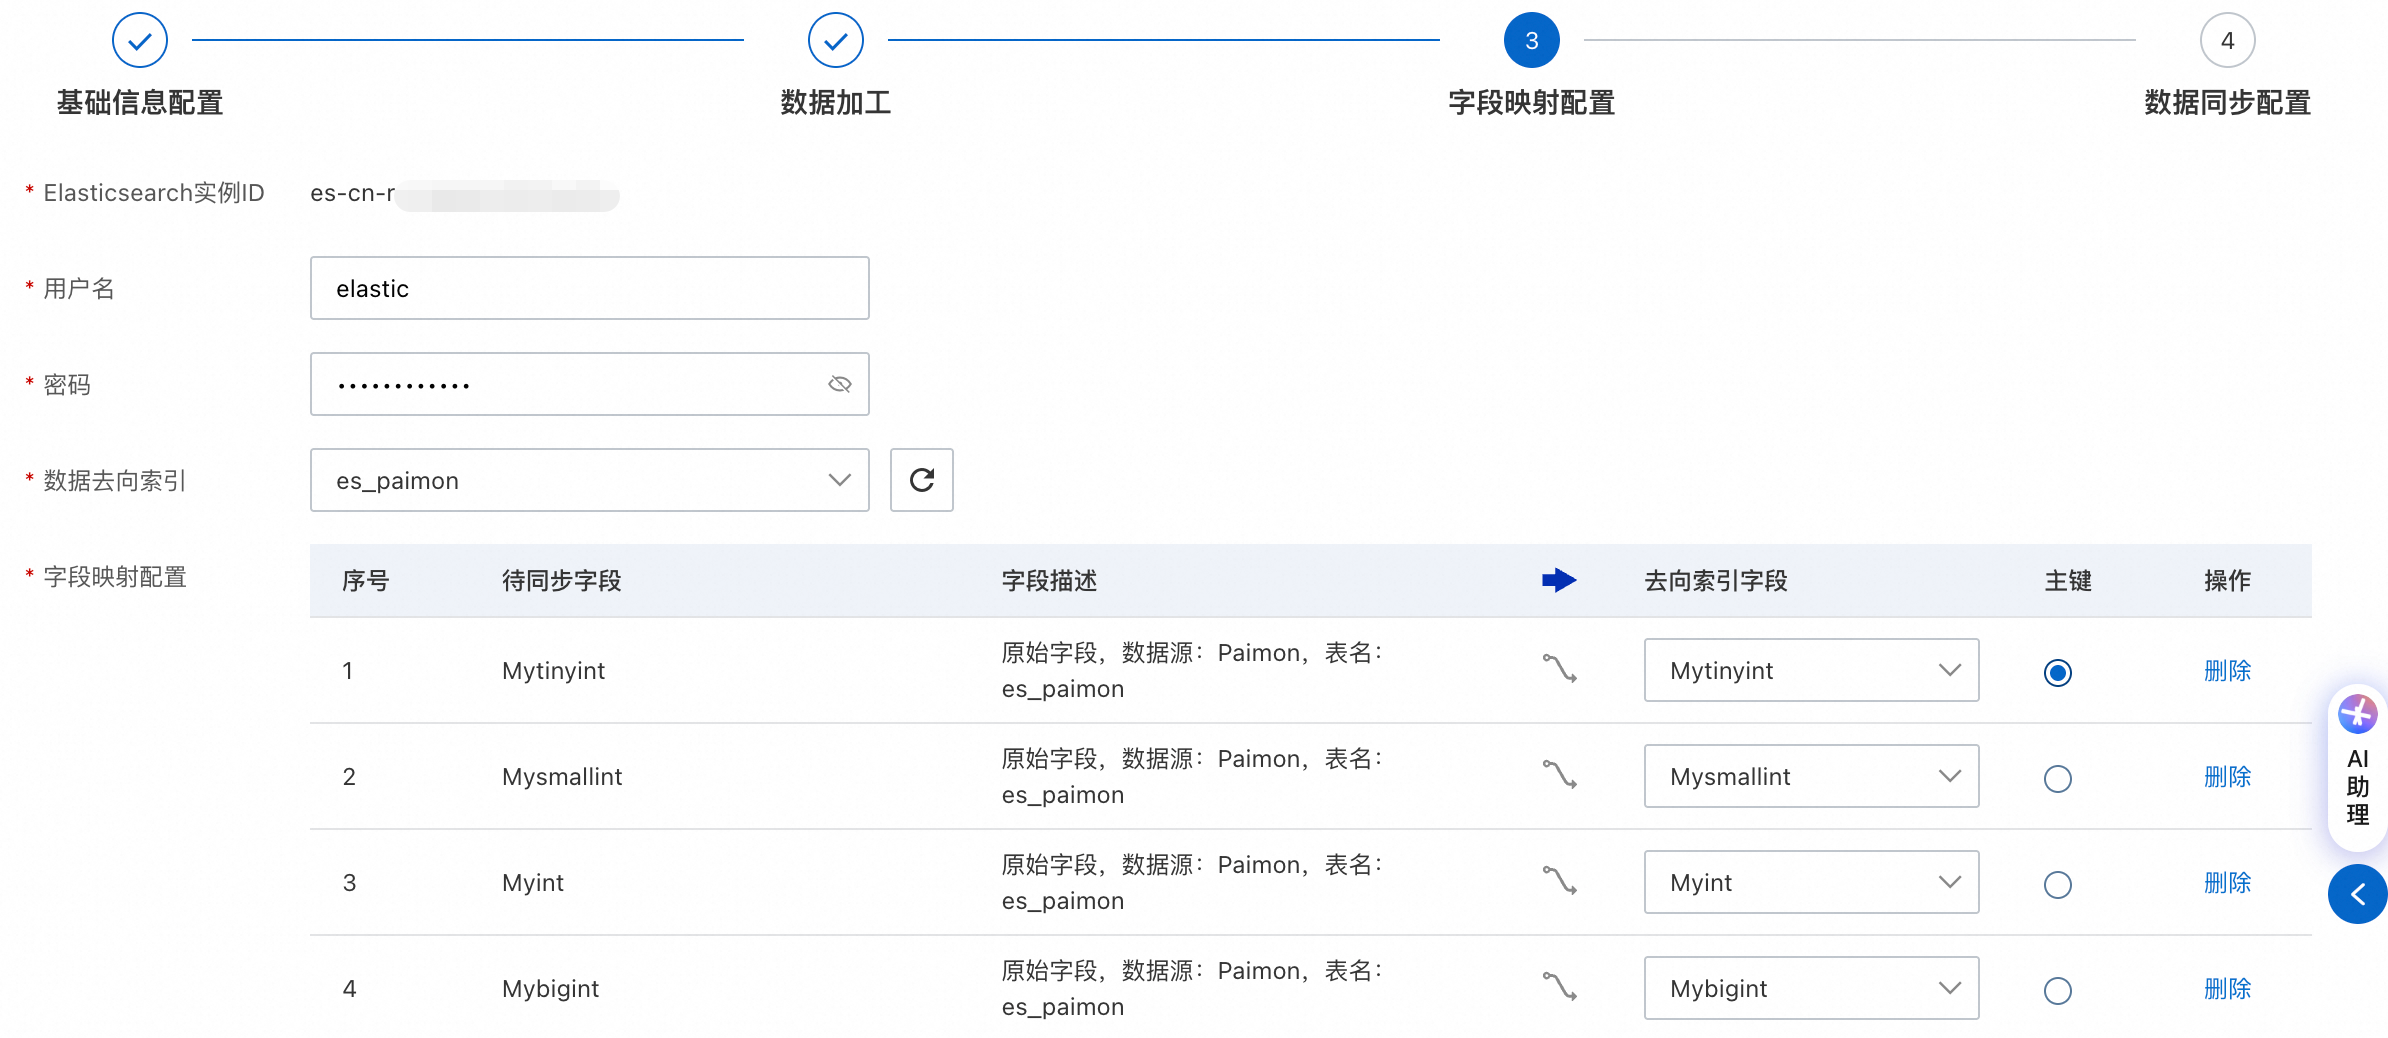
Configure field mapping
In this step, you can establish the mapping between the source fields and the fields in the target ES index.
ES information configuration: Enter the Username and Password to connect to ES, and select the Target Index.
ImportantThe system automatically loads all indexes in the current ES instance. If the target index does not appear in the Target Index drop-down list, you must manually create the index. For more information, see the following example.
PUT /your_index_name
{
  "settings": {
    "index": {
      "number_of_shards": 1,         // Number of primary shards
      "number_of_replicas": 1,       // Number of replicas for each primary shard
      "refresh_interval": "30s",     // Data refresh interval (search delay after write)
      "analysis": {                  // Analyzer configuration (example)
        "analyzer": {
          "default": {
            "type": "standard"
          }
        }
      }
    }
  },
  "mappings": {
    "properties": {
      "id": {
        "type": "keyword"
      },
      "name": {
        "type": "text",
        "fields": {
          "keyword": {
            "type": "keyword",
            "ignore_above": 256
          }
        }
      },
      "url": {
        "type": "keyword"
      },
      "source": {
        "type": "keyword"
      },
      "embedding": {
        "type": "dense_vector",
        "dims": 768
      }
    }
  }
}
On the Field Mapping Configuration tab, configure the following:
Configure the field mapping relationship
The system automatically matches fields that have the same name. You can also adjust the mappings manually.
Fields to Sync: The original fields from the data source that you want to synchronize.
Target Index Field: The target fields in the ES index that receive the data.
Primary Key: Select a field to serve as the unique identifier (
_id) for documents in ES.
Only a single primary key is supported. If your source table uses a composite primary key, you must create a new column in the source. Concatenate the composite primary key fields into a unique string ID in the new column. Then, you can use this column as the primary key for synchronization.
After you confirm that all fields to be synchronized are correctly mapped, click Next.
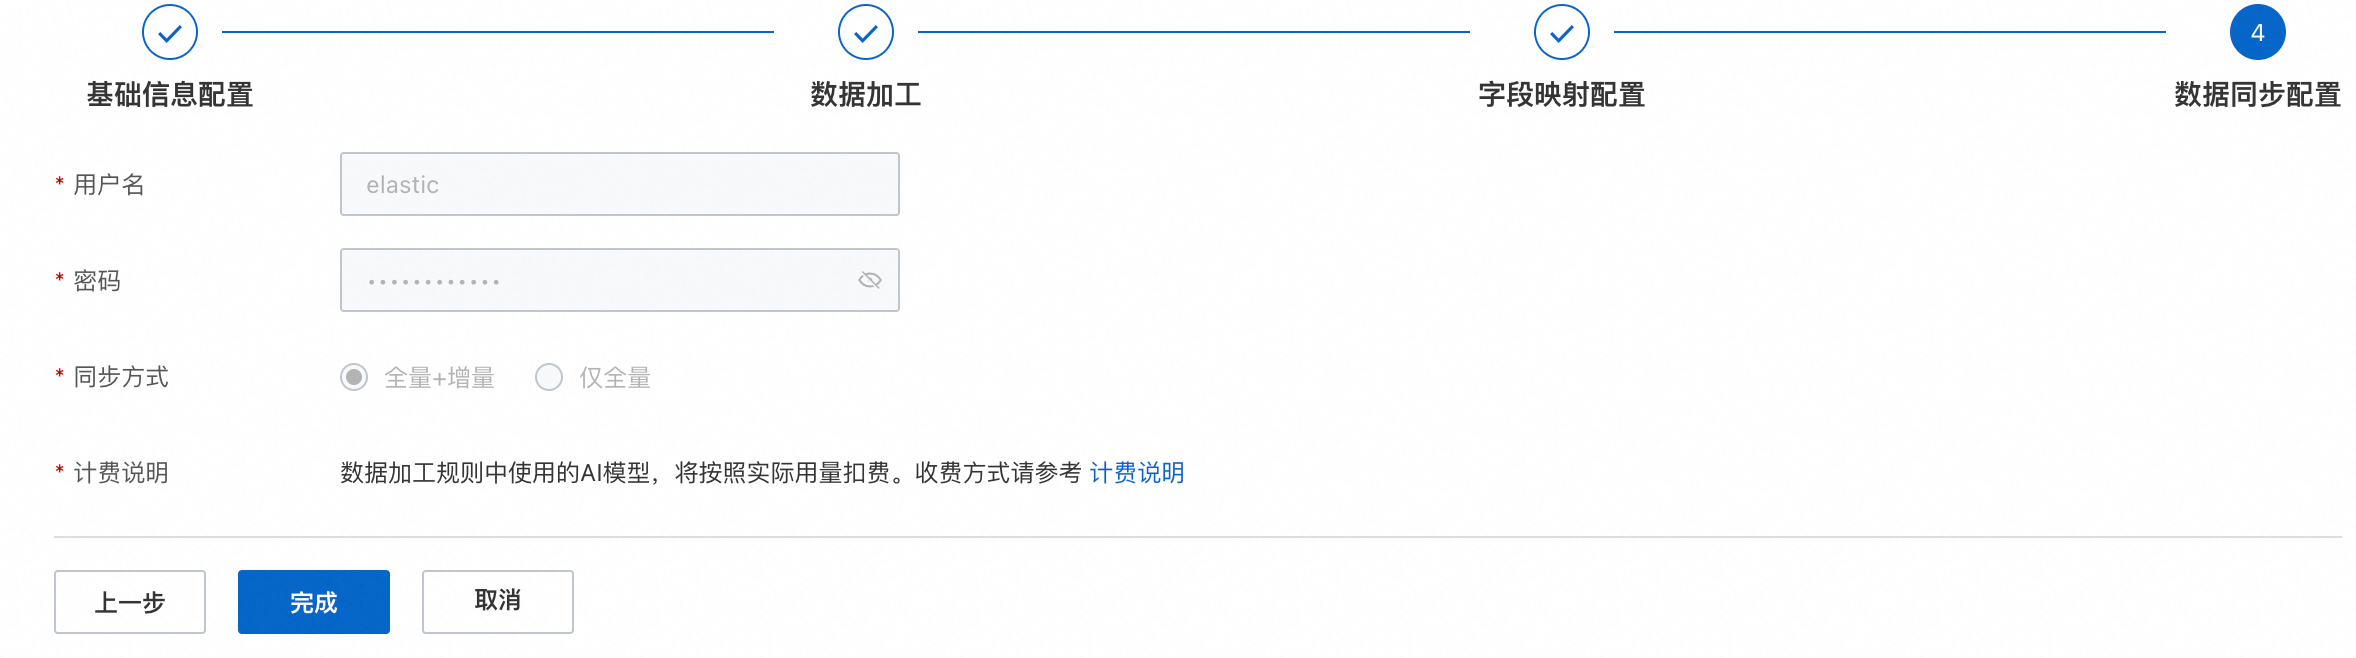
Configure and start the sync task
On the Data Synchronization Configuration tab, confirm your synchronization policy configuration and click Complete to start the task.

Manage and monitor sync tasks
After the task is created, you can manage and monitor it on the sync task list page.
The status of a task can be Scheduled, Running, or Run Failed.
Management operations:
Create Copy: You can copy the configuration of an existing task to create similar tasks in batches.
Delete: You can delete tasks that are no longer needed. Deleted tasks cannot be recovered. Proceed with caution.

Verify the data synchronization result
You can log on to Kibana to verify that the data was synchronized successfully.