The directory protection feature of the OSS-HDFS service (JindoFS service) enhances data security by preventing you from accidentally deleting or renaming directories. After directory protection is enabled, delete and rename operations on a directory are strictly restricted as long as it contains any subdirectories or files. You can delete or rename the protected directory only once it is empty.
Prerequisites
The OSS-HDFS service is enabled, and you have the required permissions to access it. For more information, see Enable the OSS-HDFS service.
Limitations
You can set directory protection using the OSS console or the JindoFS CLI. You can protect a maximum of 3,000 directory paths in total across both methods.
OSS console
To set directory protection using the OSS console, you must first submit a ticket to enable the feature.
-
Set directory protection.
-
Log on to the OSS console.
-
In the navigation pane on the left, click Buckets, and then click the name of the desired bucket.
-
In the navigation pane on the left, choose .
-
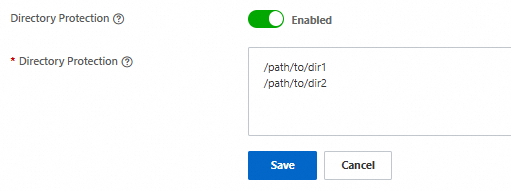
On the OSS-HDFS tab, turn on Directory Protection, and then specify one or more directories to protect.
The specified directory paths must be absolute paths that start with a forward slash (/). Separate multiple paths with line breaks.
-
Click Save.
After you save the settings, the directory protection feature takes effect within 30 seconds.
-
-
(Optional) To rename or delete a protected directory, you can disable its protection.
-
Disable directory protection.
NoteYou can disable protection for all directories at once or for specific directories individually.

-
Click Save.
-
JindoFS CLI
-
Connect to an ECS instance. For more information, see Connect to an ECS instance.
-
Download the JindoFS CLI.
-
Configure the AccessKey pair and environment variables.
-
Navigate to the bin directory of your JindoFS SDK installation.
The following example uses
jindofs-sdk-x.x.x-linux. If you are using a different version of the JindoFS SDK, replace the name accordingly.cd jindofs-sdk-x.x.x-linux/bin/ -
In the bin directory, create a configuration file named jindofs.cfg. In the file, provide the AccessKey pair (AccessKey ID and AccessKey Secret) of your Alibaba Cloud account or a RAM user that has the required permissions.
[client] fs.oss.accessKeyId = <key> fs.oss.accessKeySecret = <secret> -
Set the environment variable.
NoteSet <JINDOSDK_CONF_DIR> to the absolute path of the
jindofs.cfgconfiguration file.export JINDOSDK_CONF_DIR=<JINDOSDK_CONF_DIR>
-
-
Set directory protection.
The following example shows how to set directory protection for the
/path/to/dir1and/path/to/dir2directories in a bucket named examplebucket in the China (Hangzhou) region../jindofs admin -putConfig -dlsUri oss://examplebucket.cn-hangzhou.oss-dls.aliyuncs.com/ -conf fs.protected.directories=/path/to/dir1,/path/to/dir2Note-
The directory paths must be absolute paths that start with a forward slash (/). Separate multiple paths with commas (,).
-
If the command returns no output, the setting is successful. The feature takes effect within 30 seconds.
-
-
(Optional) Query the protected directories.
./jindofs admin -getConfig -dlsUri oss://examplebucket.cn-hangzhou.oss-dls.aliyuncs.com/ -name fs.protected.directoriesSample output:
fs.protected.directories: /path/to/dir1,/path/to/dir2 -
(Optional) If you need to rename or delete a protected directory, you can remove its protection.
ImportantThe following command removes protection from all directories in the current bucket. You cannot use this command to remove protection from specific directories.
./jindofs admin -putConfig -dlsUri oss://examplebucket.cn-hangzhou.oss-dls.aliyuncs.com/ -conf fs.protected.directories=