PAI ArtLab LoRA model training tutorial
Use Kohya in PAI ArtLab to train Low-Rank Adaptation (LoRA) models and generate customized images with Stable Diffusion.
Log on to the PAI ArtLab console.
Background information
Stable Diffusion (SD) is an open-source deep learning text-to-image model. SD WebUI is its web-based interface, supporting text-to-image and image-to-image operations with customization through extensions and model imports.
Image generation with SD WebUI relies on various models, each requiring specific training datasets and strategies. LoRA is a lightweight fine-tuning method known for fast training, small file sizes, and low hardware requirements.
Kohya is a popular open-source platform for training LoRA models. It provides a dedicated training environment and user interface without interference from other programs. Although SD WebUI supports model training through extensions, that approach can cause conflicts and errors.
For more information about other model fine-tuning methods, see Models.
Introduction to LoRA models
LoRA (Low-Rank Adaptation of Large Language Models) trains stylized models based on foundation models and datasets, enabling highly customized image generation.
The file specifications are as follows:
-
File size: Typically ranges from a few to several hundred MB. The exact size depends on the trained parameters and the complexity of the foundation model.
-
File format: Uses .safetensors as the standard file name extension.
-
File application: Must be used with a specific Checkpoint foundation model.
-
File version: You must distinguish between Stable Diffusion v1.5 and Stable Diffusion XL versions. Models are not interchangeable between these versions.
LoRA fine-tuning models
Foundation models (such as Stable Diffusion v1.5, v2.1, or SDXL base 1.0) provide the base capability. A LoRA model adds unique style and creativity on top of these foundations, making content creation more flexible, efficient, and personalized.
For example, the Stable Diffusion v1.5 model has these limitations:
-
Imprecise details: May struggle to reproduce specific details or complex content accurately, resulting in images lacking detail or realism.
-
Inconsistent logical structure: Object layout, proportions, and lighting may not adhere to real-world principles.
-
Inconsistent style: The highly complex and random generation process makes maintaining consistent style or reliable neural style transfer difficult.
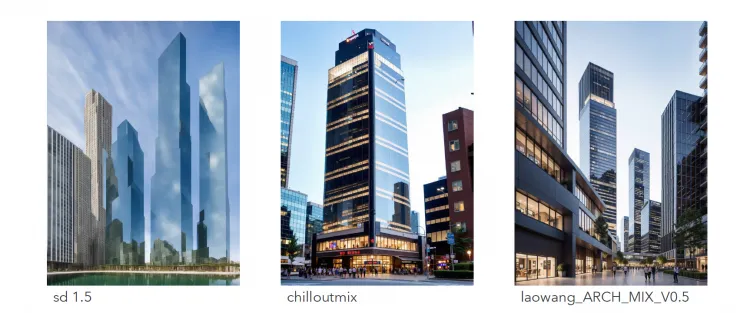
The open-source community offers many fine-tuned models that produce images with richer details, more distinct styles, and more controllable content than original foundation models. The following image compares Stable Diffusion v1.5 output with a fine-tuned model:
Different types of LoRA models
-
LyCORIS (predecessor to LoHa/LoCon)
LyCORIS is an enhanced LoRA variant that fine-tunes 26 neural network layers (compared to LoRA's 17), providing greater expressiveness and capacity. Its core components are LoHa and LoCon. LoCon adjusts each SD model level, while LoHa doubles the amount of processed information.
Used identically to LoRA, it achieves advanced results by adjusting text encoder, U-Net, and DyLoRA weights.
-
LoCon
Conventional LoRA adjusts only cross-attention layers. LoCon uses the same method to adjust the ResNet matrix. LoCon has been merged into LyCORIS, making old LoCon extensions obsolete. For more information, see LoCon-LoRA for Convolution Network.
-
LoHa
LoHa (LoRA with Hadamard Product) replaces the matrix dot product with the Hadamard Product. Theoretically, it can hold more information under the same conditions. For more information, see FedPara Low-Rank Hadamard Product For Communication-Efficient Federated Learning.
-
DyLoRA
A higher rank is not always better for LoRA — the optimal value depends on the model, dataset, and task. DyLoRA explores various rank configurations within a specified dimension, simplifying the search for the optimal rank and improving fine-tuning efficiency.
Prepare a dataset
Determine the LoRA type
First, determine the type of LoRA model to train, such as character type or style type.
For example, you might train a style model for Alibaba Cloud 3D product icons based on the Alibaba Cloud Evolving Design language system: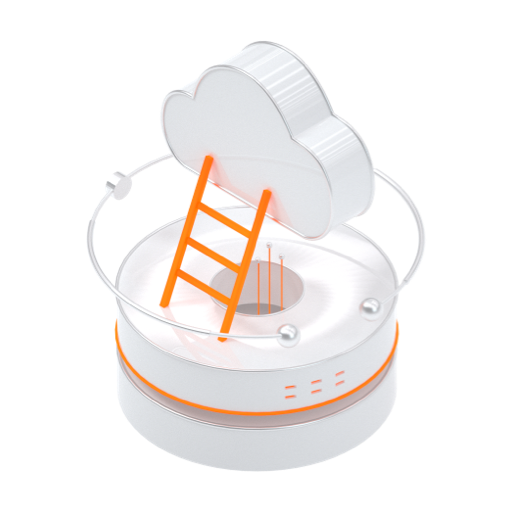
Dataset content requirements
A dataset consists of two types of files: images and corresponding text files for annotation.
Prepare dataset content: Images
-
Image requirements
-
Quantity: 15 or more images.
-
Quality: Moderate resolution and clear image quality.
-
Style: A set of images with consistent style.
-
Content: Images must highlight the subject to be trained. Avoid complex backgrounds and irrelevant content, especially text.
-
Size: Resolution must be a multiple of 64, ranging from 512 to 768. For low GPU memory, crop to 512×512. For high GPU memory, crop to 768×768.
-
-
Image pre-processing
-
Quality adjustment: Use moderate image resolution to ensure clear quality. For low-resolution images, upscale using the Extras feature in SD WebUI or other image processing tools.
-
Size adjustment: Use batch cropping tools to crop images.
-
-
Example of prepared images
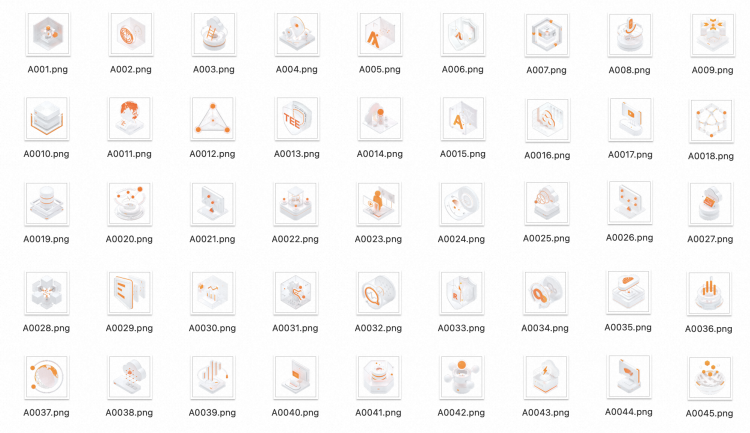
Store the images in an on-premises folder.
In this example, the local folder is named
100_ACD3DICON.
Create a dataset and upload files
Before uploading, note the file attribute and naming requirements. If you only use the platform to manage dataset files or annotate images, you can upload files or folders directly without naming conventions.
To use Kohya on the platform to train a LoRA model after dataset annotation, uploaded files must meet the following attribute and naming requirements:
-
Naming format: Number_CustomName
-
Number: User-defined.
-
For example, if a folder contains 10 images, each image is trained 1500 / 10 = 150 times. The folder name number can be 150. If a folder contains 20 images, each image is trained 1500 / 20 = 75 times. Since 75 < 100, set the folder name number to 100.
-
CustomName: A descriptive dataset name. This topic uses 100_ACD3DICON as an example.
-
Log in to PAI ArtLab and select Kohya (Exclusive Edition) to open the Kohya-SS page.
-
Create a dataset.
On the dataset page, click Create Dataset and enter a name for the dataset. This example uses acd3dicon.
-
Upload dataset files.
Click the name of the dataset you created. Then, drag the prepared image folder from your local computer to the upload area.
After the upload is successful, the folder appears on the page.
After the upload is complete, you can confirm the dataset name, total number of files, and total file size in the Dataset details panel on the right.
-
Click the folder to view the uploaded images.
After you select an image, the right-side panel displays file details, including its name, annotation (where you can enter the English annotation for the image), format, file size, and modification time.
Prepare dataset content: Image annotations
Image annotation refers to the text description for each image. The annotation file is a TXT file with the same name as the image.
-
Image annotation requirements
Elements with a clear structural layout, standard perspective, and specific lighting, such as product icons, require a different annotation process than portraits or landscapes. Use basic descriptive annotations. Focus on the simple geometric shapes of the main elements, such as "sphere" or "cube".
Category
Keywords
Service
Product/Service
database, cloud security, computing platform, container, cloud-native, etc. (in English)
Cloud computing elements
Data processing, Storage, Computing, Cloud computing, Elastic computing, Distributed storage, Cloud database, Virtualization, Containerization, Cloud security, Cloud architecture, Cloud services, Server, Load balancing, Automated management, Scalability, Disaster recovery, High availability, Cloud monitoring, Cloud billing
Design (Texture)
Environment & Composition
viewfinder, isometric, hdri environment, white background, negative space
Material
glossy texture, matte texture, metallic texture, glass texture, frosted glass texture
Lighting
studio lighting, soft lighting
Color
alibaba cloud orange, white, black, gradient orange, transparent, silver
Emotion
rational, orderly, energetic, vibrant
Quality
UHD, accurate, high details, best quality, 1080P, 16k, 8k
Design (Atmosphere)
...
...
-
Example 1: Splitting information dimensions for annotating a 3D icon image.
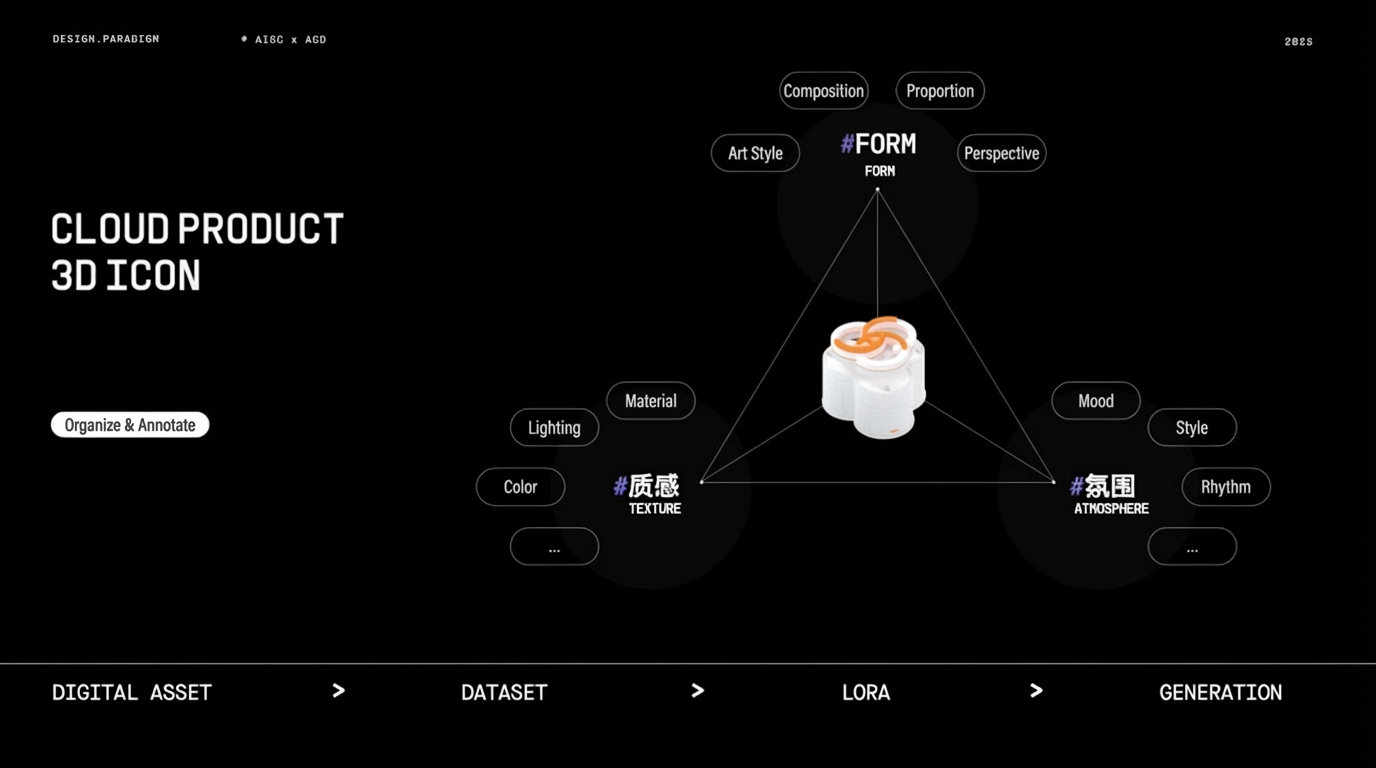
-
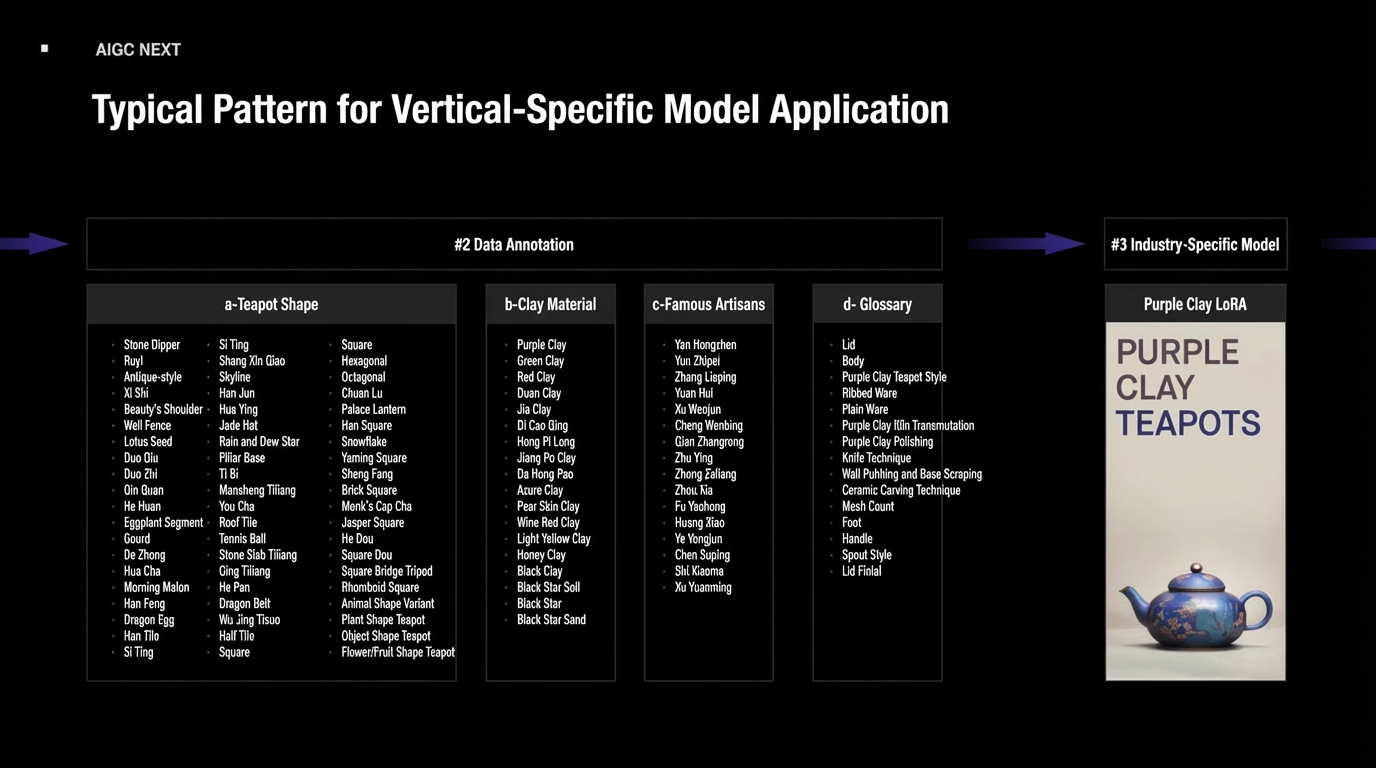
Example 2: Splitting information dimensions for annotating a purple clay teapot item.
-
-
Add annotations to images
You can manually annotate each image, but this is inefficient for large datasets. Kohya supports batch annotation using the BLIP model to auto-generate text descriptions, which you can then refine manually.
Annotate the dataset
-
On the Kohya-SS page, go to Utilities > Captioning > BLIP Captioning.
-
Select the uploaded image folder in the created dataset.
-
In the prefix field, enter keywords that will be added to the beginning of each annotation. These keywords should be based on the key features of your dataset images. The annotation features vary for different types of images.
-
Click Caption Image to start annotating.
Go to Utilities > Captioning > BLIP Captioning. In the Image folder to caption field, enter the dataset path, such as
/data-oss/datasets/acd3dicon/100_ACD3DICON. In the Prefix to add to BLIP caption field, enter a prompt prefix, such as3d icon, C4D,OC render,studio lighting, Bauhaus,best quality,Isometric view. In the Postfix to add to BLIP caption field, enter a suffix, such asStable con-position,Particle effect. Then, click Caption images to begin. -
In the log viewer at the bottom, you can monitor the annotation progress and see the completion message.
-
Return to the dataset. A corresponding annotation file has been generated for each uploaded image.
-
(Optional) Manually modify any inappropriate annotations.
Train the LoRA model
-
On the Kohya-SS page, go to LoRA > Training > Source Model.
-
Configure the following parameters:
-
Model Quick Pick: runwayml/stable-diffusion-v1-5
-
Save trained model as: safetensors
NoteIf your desired model is not available in the Model Quick Pick dropdown list, you can select custom and then choose the model. Base models added from Models to My Models and base models locally uploaded to My Models can be found in the custom path.
-
-
On the Kohya-SS page, go to LoRA > Training > Folders.
-
Select the dataset that contains the dataset folder and configure the training parameters.
Go to the LoRA > Training > Folders tab. In the Image folder field, enter the path to your dataset's image folder (for example,
/data-oss/datasets/acd3dicon). Specify a Model output name. After you finish, click Start training.NoteWhen you annotate dataset files, you select the specific image folder within the dataset. When you train the model, you select the parent dataset that contains this folder.
-
Click Start training.
For more information about the parameters, see Frequently used training parameters.
-
You can monitor the training progress in the log viewer at the bottom. When training is complete, the message
model saved.appears in the log, indicating the LoRA model was saved successfully.steps: 99%|██████████| 1540/1550 [05:08<00:02, 4.99it/s, loss=0.0181] steps: 99%|██████████| 1541/1550 [05:08<00:01, 4.99it/s, loss=0.0181] steps: 99%|██████████| 1541/1550 [05:08<00:01, 4.99it/s, loss=0.0181] steps: 99%|██████████| 1542/1550 [05:09<00:01, 4.99it/s, loss=0.0181] steps: 99%|██████████| 1542/1550 [05:09<00:01, 4.99it/s, loss=0.0181] steps: 100%|██████████| 1543/1550 [05:09<00:01, 4.99it/s, loss=0.0181] steps: 100%|██████████| 1543/1550 [05:09<00:01, 4.99it/s, loss=0.0181] steps: 100%|██████████| 1544/1550 [05:09<00:01, 4.99it/s, loss=0.0181] steps: 100%|██████████| 1544/1550 [05:09<00:01, 4.99it/s, loss=0.0181] steps: 100%|██████████| 1545/1550 [05:09<00:01, 4.99it/s, loss=0.0181] steps: 100%|██████████| 1545/1550 [05:09<00:01, 4.99it/s, loss=0.0181] steps: 100%|██████████| 1546/1550 [05:09<00:00, 4.99it/s, loss=0.0181] steps: 100%|██████████| 1546/1550 [05:09<00:00, 4.99it/s, loss=0.0181] steps: 100%|██████████| 1547/1550 [05:10<00:00, 4.99it/s, loss=0.0181] steps: 100%|██████████| 1547/1550 [05:10<00:00, 4.99it/s, loss=0.0181] steps: 100%|██████████| 1548/1550 [05:10<00:00, 4.99it/s, loss=0.0181] steps: 100%|██████████| 1549/1550 [05:10<00:00, 4.99it/s, loss=0.0181] steps: 100%|██████████| 1549/1550 [05:10<00:00, 4.99it/s, loss=0.0181] steps: 100%|██████████| 1550/1550 [05:10<00:00, 4.99it/s, loss=0.0181] steps: 100%|██████████| 1550/1550 [05:10<00:00, 4.99it/s, loss=0.0181] steps: 100%|██████████| 1550/1550 [05:11<00:00, 4.98it/s, loss=0.0181] epoch 1/1 saving checkpoint: /data-oss/models/Lora/last.safetensors model saved.
Frequently used training parameters
Parameters
Number of images × Repeats × Epochs / Batch size = Total training steps
For example: 10 images × 20 repeats × 10 epochs / 2 (batch size) = 1000 steps.
On the Kohya-SS page, go to LoRA > Training > Parameters to configure the parameters for model training. The following are the common parameters:
-
Basic tab
The Basic tab also includes the following parameters: set Text Encoder learning rate to 0.00005 and U-Net learning rate to 0.0001. Enable buckets is selected by default. Set Minimum bucket resolution to 256 and Maximum bucket resolution to 2048. Keep Scale weight norms, Network dropout, Rank dropout, and Module dropout at 0.
Parameter
Function
Settings
repeat
Number of times to read an image
Set the number of times to read an image in the folder name. A higher number improves the learning effect. Recommended settings for initial training:
-
Animation and Comics: 7–15
-
Portrait: 20 to 30
-
Real object: 30 to 100
LoRA type
LoRA type to use
Keep the default selection, Standard.
LoRA network weights
LoRA network weights
Optional. To continue training, select the last trained LoRA.
Train batch size
Training batch size
Select a value based on your graphics card performance. The maximum is 2 for 12 GB of video memory and 1 for 8 GB of video memory.
Epoch
Number of training rounds. One round is one full training pass over all data.
Calculate as needed. Generally:
-
Total training steps in Kohya = Number of training images × Repeats × Epochs / Training batch size
-
Total training steps in WebUI = Number of training images × Repeats
When using category images, the total training steps in Kohya or WebUI are doubled. In Kohya, the number of model saves is halved.
Save every N epochs
Save the result every N training epochs
If set to 2, the training result is saved after every 2 training epochs.
Caption Extension
Annotation file name extension
Optional. The format for annotation/prompt files in the training dataset is .txt.
Mixed precision
Mixed precision
Determined by graphics card performance. Valid values:
-
no
-
fp16 (default)
-
bf16 (can be selected for RTX 30 series or later graphics cards)
Save precision
Save precision
Determined by graphics card performance. Valid values:
-
no
-
fp16 (default)
-
bf16 (can be selected for RTX 30 series or later graphics cards)
Number of CPU threads per core
Number of CPU threads per core
This depends mainly on CPU performance. Adjust it based on the purchased instance and your requirements. You can keep the default value.
Seed
Random number seed
Can be used for image generation verification.
Cache latents
Cache latents
Enabled by default. After training, image information is cached as latents files.
LR Scheduler
Learning rate scheduler
In theory, there is no single best learning point. To find a good hypothetical value, you can generally use Cosine.
Optimizer
Optimizer
The default is AdamW8bit. If you are training with the sd1.5 foundation model, keep the default value.
Learning rate
Learning rate
For initial training, set the learning rate to a value from 0.01 to 0.001. The default value is 0.0001.
You can adjust the learning rate based on the loss function (loss). When the loss value is high, you can moderately increase the learning rate. If the loss value is low, gradually decreasing the learning rate can help fine-tune the model.
-
A high learning rate speeds up training but can cause overfitting due to rough learning. This means the model adapts too much to the training data and has poor generalization ability.
-
A low learning rate allows for detailed learning and reduces overfitting, but it can lead to long training times and underfitting. This means the model is too simple and fails to capture the data's characteristics.
LR Warmup (% of steps)
Learning rate warmup (% of steps)
The default value is 10.
Max Resolution
Maximum resolution
Set based on the images. The default value is 512,512.
Network Rank (Dimension)
Model complexity
A setting of 64 is generally sufficient for most scenarios.
Network Alpha
Network Alpha
Set a small value. The Rank and Alpha settings affect the final size of the output LoRA.
Clip skip
Number of layers to skip in the text encoder
Select 2 for anime and 1 for realistic models. Anime model training initially skips one layer. If the training material is also anime images, skip another layer for a total of 2.
Sample every n epochs
Sample every n training epochs
Saves a sample every few rounds.
Sample prompts
Sample prompts
Sample of prompts. Requires using a command with the following parameters:
-
--n: Negative prompt.
-
--w: Image width.
-
--h: Image height.
-
--d: Image seed.
-
--l: Prompt relevance (CFG Scale).
-
--s: Iteration steps (steps).
-
-
Advanced tab
On the Weights sub-tab, find and configure the Clip skip parameter.
Parameter
Function
Settings
Clip skip
Number of layers to skip in the text encoder
Select 2 for anime and 1 for realistic models. Anime model training initially skips one layer. If the training material is also anime images, skip another layer for a total of 2.
-
Samples tab
This tab also includes the Sample every n steps and Sample sampler (for which you can select
euler_aand other options) fields.Parameter
Function
Settings
Sample every N epochs
Sample every N training epochs
Saves a sample every few rounds.
Sample prompts
Sample prompts
Sample of prompts. Requires using a command with the following parameters:
-
--n: Negative prompt.
-
--w: Image width.
-
--h: Image height.
-
--d: Image seed.
-
--l: Prompt relevance (CFG Scale).
-
--s: Iteration steps (steps).
-
Loss value
The Loss value is a key metric for evaluating LoRA training quality. It should gradually decrease as training progresses, indicating effective learning. A value between 0.08 and 0.1 generally indicates a well-trained model, with values around 0.08 suggesting highly effective training.
For example, if you set 30 training epochs and target a Loss value between 0.07 and 0.09, this range is typically reached between the 20th and 24th epochs. Setting an appropriate number of epochs prevents the Loss value from dropping too quickly. If epochs are too few, Loss might jump from 0.1 to 0.06 in a single step, causing you to miss the optimal range.
epoch 8/30
steps:  27%|████████                | 8800/33000 [44:40<2:02:50,  3.28it/s, avr_loss=0.138]
saving checkpoint: C:/Users/M/Desktop/Database (high-level office)/output\cixiulong1-000008.safetensors
epoch 9/30
steps:  30%|█████████               | 9900/33000 [50:16<1:57:18,  3.28it/s, avr_loss=0.135]
epoch 10/30
steps:  33%|██████████              | 11000/33000 [55:53<1:51:47,  3.28it/s, avr_loss=0.131]
saving checkpoint: C:/Users/M/Desktop/Database (high-level office)/output\cixiulong1-000010.safetensors
epoch 11/30
steps:  37%|███████████             | 12100/33000 [1:01:32<1:46:18,  3.27it/s, avr_loss=0.131]
epoch 12/30
steps:  40%|████████████            | 13200/33000 [1:07:11<1:40:47,  3.27it/s, avr_loss=0.136]
saving checkpoint: C:/Users/M/Desktop/Database (high-level office)/output\cixiulong1-000012.safetensors
epoch 13/30
steps:  43%|█████████████           | 14300/33000 [1:12:49<1:35:14,  3.27it/s, avr_loss=0.133]
epoch 14/30
steps:  47%|██████████████          | 15400/33000 [1:18:28<1:29:40,  3.27it/s, avr_loss=0.12]
saving checkpoint: C:/Users/M/Desktop/Database (high-level office)/output\cixiulong1-000014.safetensors
epoch 15/30
steps:  50%|███████████████         | 16500/33000 [1:24:03<1:24:03,  3.27it/s, avr_loss=0.125]
epoch 16/30
steps:  53%|████████████████        | 17600/33000 [1:32:45<1:21:10,  3.16it/s, avr_loss=0.125]
saving checkpoint: C:/Users/M/Desktop/Database (high-level office)/output\cixiulong1-000016.safetensors
epoch 17/30
steps:  54%|████████████████        | 17900/33000 [1:35:23<1:20:28,  3.13it/s, avr_loss=0.12]