Use OpenClaw in DSW
OpenClaw is an AI agent framework that supports direct operating system control, persistent memory, and scheduled proactive notifications. You can interact with it through various interfaces, including a web UI and DingTalk, and it comes with a rich ecosystem of built-in skills. PAI-DSW provides an automated installation script that lets you quickly deploy OpenClaw and choose either Model Studio or PAI-EAS as your Large Language Model (LLM) service provider.
Overview
Why choose PAI-DSW
Deploying OpenClaw on DSW deeply integrates AI computing power with the agent's capabilities, offering the following advantages:
On-demand and maintenance-free
Elastic computing power
Seamless integration with the Alibaba Cloud ecosystem
Secure access that prevents public internet exposure
Runs alongside your computing power
OpenClaw runs in the same environment as your computing resources, training tasks, and file storage. This enables it to directly read and write files, monitor GPU status, and execute scripts, for an intelligent cloud development experience.
OpenClaw access methods
After deploying OpenClaw, you can interact with it in the following ways:
Access the Web UI through DSW Gateway (Recommended): No extra configuration is needed. After the script finishes, it automatically provides a clickable access link. Log in with your Alibaba Cloud account to open the Web UI directly in your browser.
Access through DingTalk (Optional): Create a bot in DingTalk to use OpenClaw through chat.
Access the Web UI through a local SSH tunnel (Optional): Establish an SSH tunnel to access the OpenClaw Web UI from your local browser.
Comparison of access methods:
Access method | DSW Gateway (recommended) | DingTalk access | Local SSH tunnel |
Configuration difficulty | None | Easy | Medium |
Convenience | One-click access | Anytime, anywhere | Requires an active tunnel |
Team collaboration | Single-user | Multi-user support | Single-user |
Mobile support | Browser access | Native support | Inconvenient |
Message history | Saved in the Web UI | Saved in DingTalk | Saved in the Web UI |
Use cases | Quick start, development, and debugging | Daily work and team collaboration | Special network environments |
Recommendations:
New users: Start with DSW Gateway for a zero-configuration experience.
Teams: Set up DingTalk access to enable multi-user sharing and mobile access.
Developers: Use DSW Gateway for daily tasks and enable an SSH tunnel only for special requirements.
You can use all three methods simultaneously. Choose the configuration that best suits your needs.
Quick start
This section explains how to quickly deploy OpenClaw in DSW and access its Web UI using DSW Gateway.
Step 1: Create and configure a DSW instance
Log in to the PAI console. In the upper-left corner, select the region where you want to activate the service, and then click Activate. After the service is activated, a default workspace is automatically created.
In the left-side navigation pane, click Workspaces and select the desired workspace.
In the left-side navigation pane, choose Model Training > Data Science Workshop (DSW) > Create an instance..
Configure the following parameters:
Instance Name: For example,
openclaw-test.Resource Type: Select Public Resources.
Instance Type: We recommend
ecs.g9i.xlarge(4 vCPU, 16 GiB). You can also select a GPU instance type as needed.Image config: OpenClaw has no specific image requirements. If you have no preference, we recommend selecting the Alibaba Cloud Image:
modelscope:1.34.0-pytorch2.3.1tensorflow2.16.1-gpu-py311-cu121-ubuntu22.04. This image includes essential tools like Python and Git.
Click OK to create the instance. Wait for the instance status to change to Running.
Step 2: One-click deploy OpenClaw
On the DSW instance list page, click Open on the right to enter the DSW environment.
Click Terminal to open a terminal and run the following command to download and run the automated installation script.
curl -fsSL https://pai-dsw-ai-machine.oss-cn-beijing.aliyuncs.com/agent/openclaw/openclaw_installer_dsw.sh -o openclaw_installer_dsw.sh && bash openclaw_installer_dsw.shThe installation process begins:
ψ OpenClaw Manager (PAI-DSW)

Status: Not installed (Latest version: 2026.3.8)
Gateway: Not running

◆ Select Operation
  (↑↓ Navigate | Number keys to select | Enter to confirm)
[1]  ● Installation      - Full installation process
[2]  ○ Upgrade           - Upgrade to the latest version
[3]  ○ Configuration     - Reconfigure (overwrites existing configuration)
[4]  ○ Models            - Update model configuration only (keeps other settings)
[5]  ○ Channels          - Manage channel plugins (keeps other settings)
[6]  ○ Gateway           - Start/Stop/Restart
[7]  ○ Status            - Display installation status
[8]  ○ Repair            - Diagnose and fix issues
[9]  ○ Uninstallation    - Uninstall OpenClaw
[10] ○ Exit
Select the recommended installation version,
2026.3.8.● Select the version to install (↑↓ Navigate | Number keys to select | Enter to confirm) [1] ● Recommended version 2026.3.8 - Verified compatible with DSW Gateway [2] ○ Latest version (2026.3.11) - Latest version on npm [3] ○ Specify a version manually - Enter a custom version numberChoose to skip channel configuration.
● Select a channel (selected: DT=0)
  (↑↓ Navigate | Number keys to select | Enter to confirm)
  [1] ● Skip channel configuration (you can still access OpenClaw directly through DSW Gateway)
  [2] ○ DingTalk - requires clientId + clientSecret
i Channel configuration skipped
Select a model provider. You can choose a Large Language Model (LLM) from Model Studio or a model service deployed on PAI-EAS.
◆ Configure the AI model

◆ Select a model provider
  (↑↓ Navigate | Number keys to select | Enter to confirm)
  [1] ● Model Studio (DashScope) - Alibaba Cloud Model Studio model service
  [2] ○ EAS service - Alibaba Cloud PAI-EAS model service
Model Studio
Configure the Model Studio Base URL. The URL for the Model Studio Coding Plan is used by default. For standard Model Studio accounts, enter
https://dashscope.aliyuncs.com/compatible-mode/v1.▸ Configure the Model Studio (DashScope) model Tip: The Coding Plan base URL is used by default. For a standard Model Studio account, enter https://dashscope.aliyuncs.com/compatible-mode/v1 ◆ Model Studio base URL [https://coding.dashscope.aliyuncs.com/v1]:Paste your Model Studio API Key.
Select an AI model as needed.
Configure the gateway port. The default value is sufficient.
PAI-EAS
Deploy a Large Language Model (LLM), for example Qwen3.5-397B-A17B, from the Model Gallery with one click. For detailed steps, see Quick start: Deploy, fine-tune, and evaluate Qwen3 series models.
After the service is deployed, go to the service details page to get the public endpoint and token.
Click Invocation Information. On the Shared Gateway tab, you can view and copy the Internet Endpoint, VPC Endpoint, and Token.
Then, configure them in the script:
◆ Configure EAS service

  Tip: Get the base URL and token from the PAI-EAS console.
  Base URL example: http://16********.cn-hangzhou.pai-eas.aliyuncs.com/api/predict/test
  Note: Only enter the base URL (without /v1). The script adds it automatically.

◆ EAS base access URL: http://16xxxxxxxx.cn-hangzhou.pai-eas.aliyuncs.com/api/predict/test
◆ EAS Token (visible input): your-eas-token-here
Configure tool calling. The script asks whether to disable tool calling:
◆ Tool Calling Configuration
  Tip: If the EAS service was not started with the --enable-auto-tool-choice parameter,
       it will cause a 400 error. In this case, you must disable tool calling.

◆ Disable tool calling?
  [1] ○ No - Enable tool calling (Recommended, requires EAS server-side support)
  [2] ○ Yes - Disable tool calling (For when the server is not configured)
Recommendations:
If your EAS service is configured to support tool calling, select "No".
If you are unsure or encounter a 400 error, select "Yes".
Complete the configuration.
Step 3: Access the Web UI via DSW Gateway
After the script finishes and the Gateway starts successfully, the terminal automatically displays access information:
Starting the Gateway service...

● Gateway started (PID: 20049)
✓ Gateway started successfully and is running in the background

Service information
├── Process PID    20049
├── Log file       ~/.openclaw/gateway.log
└── PID file       ~/.openclaw/gateway.pid

Access address
└── http://127.0.0.1:18789/?tcxxxd8aafc2b2f5ee0878c58f9d86b3d3e5

Common commands
├── View logs        tail -f ~/.openclaw/gateway.log
├── View process     ps -p 20049
└── Stop service     kill 20049
Click the access address link. DSW automatically forwards the request through its built-in Gateway proxy, and your browser opens the OpenClaw Web UI.
Note: The 127.0.0.1 in the link is the local address within the DSW instance. The DSW Gateway proxy mechanism securely exposes this address to logged-in Alibaba Cloud users, and no manual port mapping is required.In the upper-right corner of the Web UI, check the service status:
Health: OK indicates the service is running normally.
Gateway: Connected indicates the Gateway connection is normal.
You can then start a conversation with OpenClaw using the dialog box at the bottom.
After you send the first message, the AI assistant introduces itself, indicates that it is in the initialization ("birth") phase, and guides you through the personalization settings, such as naming the assistant and choosing a preferred conversation style.
For examples of using OpenClaw on DSW, see Application scenarios.
Access OpenClaw through DingTalk (Optional)
Step 1: Create a DingTalk app
You can refer to the official documentation on the DingTalk Open Platform.
Create an internal enterprise app in DingTalk. Log in to the DingTalk Open Platform, and choose Application Development > DingTalk Apps > Create App.
Fill in the application information:
App name: For example, OpenClaw Assistant
App description: An AI-powered office assistant
App logo: Upload an icon for the app
Configure the bot feature. On the app details page, click Features > Add Feature, and select Bot. Configure the bot information and publish it.
Bot name: For example, OpenClaw Assistant
Bot description: An intelligent AI assistant to help you with daily office tasks
Message receiving mode: Stream Mode. Important: You must select Stream Mode. Otherwise, the bot cannot receive messages properly.
Grant permissions. In the left-side navigation pane, click Permissions and enable the following permissions (see dingtalk-openclaw-connector):
Card.Streaming.WriteCard.Instance.Writeqyapi_robot_sendmsg
In the search box, enter the name of the permission, such as
Card.Streaming.Write. Then, find the target permission and click Apply for Permission to enable it.Publish the app. Go to Versioning and release, click Create New Version, fill in the version information, and click Save > Confirm Release. In your DingTalk client, search for and add the bot to a group or one-on-one chat.
Get the application credentials. On the app details page, find the Credentials and Basic Information section on the left to obtain the following:
Client ID (AppKey): The unique identifier for the app.
Client Secret (AppSecret): The secret key for the app.
Step 2: Configure the OpenClaw channel
Return to the DSW instance terminal and run the following command to start the wizard script again and configure the DingTalk channel.
bash openclaw_installer_dsw.shSelect Channels.
◆ Select Operation
  (↑↓ Navigate | Number keys to select | Enter to confirm)
  [1] ○ Installation                  - Full installation process
  [2] ○ Upgrade                       - Upgrade to the latest version
  [3] ○ Configuration                 - Reconfigure (overwrites existing configuration)
  [4] ○ Models                        - Update model configuration only (keeps other settings)
  [5] ● Channels                      - Manage channel plugins (keeps other settings)
  [6] ○ Gateway                       - Start/Stop/Restart
  [7] ○ Status                        - Display installation status
  [8] ○ Repair                        - Diagnose and fix issues
  [9] ○ Uninstallation                - Uninstall OpenClaw
  [10] ○ Exit
Go to the Channels configuration and select Add DingTalk Channel.
This automatically installs the DingTalk plugin. You only need to provide the application credentials you just configured to complete the setup.
The default DingTalk plugin used is dingtalk-openclaw-connector.
Step 3: Test the DingTalk bot
Search for your bot's name in the DingTalk client.
Send a message to test it.
Access the Web UI via local SSH tunnel (Optional)
Step 1: Configure DSW SSH parameters
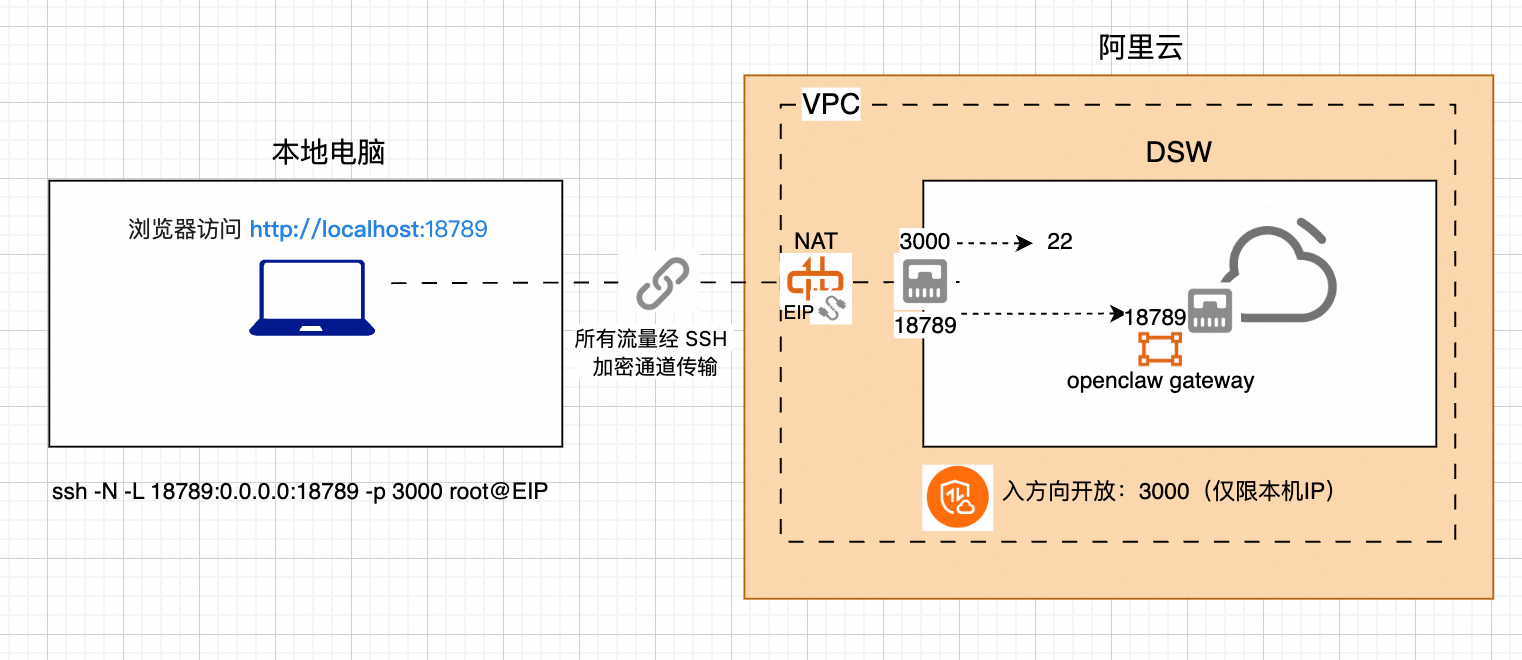
On the DSW instance configuration page, configure the Virtual Private Cloud (VPC), SSH key, public access port (e.g., 3000), public NAT gateway, and Elastic IP Address (EIP). For detailed instructions, see Remote Connection: Direct SSH Connection. The network architecture is shown in the following figure:
Step 2: Start the gateway service
After you configure and run the script in DSW, the Gateway starts and the system automatically generates a security token, which is stored in ~/.openclaw/openclaw.json. If you need to find the gateway token later, you can run the following command to view the openclaw.json file:
cat ~/.openclaw/openclaw.jsonStep 3: Establish an SSH tunnel
Run the following command in the terminal on your local machine:
# Establish SSH tunnel
ssh -N -L 18789:0.0.0.0:18789 -p 3000 root@<YOUR_DSW_EIP_ADDRESS>
Parameter description:
-N: Do not execute a remote command. This is used for port forwarding only.-L 18789:0.0.0.0:18789: Maps local port 18789 to remote port 18789.-p 3000: The SSH connection port (the DSW public port).root@<YOUR_DSW_EIP_ADDRESS>: The public IP address of your DSW instance.
Success indicators:
The command executes without errors.
The terminal remains connected and does not return to the command prompt.
Keep the tunnel running:
macOS/Linux: You can keep it running directly in the terminal window, or manage it with
screen/tmux.Windows: Run the command in PowerShell, or use an SSH client like PuTTY to configure the tunnel.
Step 4: Access the Web UI
Open the following URL in your local browser:
http://localhost:18789/?token=<YOUR_GATEWAY_TOKEN>Application scenarios
Basic scenarios
Scenario 1: Daily Q&A and code assistant
Please create an ipynb notebook in /mnt/workspace that implements a house price prediction model using public Kaggle data.Scenario 2: Intelligent file search
Please find all Markdown files in the DSW instance that contain the keyword "report".Scenario 3: Message subscription
Send me the latest AI industry news every morning at 9 AM.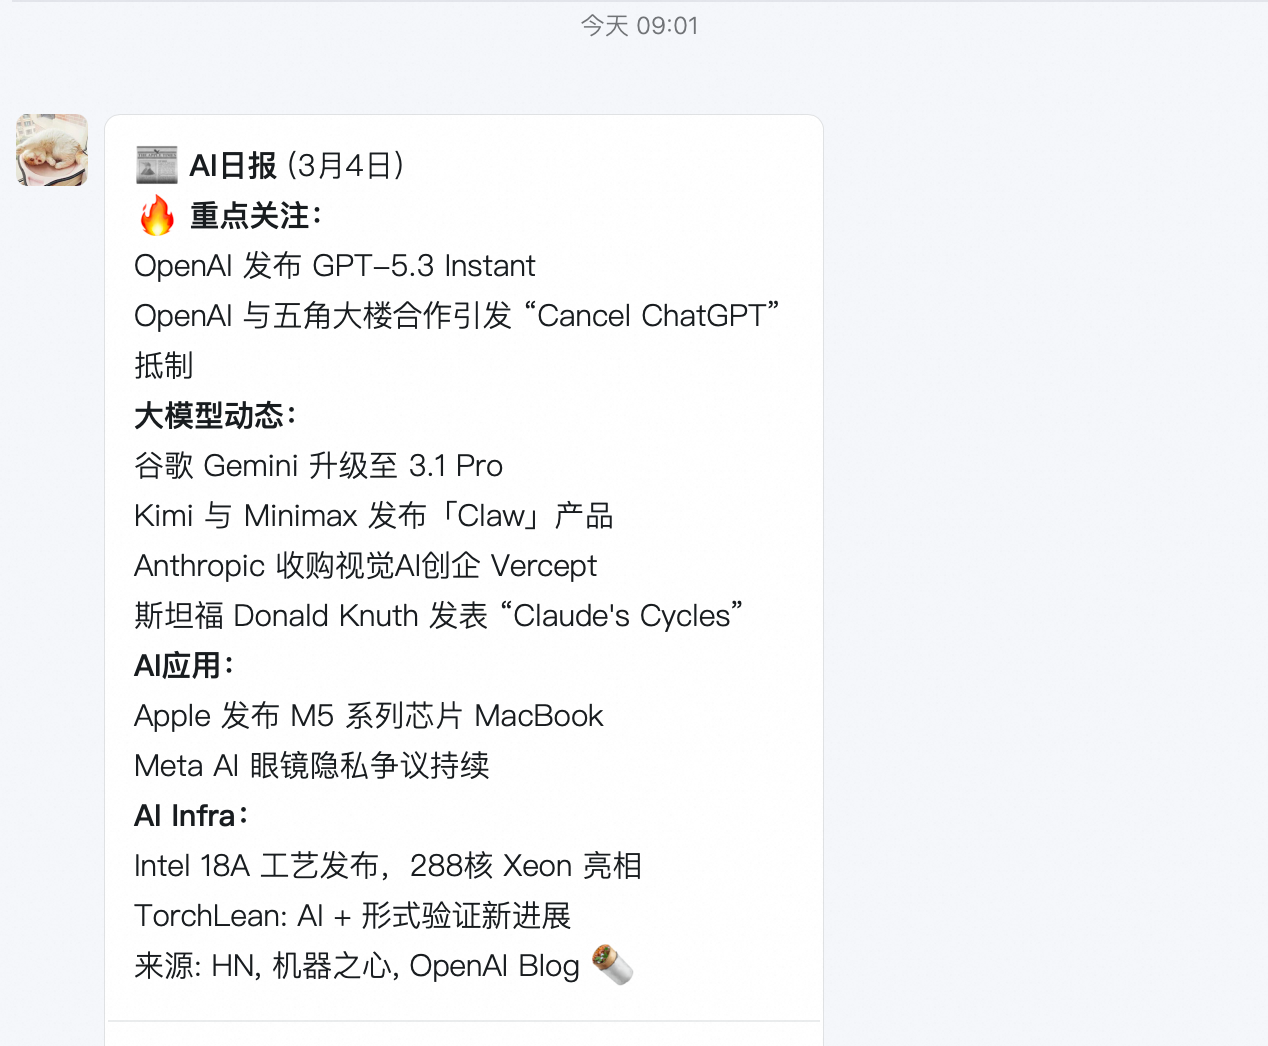
Training scenarios
The core value of an OpenClaw-equipped DSW instance in GPU training workflows includes:
Proactive monitoring: Eliminates the need for constant supervision. OpenClaw can actively detect problems and notify you.
Remote operations: Manage tasks remotely through a DingTalk conversation, without needing to be at your computer.
Intelligent memory: It automatically organizes experiment records, so you can query historical data at any time.
Scenario 1: Query task status
You can ask about status anytime in DingTalk or the web interface.
What's the GPU utilization of the training task I just ran?The AI assistant returns the real-time status of the training task, including:
GPU information: NVIDIA A10, GPU memory 10.5 GB/22.5 GB (47%), utilization 100%
Training progress: Epoch 1/3 complete (Loss 10.9245, 6 minutes 41 seconds), Epoch 2/3 in progress (28%, 570/2000 steps), Epoch 3/3 pending
Estimated 14 minutes remaining, with completion at about 21:46
Scenario 2: Task status monitoring and alerts
User pain point: When running long training tasks (like LLM fine-tuning) on DSW, a job might fail in the middle of the night without the user's knowledge. The GPU sits idle, wasting money, and the user only discovers the failure the next morning.
Solution: Use OpenClaw to periodically check the GPU status (or other relevant metrics). If it detects an anomaly, it sends a DingTalk alert. You can configure scheduled tasks via the command line or issue instructions through chat.
openclaw cron add \
  --name "GPU Training Monitor" \
  --cron "*/15 * * * *" \
  --tz "Asia/Shanghai" \
  --session isolated \
  --message "Please perform the following actions to check the GPU training status:

1. Run the command: python gpu_monitor.py
2. If it returns 'HEARTBEAT_OK', everything is normal; no further action is needed.
3. If it returns an exception report, please:
   - Send the full report to me via DingTalk.
   - Analyze the possible causes mentioned in the report.
   - Provide recommended solutions.

Note: Only notify me when an anomaly is detected." \
  --announce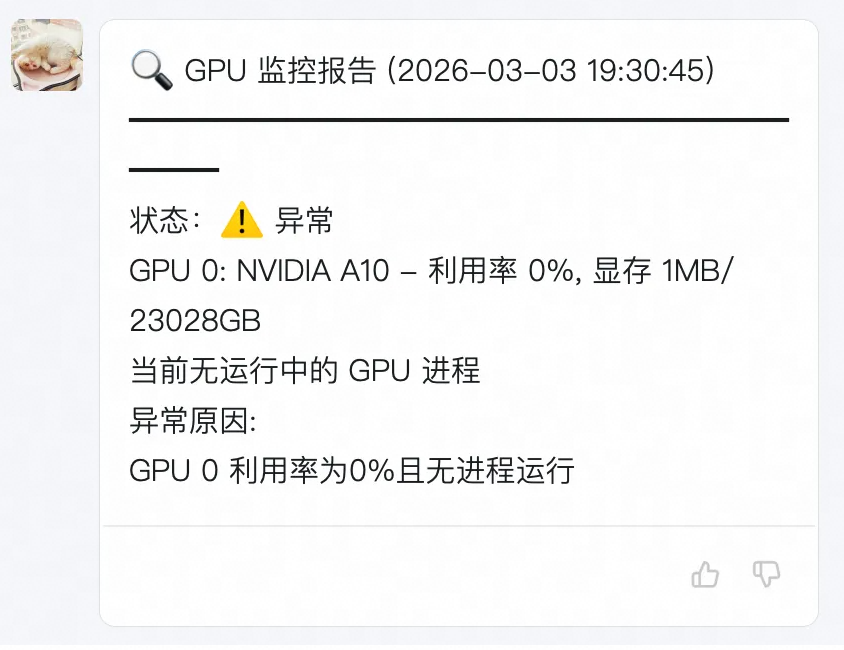
Scenario 3: Automatically archive experiment data
User pain point: The most tedious part of running algorithm experiments is not running them, but organizing the records. After each training run, you have to manually record hyperparameters, result metrics, conclusions, and future improvements.
Solution: Use OpenClaw's memory mechanism combined with scheduled tasks to automate experiment logging.
Please run the experiment log archiving task every night at 10 PM:
1. Run the archiving script:
   python /gpu-training-tester/experiment_archiver.py
2. If it returns 'HEARTBEAT_OK', it means there are no new experiments today, so no action is needed.
3. If it returns experiment records, please:
   - Append the records to /mnt/workspace/experiment_log.md
   - Remember these experiment results (using the memory feature).
   - Send a summary to DingTalk.
Remember: When I ask about historical experiments later, you should be able to retrieve this information from your memory.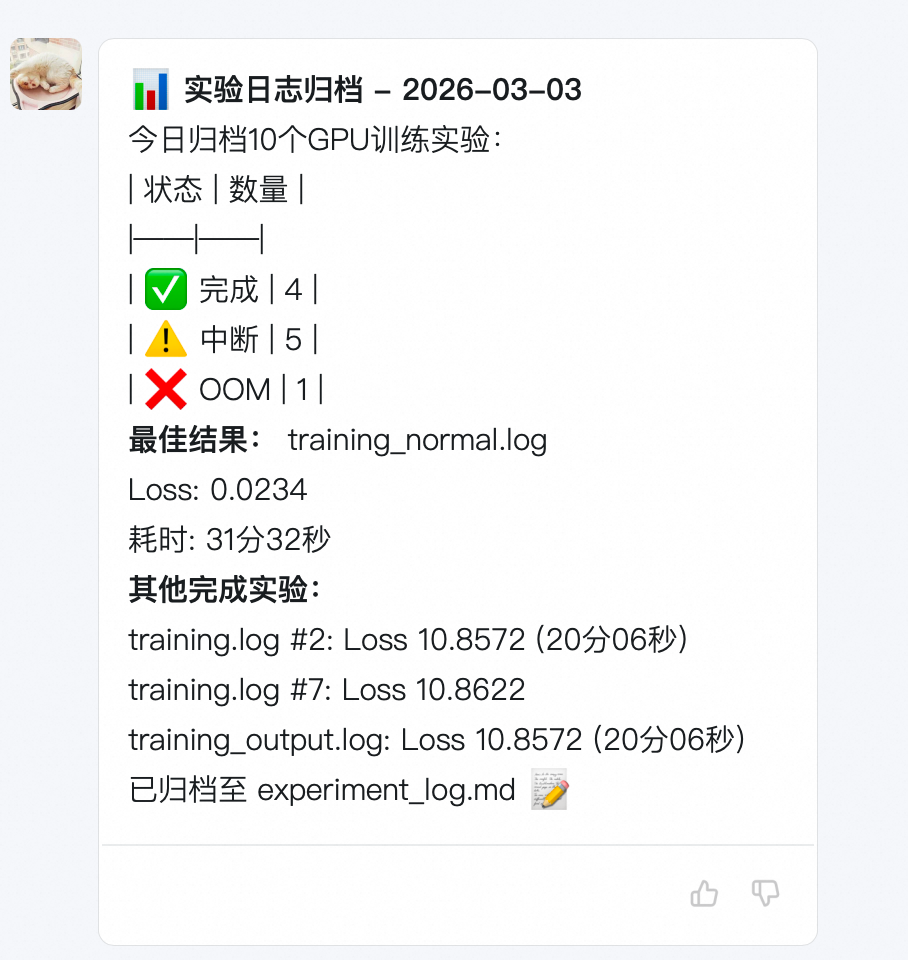
After this, the /mnt/workspace/experiment_log.md file is automatically maintained:
## Experiment Log

### 2026-03-02

| Experiment | Model | Learning Rate | Epochs | Final Loss | Accuracy | Status | Duration |
|------------|-------|---------------|--------|------------|----------|--------|----------|
| exp_20260302_143015 | qwen-7b | 2e-5 | 3 | 0.0234 | 92.1% | Complete | 0:31:32 |
| exp_20260302_161522 | qwen-7b | 5e-5 | 3 | - | - | OOM | 0:04:23 |

### 2026-03-01

| Experiment | Model | Learning Rate | Epochs | Final Loss | Accuracy | Status | Duration |
|------------|-------|---------------|--------|------------|----------|--------|----------|
| exp_20260301_091523 | qwen-7b | 1e-5 | 5 | 0.0312 | 91.8% | Complete | 2h28m |
| exp_20260301_141035 | qwen-14b | 1e-5 | 5 | - | - | OOM | 12m |
Users can open the file directly in JupyterLab to view it, or query OpenClaw at any time for task comparisons and details about experimental data.
Appendix
A. OpenClaw configuration
To make the OpenClaw configuration directory easily visible in the file tree of JupyterLab or your web IDE, create a symbolic link in the DSW terminal:
# Create a symbolic link to the OpenClaw config directory in the workspace
ln -s ~/.openclaw /mnt/workspace/openclaw_config
B. Query gateway token
To query the current gateway token, run:
cat ~/.openclaw/openclaw.json