Data security in collaborative model training
Introduction
Improving model accuracy and performance in large-scale model training often requires using high-quality third-party data.
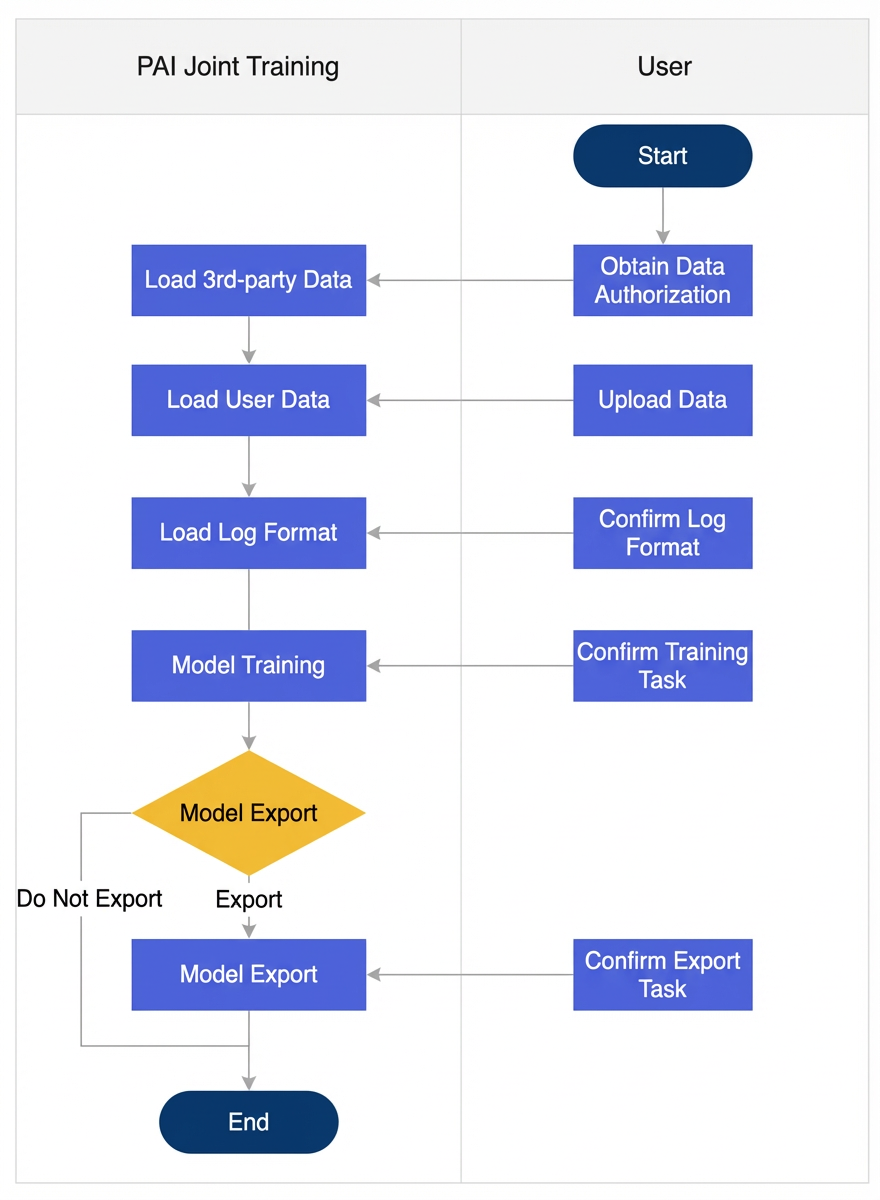
The PAI platform addresses this by providing a secure, compliant collaborative training mechanism that allows data to be used without exposing it. This achieves the core objective of ensuring that data is usable but not visible, and its value is shareable but not copyable. Its core security mechanisms include:
-
Cross-account authorization: Data providers use Alibaba Cloud's cross-account authorization to grant model trainers access to training data within a controlled sandbox environment provided by Distributed Training (DLC). This setup prevents trainers from accessing, downloading, or viewing the raw data.
-
Training data filtering: Training logs are strictly filtered to prevent data leaks.
-
Model export security scanning: When models are exported, their files are scanned to detect and block any residual training data, preventing data leaks.
Prerequisites
Contact your account manager to complete the following preparations:
-
Authorize third-party data use: Provide your account ID, PAI workspace ID, and the permitted duration and frequency of use.
-
Provide base model information: Include a high-level architecture overview and key performance metrics to help us adapt the security scanning policies.
-
Confirm log output format: Describe your model's training logs, including the framework used, to help us configure the appropriate output rules.
Procedure
Step 1: Submit a training job
-
View the dataset shared by the data provider. Log on to the PAI console. In the upper-left corner, select the target region and workspace. In the left-side navigation pane, choose AI Asset Management > Datasets. In the list, verify that the dataset shared by the data provider is visible.
-
Create a DLC task. In the left-side navigation pane, choose Model Training > Deep Learning Containers (DLC), and then click Create Job.
-
Configure the DLC task parameters. In addition to the key parameters described below, configure the job name, image, and resources as needed.
-
Mount dataset: Add a Custom Dataset. Select the cross-account shared dataset and your own datasets. You must enable Read-only mode for all selected datasets; otherwise, the job submission will fail.
-
Model name: Required. This name is used for the model subdirectory for the current job and for the model name to be registered in Model Center after training is complete.
In the Dataset Mounting section, you must enable the Read-only switch when mounting a cross-account shared dataset. We recommend enabling read-only mode for your own datasets as well. After you mount a cross-account shared dataset, the Model Name field becomes required.
After you configure the parameters, click Confirm to create the task.
-
-
View job details and training logs.
After submitting the job, view the job details.
The Overview tab on the job details page shows a timeline of task stages (Task Created, Queuing, Preparing Environment, Task Running, Task Stopped). It also contains the following sections: Basic Information (task name and ID), Environment Information (node image, dataset, model, command, and variables), Resource Information (resource type such as Lingjun Intelligent Computing, resource quota, framework, priority, and worker node configurations), and Network Information (Virtual Private Cloud (VPC), security group, and vSwitch).
View the training log content.
On the task details page, a progress bar at the top displays the task lifecycle stages and their durations; on the Logs tab, the User Logs section shows training parameters (e.g.,
world_size=8,weight_decay=0.01, andv_head_dim=128) and iteration progress (e.g.,iteration 1/30, throughput, checkpoint saves). The Instance List in the lower-left corner displays the status of each instance, such as Succeeded.
Step 2: Scan and export the model
When the training job succeeds, the PAI platform automatically registers the resulting model in Model Center using the name you specified during job submission.
-
In the left-side navigation pane of the PAI console, choose AI Asset Management > Models. In the model list, find the model with the name you specified for the job.
-
Click the model to open its details page.
The model details page contains basic information (such as Model Name and Model ID), a tags section, and a list of model versions. The tag
PAIExportModelEnabled : trueindicates that the model can be exported. The version list includes details such as Version, Model Address, and Admission Status (for example, Pending). The Actions column for each version provides options such as deploy to EAS and Export. -
Click Export and configure the required settings to export the model.
-
model_file: The directory of the model files to be exported.
-
model_name: The name of the model architecture.
For resource configuration, set Resource Type to Lingjun Intelligent Computing, Resource Source to Resource Quota, and Resource Quota to Lingjun Intelligent Computing-shared. For the task resources, you must specify the Number of Nodes, GPU (cards), CPU (cores), Memory (GiB), and Shared Memory (GiB). For the hyperparameters, set model_file to
/workspace/Qwen3-VL-2B-Instructand model_name toQwen3-VL-2B-Instruct. After you complete the settings, click Export. -