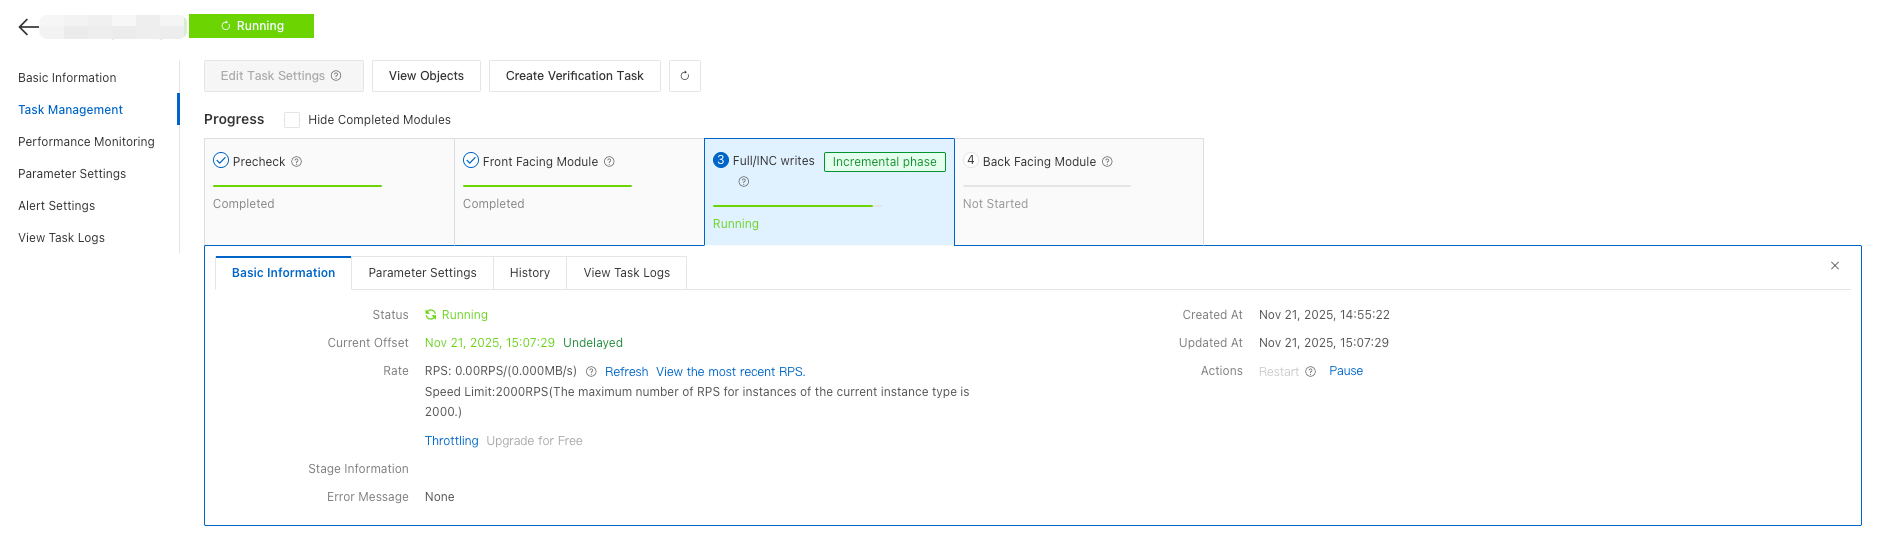
This topic explains how to use Data Transmission Service (DTS) for full and incremental data migration between Redis and the Orca feature of PolarDB for MySQL. It also covers how to migrate data from Orca to other databases.
For questions about Orca data migration, join our DingTalk support group by searching for the group ID. You can @ an expert in the group with your question.
DingTalk group ID: 126410000799
Prerequisites
-
The Orca feature is enabled for your PolarDB for MySQL cluster. For more information, see Enable the Orca feature.
-
You have created at least one Orca account for DTS to use for login.
Limitations
-
DTS does not support incremental data migration from Orca.
-
The Orca feature currently supports connections only through a VPN Gateway, regardless of whether Orca is the source or the destination.
-
Data Transmission Service (DTS) does not support two-way synchronization.
-
Redis version limits:
-
If Orca is the source, ensure that the destination version is compatible with the Redis versions supported by Orca.
-
If you use another Redis product as the source, ensure its version is 2.8.0 or later, but not newer than the Redis version supported by Orca (Redis 7.0).
-
-
The Orca feature supports up to 16 Redis databases (DB0 to DB15). If the source Redis uses databases above DB15, such as DB16 to DB255, their data cannot be migrated.
Billing
|
Migration type |
Link specification fee |
Public traffic fee |
|
Full data migration |
Free of charge. |
Migrating data over the public network incurs fees. For more information, see Billable Items. |
|
Incremental data migration |
Billed. For more information, see Billable Items. |
Procedure
This example shows how to migrate data from Tair (Redis OSS-compatible) to Orca.
Step 1: Configure source and destination
-
Log on to the DTS migration task list page and click Create Task.
-
Configure the source and destination databases.
Section
Parameter
Description
Sample image
N/A
Task Name
DTS automatically generates a task name. For easier identification, specify a descriptive name. The name does not need to be unique.
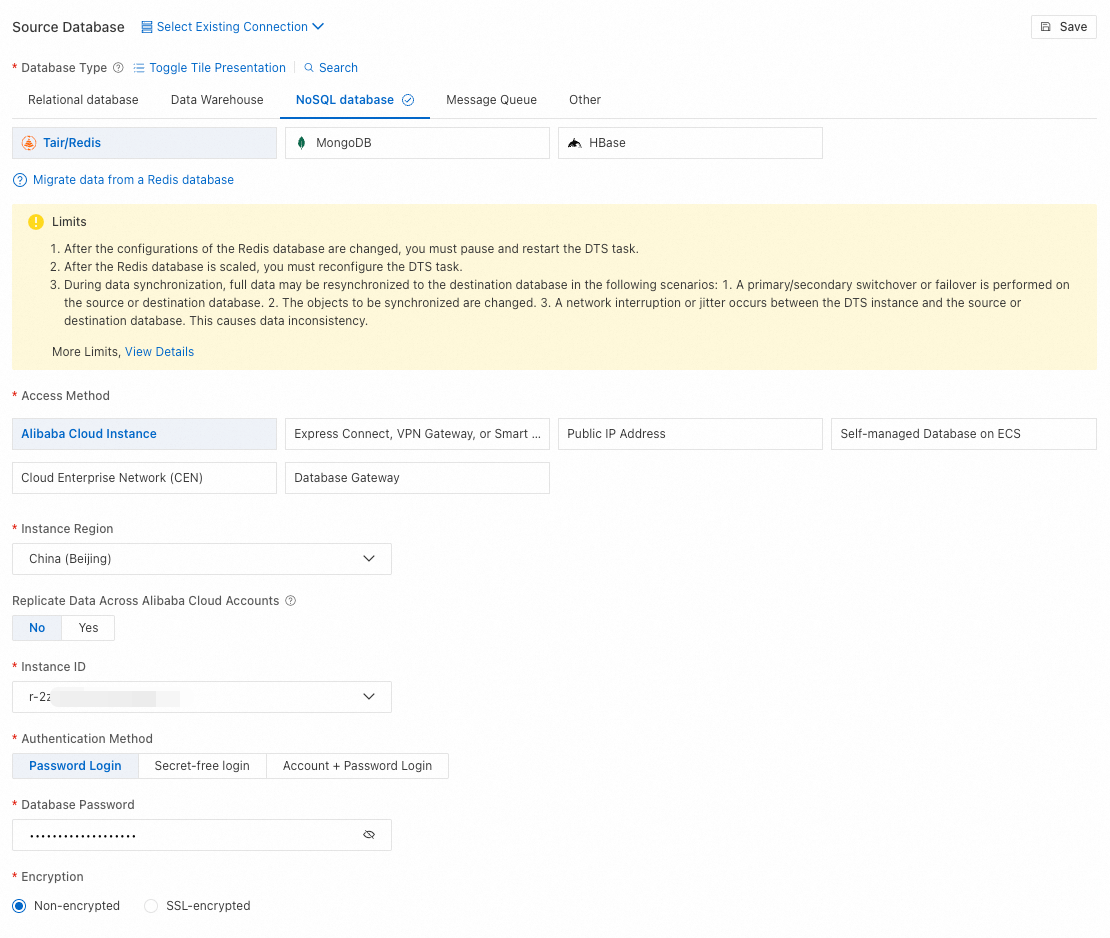
Source database
Database Type
Select a database type based on the deployment location of the source database. This example uses .
NoteIf the source or destination database is hosted on another cloud platform, you must also complete additional preparations.
Access Method
Select Alibaba Cloud Instance.
NoteConfigure this parameter based on your business requirements.
Instance Region
Select the region where the Tair/Redis instance is located.
NoteIf the source or destination database is on another cloud platform, you can select a nearby region.
Replicate Data Across Alibaba Cloud Accounts
Configure this parameter based on your business requirements. This example uses an instance in the same No.
Instance ID
Select the Tair/Redis instance in your account.
Authentication Method
Select Password Login.
Database Password
Enter the password for the Tair/Redis instance.
Encryption
Based on your Tair/Redis instance settings, select Non-encrypted or SSL-encrypted.
Destination database
Database Type
This parameter is fixed to .
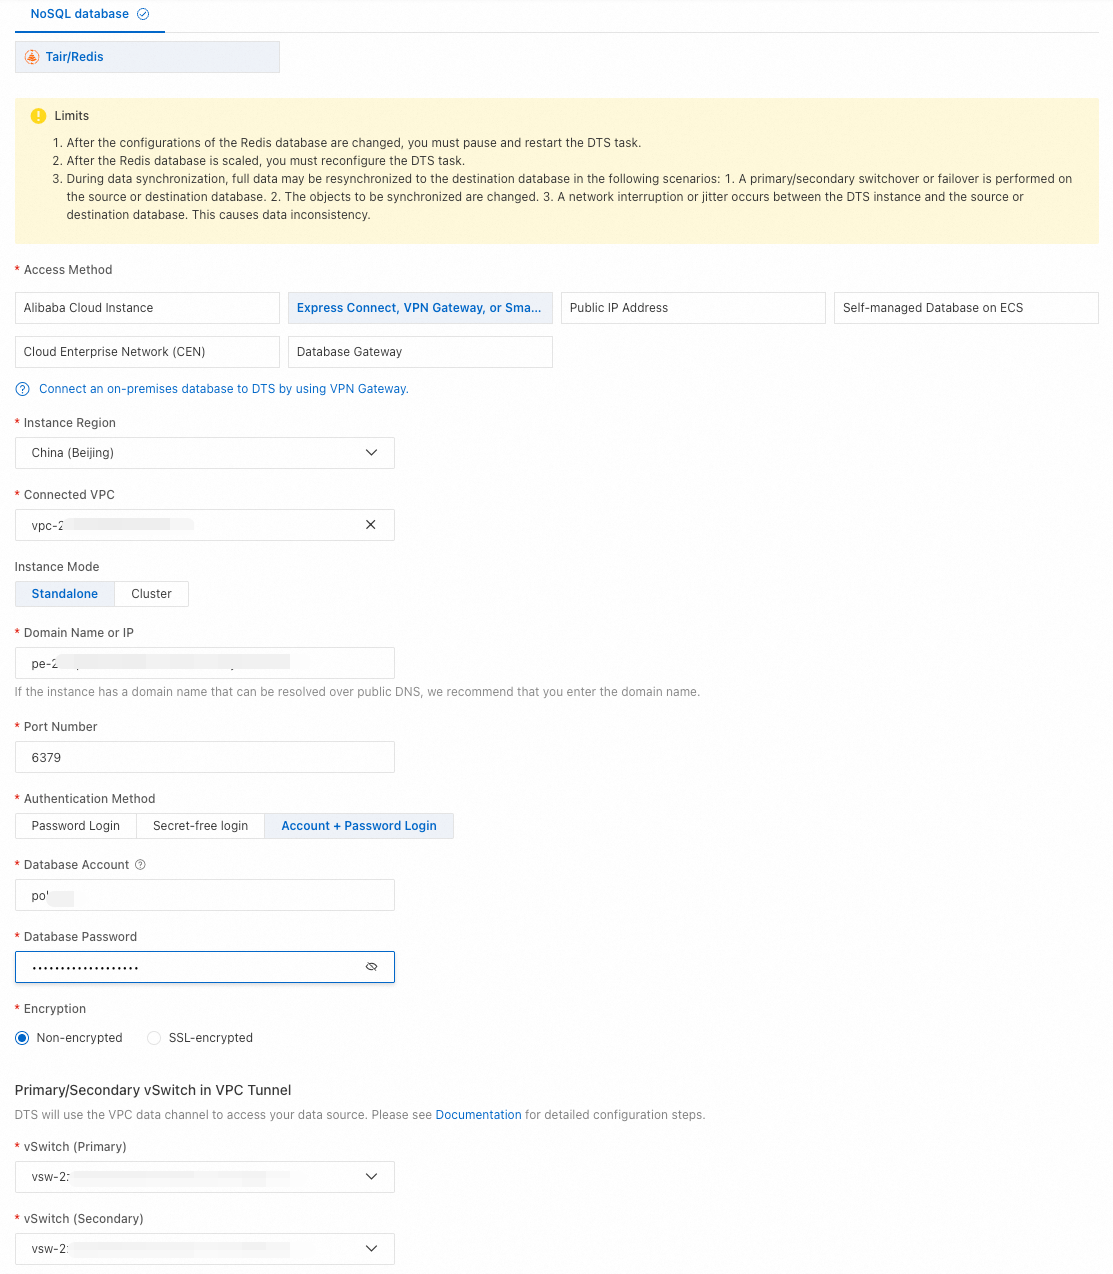
Access Method
Select Express Connect, VPN Gateway, or Smart Access Gateway.
Instance Region
Select the region where the PolarDB for MySQL cluster resides.
Connected VPC
Select the VPC for the PolarDB cluster.
Instance Mode
This parameter is fixed to Standalone. The cluster edition is not supported.
Domain Name or IP
Enter the private endpoint of Orca.
Port Number
Enter the port for the Orca private endpoint. The default port is 6379.
Authentication Method
Select Account + Password Login.
Database Account
Enter the Orca account.
Database Password
Enter the password for the Orca account.
Encryption
Based on your PolarDB for MySQL cluster settings, select Non-encrypted or SSL-encrypted.
Primary/Secondary vSwitch in VPC Tunnel
Select the vSwitches that DTS will use to access the data source through the VPC.
-
Click Test Connectivity and Proceed. In the CIDR Blocks of DTS Servers dialog box, add the IP addresses listed for the Destination to the whitelist of your PolarDB for MySQL cluster. Click Confirm authorization and test link. A successful connection test automatically proceeds to the next step.
WarningAdding public IP addresses of DTS servers may introduce security risks. By using this product, you acknowledge and accept these risks. Implement basic security measures such as strong passwords, restricted ports, API authentication, regular network segment reviews, or private connections through Express Connect, VPN Gateway, or Smart Access Gateway.
Step 2: Configure migration objects and types
-
Configure migration settings.
Parameter
Description
Sample image
Migration types
-
To perform only a full data migration, select Full Data Migration.
-
To perform a migration with minimal downtime, select full data migration + incremental data migration.
NoteIf you do not select incremental data migration, do not write new data to the Tair/Redis source during the migration to ensure data consistency.
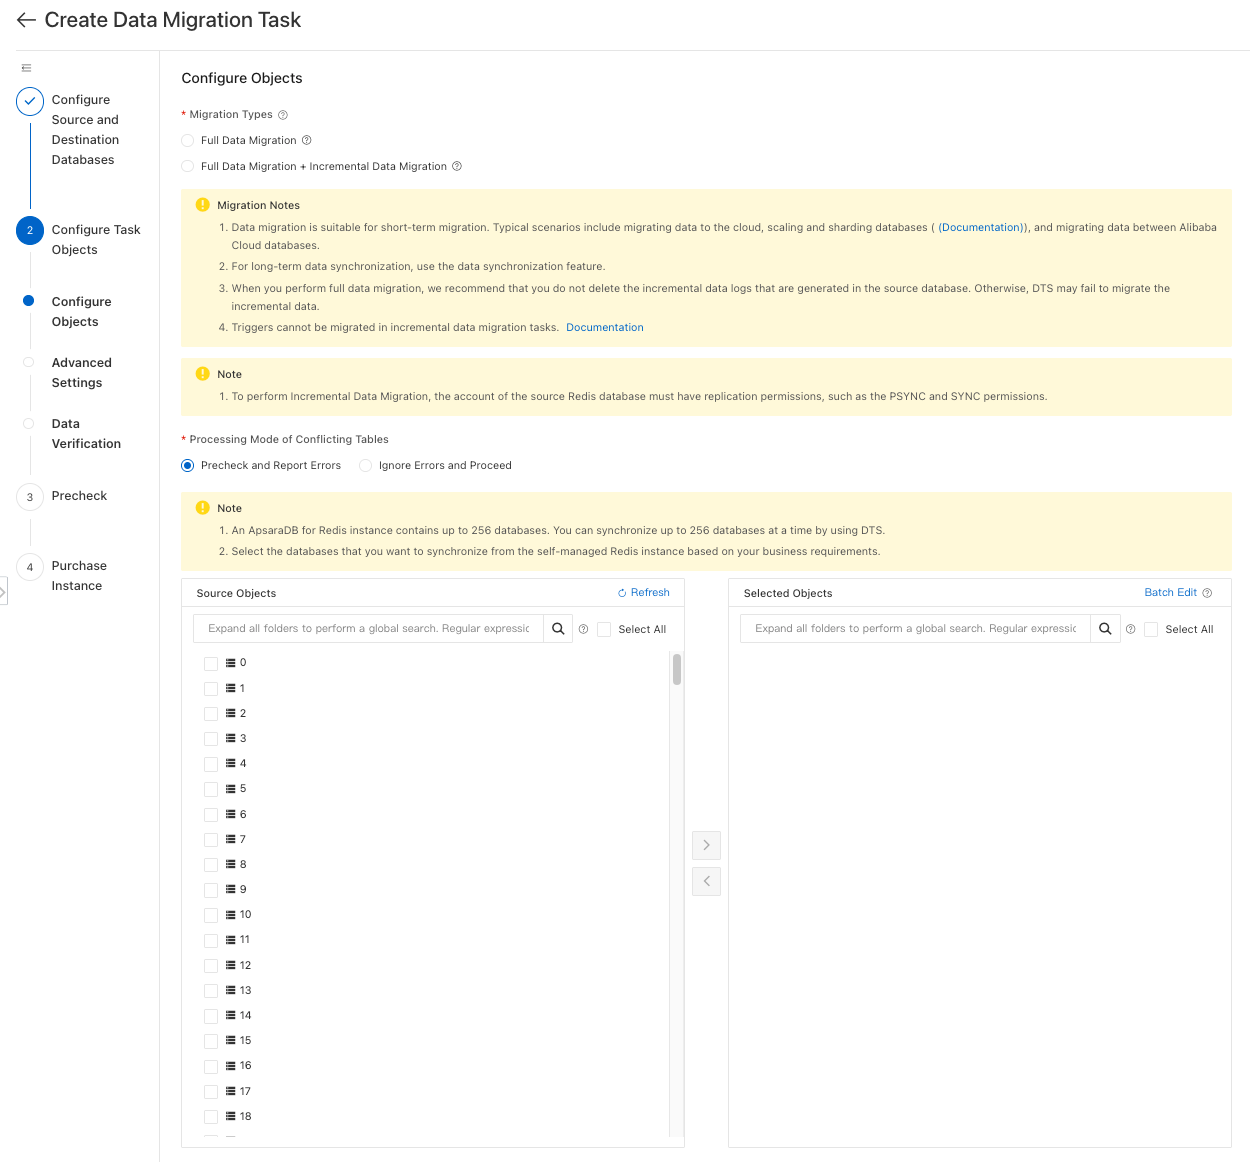
Conflict handling for existing objects
-
Precheck and Report Errors: Checks whether the destination is empty. If the destination to be migrated to is empty, the precheck is passed. If not, an error is reported during the precheck, and the data migration job does not start.
-
Ignore Errors and Proceed: Skips the Check the existence of objects in the destination database. check item.
WarningIf you select Ignore Errors and Proceed and a key in the destination has the same name as a key in the source during migration, the data from the source overwrites the data in the destination. This may cause data loss in the destination. Proceed with caution.
Migration objects
In the Source Objects box, click the objects to migrate, and then click
 to move them to the Selected Objects box.Note
-
Data is migrated at the database level.
-
In the Source Objects box, select the database to migrate. Orca supports DB0 to DB15.
-
-
Click Advanced Settings and configure the parameters as required.
-
Click Data Verification and configure the parameters as required.
Step 3: Precheck
To use data verification, see Configure data verification. When you are ready, click Next: Save Task Settings and Precheck in the lower-right corner of the page and wait for the precheck to complete.
-
A precheck runs before the migration task starts. You can start the task only after all precheck items pass.
-
If the precheck fails, click the
 icon next to the failed item to view its details.
-
Follow the provided instructions to resolve the issue, and then run the precheck again.
-
For a warning item, you can also click Ignore to skip it and then run the precheck again.
-
Step 4: Purchase and start task
-
On the purchase page, select a Instance Class and select the checkbox to agree to the Data Transmission Service (Pay-as-you-go) Service Terms.
-
Click Buy and Start.
-
Full data migration
Do not manually stop the task, as this may result in incomplete data. Wait for the task to stop automatically.
-
Incremental data migration
An incremental data migration task does not stop automatically. After the task enters the Incremental Data Migration phase and its status is Undelayed, you must manually stop it at an appropriate time. For example, stop the task during off-peak hours or before you switch your business to the destination instance.

-
-
Wait for the migration to complete.