Background
PolarDB-X lets you scale storage resource pools and individual data nodes up or down. This provides fine-grained control, enables resource isolation for different business needs, and improves resource utilization.
-
A storage resource pool is a group of non-overlapping data nodes. You can add data nodes to or remove them from a specific pool. If you need resource isolation, such as in a multi-tenant SaaS application, you can create a custom storage resource pool for each tenant. By default, PolarDB-X provides two pools:
_default, the default storage resource pool, and_recycle, the recycle bin resource pool. -
The
localityproperty lets you associate database objects, such as databases, tables, and partitions, with different storage resource pools.
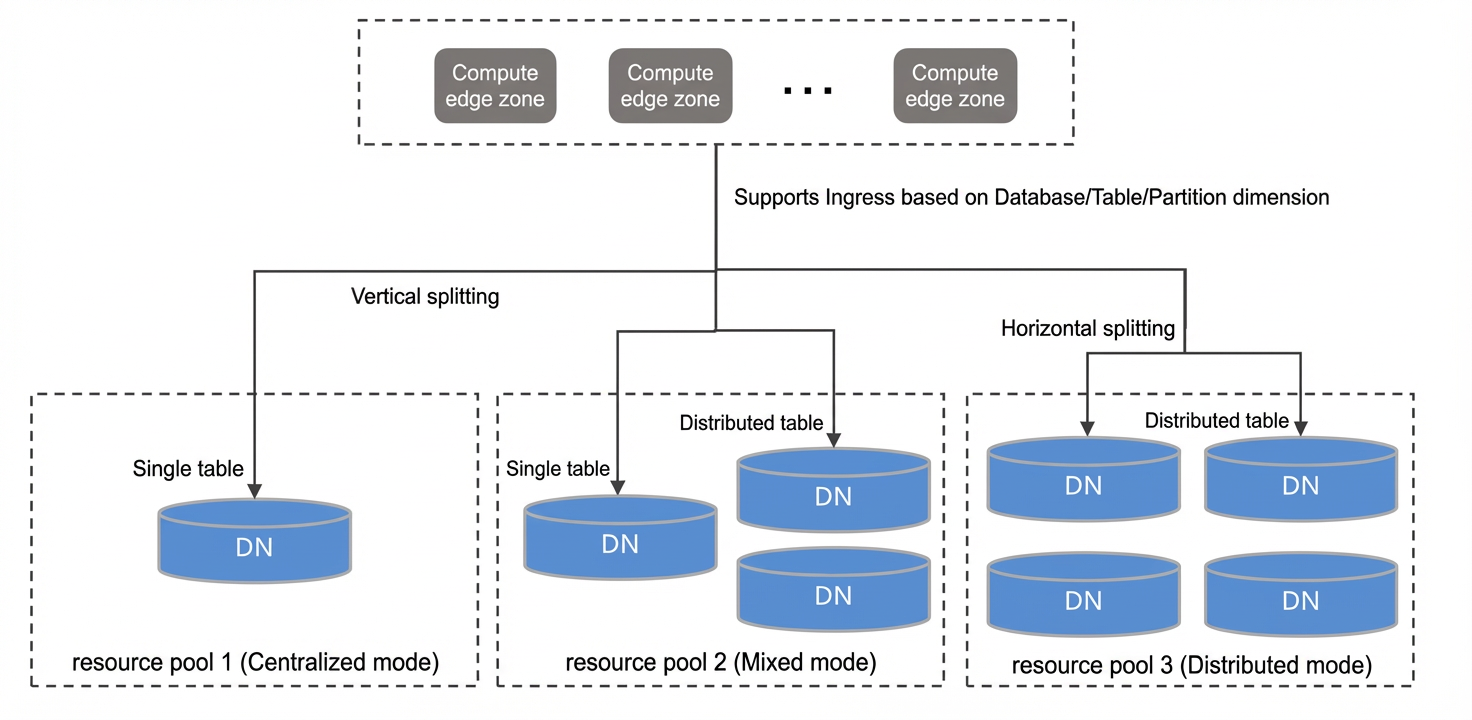
Because data is distributed differently across data nodes, resource requirements can vary for each node. PolarDB-X lets you scale each data node up or down independently to improve overall resource utilization.
Usage notes
-
To use the storage resource pool feature, your PolarDB-X instance must be version V5.4.18-17066805 or later. When you upgrade an instance from an earlier version, PolarDB-X automatically assigns its existing data nodes to the
_defaultstorage resource pool. -
The Data Node Management feature is not supported for read-only instances.
-
After you change the configuration of a single data node, the specifications of the data nodes within the instance are no longer identical. This affects instance management in the following ways:
-
You can no longer scale the entire PolarDB-X instance up or down. Instead, you must change the configurations of compute nodes and data nodes separately.
-
You can no longer scale in the PolarDB-X instance by reducing the number of data nodes. To scale in, you must delete specific data nodes from the Data Node Management page.
-
Procedure
Create a custom storage resource pool
If your business requires resource isolation, such as in a multi-tenant SaaS application, you can create a dedicated custom resource pool for each tenant.
-
Log on to the PolarDB-X console.
-
In the upper-left corner of the page, select the region where your target instance is located.
-
On the Instances page, click the PolarDB-X 2.0 tab.
-
Find the target instance and click its ID.
-
In the navigation pane on the left, click Data Node Management.
-
On the right side of the page, click Create Resource Pool.
-
In the Create Resource Pool dialog box, enter a Resource Pool Name. Under Advanced Options, you can Select Data Node from the
_recyclestorage resource pool and associate them with the new pool. This step is optional, and you can add nodes after the pool is created.
-
Click OK to create the custom storage resource pool.
Change data node configuration
-
Log on to the PolarDB-X console.
-
In the upper-left corner of the page, select the region where your target instance is located.
-
On the Instances page, click the PolarDB-X 2.0 tab.
-
Find the target instance and click its ID.
-
In the navigation pane on the left, click Data Node Management.
-
In the data node list, find the target node and click Change Configurations in the Actions column.
NoteTo change the configurations of multiple data nodes at once, select the nodes and click Batch Change Configurations in the upper-right corner.
-
In the Data Node Configuration Change dialog box, select the target specifications and the switchover method for the data node.
-
Click Buy Now to submit the Change Configurations request.
Add a data node
-
Log on to the PolarDB-X console.
-
In the upper-left corner of the page, select the region where your target instance is located.
-
On the Instances page, click the PolarDB-X 2.0 tab.
-
Find the target instance and click its ID.
-
In the navigation pane on the left, click Data Node Management.
-
Add a node.
-
If your instance version does not support the storage resource pool feature, click Add Node in the upper-right corner of the page.
-
If your instance supports storage resource pools, click the target storage resource pool tab, and then click Add Node to add data nodes to that pool.
NoteIf you have not created any custom storage pools for your instance, new nodes are added to the
_defaultstorage resource pool. -
-
In the dialog box, select the number of data nodes to add and click Submit.
Release a data node
-
Log on to the PolarDB-X console.
-
In the upper-left corner of the page, select the region where your target instance is located.
-
On the Instances page, click the PolarDB-X 2.0 tab.
-
Find the target instance and click its ID.
-
In the navigation pane on the left, click Data Node Management.
-
In the data node list, find the target node and click Release Node in the Actions column.
Note-
To release multiple data nodes at the same time, select the nodes and click Delete Node in the upper-right corner.
-
Some data nodes serve as the default storage for single tables. You can change their configurations, but you cannot release them. For these nodes, the Release Node button is unavailable.
-
Deleting a node reduces the maximum load capacity of the instance. You must fully evaluate and confirm that the remaining capacity of the PolarDB-X instance is sufficient for your business needs. After a data node is deleted, historical backup sets become invalid. If you delete a data node, we recommend that you create a new backup immediately after the node is successfully deleted.