Create a DingTalk Sheet data source
Connect a DingTalk Sheet as a data source to import business data into Quick BI. This lets you use the powerful analytical tools in Quick BI to gain actionable insights from your sheet data without disrupting your daily workflow. This topic shows you how to create a DingTalk Sheet data source.
Prerequisites
You have created a DingTalk application and obtained the required authorization information. For more information, see Obtain application authorization information.
You have obtained the shareable link for the DingTalk Sheet that you want to connect to Quick BI. For more information, see Obtain a DingTalk Sheet link.
You have completed DingTalk authorization on the Organization Management > Office Software Integration page. For more information, see DingTalk integration.
Your Quick BI account must be bound to a DingTalk account within the same organization as the DingTalk application.
Limitations
Only the Professional Edition supports creating DingTalk Sheet data sources.
DingTalk Sheet data sources have the following limitations:
For a dataset created from a DingTalk Sheet data source:
The custom SQL, extraction acceleration, relational modeling, and placeholder features are not supported.
You cannot create trend analysis tables or multi-dimensional analysis tables based on the dataset.
The monitoring and alerting and self-service data retrieval features are not supported.
Due to limitations set by DingTalk, the API for the Standard Edition has a cumulative limit of 5,000 calls per month. If this call volume is insufficient, you can upgrade to the DingTalk Professional or Exclusive editions to increase the limit. For more details, see the DingTalk PaaS Capability Adjustment Announcement.
Procedure
This procedure involves three main steps: obtaining application authorization, obtaining the sheet link, and creating the data source in Quick BI.
Step 1: Obtain application authorization
Create an internal enterprise application on the DingTalk Open Platform to obtain the authorization information required for authentication in Quick BI.
Log on to the DingTalk developer console and apply for developer permissions for your account.
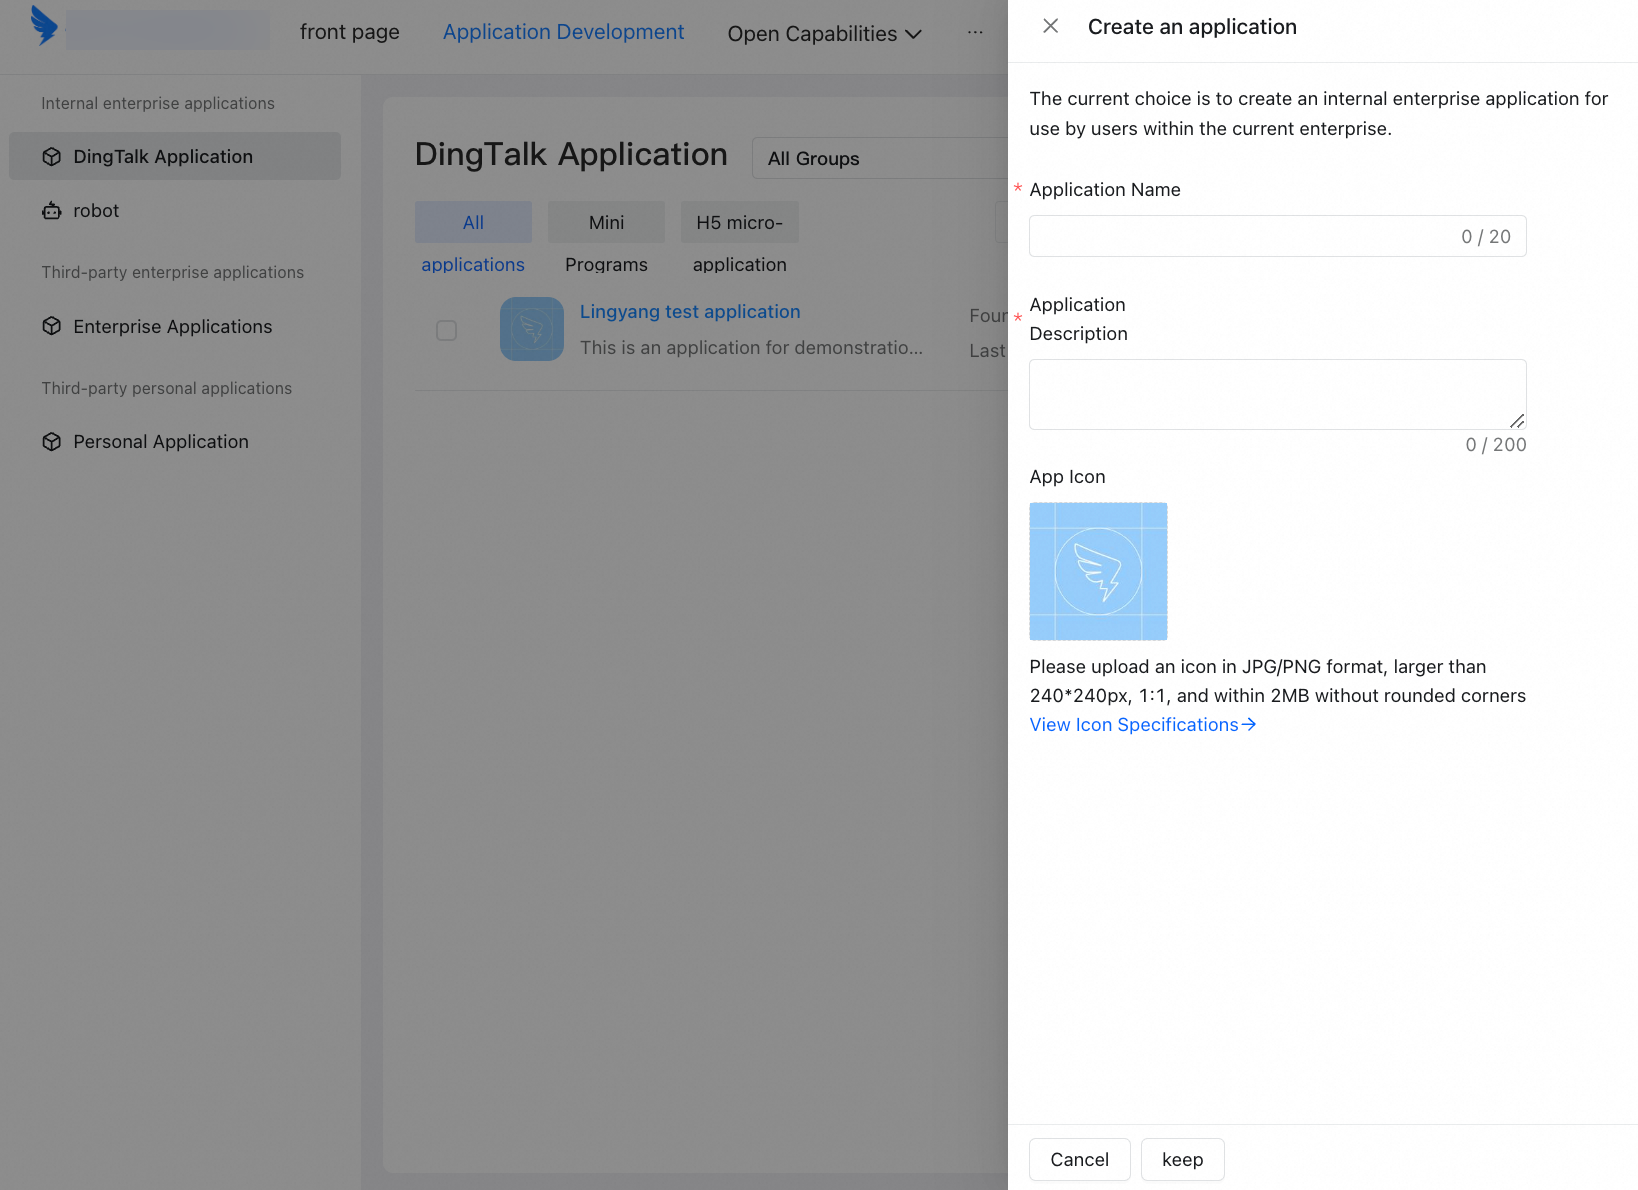
Click Create Application. In the dialog box that appears, provide the application information and click Save.
Quick BI uses APIs to read data from DingTalk Sheets, so you must request API permissions for your application. In the application's developer console, go to permission management and configure the required permissions.
NoteDue to a limitation imposed by DingTalk, the total number of API calls for the DingTalk Standard Edition is limited to 5,000 per month. If this call volume is insufficient for your needs, you can upgrade to the DingTalk Professional Edition or DingTalk Exclusive Edition to increase your call limit. For more information, see DingTalk PaaS Capability Adjustment Announcement.
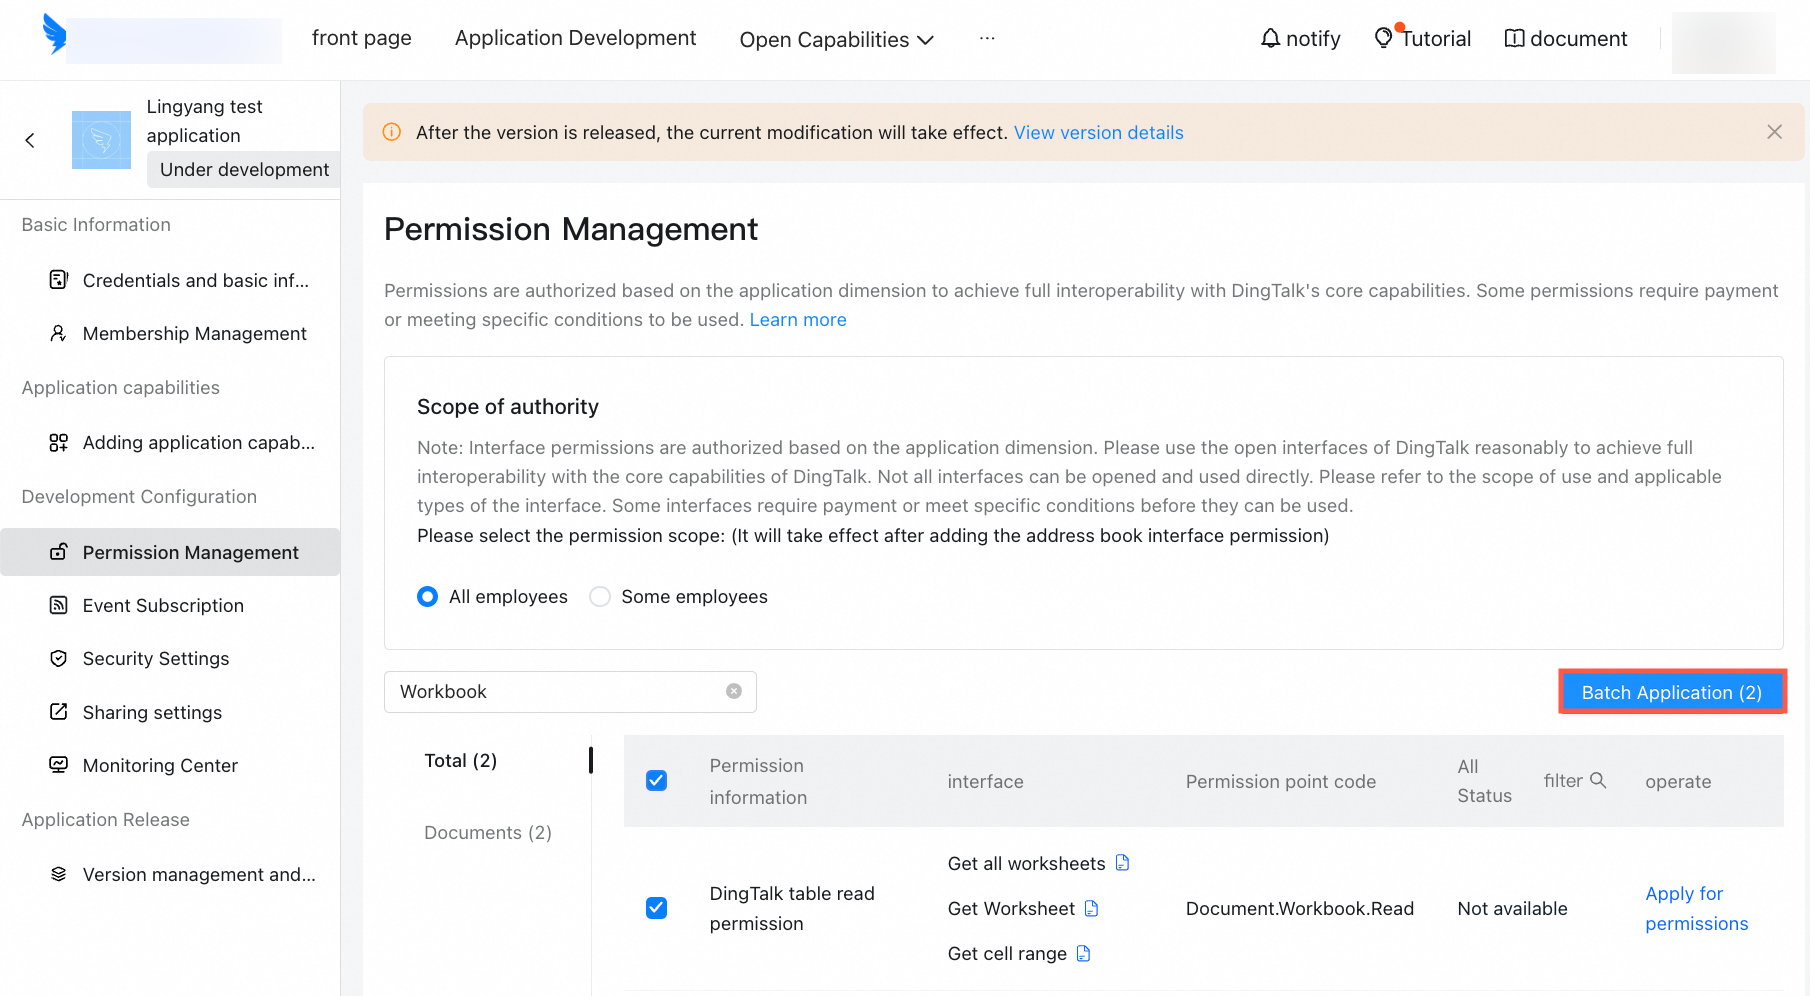
Enable the following API permissions and click Bulk Enable.
DingTalk Sheets Read Permission
Member Information Read Permission
Corporate Storage Application Read Permission
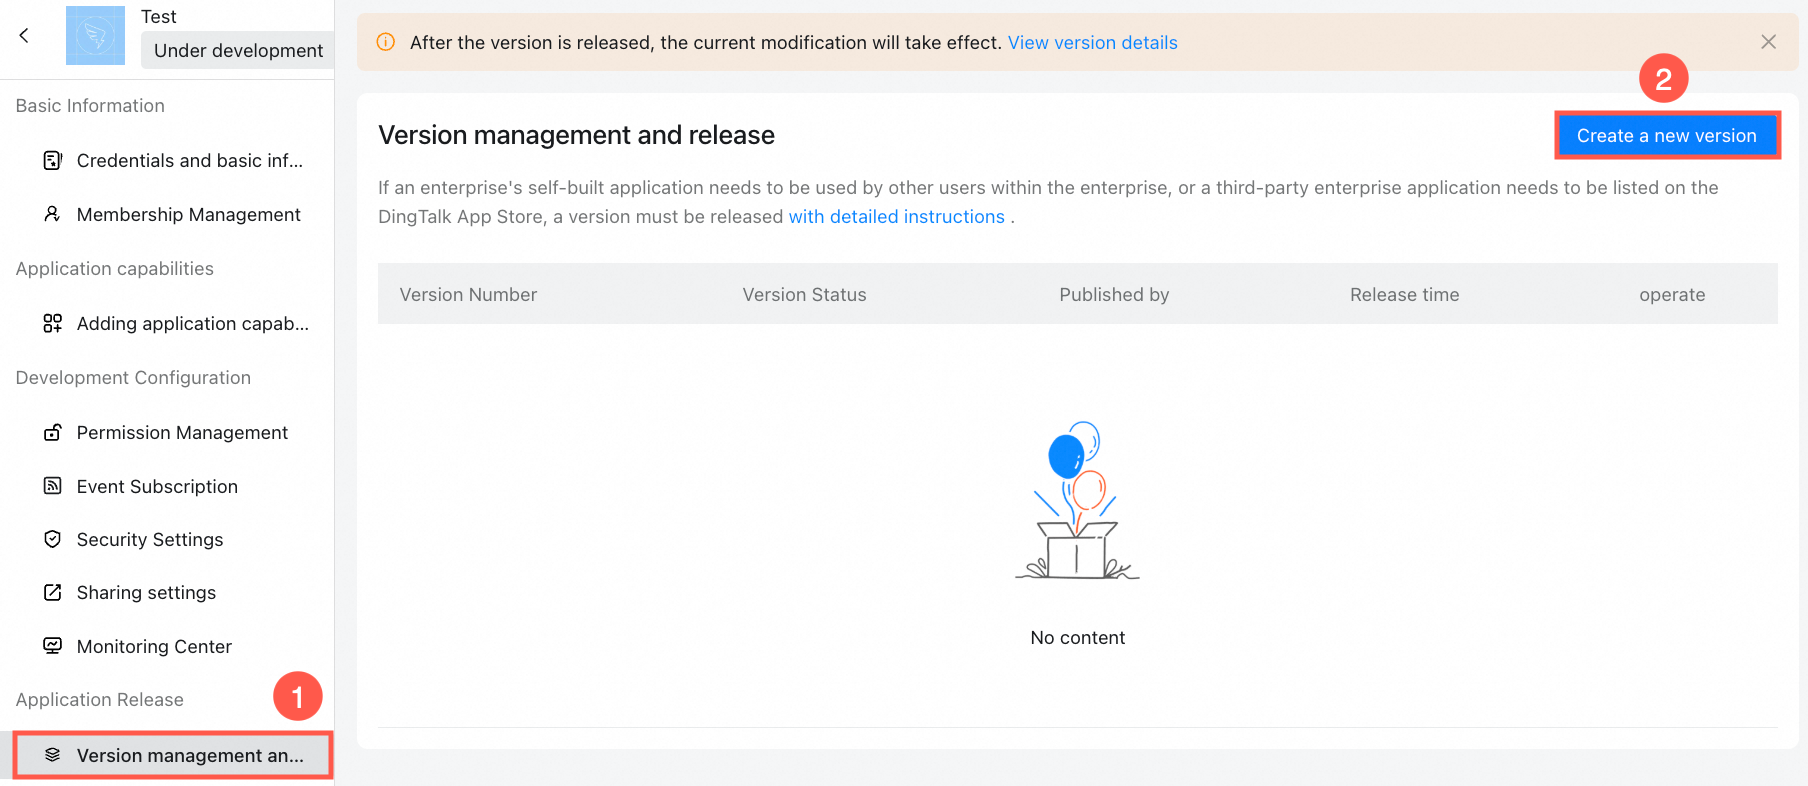
In the right-side navigation pane, choose App Release > Version Management and Release, and then click Create Version.
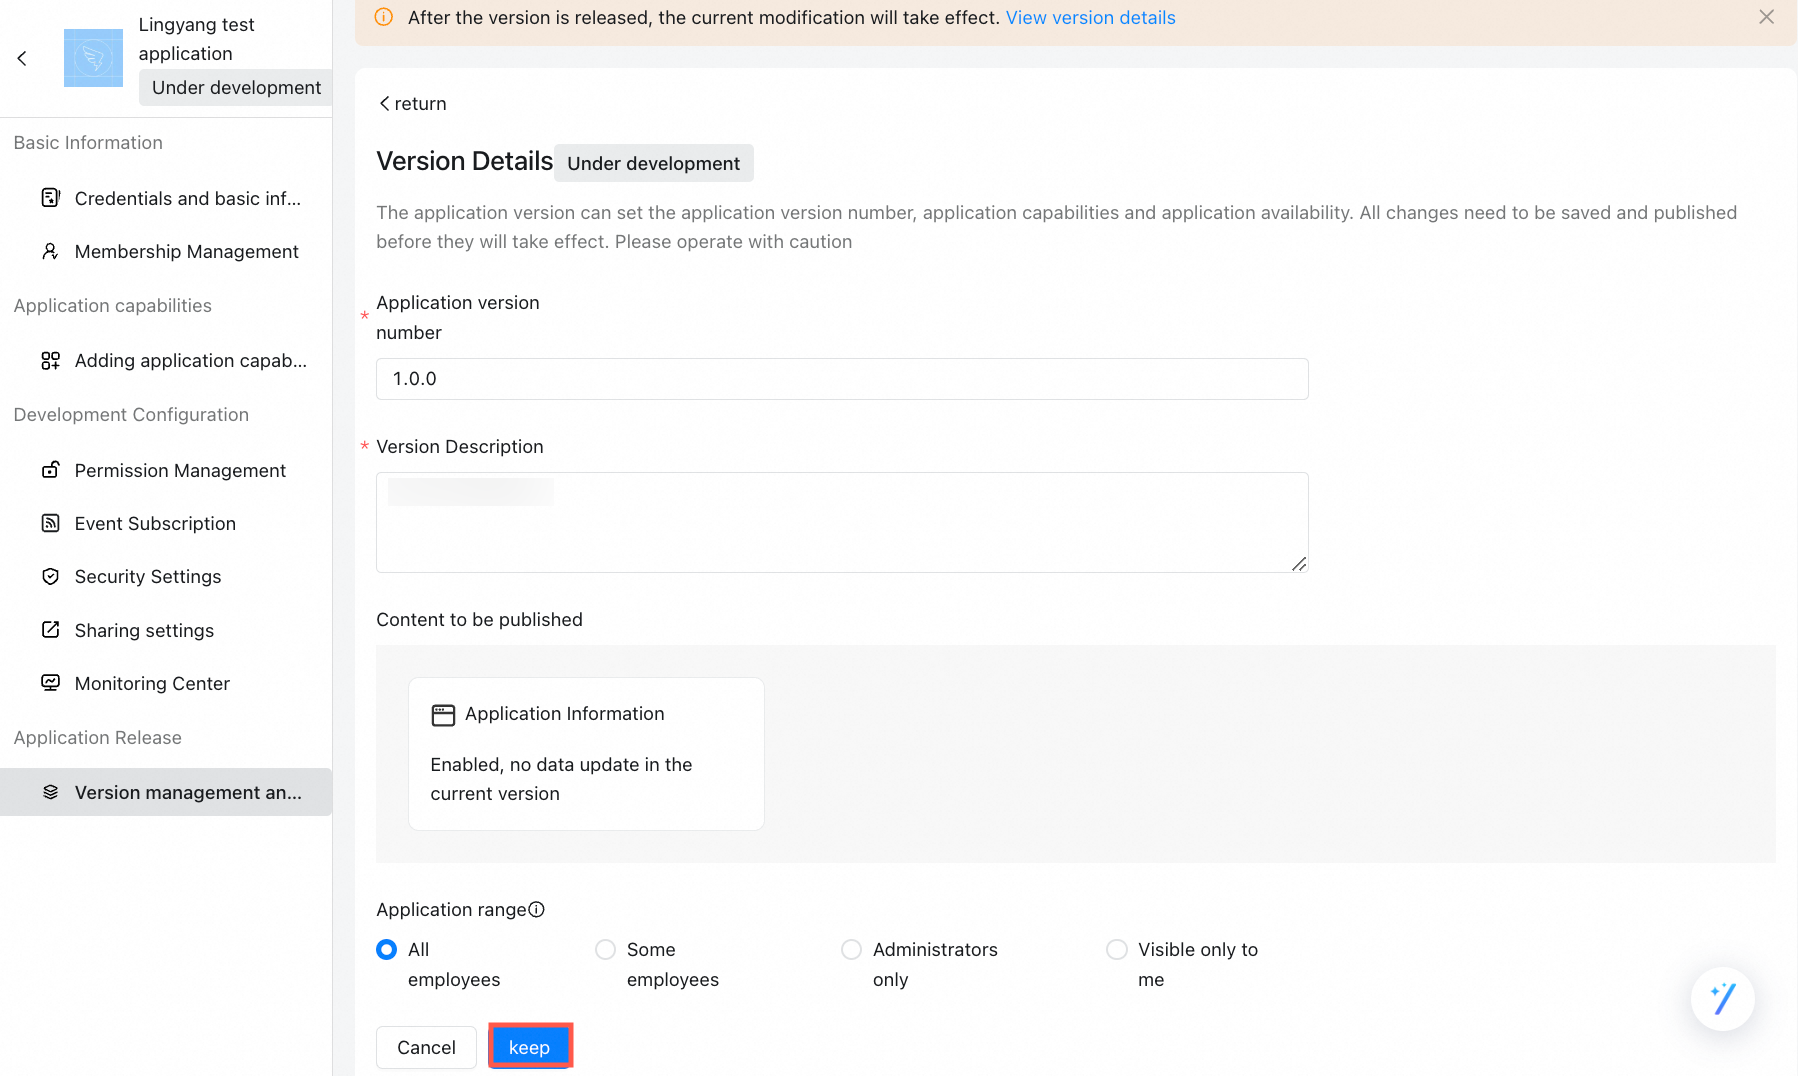
On the Version Details page, configure the version information and click Save. This triggers an approval workflow. The application is published automatically after approval.
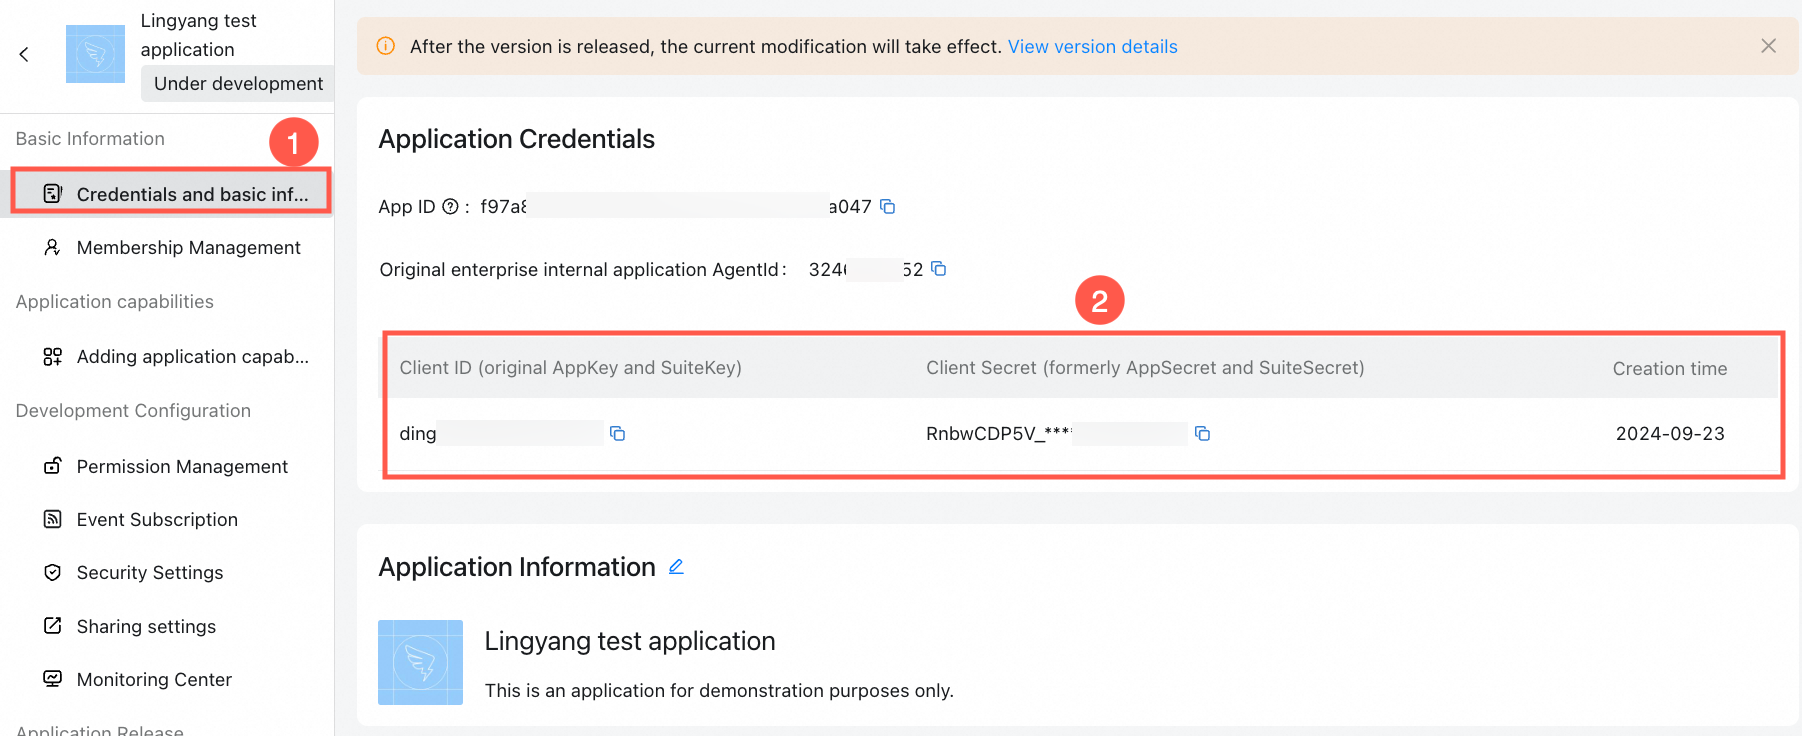
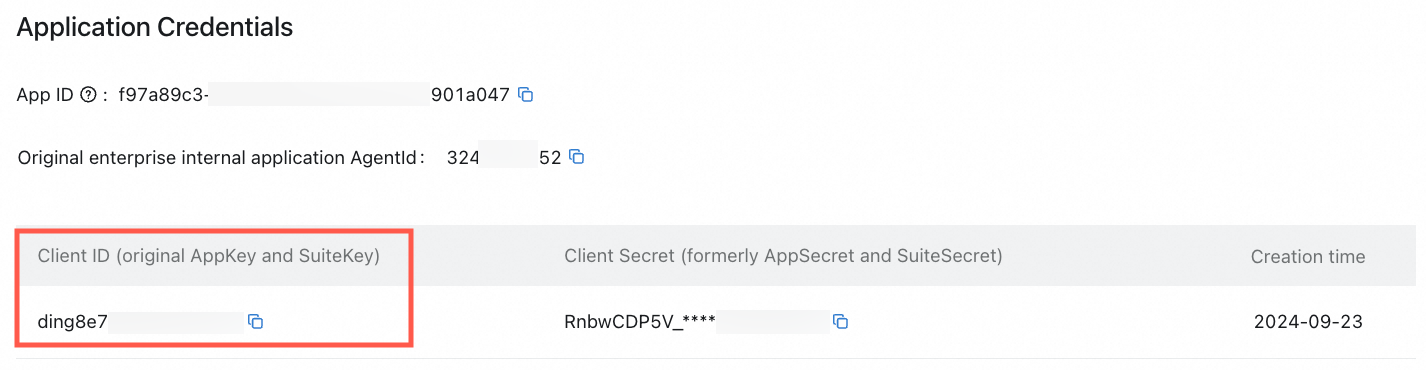
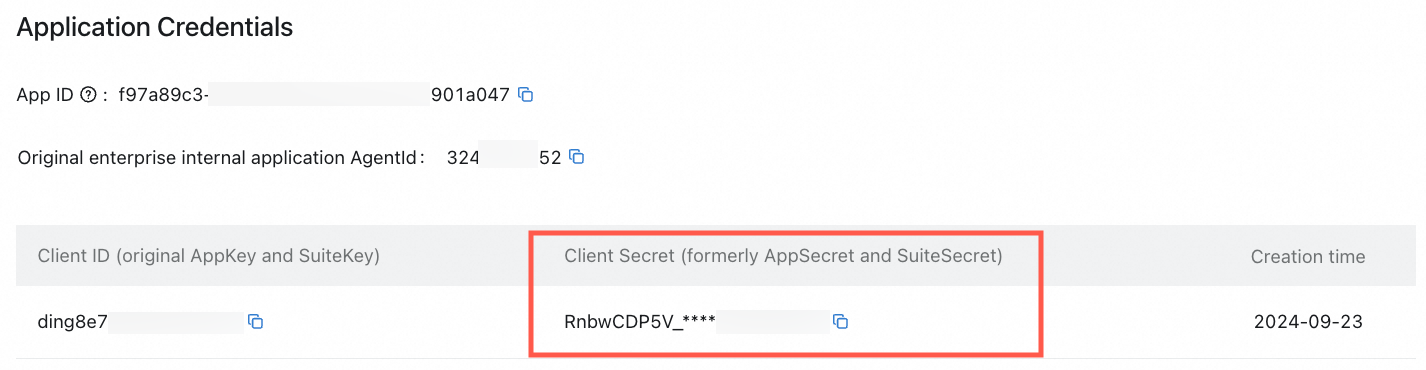
After the application is published, go to the credentials and basic information page. Copy and save the Client ID and Client Secret for the application.
Step 2: Obtain a DingTalk Sheet link
In DingTalk Docs, find the DingTalk Sheet you want to connect, then copy and save its shareable link.
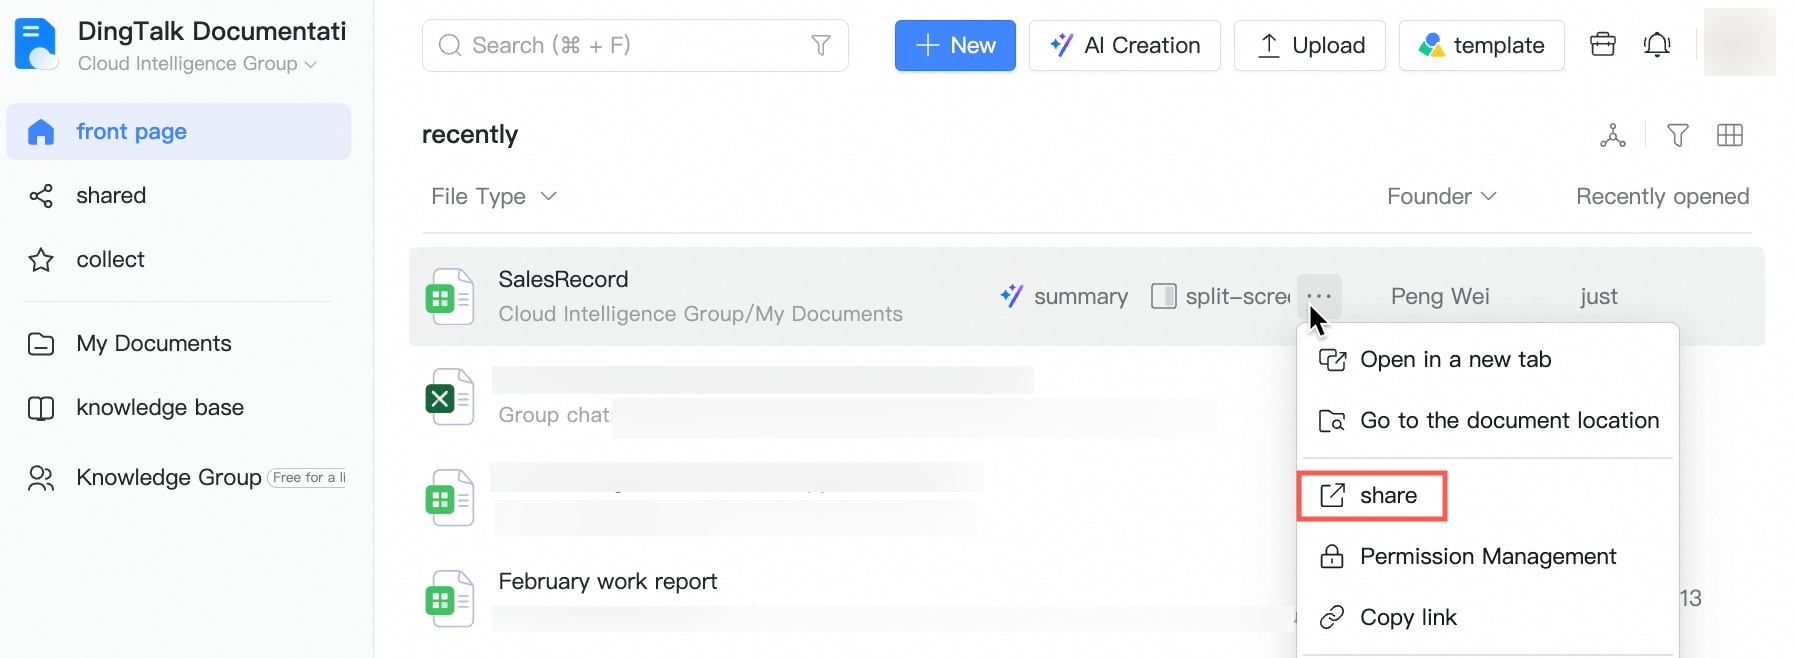
In your DingTalk Docs list, find the target DingTalk Sheet, and click Share from the drop-down list in the Actions column.
 Note
NoteA DingTalk Sheet connected to Quick BI must meet the following requirements:
A single worksheet cannot have more than 100 columns or 10,000 rows.
The data in the DingTalk Sheet must be structured. Avoid using different data types within the same column.
Ensure that the first column is not empty, no intermediate columns are empty, column names are not duplicated, and no merged cells exist. Otherwise, data parsing or synchronization errors may occur.
Formulas from the source sheet are not supported. Only the calculated values are imported.
The worksheets in the DingTalk Sheet must not be empty, and the total number of worksheets cannot exceed five.
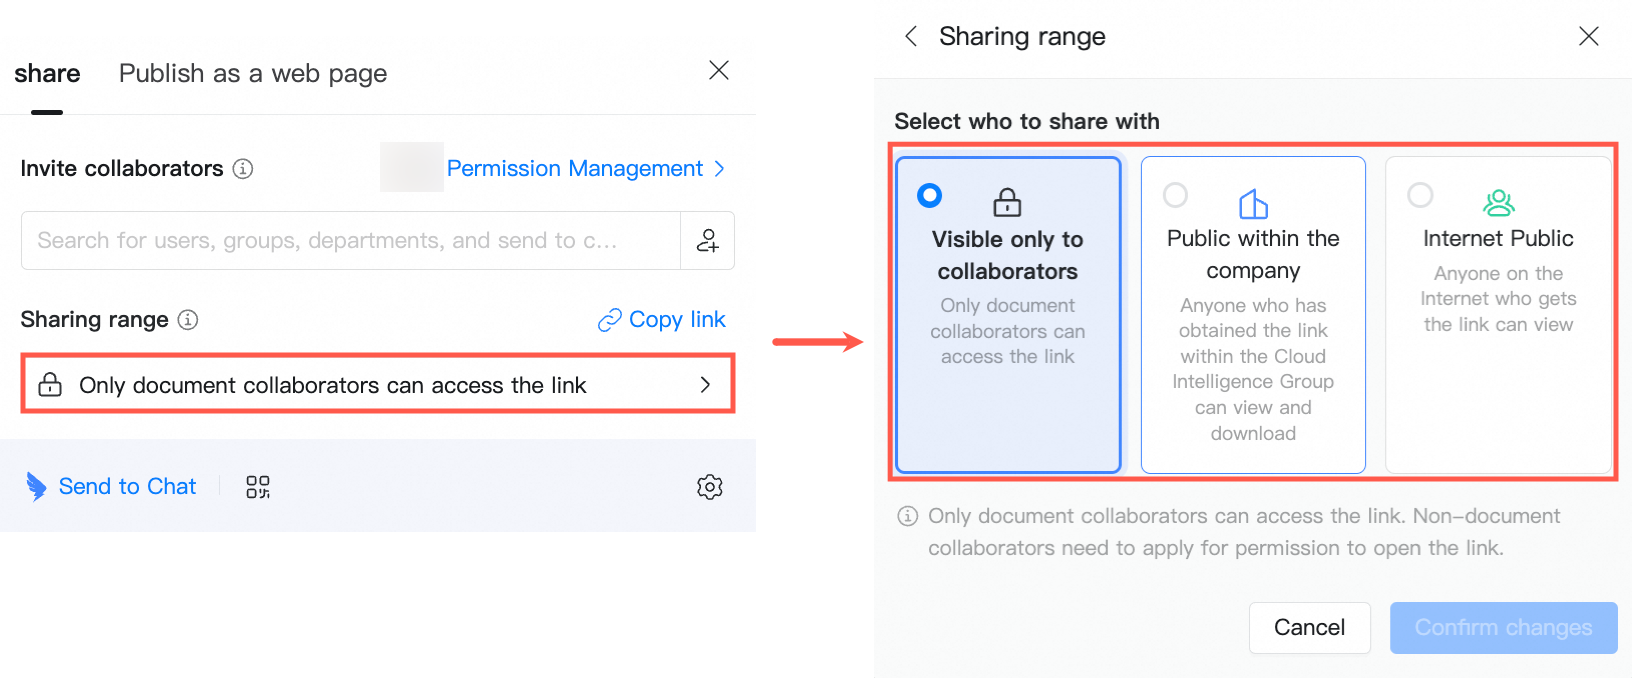
In the Share dialog box, configure the sharing permissions for the link.
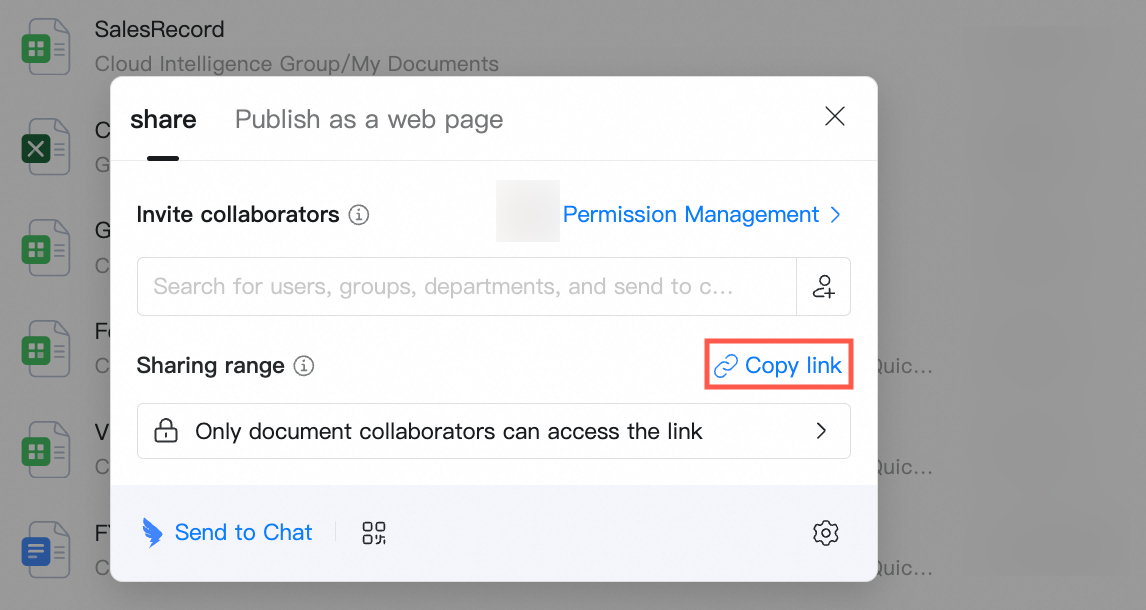
Click Copy Link to copy and save the shareable link for the sheet.
Step 3: Create the data source
Add the authorization information and the sheet's shareable link to Quick BI to create the data source.
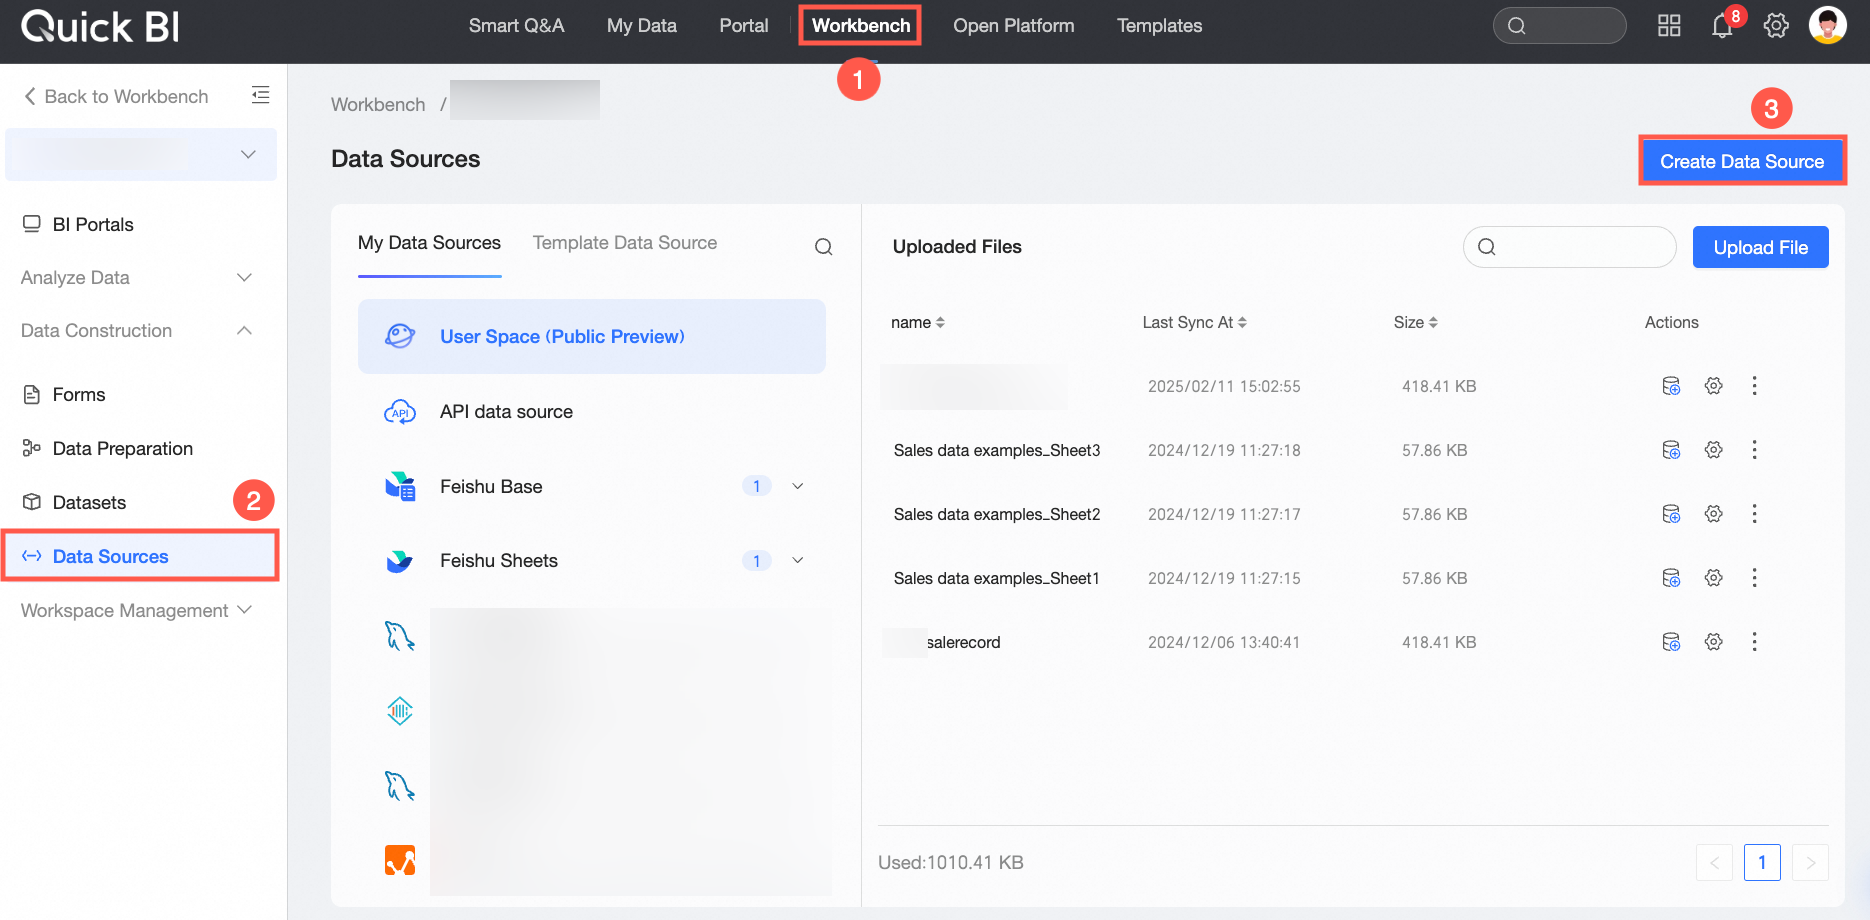
Log on to the Quick BI workbench, go to the Data Sources page, and click New Data Source in the upper-right corner.
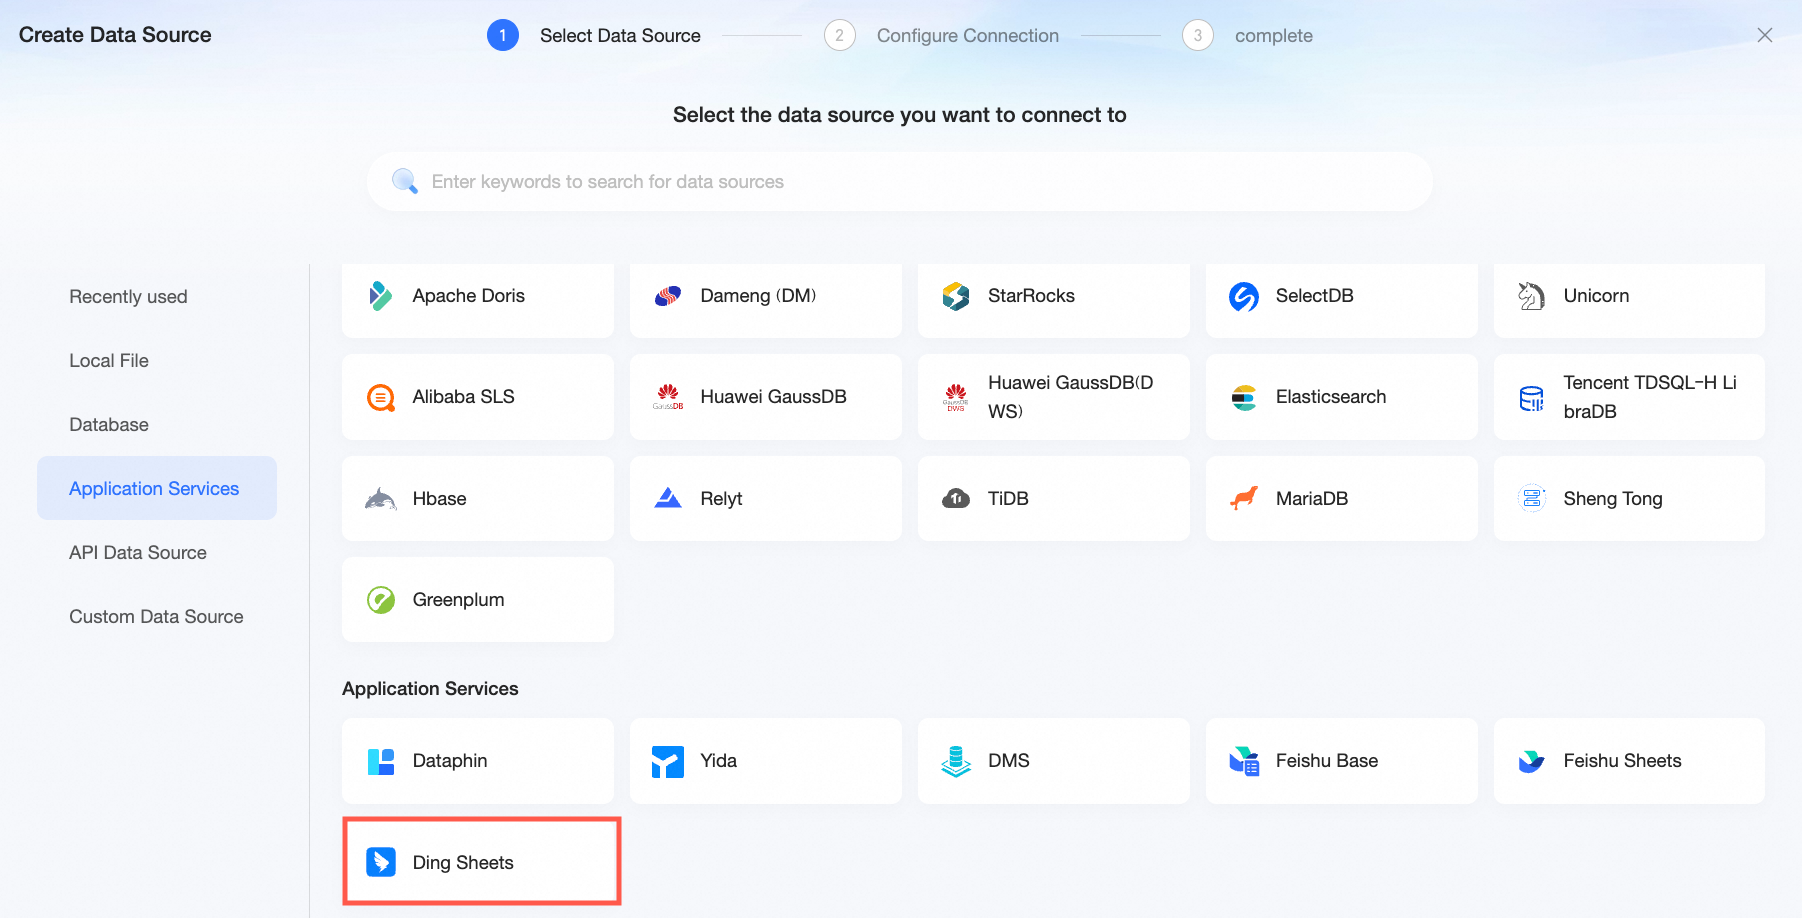
On the New Data Source page, select Application Services > DingTalk Sheet.
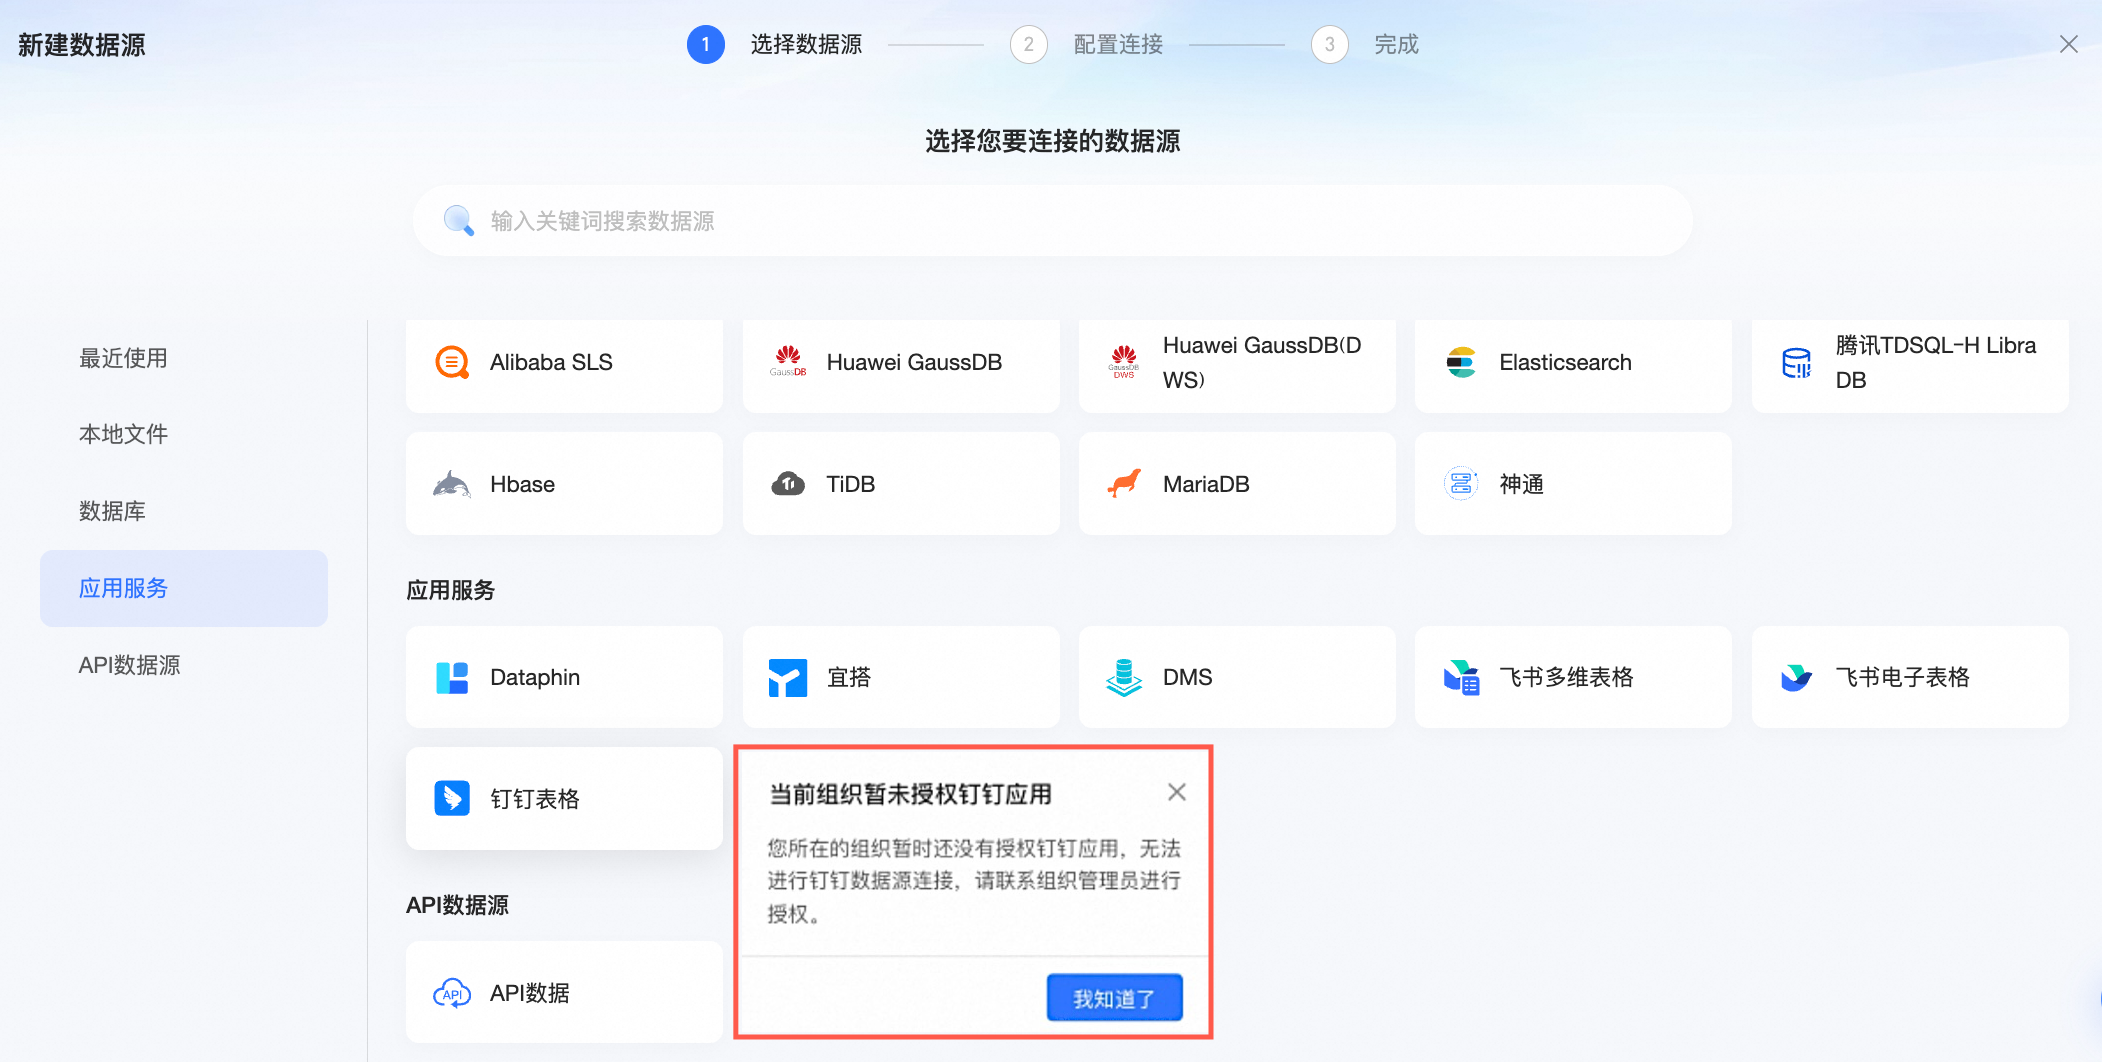
NoteEnsure that your organization has completed the DingTalk application authorization on the Organization Management > Office Software Integration page. Otherwise, you cannot connect to the DingTalk data source. You can contact your organization administrator to grant the authorization. For more information, see DingTalk integration.
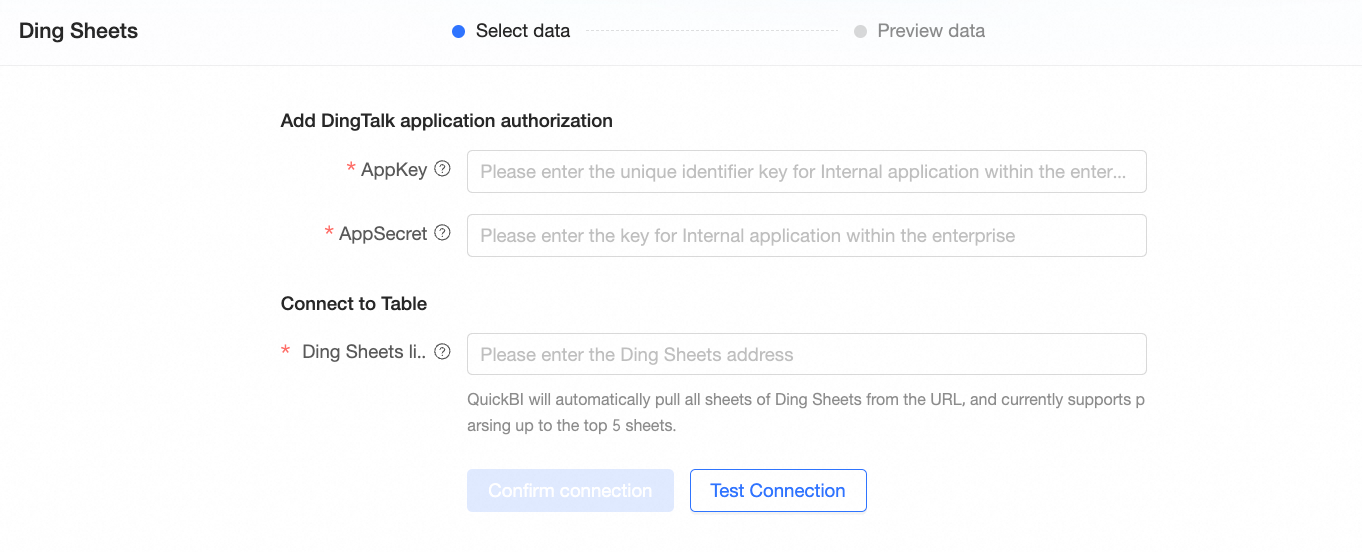
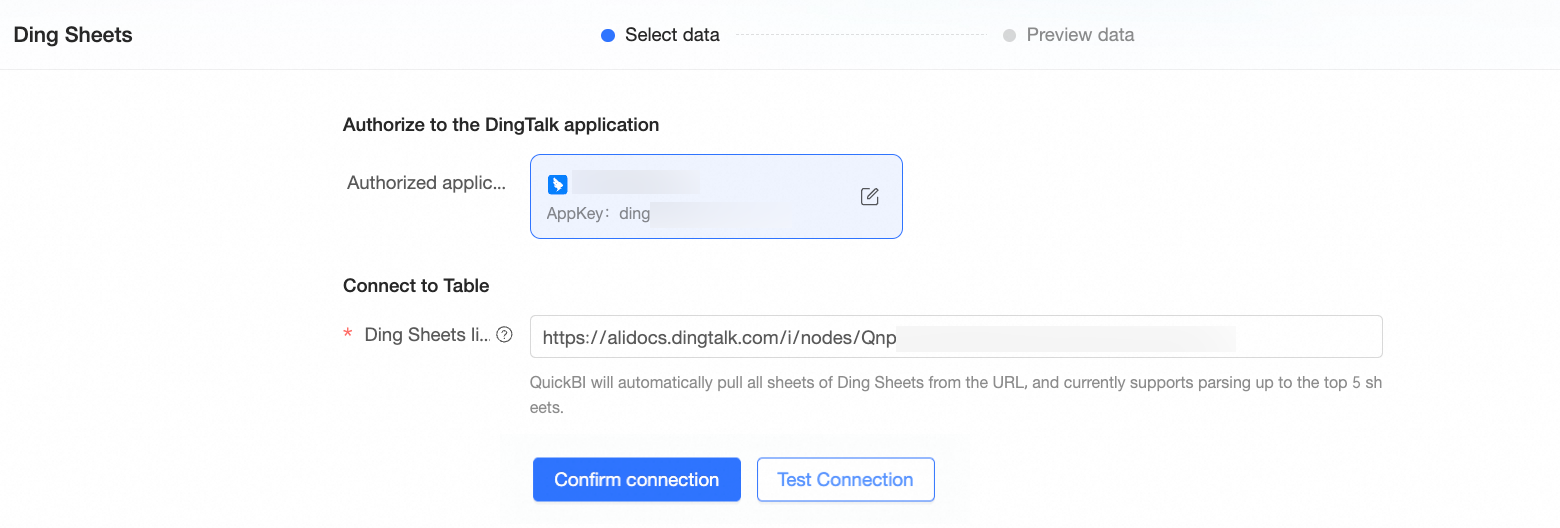
On the configuration page, enter the authorization information from Step 1 and Step 2.
Parameter
Description
AppKey
Enter the unique identifier of the DingTalk application. This corresponds to the Client ID on the credentials and basic information page in the DingTalk developer console.
AppSecret
Enter the secret for the DingTalk application, which is automatically generated by the DingTalk platform when you create the application. This corresponds to the Client Secret on the credentials and basic information page in the DingTalk developer console.
DingTalk Sheet Link
Enter the shareable link for the DingTalk Sheet that you copied from the document sharing page in DingTalk.
Click Test Connection. After the test succeeds, information about the authorized application is displayed.
Click Confirm Connection. The system automatically parses the content of all worksheets at the specified URL.
NoteA maximum of five worksheets can be parsed.
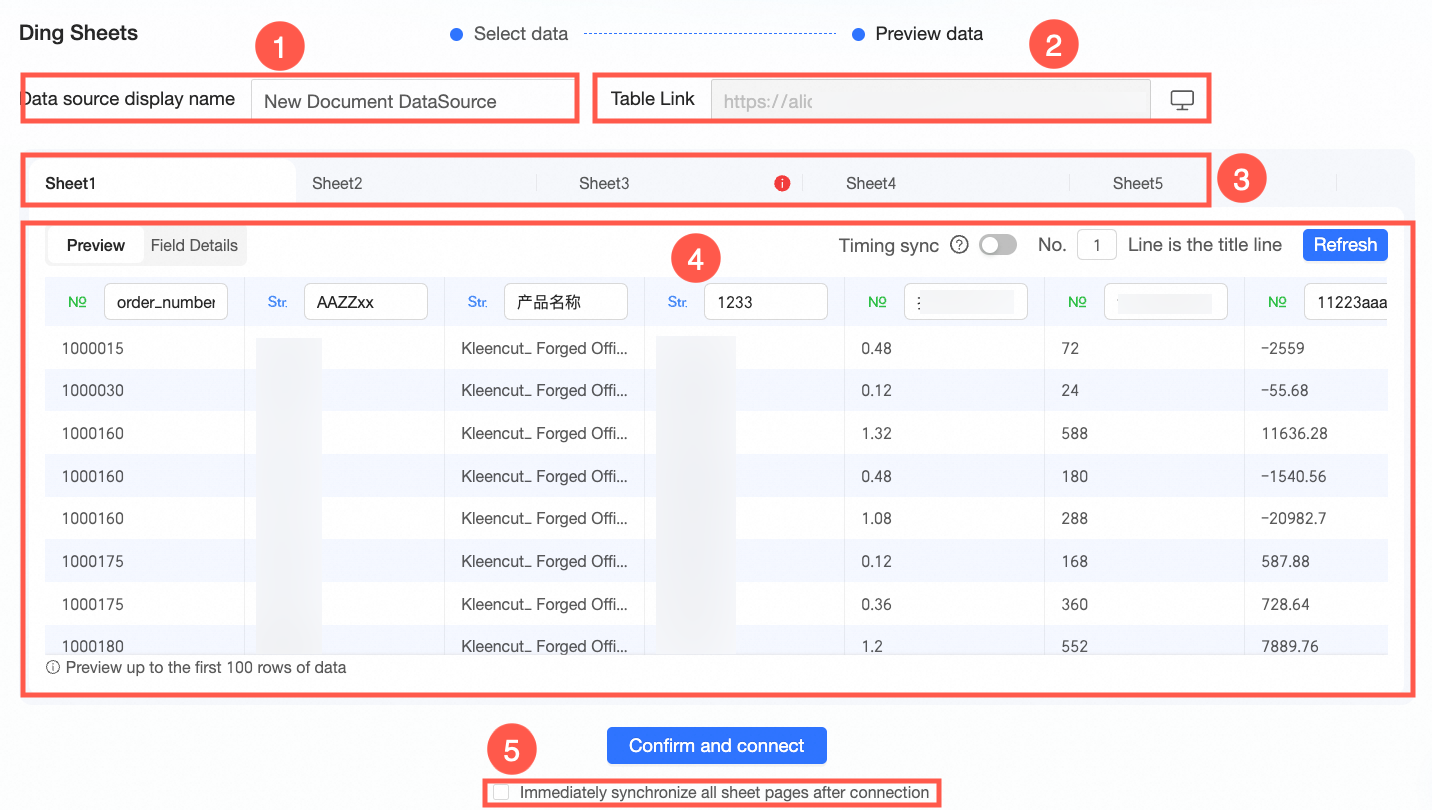
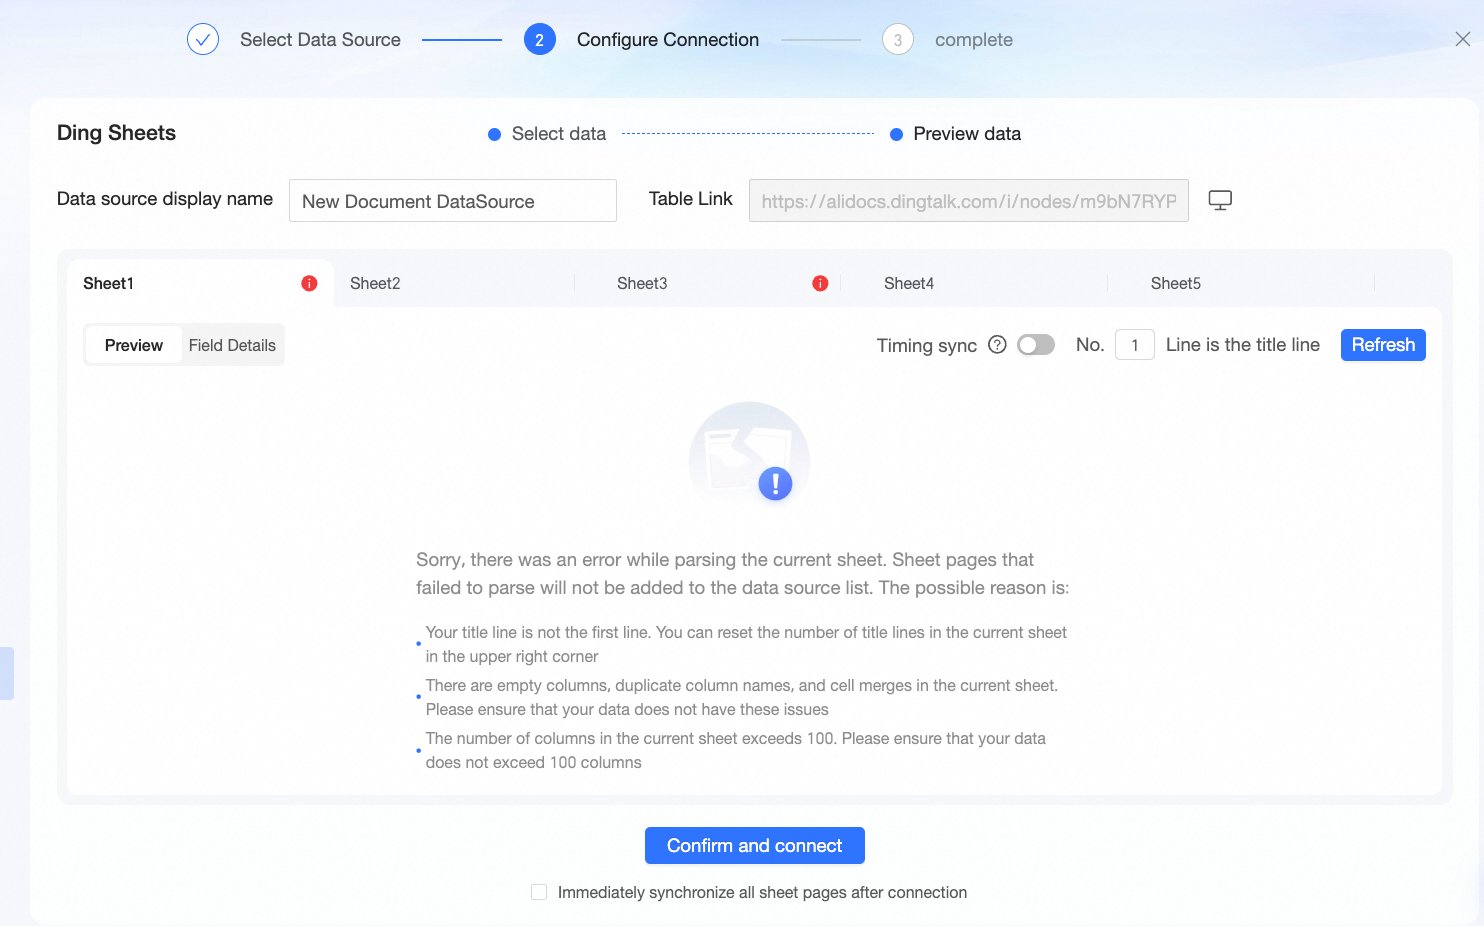
If all worksheets are parsed successfully, you are redirected to the Data Preview page. On this page, you can preview information and perform related operations.
Area
Configuration item
Description
Area ①
Display name of the table in Quick BI
Rename display name
You can change the name to suit your business needs.
NoteThe display name cannot contain special characters or leading or trailing spaces.
Area ②
Shareable link of the table
View source document
Click the
icon next to the table link to open the source document in a new window.Area ③
Number and titles of worksheets
Switch worksheets
Click a worksheet tab to preview its data. The data content in Area ④ changes as you switch tabs.
Rename worksheet
Double-click the name to rename the worksheet. By default, the name is read from the DingTalk Sheet.
NoteThe worksheet name cannot contain special characters or leading or trailing spaces.
Area ④
Data content of the table
Data Preview
On the Data Preview tab, you can preview the data and perform the following operations:
Modify field name: Click the field name text box to change the name.
Modify field type: Click the field type icon and select a type from the drop-down list. Supported types include Text, Number, and Date.
NoteFormulas from the source DingTalk Sheet are not supported. Only the calculated values are imported.
Field Details
When a worksheet is connected, Quick BI stores its data as a database table. The Database Field Name and Field Type are the fields in this new table, while Field Name refers to the original column names in the DingTalk Sheet.
You can rename fields and change field types as needed. To remove a field, click the
icon.NoteFormulas from the source DingTalk Sheet are not supported. Only the calculated values are imported.
Set scheduled synchronization
To automatically synchronize the latest business data to your data source daily, enable the Scheduled Sync switch and set the synchronization time.
After setting the schedule, you can also click the
icon to modify the settings.NoteEach synchronization performs a full overwrite of the existing data. The synchronization limit for a single worksheet is 10,000 rows and 100 columns.
This setting applies only to the current worksheet. If you need to synchronize multiple worksheets, you must switch to each worksheet tab and configure its scheduled synchronization time individually.
Set header row
By default, the system identifies the first row of a sheet as the header row and starts synchronizing data from the second row. You can change the header row for the current worksheet as needed and click Refresh to apply the change.
NoteThe entered value must be an integer greater than 0.
Ensure that the header row does not contain any empty fields to avoid errors.
Area ⑤
Sync settings
Sync all sheets immediately after connection
If you select this option, Quick BI automatically synchronizes all worksheets, so you do not need to sync them manually.
If a worksheet fails to parse, its status shows as Failed. Check the cause on the Data Preview page, correct the error in the source sheet, and then click Refresh to try again. If the failed worksheet is not required, you can ignore it. The worksheet is automatically filtered out when you complete the connection process for the other worksheets.
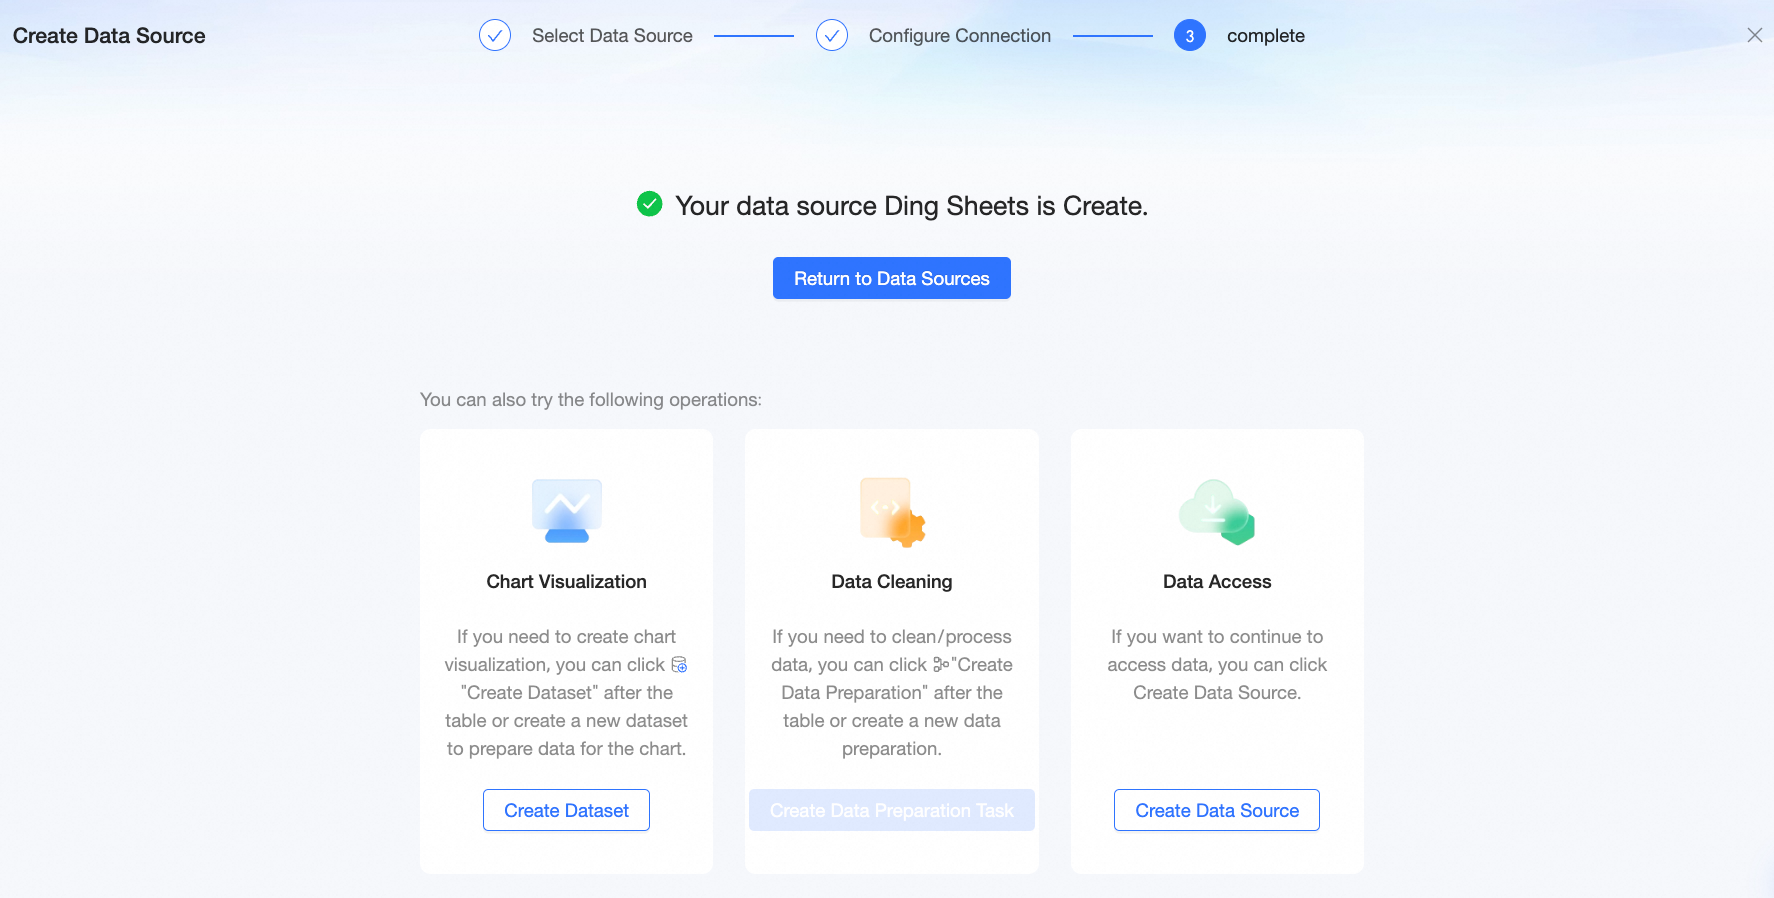
After you complete the configuration, click Confirm and Connect to create the DingTalk Sheet data source.
Return to the Data Sources page. In the data source list, find the DingTalk Sheet data source you just added and click the
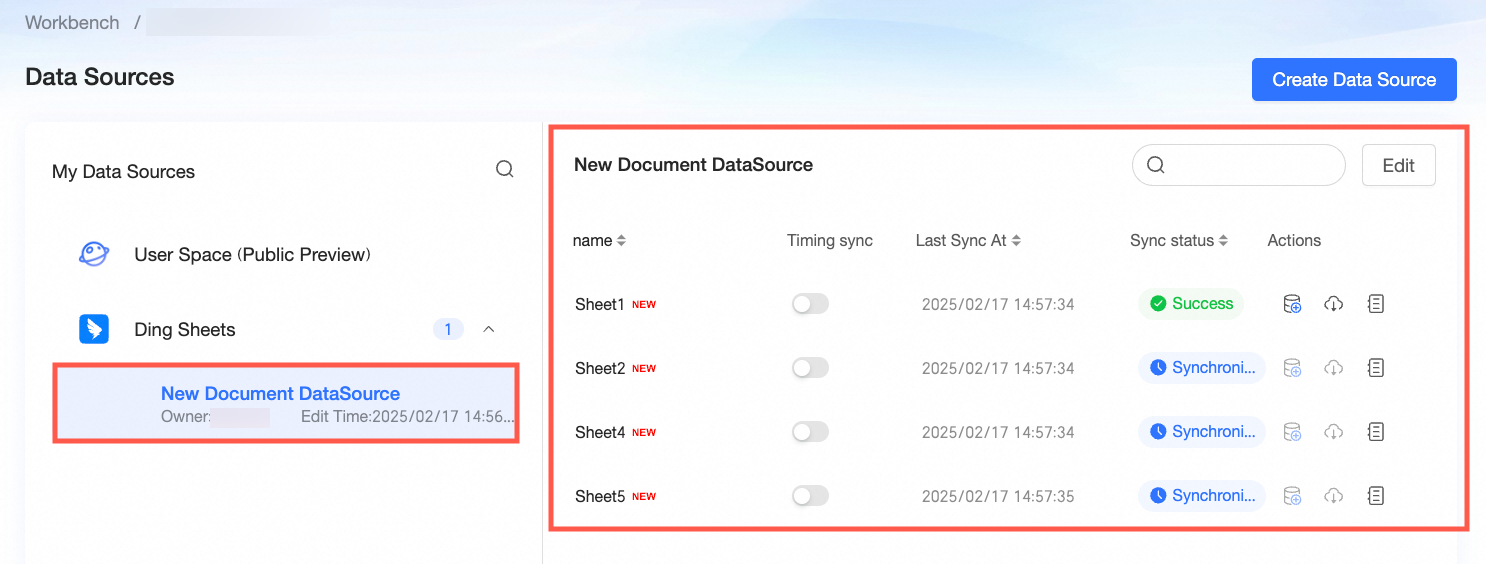
icon in the Actions column for each worksheet to sync its data.NoteIf you selected the Sync all sheets immediately after connection option, the system has already synchronized the content automatically. You can skip this step.
(Optional) On the Data Sources page, you can view and manage your DingTalk Sheet data sources and their worksheets. The following operations are supported:
Preview data table: In the Name column, find the data table that you want to preview and click its name. You can view the table's content on the Data Preview page.
Set scheduled synchronization: Click the scheduled synchronization switch
to enable or disable the feature. If it is enabled, you can click the icon to modify the synchronization time.Create dataset: Click the
icon to go to the dataset creation page and build a dataset from the current worksheet. For detailed instructions, see Create a dataset.NoteEnsure that the synchronization status of the current worksheet is 'Succeeded'. Otherwise, you cannot create a dataset from it.
Sync data: Click the
icon to manually trigger a synchronization task.View sync records: Click the
icon to open the View Logs dialog box and view the update history for the current worksheet. The history includes the update time, status, duration, and log details. You can also query logs for a specific time range.
 icon next to the table link to open the source document in a new window.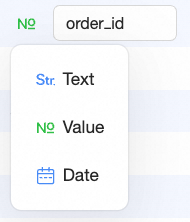
 icon.
icon.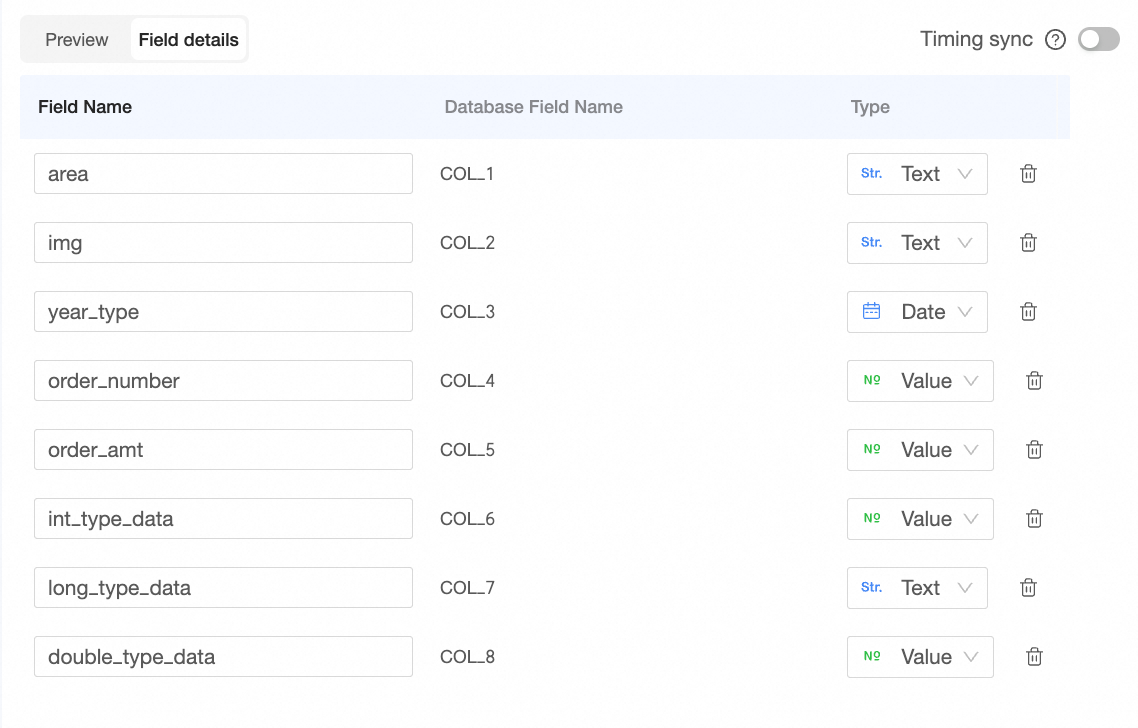
 icon to modify the settings.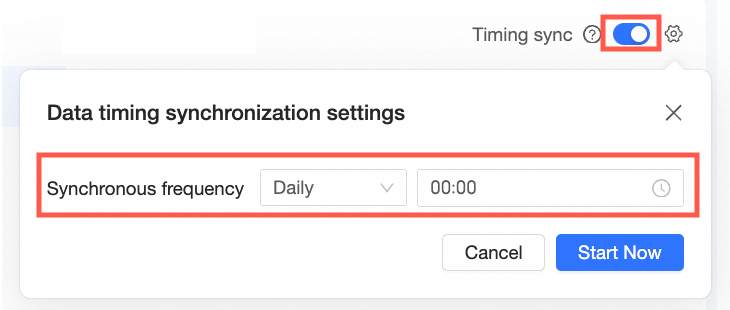

 icon in the Actions column for each worksheet to sync its data.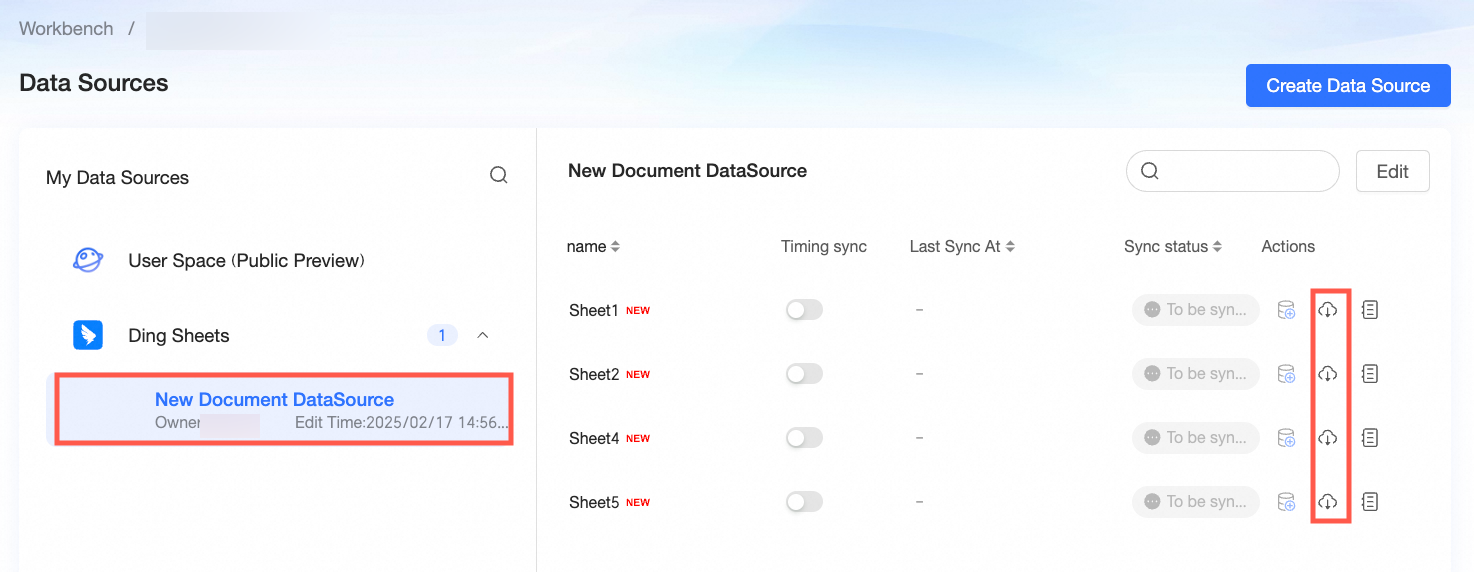
 to enable or disable the feature. If it is enabled, you can click the
  icon to modify the synchronization time.
 icon to go to the dataset creation page and build a dataset from the current worksheet. For detailed instructions, see
  icon to open the View Logs dialog box and view the update history for the current worksheet. The history includes the update time, status, duration, and log details. You can also query logs for a specific time range.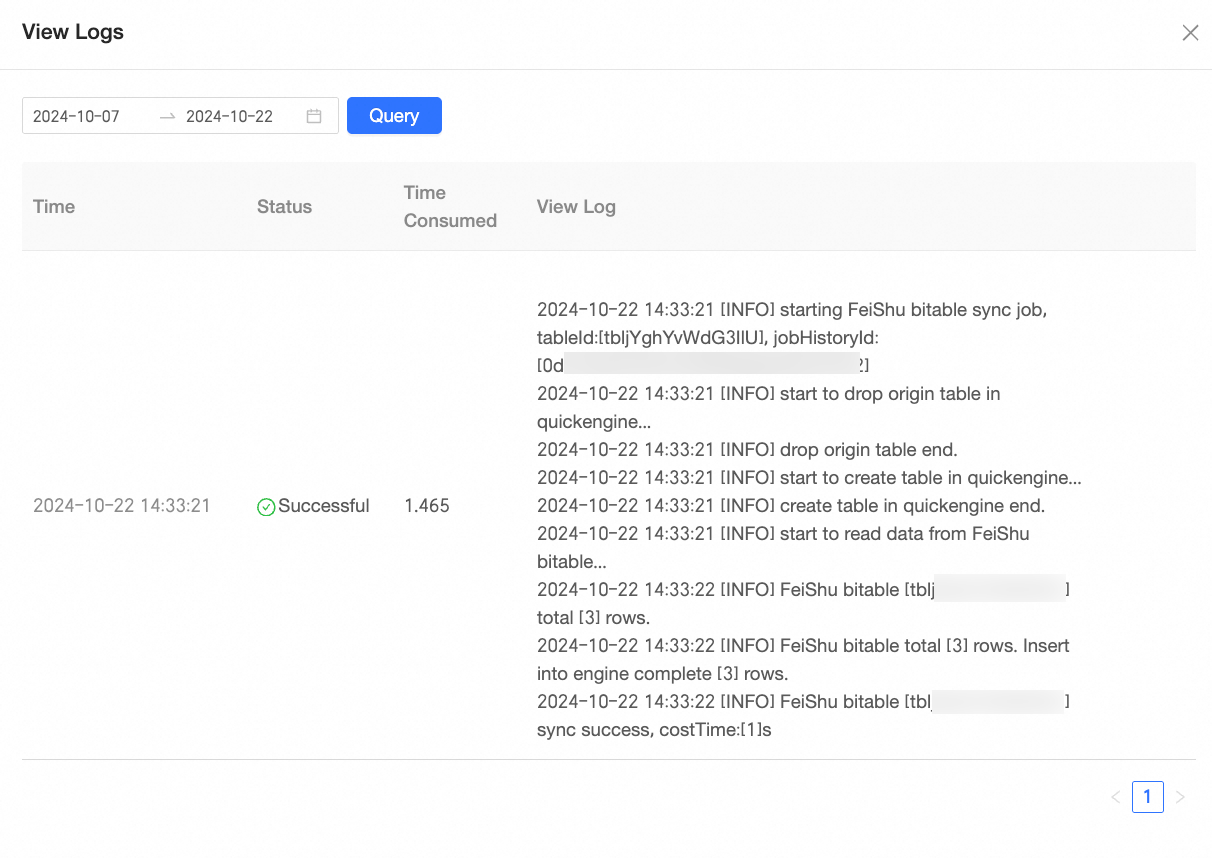
Step 4: Edit the data source
You can edit the authorization information, shareable link, and display name of a connected DingTalk Sheet data source.
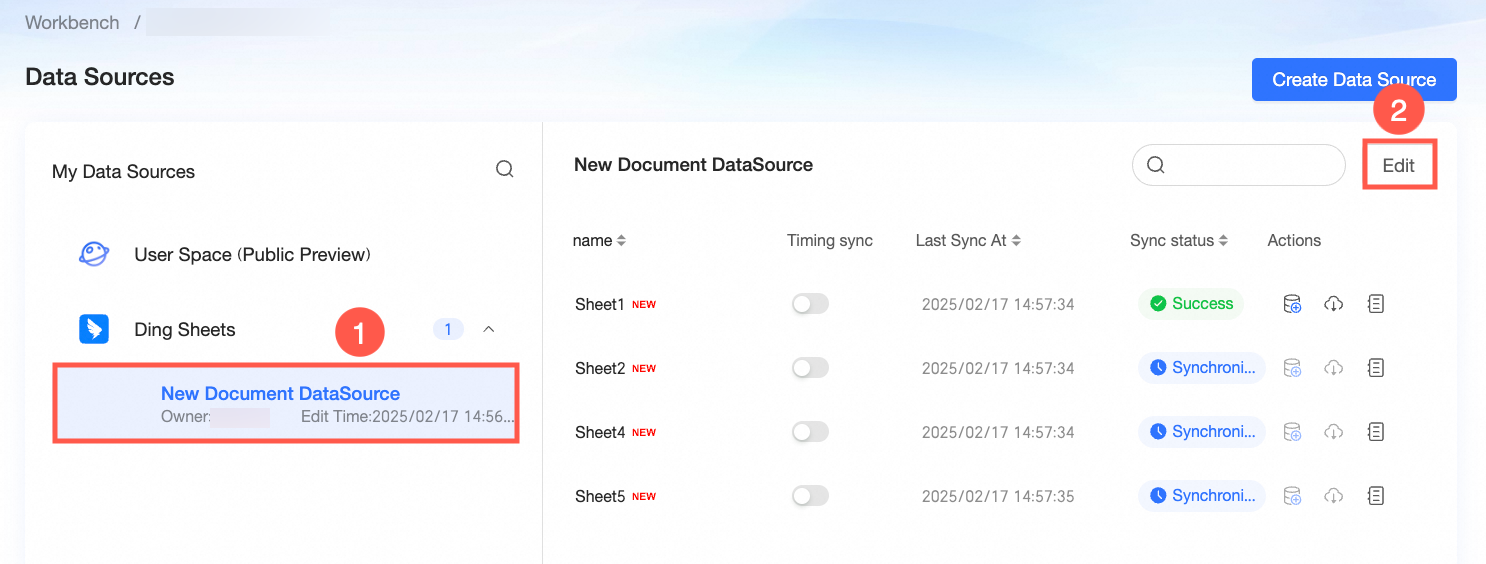
In the DingTalk Sheet list, find the target data source and click Edit.
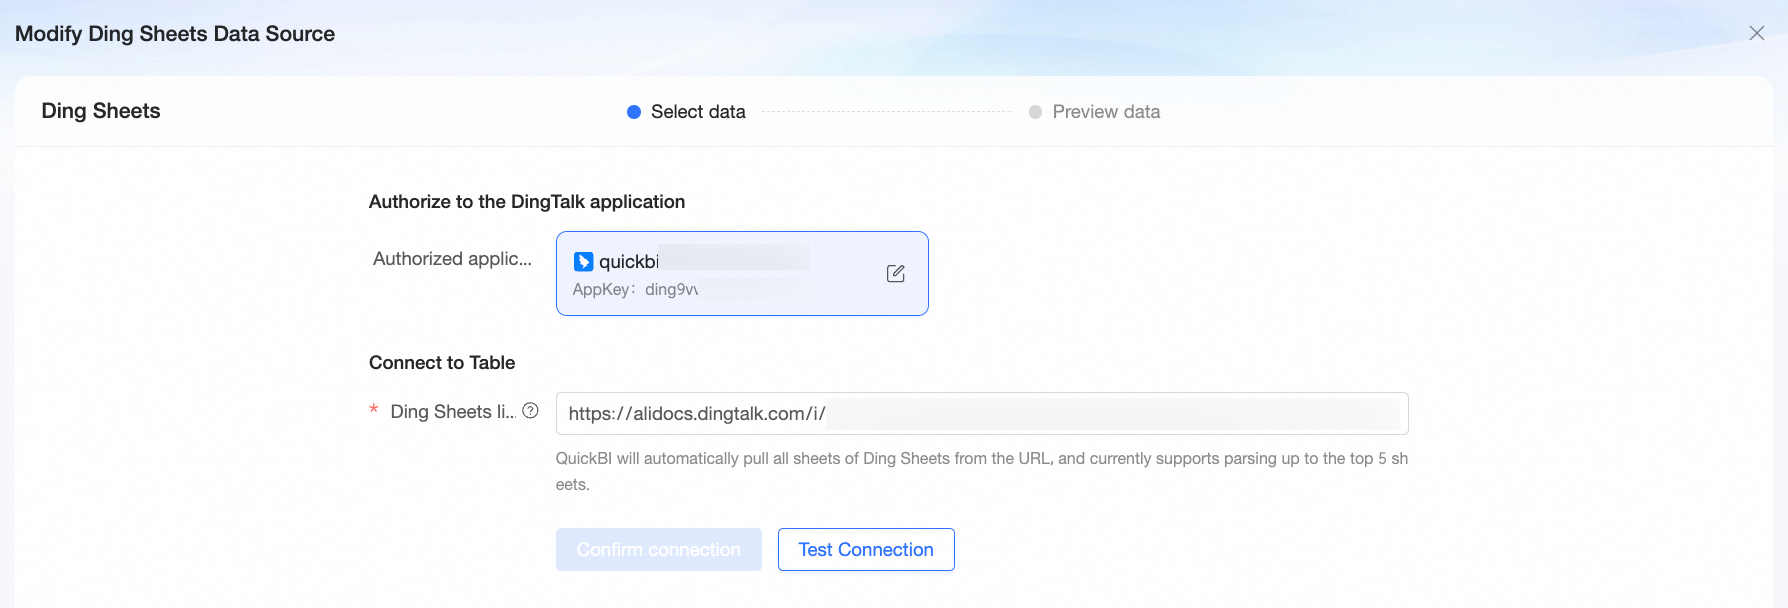
On the Select Data page for the DingTalk Sheet, modify the authorization information for your custom DingTalk application.
Parameter
Description
Authorized Application
Click the
icon next to Authorized Application. Input boxes for AppKey and AppSecret appear. Enter the AppKey and AppSecret for the new application.DingTalk Sheet Link
Enter the shareable link for the new sheet.
Click Test Connection. After the connection is verified, click Confirm Connection to go to the Data Preview page. On this page, you can edit the display name, scheduled synchronization settings, field names, and data types of the DingTalk Sheet. For more information, see Step 5 in Step 3: Create the data source.
After you finish editing, click Confirm and Connect.
 icon next to Authorized Application. Input boxes for AppKey and AppSecret appear. Enter the AppKey and AppSecret for the new application.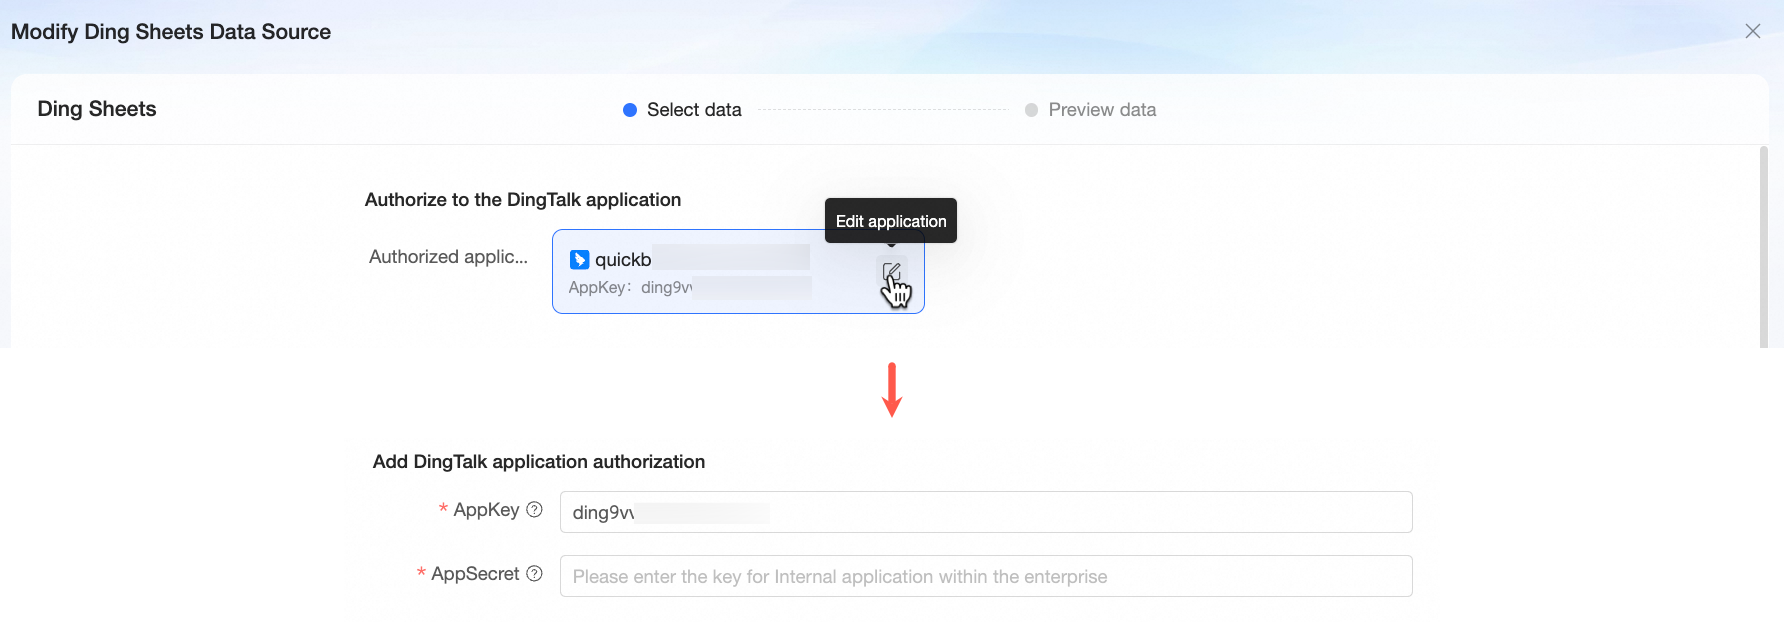
Next steps
After you create the data source, you can create a dataset and analyze the data.
To create a dataset from the connected DingTalk Sheet data source, see Create a dataset.
To add a visualization and analyze data, see Create a dashboard and Visualizations.
To drill down for in-depth data analysis, see Step 3: Configure and view drill-downs.